
This section explains how to identify the machine's interface and connect the machine according to the network environment.
![]()
|
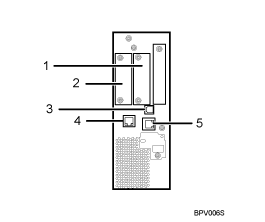
Slot A
Install an optional interface or expansion board in this slot.
The Bluetooth interface, File Format Converter, or one of the following interface boards can be installed in this slot:
IEEE1284 interface board: Required if you want to connect an IEEE 1284 cable to this machine. When installed in Slot A, this board allows you to connect the machine to a computer through an IEEE 1284 cable.
Wireless LAN interface unit: Required if you want to connect this machine to a wireless LAN. When installed in Slot A, this unit allows you to connect the machine to an IEEE 802. a or IEEE 802.11 b/g wireless LAN.
Slot B
Install the optional Copy Connector.
Copy Connector (optional): Required if you want to connect this machine to a sub-machine in order to use the connect copy function.
USB 2.0 [Type B] interface
Port for connecting the USB2.0 [Type B] interface cable.
Gigabit Ethernet port (optional)
Port for using the 1000BASE-T, 100BASE-TX, or 10BASE-T cable.
10 Base-T, 100 Base-TX port
Port for connecting the 100BASE-TX or 10BASE-T cable.
![]()
Slot A can contain one module only: You can install only one 1284 Interface board, one Wireless LAN Interface Unit, one Bluetooth Unit, or one File Format Converter at a time in this slot.
The Ethernet and Gigabit Ethernet port cannot be used simultaneously. If the optional Gigabit Ethernet board is installed, connect the Ethernet cable to the port on the Gigabit Ethernet board Communication with the machine will fail if cables are connected to both ports simultaneously.