HW-F355/ZF, Barre de son 2.1, Bluetooth, SoundShare HW-F355 - Manuels - Samsung
HW-F355/ZF, Barre de son 2.1, Bluetooth, SoundShare HW-F355 - Manuels - Samsung
SAMSUNG sur FNAC.COM
- Revenir à l'accueil
ou juste avant la balise de fermeture -->

-
CE DoC
0.01MB, PDF, ANGLAIS
2014.07.17
-
-
-
Recherche par catégories :
Imprimantes Téléphones
GSM Informatique
Ordinateurs Galaxy
Photo TV
Electroménager
Vidéos :

Samsung Mobile :


SAMSUNG MEMORY - MEMOIRE :


Tutoriels :


 Samsung-GALAXY-S4-Air-View-Tutoriel-Video
 Samsung- GALAXY S4 - Air Gesture - Tutoriel - Video
 Samsung- GALAXY S4 - Lecteur optique - Tutoriel - Video
 Samsung - GALAXY S4 - Smart Scroll - Tutoriel - Video
 Samsung GALAXY S4 - ChatOn - Tutoriel - Video
 Samsung GALAXY S4 - S Translator - Tutoriel - Video
Samsung, vidéos en français :

VOir également :
![[TXT]](http://www.audentia-gestion.fr/__ovh_icons/text.gif)
Samsung-TV-3D-TV-LED..> 23-Mar-2015 17:32 1.6M
Samsung-Mutiroom_Lin..> 23-Mar-2015 17:31 1.6M
Samsung-FRA-NUDVBEUH..> 23-Mar-2015 17:31 2.0M
Samsung-ENG-NUDVBEUH..> 23-Mar-2015 17:31 1.1M
Samsung-[Mutiroom_Li..> 23-Mar-2015 17:31 1.1M
Samsung-[HU7500-XNZF..> 23-Mar-2015 17:31 827K
Samsung-TV-3D-TV-LED..> 23-Mar-2015 17:30 1.2M
Samsung-FRA-X14DVBEU..> 23-Mar-2015 17:30 1.2M
Samsung-ENG-X14DVBEU..> 23-Mar-2015 17:30 1.5M
Samsung-Mutiroom_Lin..> 23-Mar-2015 17:30 1.2M
Samsung-SM-T800_UM_O..> 23-Mar-2015 17:29 1.7M
Samsung- Tablettes-G..> 23-Mar-2015 17:29 1.5M
Samsung-SM-T800_QSG_..> 23-Mar-2015 17:29 1.9M
Samsung-SM-T800_UM_E..> 23-Mar-2015 17:29 1.9M
Samsung-Televisions-..> 20-Mar-2015 18:41 6.8M
Samsung-Tablettes-ta..> 20-Mar-2015 18:39 2.7M
Samsung-SM-T530_UM_O..> 20-Mar-2015 18:38 2.7M
Samsung-SM-T530_UM_E..> 20-Mar-2015 18:38 2.8M
Samsung-Tablettes-Ga..> 20-Mar-2015 18:38 2.9M
Samsung-SM-T230_UM_E..> 20-Mar-2015 18:37 2.9M
Samsung-SM-T230_UM_O..> 20-Mar-2015 18:37 3.0M
Samsung-Smartphones-..> 20-Mar-2015 18:36 3.1M
Samsung-GT-S7390G_UM..> 20-Mar-2015 18:36 3.1M
Samsung-Galaxy-Camer..> 20-Mar-2015 18:35 3.1M
Samsung-EK-GC100_UM_..> 20-Mar-2015 18:35 3.3M
Samsung-EK-GC100_UM_..> 20-Mar-2015 18:34 3.4M
Samsung-Smartphones-..> 20-Mar-2015 18:34 3.4M
Samsung-GT-S7390_UM_..> 20-Mar-2015 18:33 3.6M
Samsung-GT-S7390_UM_..> 20-Mar-2015 18:32 3.7M
Samsung-Smartphones-..> 20-Mar-2015 18:32 3.8M
Samsung-Safety_infor..> 20-Mar-2015 18:31 5.0M
Samsung-Smartphones-..> 20-Mar-2015 18:30 5.0M
Samsung-SM-G800F_UM_..> 20-Mar-2015 18:30 5.3M
Samsung-SM-G800F_QSG..> 20-Mar-2015 18:29 5.4M
Samsung-SM-G800F_UM_..> 20-Mar-2015 18:28 5.6M
Samsung-Smartphones-..> 20-Mar-2015 18:27 5.9M
Samsung-SM-G900F_UM_..> 20-Mar-2015 18:26 3.1M
Samsung-SM-G900_UM_E..> 20-Mar-2015 18:25 3.6M
Samsung-SM-G900F_UM_..> 20-Mar-2015 18:25 3.4M
Samsung-SM-G900F_QSG..> 20-Mar-2015 18:24 3.8M
Samsung-SM-G900F_UM_..> 20-Mar-2015 18:24 3.8M
Samsung-Smartphones-..> 18-Mar-2015 07:24 1.7M
Samsung-Smartphones-..> 18-Mar-2015 07:24 1.9M
Samsung-Smartphones-..> 18-Mar-2015 07:23 2.2M
Samsung-SM-N915_UM_O..> 18-Mar-2015 07:23 2.2M
Samsung-Smartphones-..> 18-Mar-2015 07:23 2.4M
Samsung-SM-N910_UM_O..> 18-Mar-2015 07:22 2.4M
Samsung-SM-N910_UM_E..> 18-Mar-2015 07:22 2.6M
Samsung-SM-N910_UM_E..> 18-Mar-2015 07:22 2.7M
Samsung-Televisions-..> 18-Mar-2015 07:21 3.0M
Samsung-Televisions-..> 18-Mar-2015 07:21 3.3M
Samsung-Mobilite-Gal..> 18-Mar-2015 07:20 3.5M
Samsung-SM-N7505_UM_..> 18-Mar-2015 07:20 3.5M
Samsung-Safety_infor..> 18-Mar-2015 07:19 4.8M
Samsung-SM-N7505_QSG..> 18-Mar-2015 07:19 3.5M
Samsung-Solutions-d-..> 18-Mar-2015 07:17 5.3M
Samsung-SL-C460W_G1...> 18-Mar-2015 07:17 5.3M
visualkit.htm 17-Mar-2015 12:08 570
Samsung-Smartphones-..> 17-Mar-2015 06:32 3.6M
Samsung-Smartphones-..> 17-Mar-2015 06:31 3.8M
Samsung-Tablette-SM-..> 17-Mar-2015 06:31 4.0M
Samsung-Smartphone-G..> 17-Mar-2015 06:30 4.1M
Samsung-Telephones-c..> 17-Mar-2015 06:30 4.3M
Samsung-Tablettes-ta..> 17-Mar-2015 06:29 2.6M
Samsung-Gsm-Archives..> 17-Mar-2015 06:28 2.7M
Samsung-Tablettes-ta..> 17-Mar-2015 06:28 1.5M
Samsung-Smartphones-..> 16-Mar-2015 19:34 6.2M
Samsung-Televisions-..> 16-Mar-2015 19:31 5.2M
Samsung-Televisions-..> 16-Mar-2015 19:31 5.3M
Samsung-Televisions-..> 16-Mar-2015 19:29 6.0M
Samsung-Televisions-..> 16-Mar-2015 19:29 5.7M
Samsung-SamsungSchoo..> 16-Mar-2015 19:14 5.0M
Galaxy-Mini-S5570-An..> 16-Mar-2015 18:52 6.0M
Samsung-Smartphone-G..> 16-Mar-2015 18:48 2.3M
Samsung-Gsm-Archives..> 16-Mar-2015 18:48 2.6M
Samsung-Smartphones-..> 16-Mar-2015 18:48 2.4M
Samsung-Smartphones-..> 16-Mar-2015 18:47 2.7M
Samsung-Appareils-ph..> 16-Mar-2015 18:47 2.9M
Samsung-Tablet-GALAX..> 16-Mar-2015 18:46 3.4M
Samsung-Smartphone-G..> 16-Mar-2015 18:46 3.2M
Samsung-Telephones-c..> 16-Mar-2015 18:45 3.7M
Samsung-Portable_SSD..> 16-Mar-2015 18:45 3.4M
Samsung-Guide-de-l-u..> 16-Mar-2015 18:44 4.1M
Samsung-Manuel-d-uti..> 16-Mar-2015 18:44 3.7M
Samsung-School-Manue..> 16-Mar-2015 18:43 4.4M
Samsung-AVMGH052CA3-..> 16-Mar-2015 18:43 4.1M
Samsung-Vibrant-User..> 16-Mar-2015 18:41 4.7M
Samsung-AVMWH020CA0-..> 16-Mar-2015 18:41 4.4M
Samsung-Guide-détai..> 16-Mar-2015 18:40 4.7M
Galaxy-Mini-S5570-An..> 16-Mar-2015 18:52 6.0M
Samsung-Smartphone-G..> 16-Mar-2015 18:48 2.3M
Samsung-Gsm-Archives..> 16-Mar-2015 18:48 2.6M
Samsung-Smartphones-..> 16-Mar-2015 18:48 2.4M
Samsung-Smartphones-..> 16-Mar-2015 18:47 2.7M
Samsung-Appareils-ph..> 16-Mar-2015 18:47 2.9M
Samsung-Tablet-GALAX..> 16-Mar-2015 18:46 3.4M
Samsung-Smartphone-G..> 16-Mar-2015 18:46 3.2M
Samsung-Telephones-c..> 16-Mar-2015 18:45 3.7M
Samsung-Portable_SSD..> 16-Mar-2015 18:45 3.4M
Samsung-Guide-de-l-u..> 16-Mar-2015 18:44 4.1M
Samsung-Manuel-d-uti..> 16-Mar-2015 18:44 3.7M
Samsung-School-Manue..> 16-Mar-2015 18:43 4.4M
Samsung-AVMGH052CA3-..> 16-Mar-2015 18:43 4.1M
Samsung-Vibrant-User..> 16-Mar-2015 18:41 4.7M
Samsung-AVMWH020CA0-..> 16-Mar-2015 18:41 4.4M
Samsung-SamsungSchoo..> 16-Mar-2015 18:40 5.0M
Samsung-Guide-détai..> 16-Mar-2015 18:40 4.7M
Samsung-Wave-M-noir-..> 28-Jan-2015 09:37 5.6M
Samsung-Wave-noir-Op..> 28-Jan-2015 09:36 3.6M
Samsung-Wave-M-noir-..> 28-Jan-2015 09:35 3.9M
Samsung-Wave-723-gri..> 28-Jan-2015 09:35 7.0M
samsung-Wave-II-noir..> 28-Jan-2015 09:34 3.3M
Samsung-Wave-578-noi..> 28-Jan-2015 09:33 4.2M
Samsung-Wave-575-bla..> 28-Jan-2015 09:32 4.6M
Samsung-Wave-533-noi..> 28-Jan-2015 09:31 4.6M
Samsung-Wave-3-noir-..> 28-Jan-2015 09:30 4.9M
http://downloadcenter.samsung.com/content/UM/201308/20130815074232035/GT-I9195_UM_Open_Jellybean_Ita_Rev.1.0_130708.pdf
GT-I9195_UM_Open_Jellybean_Ger_Rev.1.0_130620.pdfhttp://downloadcenter.samsung.com/content/UM/201407/20140728164130527/[Mutiroom_Link]FRA-0723.pdf
http://downloadcenter.samsung.com/content/UM/201407/20140728164130527/[Mutiroom_Link]FRA-0723.pdf
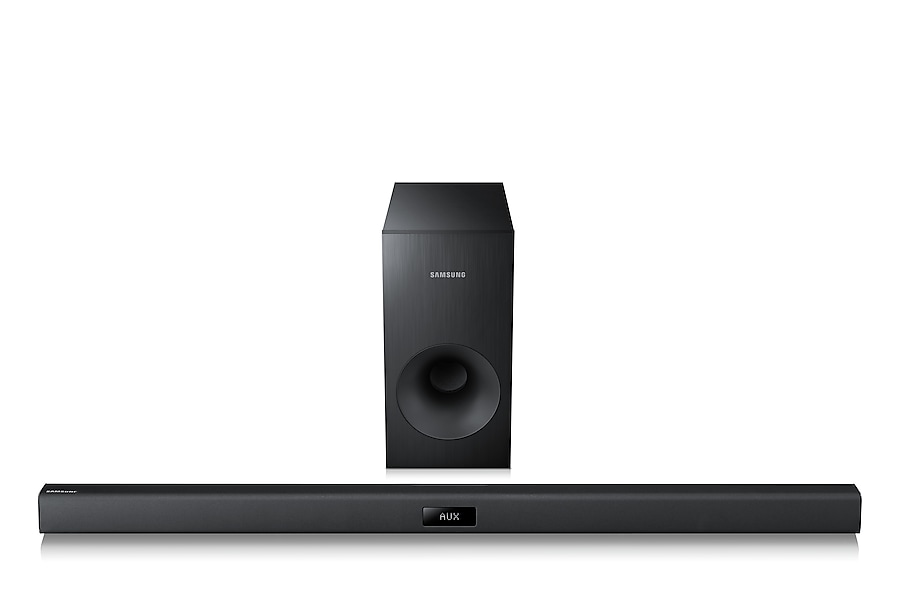
Crystal Surround Air Track
(système avec enceintes actives)
Manuel d'utilisation
imaginez les possibilités
Merci d’avoir choisi un appareil Samsung.
Pour recevoir une assistance plus complète,
veuillez enregistrer votre produit sur
www.samsung.com/register
HW-F350
HW-F355
2
caractéristiques
SoundShare
Le SoundShare émet le son du téléviseur sur votre le Crystal Surround Air Track (SAT) via une connexion Bluetooth et le son
est contrôlé.
3D SOUND PLUS
La fonctionnalité 3D SOUND PLUS ajoute de la profondeur et de la grandeur au son.
Mode sonore spécial
Vous avez le choix entre sept modes de sons différents - MUSIC, NEWS, DRAMA, CINEMA, SPORTS, GAME, et OFF (son
original) - selon le type de contenu dont vous souhaitez profiter.
Télécommande multifonction
La télécommande fournie peut également être utilisée pour commander le téléviseur connecté à cet ensemble. (Fonctionne
uniquement avec les téléviseurs Samsung)
Elle est pourvue d'une touche d'accès rapide au téléviseur permettant d'activer plusieurs options d'une simple pression sur
les touches.
Système avec enceintes actives
Cet ensemble est doté d'un système avec enceintes actives qui offre une haute qualité sonore dans une seule unité peu
encombrante.
Cet ensemble ne nécessite aucun haut-parleur satellite ni câbles, généralement présents dans les systèmes ambiophoniques
classiques.
Prise en charge de la fonction Hôte USB
Vous pouvez connecter des périphériques de stockage USB externes (lecteur MP3, mémoire flash USB, etc.) afin d’en lire
les fichiers musicaux à l’aide de la fonction USB HOST du système Air Track.
Fonction Bluetooth
Vous pouvez connecter un périphérique Bluetooth à le Crystal Surround Air Track pour écouter de la musique avec un son
stéréo de haute qualité, tout cela sans fil!
LICENCE
Fabriqué sous licence par Dolby Laboratories. Dolby et le symbole représentant deux D sont des marques de commerce de
Dolby Laboratories.
Fabriqué sous licence sous les brevets américains suivants : 5,956,674; 5,974,380; 6,487,535 et autres brevets déposés
ou en attente aux États-Unis ou dans d'autres pays. DTS, le Symbole, ainsi que DTS et le Symbole ensemble sont des
marques déposées et DTS 2.0 Channel est une marque de commerce de DTS, Inc. Le produit inclut le logiciel. © DTS, Inc.
Tous droits réservés.
- Pour toute requête et demande concernant les questions sur les sources ouvertes, contactez Samsung via
e-mail (oss.request@ samsung.com).
3
FRA
informations relatives à la sécurité
AVERTISSEMENTS
POUR ÉVITER LES RISQUES DE CHOC ÉLECTRIQUE, NE DÉMONTEZ PAS LE CAPOT. L’APPAREIL NE CONTIENT PAS DE
PIÈCES RÉPARABLES PAR L’UTILISATEUR ; S’ADRESSER À UN SERVICE APRÈS-VENTE QUALIFIÉ.
ATTENTION
RISQUE DE CHOC ÉLECTRIQUE.
NE PAS OUVRIR
Ce symbole avertit l’utilisateur de la
présence d’une tension dangereuse à
l’intérieur de l’appareil.
Ce symbole avertit l’utilisateur de la
présence de directives importantes dans la
documentation accompagnant cet appareil.
AVERTISSEMENT : Afin de diminuer les risques d’incendie ou de choc électrique, n’exposez pas cet appareil à la pluie ou à l’
humidité.
MISE EN GARDE : POUR PRÉVENIR LES CHOCS ÉLECTRIQUES, BRANCHEZ LA FICHE AU FOND, EN PRENANT SOIN
D'INSÉRER LA TIGE LARGE DANS LA FENTE LARGE.
• Cet appareil doit toujours être branché à une prise terre.
• Pour déconnecter l’appareil du circuit principal, la prise doit être débranchée de la prise principale ; il est de ce fait
nécessaire que la prise principale soit facile d'accès.
ATTENTION
• Évitez toute projection d’eau sur l’appareil. Ne posez jamais d’objet contenant un liquide (ex : un vase) dessus.
• Pour éteindre complètement l'appareil, vous devez retirer le cordon d'alimentation de la prise murale. Par conséquent,
le cordon d'alimentation doit être facilement accessible à tout moment.
4
PRÉCAUTIONS
Assurez-vous que l'alimentation électrique de votre maison est conforme à la plaque d'identification située au dos de votre produit.
Posez votre produit à plat sur un meuble stable en veillant à laisser un espace de 7 à 10 cm autour de l'appareil afin d’assurer une ventilation
correcte de celui-ci. Faites attention à ne pas obstruer les orifices de ventilation. Ne posez pas l'ensemble sur un amplificateur ou
un autre appareil susceptible de chauffer. Cet ensemble est conçu pour une utilisation en continu. Pour entièrement éteindre l'appareil,
débranchez la fiche CA de la prise murale. Débranchez l'appareil si vous envisagez de ne pas l'utiliser durant une longue période.
En cas d'orage, débranchez la fiche de l'appareil de la prise murale.
Les surtensions occasionnées par l'orage pourraient endommager votre
appareil.
Protégez le produit de l'humidité (comme les vases) et d'une chaleur
excessive (comme une cheminée) ou de tout équipement capable de
créer des champs magnétiques ou électriques. Débranchez le câble
d'alimentation en cas de dysfonctionnement.
Votre produit n'est pas prévu pour un usage industriel. Ce produit ne peut
être utilisé qu'à des fins personnelles.
Une condensation peut se former si le produit ou un disque a été stocké
à basse température. Si vous devez transporter l'ensemble pendant
l'hiver, attendez environ 2 heures que l'appareil ait atteint la température
de la pièce avant de l'utiliser.
N'exposez pas l'ensemble aux rayons directs du soleil ou à toute autre
source de chaleur. Ceci pourrait entraîner une surchauffe et un dysfonctionnement
de l’appareil.
Les piles utilisées dans ce produit peuvent contenir des produits
chmiques dangereux pour l'environnement.
Ne jetez pas les piles dans votre poubelle habituelle.
Ne vous débarrassez pas des piles en les faisant brûler.
Les piles ne doivent pas être court-circuitées, démontées ou subir de
surchauffe.
Le remplacement incorrect de la batterie entraîne un risque d'explosion.
Ne la remplacez que par une batterie du même type.
pp
Phones
3.9 inch 3.9 inch
2.7 inch
3.9 inch 99.1mm
99.1mm 99.1mm
68.6mm
Ɣ Les fi gures et les illustrations du présent Manuel d'utilisation sont fournies à titre de référence uniquement et
peuvent différer de l'apparence du produit réel.
Ɣ Des frais supplémentaires pourront vous être facturés dans les cas suivants :
(a) Vous demandez l'intervention d'un ingénieur, mais il s'avère que l'appareil ne présente aucune anomalie
(par ex. vous n'avez pas lu ce Manuel d'utilisation).
(b) Vous portez l'unité à un centre de réparation, mais il s'avère que celle-ci ne présente aucune défaillance
(par ex. vous n'avez pas lu ce Manuel d'utilisation).
Ɣ Le montant de ces frais administratifs vous sera notifi é avant que tout travail ou toute visite à votre domicile
ne soit effectuée).
5
FRA
sommaire
CARACTÉRISTIQUES
2
2 Caractéristiques
2 Licence
INFORMATIONS RELATIVES À LA
SÉCURITÉ
3
3 Avertissements
4 Précautions
DÉMARRAGE
6
6 Avant de lire le manuel d'utilisation
6 Contenu
DESCRIPTIONS
7
7 Façade
8 Panneau arrière
8 Installation du noyau torique en ferrite sur le
câble des enceintes du caisson de graves
TÉLÉCOMMANDE
9
9 Présentation de la télécommande
BRANCHEMENTS
11
11 Installation de la fixation murale
12 Connexion d'un périphérique externe à
l'aide d'un câble audio (analogique) ou
optique (numérique)
DÉPANNAGE
21
21 Dépannage
ANNEXE
22
22 Spécifications
FONCTIONS
13
13 Mode d’entrée
13 Bluetooth (Modèle HW-F355 uniquement)
15 SoundShare (Modèle HW-F355 uniquement)
16 USB
17 Utilisation de la télécommande
20 Mise à jour du logiciel
6
AVANT DE LIRE LE MANUEL D'UTILISATION
Prenez connaissance des termes suivants avant de lire le manuel d'utilisation.
Icônes utilisées dans le présent manuel
Icône Terme Définition
Attention Indique une situation pour laquelle une fonction ne fonctionne pas ou que
des paramètres peuvent être annulés.
Remarque Donne des conseils ou des instructions permettant d'améliorer l'utilisation
de chaque fonction.
Consignes de sécurité et dépannage
1) Familiarisez-vous avec les Consignes de sécurité avant d'utiliser ce produit. (Reportez-vous à la page 3)
2) En cas de problème, consultez la section Dépannage. (Reportez-vous à la page 21)
Copyright
©2013 Samsung Electronics Co.,Ltd.
Tous droits réservés. Le présent manuel d'utilisation ne peut être reproduit ou copié, en partie ou
dans son intégralité, sans l'autorisation écrite préalable de Samsung Electronics Co., Ltd.
démarrage
ƒ L'aspect des accessoires peut légèrement différer des illustrations ci-dessus.
ƒ Utilisez le câble USB dédié pour connecter des périphériques USB à l'unité.
CONTENU
Vérifiez la présence des accessoires fournis présentés ci-dessous.
POWER TV POWER
AH59-02548A
TV VOL TV CH AUDIO SYNC
AUX USB TV SOURCE
TV PRE-CH TV EXIT
SOUND EFFECT SMART VOLUME
S/W
LEVEL S/W
LEVEL
VOL
VOL
3D SOUND PLUS DRC
TV MUTE TV INFO
AUTO POWER
REPEAT DIMMER
OPTICAL
MUTE (Vis : 2EA)
(Vis du support : 2EA)
Télécommande/ Piles
(type AAA) Manuel d'utilisation Fixation de support mural Vis Câble USB
Cordon d'alimentation Adaptateur Câble auxiliaire Noyau torique en ferrite
7
FRA
● DESCRIPTIONS
descriptions
FAÇADE
BOUTON POWER Permet d'allumer/d'éteindre le Crystal Surround Air Track.
BOUTON DE
FONCTIONS
Permet de sélectionner les entrées D.IN, AUX, BT, TV, USB.
- Lorsque l’appareil est sous tension, si vous appuyez sur le bouton
( ) pendant plus de 3 secondes, le bouton fonctionne en MUTE
(SILENCIEUX). Pour annuler la configuration du bouton MUTE
(SILENCIEUX), appuyez à nouveau sur le bouton ( ) pendant
plus de 3 secondes.
VOLUME +/- Permet de régler le volume.
AFFICHAGE Affiche le mode actuellement sélectionné.
ƒ Lorsque vous mettez l'unité sous tension, il faut compter 4 ou 5 secondes de retard avant
le déclenchement du son.
1 2 3
4
8
BORNE DU
CONNECTEUR DU
CAISSON DE
GRAVES
Permet de connecter la prise du connecteur au caisson de graves.
ENTRÉE DE
L'ALIMENTATION
Branchez correctement la prise de l'adaptateur CA au secteur, puis
branchez la fiche de l'adaptateur CA dans la prise murale.
PORT USB
Connectez ici des périphériques USB comme des lecteurs MP3
pour lire des fichiers sur les périphériques.
- Utilisez le câble USB fourni si vous avez installé l'appareil sur un
mur.
ENTRÉE
OPTIQUE Permet la connexion à la sortie (optique) numérique d’un appareil externe.
5 ENTRÉE AUX Permet la connexion à la sortie analogique d’un périphérique externe.
ƒ Lorsque vous débranchez le câble d’alimentation de l'adaptateur CA de la prise murale,
veillez à maintenir la fiche. Ne tirez pas sur le câble.
ƒ Ne branchez pas cette unité ou d'autres composants sur une prise CA jusqu'à ce que
tous ces branchements entre les composants soient terminés.
descriptions
PANNEAU ARRIÈRE
INSTALLATION DU NOYAU TORIQUE EN FERRITE SUR LE CÂBLE
DES ENCEINTES DU CAISSON DE GRAVES
Soulevez pour
déverrouiller et ouvrir le
noyau en ferrite.
Placez le câble des
enceintes du caisson de
graves sur le noyau ouvert.
Verrouillez à nouveau le noyau.
3
AUX IN OPTICAL IN
5 4
1
2
9
FRA
● TÉLÉCOMMANDE
télécommande
PRÉSENTATION DE LA TÉLÉCOMMANDE
HW-F350
Installation des piles dans la télécommande
1. Soulevez le couvercle situé à
l'arrière de la télécommande
comme indiqué.
2. Insérez deux piles de type AAA.
Vérifiez bien que les pôles + et - des piles
sont placés comme indiqué sur le diagramme
représenté à l'intérieur du compartiment.
3. Repositionnez le couvercle.
Dans un schéma d'utilisation
classique, les piles durent
environ un an.
Portée de la Télécommande
La portée de la télécommande en ligne droite est d'environ 7 mètres. Elle fonctionne également inclinée
selon un angle horizontal de 30° maximum par rapport au capteur de la télécommande.
BOUTON POWER
Permet d'allumer/d'éteindre
le Crystal Surround Air Track.
OPTICAL
Appuyez sur le mode optique.
BOUTON TV POWER
Permet d'allumer/d'éteindre le
téléviseur Samsung.
AUTO POWER, DIMMER
Synchronise le système Air Track par la
connexion optique via la prise Optique de
façon à ce qu’il s’active automatiquement
lorsque vous allumez votre téléviseur.
Vous pouvez régler la luminosité de
l'affichage.
BOUTON DE COMMANDE
Permet de lire, mettre en pause ou arrêter
la lecture d'un fichier musical, ou de
rechercher le fichier musical suivant ou
précédent.
TV MUTE
Permet de couper le son du téléviseur.
Appuyez à nouveau pour rétablir le son
à son niveau de volume précédent.
AUX
Appuyez sur le mode AUX.
USB
Appuyez sur le mode USB.
CHAÎNE DE TÉLÉVISION, AUDIO SYNC
Permet de commuter entre les
chaînes TV disponibles.
Permet de synchroniser les signaux
vidéo et audio lors de la connexion de
l’appareil à un téléviseur numérique. TV INFO, TV PRE-CH
Permet de visionner les informations
relatives aux chaînes de télévision.
Permet de revenir à la chaîne de
télévision précédente.
REPEAT
Sélectionnez Répéter le fichier, Tout,
Aléatoire.
S/W LEVEL, VOLUME
Règle le niveau du caisson de basses.
Règle le niveau de volume de l’unité.
TV SOURCE
Appuyez ici pour connecter une source
vidéo du téléviseur.
VOLUME SONORE DU TÉLÉVISEUR
Règle le niveau de volume du téléviseur.
SOUND EFFECT
Permet de sélectionner les Effets sonores:
(MUSIC, NEWS, DRAMA, CINEMA, SPORTS,
GAME, OFF (Son original))
MUTE
Permet de mettre l'appareil en
sourdine. Appuyez de nouveau sur cette
touche pour restaurer le volume initial.
DRC
Vous pouvez utiliser cette fonction pour
bénéficier du son Dolby Digital lorsque
vous regardez un film à un faible volume
sonore la nuit (Standard, MAX, MIN).
TV EXIT
Permet de quitter le téléviseur. (fonctionne de
la même manière que le bouton EXIT de la
télécommande du téléviseur)
SMART VOLUME
Contrôle et stabilise le niveau du
volume pour éviter toute variation
sonore spectaculaire.
3D SOUND PLUS
Cette fonction ajoute de la
profondeur et de l’espace au
son.
POWER TV POWER
AH59-02548A
TV VOL TV CH AUDIO SYNC
AUX USB TV SOURCE
TV PRE-CH TV EXIT
SOUND EFFECT SMART VOLUME
S/W
LEVEL S/W
LEVEL
VOL
VOL
3D SOUND PLUS DRC
TV MUTE TV INFO
AUTO POWER
REPEAT DIMMER
OPTICAL
MUTE
10
BOUTON POWER
Permet d'allumer/d'éteindre
le Crystal Surround Air Track.
REPEAT
Sélectionnez Répéter le fichier, Tout, Aléatoire.
BOUTON TV POWER
Permet d'allumer/d'éteindre le téléviseur
Samsung.
AUX
Appuyez sur le mode AUX.
POWER TV POWER
AH59-02532A
TV VOL TV CH AUDIO SYNC
AUX TV SOURCE
TV PRE-CH DIMMER
SOUND EFFECT SMART VOLUME
VOL
VOL
DRC
TV MUTE TV INFO
OPTICAL
S/W MUTE LEVEL S/W
LEVEL
3D SOUND PLUS
AUTO POWER SoundShare
USB/
REPEAT
BOUTON DE COMMANDE
Permet de lire, mettre en pause ou arrêter la
lecture d'un fichier musical, ou de rechercher
le fichier musical suivant ou précédent.
OPTICAL
Appuyez sur le mode optique.
SOUND EFFECT
Permet de sélectionner les Effets sonores:
(MUSIC, NEWS, DRAMA, CINEMA,
SPORTS, GAME, OFF (Son original))
S/W LEVEL, VOLUME
Règle le niveau du caisson de
basses.
Règle le niveau de volume de l’unité.
USB, Bluetooth
Appuyez sur le mode USB/Bluetooth.
TV SOURCE
Appuyez ici pour connecter une
source vidéo du téléviseur.
SoundShare
Le son du téléviseur est émis sur votre
enceinte satellite (SAT) via une connexion
Bluetooth et le son est contrôlé.
AUDIO SYNC
Permet de synchroniser les signaux
vidéo et audio lors de la connexion de
l’appareil à un téléviseur numérique.
AUTO POWER
Synchronise le système Air Track par la
connexion optique via la prise Optique de
façon à ce qu’il s’active automatiquement
lorsque vous allumez votre téléviseur.
VOLUME SONORE DU TÉLÉVISEUR
Règle le niveau de volume du téléviseur.
CHAÎNE DE TÉLÉVISION
Permet de commuter entre les
chaînes TV disponibles.
TV MUTE
Permet de couper le son du téléviseur.
Appuyez à nouveau pour rétablir le son
à son niveau de volume précédent.
SMART VOLUME
Contrôle et stabilise le niveau du
volume pour éviter toute variation
sonore spectaculaire.
3D SOUND PLUS
Cette fonction ajoute de la
profondeur et de l’espace au son.
TV INFO, TV PRE-CH
Permet de visionner les informations relatives
aux chaînes de télévision. Permet de revenir
à la chaîne de télévision précédente.
ƒ SAT signifie Surround Air Track (Système Air Track) qui est un nom de propriété Samsung.
ƒ La télécommande n'est opérationnelle que sur les téléviseurs Samsung.
ƒ Cette télécommande risque de ne pas fonctionner sur tous les téléviseurs. Si vous ne pouvez pas, utilisez le
téléviseur via sa télécommande.
DIMMER
Vous pouvez régler la luminosité de l'affichage.
DRC
Vous pouvez utiliser cette fonction pour
bénéficier du son Dolby Digital lorsque
vous regardez un film à un faible volume
sonore la nuit (Standard, MAX, MIN).
MUTE
Permet de mettre l'appareil en
sourdine. Appuyez de nouveau sur cette
touche pour restaurer le volume initial.
télécommande
PRÉSENTATION DE LA TÉLÉCOMMANDE
HW-F355
11
FRA
● BRANCHEMENTS
INSTALLATION DE LA FIXATION MURALE
Vous pouvez utiliser le support de fixation mural pour fixer l’unité au mur.
ƒ Ne vous appuyez pas sur l'unité montée et protégez celle-ci de tout risque d’impact.
ƒ Fixez fermement l’unité au mur afin qu’elle ne tombe pas. La chute de l’appareil peut
provoquer des blessures ou endommager le produit.
ƒ Lorsque l’unité est fixée au mur, veillez à ce qu’un enfant ne tire pas sur les câbles de
connexion au risque de faire tomber l’appareil.
ƒ Pour qu'une installation avec fixation murale fonctionne de manière optimale, veillez à ce
que le système d'enceintes et le téléviseur soient séparés d'au moins 5 cm.
Précautions d’installation
• Procédez à l'installation sur un mur vertical uniquement.
• Pour l’installation, évitez les températures extrêmes et l’humidité ou encore un mur pas assez solide pour
supporter le poids de l’appareil.
• Vérifiez la solidité du mur. Si le mur n'est pas assez solide pour supporter l'appareil, renforcez le mur ou
installez l'appareil sur un autre mur pouvant supporter son poids.
• Achetez et utilisez les vis de fixation ou les boulons appropriés au type de mur dont vous disposez
(plaque de plâtre, fer forgé, bois, etc.). Si possible, fixez les vis de fixation dans les poteaux du mur.
• Branchez les câbles entre l'appareil et les périphériques externes avant de l'installer sur le mur.
• Veillez à éteindre et débrancher l’unité avant installation. Autrement, vous vous exposeriez à un risque de
décharge électrique.
1. Placez le support de fixation sur la surface du mur puis
fixez-le à l’aide de deux vis (non fournies).
Si vous suspendez l'appareil en dessous d'un téléviseur,
assurez-vous d'installer le support mural de telle sorte que la
flèche ( ) soit placée au centre du téléviseur.
Assurez-vous également que l'appareil est placé à au
moins 5 cm (2 pouces) en dessous du téléviseur.
2. Alignez les trous à vis sur les deux côtés de l'UNITÉ
PRINCIPALE avec les trous à vis du SUPPORT AUX VIS
et fixez-le avec les vis.
3. Insérez le câble USB à l’arrière de l'unité avant de
l’installer sur le mur.
4. Introduisez l’unité dans les fentes correspondantes
du support de fixation mural. - Pour une sécurité
d’ installation optimale, veillez à ce que les goujons
descendent jusqu’en butée à l’intérieur des fentes.
5. L'installation est terminée.
5 cm (2 pouces) minimum
1 2
branchements
12
branchements
CONNEXION D'UN PÉRIPHÉRIQUE EXTERNE À L'AIDE D'UN CÂBLE
AUDIO (ANALOGIQUE) OU OPTIQUE (NUMÉRIQUE)
Cette section présente les deux méthodes (numérique et analogique) de connexion de l’unité au téléviseur.
Cet appareil est équipé d'une prise numérique optique et d'une prise analogique audio pour la connexion à un
téléviseur.
ou
AUX IN
OPTICAL IN
AUX IN
AUDIO
OUT
L
R
Red White
Câble Audio
OPTICAL IN
OPTICAL
OUT
Câble Optique
(non fourni)
Lecteur BD/
DVD/Décodeur/
Console de jeux
Rouge Blanc
AUX IN (ENTRÉE AUX)
Connectez la prise AUX IN (ENTRÉE AUX) (Audio) de l’unité principale à la prise AUDIO OUT (SORTIE AUDIO)
du téléviseur ou du périphérique source.
Veillez à respecter les codes couleur.
ou,
OPTICAL IN (ENTRÉE OPTIQUE)
Branchez la prise d’entrée numérique de l’unité principale sur la sortie OPTICAL OUT du téléviseur ou de
l’appareil source.
ƒ Ne branchez pas le cordon d’alimentation de ce produit ou de votre téléviseur dans la
prise murale avant que toutes les connexions entre les différents composants n’aient été
effectuées.
ƒ Avant de déplacer ou d'installer ce produit, éteignez-le et débranchez le cordon
d'alimentation.
13
FRA
● FONCTIONS
MODE D’ENTRÉE
Vous pouvez sélectionner l'entrée D.IN, AUX, BT, TV ou bien l'entrée USB.
Actionnez le bouton approprié sur la télécommande pour sélectionner le mode souhaité ou appuyez sur ( ) pour
sélectionner l'un des modes suivants :
Mode D.IN, AUX, BT, TV ou USB.
Mode d'entrée Affichage
Entrée Optique numérique D.IN
Entrée AUX AUX
Mode BLUETOOTH BT (Modèle HW-F355 uniquement)
Mode TV TV (Modèle HW-F355 uniquement)
Mode USB USB
L'appareil s'éteint automatiquement sous les conditions suivantes:
• MODE BT/TV/USB/D.IN
- S'il n'y a aucun signal audio pendant 20 minutes.
• Mode AUX
- Si aucune entrée de TOUCHE n'est reçue durant 8 heures lorsque le
câble est branché.
- Si le câble AUX n'est pas connecté pendant 20 minutes.
ƒ Utilisez le câble fourni si la mémoire flash USB ne peut pas être connectée directement à l'appareil.
BLUETOOTH (MODÈLE HW-F355 UNIQUEMENT)
Vous pouvez utiliser un périphérique Bluetooth pour écouter de la musique avec un son stéréo de haute
qualité, tout cela sans fil!
Qu'est-ce que le système Bluetooth ?
Le système Bluetooth est une technologie qui permet de connecter facilement entre eux des
périphériques compatibles Bluetooth à l'aide d'une liaison sans fil courte distance.
• Ce périphérique Bluetooth peut générer du bruit ou créer des dysfonctionnements en fonction des
conditions d'utilisation lorsque:
- Une partie du corps de l’appareil est en contact avec le système de réception/transmission du
périphérique Bluetooth ou du système Air Track.
- Il est soumis à des variations électriques provenant d'obstructions provoquées par un mur, un coin
ou des cloisonnements de bureaux.
- Il est exposé à des interférences électriques provenant d'appareils utilisant la même bande de
fréquences (exemple : équipements médicaux, fours à micro-ondes et réseaux LAN sans fil).
• Associer le système Air Track et le périphérique Bluetooth tout en maintenant une faible distance.
• Plus la distance est grande entre le système Air Track et le périphérique Bluetooth, plus la qualité de la
transmission se dégrade. Si la distance excède la plage opérationnelle Bluetooth, la connexion est perdue.
• Dans les zones où la réception est faible, la connexion Bluetooth peut ne pas fonctionner correctement.
• La connexion Bluetooth ne fonctionne que lorsqu'elle est proche de l'appareil. La connexion
s’interrompt automatiquement lorsque cette plage est dépassée. Même si la distance est respectée, il
est possible que la qualité sonore soit détériorée par des obstacles (ex. : murs, portes).
• Ce périphérique sans fil peut provoquer des interférences électriques durant son fonctionnement.
fonctions
POWER TV POWER
HW-F350
AUX USB TV SOURCE
AUTO POWER
REPEAT DIMMER
OPTICAL AUX USB TV SOURCE
AUTO POWER
REPEAT DIMMER
OPTICAL AUX USB PTICAL
HW-F355
OPTICAL AUX TV SOURCE
AUTO POWER SoundShare
USB/
REPEAT
OPTICAL AUX TV SOURCE
AUTO POWER SoundShare
USB/
REPEAT
OPTICAL AUX
14
fonctions
Pour connecter le système Air Track à un périphérique Bluetooth
Vérifiez si le périphérique Bluetooth prend en charge la fonction des écouteurs stéréo compatible Bluetooth.
Connexion
Périphérique Bluetooth
1. Appuyez sur le bouton USB/Bluetooth de la télécommande du système Air Track pour afficher le
message BT (Bluetooth).
• Le message WAIT reste affiché pendant 4 secondes, puis le message BT READY apparaît sur la
façade du système Air Track.
2.Sélectionnez le menu Bluetooth sur le périphérique Bluetooth que vous désirez connecter. (Reportezvous
pour cela au manuel d'utilisation de ce périphérique.)
3.Sélectionnez le menu des écouteurs stéréo sur le périphérique Bluetooth.
• Vous afficherez la liste des périphériques connectés.
4. Sélectionnez "[Samsung] AirTrack" dans la liste.
• Lorsque le système Air Track est connecté au périphérique Bluetooth, BT CONNECTED ➡ BT
s'affiche sur la façade.
• Si le fait d'associer le périphérique Bluetooth et le système Air Track a échoué, supprimez le
précédent "[Samsung] AirTrack" identifié par le périphérique Bluetooth et faites-lui rechercher le
système Air Track à nouveau.
5. Lisez de la musique sur le périphérique connecté.
• Vous pouvez écouter de la musique lue sur le périphérique Bluetooth connecté via le système Crystal
Surround Air Track.
• En mode BT, les fonctions Play/Repeat/Stop/Next/Prev (Lecture/Répétition/Arrêt/Suivant/Précédent)
ne sont pas disponibles.
ƒ Il peut vous être demandé de saisir un code PIN (mot de passe) lors de la connexion du
périphérique Bluetooth au système Air Track. Si la fenêtre de saisie du code PIN apparaît, entrez
<0000>.
ƒ Le système Air Track prend en charge les données SBC (44,1 kHz, 48 kHz).
ƒ La fonctionnalité AVRCP n'est pas prise en charge.
ƒ Effectuez uniquement la connexion à un périphérique Bluetooth qui prend en charge la fonction
A2DP (AV).
ƒ Vous ne pouvez pas effectuer une connexion à un périphérique Bluetooth qui prend en charge
uniquement la fonction HF (Mains libres).
ƒ Un seul périphérique Bluetooth peut être associé à la fois.
ƒ Une fois le système Air Track éteint et le périphérique associé déconnecté, l'association ne sera
pas restaurée automatiquement. Pour les reconnecter, vous devez associer le périphérique à
nouveau.
ƒ La recherche ou la connexion peut ne pas être effectuée correctement le système Air Track dans
les cas suivants:
- En présence d'un champ électrique puissant autour du système Air Track.
- Si plusieurs périphériques Bluetooth sont associés simultanément au système Air Track.
- Si le périphérique Bluetooth est éteint, mal positionné ou s'il connaît des
dysfonctionnements.
- Notez que des appareils tels que des fours à micro-ondes, des adaptateurs LAN sans fil, des
lampes fluorescentes et des fours à gaz pour chauffage des locaux utilisent la même plage de
fréquences que le périphérique Bluetooth, ce qui peut provoquer des interférences électriques.
15
FRA
● FONCTIONS
Pour déconnecter le périphérique Bluetooth du système Air Track
Vous pouvez déconnecter le périphérique Bluetooth du système Air Track. (Pour les instructions, reportezvous
au manuel d'utilisation de ce périphérique.)
• Le système Air Track sera déconnecté.
• Lorsque le système Air Track est déconnecté du périphérique Bluetooth, le système Air Track affiche BT
DISCONNECTED en façade.
Pour déconnecter le système Air Track du périphérique Bluetooth
Appuyez sur le bouton ( ) en façade du système Air Track pour passer du mode BT (Bluetooth) à un
autre mode ou éteindre le système Air Track.
• Le périphérique Bluetooth attend un certain temps la réponse du système Air Track avant de mettre fin à
la connexion.
(Le temps de déconnexion peut varier en fonction du périphérique Bluetooth.)
• Le périphérique actuellement connecté est déconnecté.
ƒ En mode Bluetooth, la connexion sera perdue si la distance entre le système Air Track et le
périphérique Bluetooth dépasse 5 m.
ƒ Si le périphérique Bluetooth est replacé dans la portée conseillée puis est à nouveau connecté
après avoir été déconnecté, vous pouvez redémarrer pour rétablir la liaison avec ce périphérique.
ƒ Le système Air Track s'éteint après 20 minutes en état Prêt.
SOUNDSHARE (MODÈLE HW-F355 UNIQUEMENT)
Cette section explique comment connecter le Crystal Surround Air Track aux téléviseurs compatibles Bluetooth.
Pour connecter Le Crystal Surround Air Track à un téléviseur Samsung
compatible avec le Bluetooth
Connexion
Appuyez sur le bouton ( ) pour sélectionner le mode TV, puis branchez le téléviseur sur le Crystal
Surround Air Track.
• L’appareil lit le son du téléviseur lorsqu’il est connecté à celui-ci.
• Si vous passez à un autre mode sauf le mode TV SoundShare ou si vous le désactivez, le son est à
nouveau émis par le téléviseur.
Afin que le son du téléviseur soit émis sur le système Air Track via une connexion Bluetooth, vous devez
commencer par apparier votre station avec le téléviseur compatible avec le Bluetooth. Une fois l’appariement
terminé, les informations correspondantes sont enregistrées et conservées, et plus aucun message de
connexion Bluetooth ne s’affiche. Maintenez le système Air Track et le téléviseur à proximité avant l’appariement.
16
fonctions
1. Allumez le téléviseur Samsung et le système Air Track.
• Activez l'option Add New Device (Ajouter nouveau périphérique) dans le menu SoundShare Setting
(Réglage SoundShare) du téléviseur.
2. Lorsque vous remplacez le mode du système Air Track par TV, un message vous demandant si vous
souhaitez poursuivre l’appariement Bluetooth s'affiche. Le message "[Samsung] AirTrack" apparaît sur l’écran
du téléviseur.
3. Sélectionnez (Oui) sur l’écran du téléviseur. L’appariement avec le système Air Track est alors terminé.
• Une fois que l'appariement est établi, lorsque vous remplacez le mode d'entrée par le mode TV, la
connexion au téléviseur est établie automatiquement.
• Le remplacement d'un autre mode par le mode TV du système Air Track annule la connexion
SoundShare.
• Si vous voulez annuler l'appariement existant dans l'enceinte satellite (SAT) et apparier votre enceinte
satellite à un nouveau téléviseur,
- Appuyez sur le bouton PLAY/PAUSE (LECTURE/PAUSE) du système Air Track en mode d'entrée TV pour
annuler l'appariement existant. Vous pouvez maintenant l'apparier à un autre téléviseur.
• Vous pouvez contrôler le volume et le mode silencieux en utilisant la télécommande du téléviseur et celle
de l'enceinte satellite en mode SoundShare.
ƒ Plage de fonctionnement SoundShare du téléviseur
- portée de l'appariement recommandée : 50 cm maxi.
- portée de fonctionnement recommandée : 5 m maxi.
ƒ Si la distance entre le système Air Track et le téléviseur Samsung est supérieure à 5 m, la connexion ou
le son peut être coupé(e). Le cas échéant, connectez-vous à nouveau au périphérique Bluetooth dans
la plage opérationnelle.
ƒ Assurez-vous que le mode SoundShare du téléviseur est activé avant d'utiliser cette fonction.
ƒ Les boutons PLAY (LECTURE), NEXT (SUIVANT), PREV (PRÉCÉDENT), STOP (ARRÊT) ne fonctionnent
pas en mode SoundShare.
ƒ Fonction d'activation de la mise en veille du Bluetooth
- Le système Air Track est mis sous tension automatiquement dès que vous allumez le téléviseur si vous
avez connecté le téléviseur et le système Air Track avec la fonction SoundShare
- Vous pouvez alterner l'activation/la désactivation de cette fonction en appuyant sur le bouton ( ) situé en
façade pendant plus de 5 secondes lorsque l’ensemble système Air Track est hors tension. Si vous
désactivez cette fonction, l'appareil s'éteint automatiquement, mais il ne s'allume pas automatiquement.
- Cette fonction est prise en charge par les téléviseurs sortis à partir de 2013.
ƒ La fonction SoundShare est prise en charge sur certains téléviseurs fabriqués à partir de 2012. Vérifiez
si votre téléviseur prend en charge la fonction. (Pour plus d'informations, reportez-vous au manuel
d'utilisation du téléviseur.)
USB
1. Branchez le périphérique USB sur le port USB situé sur le côté de l'appareil.
2. Appuyez plusieurs fois sur le bouton ( ) situé en façade du système Air Track jusqu’à ce que le message USB
s’affiche.
3. La mention USB apparaît brièvement à l’écran.
• La connexion à au Crystal Surround Air Track.
• Il s'éteint automatiquement (Auto Power Off) si aucun périphérique USB n'a été connecté après plus de 20 minutes.
Avant de connecter un périphérique USB
L'utilisateur doit connaître les points suivants :
• Si le dossier du nom de fichier d'un périphérique USB dépasse 10
caractères, il ne s'affiche pas sur le OLED.
• Ce produit peut ne pas être compatible avec certains types de
support de stockage USB.
• Les systèmes de fichiers FAT16 et FAT32 sont pris en charge.
- Le système de fichiers NTFS n’est pas pris en charge.
17
FRA
● FONCTIONS
• Connectez un périphérique USB directement au port USB du produit.
Dans le cas contraire, vous pouvez rencontrer un problème de compatibilité USB.
• Ne connectez pas plusieurs périphériques de stockage au produit via un lecteur à cartes multiples Il peut ne
pas fonctionner correctement.
• Les protocoles PTP des caméras numériques ne sont pas pris en charge.
• Ne retirez pas le périphérique USB lorsqu'il est en cours de lecture.
• Les fichiers musicaux protégés par la technologie DRM (MP3, WMA) d'un site Web commercial ne seront
pas lus.
• Les disques durs externes ne sont pas pris en charge.
• Les téléphones mobiles ne sont pas pris en charge.
• Liste de compatibilités
Format Codec
*.mp3
MPEG 1 Couche 2
MPEG 1 Couche 3
MPEG 2 Couche 3
*.wma Wave_Format_MSAudio1
Wave_Format_MSAudio2
*.aac
AAC
AAC-LC
HE-AAC
*.wav -
*.Ogg OGG 1.1.0
*.Flac FLAC 1.1.0, FLAC 1.2.1
※ Prend en charge un débit d'échantillonnage supérieur à 16 KHz
UTILISATION DE LA TÉLÉCOMMANDE
Lecture/Pause/Arrêt
Pendant la lecture, appuyez sur les boutons ►,.
• Appuyez à nouveau sur le bouton ► pour arrêter temporairement la
lecture du fichier.
Appuyez sur le bouton ► pour lire le fichier sélectionné.
• Pour interrompre la lecture, appuyez sur le bouton Arrêt () durant la lecture.
Saut en Avant/en Arrière
Pendant la lecture, appuyez sur les boutons #,$.
• Lorsqu'il y a plusieurs fichiers et si vous appuyez sur le bouton $, le
fichier suivant est sélectionné.
• Lorsqu'il y a plusieurs fichiers et si vous appuyez sur le bouton #, le
fichier précédent est sélectionné.
Utilisation de la fonction REPEAT
Répéter la lecture vous permet de lire un fichier de manière répétée, de
répéter tout, de lire les fichiers de manière aléatoire ou de désactiver la
fonction Repeat.
Appuyez sur le bouton REPEAT.
• REPEAT OFF : permet d'annuler la lecture répétée.
• REPEAT FILE : permet de répéter la lecture d'une plage.
• REPEAT ALL : permet de répéter la lecture de toutes les plages.
• REPEAT RANDOM : permet de lire les plages dans un ordre aléatoire.
(Une plage qui a déjà été lue peut être lue à nouveau.)
ƒ Vous pouvez régler la fonction REPEAT durant la lecture de la
musique d'un périphérique USB.
HW-F350 TV PRE-CH TV EXIT
SOUND EFFECT SMART VOLUME
TV MUTE TV INFO TV PRE-CH TV EXIT
SOUND EFFECT SMART VOLUME
TV MUTE TV INFO
HW-F355
HW-F350
TV VOL TV CH AUDIO SYNC
AUTO POWER
REPEAT DIMMER
TV VOL TV CH AUDIO SYNC
AUTO POWER
DIMMER
HW-F355
TV VOL TV CH AUDIO SYNC
AUTO POWER SoundShare
REPEAT
TV VOL TV CH AUDIO SYNC
AUTO POWER SoundShare
HW-F350 TV PRE-CH TV EXIT
SOUND EFFECT SMART VOLUME
TV MUTE TV INFO TV PRE-CH TV EXIT
SOUND EFFECT SMART VOLUME
TV MUTE TV INFO
HW-F355
18
fonctions
Mise en sourdine
Cette fonction se révèle particulièrement utile lorsqu’il vous faut aller
ouvrir votre porte d’entrée ou répondre à un appel téléphonique.
1.Pour couper le son de cet appareil, appuyez sur le bouton MUTE de la
télécommande.
2.Pour couper le son du téléviseur, appuyez sur le bouton TV MUTE
( ) de la télécommande.
3.Appuyez sur MUTE / TV MUTE ( ) de la télécommande à nouveau
(ou appuyez sur VOLUME +/–) pour rétablir le son.
Utilisation de la fonction 3D SOUND PLUS
La fonctionnalité 3D Sound Plus permet d'ajouter de la profondeur et de
la grandeur au son.
Appuyez sur le bouton 3D SOUND PLUS de la télécommande.
• Chaque fois que vous appuyez sur cette touche, vous modifiez la
sélection comme suit : 3D SOUND PLUS OFF ➡ 3D SOUND PLUS
MUSIC ➡ 3D SOUND PLUS MOVIE
ƒ Lorsque vous activez le 3D Sound Plus, les Effets sonores sont
automatiquement désactivés.
Utilisation de la fonction SMART VOLUME
Cette fonction contrôle et stabilise le volume en cas de fortes variations
sonores lors d'un changement de canal ou d’une transition de scène.
Appuyez sur le bouton SMART VOLUME de la télécommande.
• Chaque fois que vous appuyez sur cette touche, vous modifiez la
sélection comme suit : SMART VOLUME ON ➡ SMART VOLUME OFF
Utilisation des SOUND EFFECT
Vous avez le choix entre sept modes de champs acoustiques différents
- MUSIC, NEWS, DRAMA, CINEMA, SPORTS, GAME, et OFF (Son
original) - selon le type de contenu que vous souhaitez.
Appuyez sur le bouton SOUND EFFECT de la télécommande.
• Sélectionnez le mode OFF si vous souhaitez bénéficier du son original.
ƒ Nous vous recommandons de sélectionner un Effet sonore basé
sur l'équipement source et votre goût personnel.
ƒ Lorsque vous choisissez les Effets sonores (OFF excepté), le 3D
Sound Plus est automatiquement désactivé.
Utilisation de la fonction S/W LEVEL
Vous pouvez contrôler le volume de base à l’aide de la touche S/W Level
de la télécommande.
1.Appuyez sur la touche S/W LEVEL de la télécommande.
2.La mention “SW 0” s’affiche.
3.Appuyez sur le bouton ou de la touche LEVEL pour augmenter ou
baisser le volume du caisson de graves. Vous pouvez effectuer le
réglage sur une valeur comprise entre SW -6 et SW +6.
HW-F350 TV PRE-CH TV EXIT
SOUND EFFECT SMART VOLUME
S/W
LEVEL S/W
LEVEL
VOL
VOL
3D SOUND PLUS DRC
TV MUTE TV INFO
MUTE
TV PRE-CH TV EXIT
SOUND EFFECT SMART VOLUME
S/W LEVEL S/W
LEVEL
VOL
VOL
3D SOUND PLUS DRC
TV MUTE TV MUTE TV INFO
HW-F355
HW-F350
LEVEL LEVEL
VOL
3D SOUND PLUS DRC
LEVEL LEVEL
VOL
3D SOUND PLUS
HW-F355 3D SOUND DRC
HW-F350 SOUND EFFECT SMART VOLUME
S/W S/W
VOL
MUTE
SOUND EFFECT SMART VOLUME
S/W S/W
VOL
MUTE
SMART VOLUME
HW-F355
HW-F350 SOUND EFFECT SMART VOLUME
S/W S/W
VOL
S/W MUTE S/W
VOL
MUTE
SOUND EFFECT
HW-F355
HW-F350 S/W
LEVEL S/W
LEVEL S/W MUTE LEVEL S/W LEVEL S/W MUTE LEVEL S/W
LEVEL
HW-F355
19
FRA
● FONCTIONS
Utilisation de la fonction AUTO POWER LINK
Le Crystal Surround Air Track est automatiquement activé lorsque vous
mettez sous tension le téléviseur ou tout autre périphérique connecté au
système Air Track à l'aide du câble optique.
Appuyez sur la touche AUTO POWER de la télécommande de cet
ensemble.
• La fonction Auto Power Link s’active ou se désactive à chaque fois
que vous appuyez sur AUTO POWER.
AUTO POWER LINK Affichage
ACTIVÉ POWER LINK ON
DÉSACTIVÉ POWER LINK OFF
ƒ Si le téléviseur ou tout autre appareil relié au système Air Track
via le câble optique est hors tension et qu'il n'y a aucune entrée
numérique, l'unité s'éteindra au bout de 20 minutes.
Utilisation de la fonction DIMMER
Appuyez sur la touche Dimmer pour régler la luminosité de l'affichage.
Appuyez sur la touche DIMMER de la télécommande de l’unité.
• Chaque fois que vous appuyez sur cette touche, vous modifiez la
sélection comme suit : DIMMER ON ➡ DIMMER OFF
Utilisation de la fonction AUDIO SYNC
Il est possible que la vidéo soit décalée par rapport à l’audio si le système
Air Track est connecté à un téléviseur numérique.
Si cela se produit, ajustez le temps de retard audio en fonction de la vidéo.
Appuyez sur la touche AUDIO SYNC +/–. de la télécommande de l’unité.
• Vous pouvez utiliser le bouton + , - pour régler le retard audio sur une
valeur comprise entre 0 ms et 300 ms.
ƒ En mode USB, en mode TV ou en mode BT, la fonction Audio
Sync (Synchr. Audio) peut ne pas fonctionner.
Utilisation de la fonction DRC
Cette fonction permet d’équilibrer la plage sonore allant des sons les plus
forts aux plus faibles. Vous pouvez utiliser cette fonction pour bénéficier
du son Dolby Digital lorsque vous regardez un film à un faible volume
sonore la nuit.
Appuyez sur la touche DRC de la télécommande de l’unité.
• Chaque fois que vous appuyez sur cette touche, vous modifiez la
sélection comme suit : DRC STANDARD ➡ DRC MAX ➡ DRC MIN
HW-F350 AUTO POWER
REPEAT DIMMER
HW-F355 OPTICAL AUX TV SOURCE
AUTO POWER SoundShare
USB/
REPEAT
OPTICAL AUX TV SOURCE
AUTO POWER SoundShare
USB/
REPEAT
AUTO POWER
HW-F350
TV VOL TV CH AUDIO SYNC
AUTO POWER
REPEAT DIMMER
TV VOL TV CH AUDIO SYNC
AUTO POWER
REPEAT
HW-F355 TV PRE-CH DIMMER
SOUND EFFECT SMART VOLUME
TV MUTE TV INFO TV PRE-CH DIMMER
SOUND EFFECT SMART VOLUME
TV MUTE TV INFO DIMMER
HW-F350 LEVEL LEVEL
VOL
3D SOUND PLUS DRC
MUTE LEVEL LEVEL
VOL
3D SOUND PLUS DRC
MUTE
HW-F355
HW-F350
TV VOL TV CH AUDIO SYNC
TV MUTE TV INFO TV PRE CH TV EXIT
TV VOL TV CH AUDIO SYNC
TV MUTE TV INFO TV PRE CH TV EXIT
AUDIO SYNC
HW-F355
20
fonctions
Utilisation de la fonction TV (uniquement avec
les téléviseurs Samsung)
• Appuyez sur le bouton TV SOURCE situé sur la télécommande pour
changer la source d’entrée du téléviseur.
• Appuyez sur le bouton TV INFO de la télécommande pour afficher les
informations concernant les chaînes de télévision.
• Appuyez sur le bouton TV CH de la télécommande pour sélectionner la
chaîne de télévision.
• Appuyez sur le bouton TV VOL de la télécommande pour augmenter ou
réduire le volume sonore.
• Utilisez le bouton TV PRE-CH pour revenir à la chaîne de télévision
précédente en mode TV.
• Pour quitter le menu du téléviseur, utilisez le bouton TV EXIT. (Il
fonctionne de la même manière que le bouton EXIT (QUITTER) de la
télécommande du téléviseur)
ƒ Lorsque vous appuyez sur le bouton SoundShare le son du
téléviseur est transmis à travers le système Air Track via une
connexion Bluetooth. Le système Air Track contrôle également
le volume du son, la qualité du son, etc.
ƒ La télécommande n'est opérationnelle que sur les téléviseurs
SAMSUNG.
MISE À JOUR DU LOGICIEL
Samsung peut proposer à l’avenir des mises à niveau pour le
micrologiciel du système Crystal Surround Air Track.
Si une mise à niveau est proposée, vous pouvez mettre le micrologiciel
à niveau en connectant un périphérique USB, contenant la mise à
niveau du micrologiciel, au port USB de votre système Air Track.
Notez qu'en présence de plusieurs fichiers de mise à niveau, vous
devez simplement les charger sur le périphérique USB et les utiliser
pour mettre à niveau le micrologiciel l'un après l'autre.
Veuillez visiter le site Web Samsung.com ou contacter le centre
d’assistance téléphonique de Samsung pour recevoir de plus amples
informations concernant le téléchargement des fichiers de mise à niveau.
ƒ Insérez un périphérique USB contenant la mise à niveau du micrologiciel dans le port USB situé sur
l’unité principale.
ƒ Veillez à ne pas débrancher l'alimentation ni à retirer le lecteur USB lorsque les mises à niveau sont
en cours d'exécution. L’unité principale s’éteint automatiquement une fois que la mise à niveau du
micrologiciel est terminée. Une fois le logiciel mis à niveau, les paramètres sont réinitialisés sur leur
valeur par défaut. Nous vous conseillons de consigner vos réglages par écrit afin de pouvoir
facilement les spécifier à nouveau après la mise à niveau.
ƒ Une fois que la mise à niveau de l’appareil est terminée, éteignez-le puis appuyez sur le bouton () et
maintenez-le enfoncé pendant un moment pour réinitialiser l'appareil.
ƒ En cas d’échec de la mise à niveau du micrologiciel, nous vous recommandons de convertir le
périphérique USB au format FAT16 et de réessayer la mise à niveau.
ƒ Pour les besoins de la mise à niveau, ne convertissez jamais les données USB au format NTFS car
ce système de fichiers n'est pas pris en charge sur l'appareil.
ƒ Tout dépendant du fabricant, le périphérique USB pourrait ne pas être compatible.
HW-F350
TV VOL TV CH AUDIO SYNC
AUX USB TV SOURCE
TV MUTE TV INFO TV PRE-CH TV EXIT
AUTO POWER
REPEAT DIMMER
OPTICAL
TV VOL TV CH AUDIO SYNC
AUX USB TV SOURCE
TV MUTE TV INFO TV PRE-CH TV EXIT
AUTO POWER
REPEAT DIMMER
OPTICAL
TV INFO
TV VOL TV CH
TV PRE-CH TV EXIT
TV SOURCE
HW-F355
TV VOL TV CH AUDIO SYNC
AUX TV SOURCE
TV MUTE TV INFO TV PRE-CH DIMMER
OPTICAL
AUTO POWER SoundShare
USB/
REPEAT
TV VOL TV CH AUDIO SYNC
AUX TV SOURCE
TV MUTE TV INFO TV PRE-CH DIMMER
OPTICAL
AUTO POWER SoundShare
USB/
REPEAT
TV SOURCE
TV INFO
TV VOL TV CH
TV PRE-CH
21
FRA
● DÉPANNAGE
dépannage
Avant de contacter l'assistance, veuillez lire ce qui suit.
Problème Vérification Solution
L'ensemble ne s'allume pas. • Le cordon d'alimentation est-il
branché dans la prise?
• Branchez la fiche d'alimentation
électrique dans la prise murale.
La fonction ne s'active pas lorsque
vous appuyez sur le bouton
correspondant.
• L'air est-il chargé en électricité
statique?
• Débranchez la fiche
d'alimentation électrique et
rebranchez-la.
Aucun son n'est émis. • L’unité est-elle correctement
reliée au téléviseur?
• La fonction Mute est-elle
activée?
• Le volume est-il réglé au
minimum?
• Branchez-les correctement.
• Appuyez sur la touche Mute
pour annuler cette fonction.
• Réglez le volume.
Aucune image n'apparaît sur le
téléviseur lorsque la fonction est
sélectionnée.
• Le téléviseur est-il
correctement branché?
• Branchez-le correctement.
La télécommande ne fonctionne pas. • Les piles sont-elles usées?
• La distance entre la
télécommande et l'unité principale
est-elle trop importante?
• Remplacez-les.
• Rapprochez-vous de l’appareil.
Le son provenant des canaux
gauche/droit est inversé.
• L’émission se fait-elle
correctement sur les câbles
audio de sortie gauche/droit
en provenance du téléviseur?
• Vérifiez le canal gauche/droit
et connectez-le correctement.
La fonction SoundShare
(appariement du téléviseur) a
échoué.
• Votre téléviseur prend-il en
charge le SoundShare?
• La version du micrologiciel du
téléviseur est-elle la plus
récente?
• Une erreur s’est-elle produite
lors de la connexion?
• Réinitialisez le MODE TV et
connectez à nouveau.
• Le SoundShare est pris en
charge par les modèles de
téléviseur Samsung sortis après
2012. Vérifiez si votre téléviseur
prend en charge la fonction.
• Mettez votre téléviseur à jour
avec la version du micrologiciel
la plus récente.
• Contactez le centre d'appels.
• Appuyez sur le bouton
pendant 5 secondes pour
réinitialiser le produit.
22
SPÉCIFICATIONS
Nom du modèle HW-F350 / HW-F355
GÉNÉRAL
USB 5 V/0,5 A
Poids
Unité principale 1,75 kg
Caisson de basses
(PS-EW1-1) 3,0 kg
Dimensions
(L x H x P)
Unité principale 943 x 49 x 59,9 mm
Caisson de basses
(PS-EW1-1)
152 x 300 x 284 mm
Plage de températures en fonctionnement de + 5 à + 35°C
Plage d'humidité en fonctionnement de 10 à 75 %
AMPLIFICATEUR
Puissance de
sortie nominale
Unité principale 30W/CH, 8OHM, THD = 10%, 1kHz
Caisson de basses
(PS-EW1-1) 60W, 3OHM, THD = 10%, 100Hz
Rapport signal/bruit (entrée analogique) 60 dB
Séparation (1 kHz) 50 dB
* Le rapport signal/bruit, la distorsion, la séparation et la sensibilité utilisable sont basés sur des mesures
effectuées à l'aide des directives AES (Audio Engineering Society).
*: Caractéristiques nominales
- Samsung Electronics Co., Ltd se réserve le droit de modifier les caractéristiques sans préavis.
- Le poids et les dimensions sont approximatifs.
- Pour l’alimentation et la consommation d’énergie, reportez-vous à l'étiquette apposée sur l'appareil.
Par la présente, Samsung Electronics déclare que ce Crystal Surround Air Track est conforme
avec les exigences essentielles et autres dispositions relatives de la Directive 1999/5/EC.
Vous pouvez visualiser la Déclaration de Conformité via le site Web http://www.samsung.com,
allez sur Support (Assistance) > Search Product Support (Recherche de l'assistance de l'appareil)
puis entrez le nom de modèle.
Cet équipement peut être utilisé dans tous les pays de l'Union Européenne.
annexe
AH68-02614J-05
En qualité de partenaire ENERGY STAR,
Comment contacter Samsung dans le monde
Si vous avez des suggestions ou des questions concernant les produits Samsung, veuillez contacter le
Service Consommateurs Samsung.
[Elimination des batteries de ce produit]
(Applicable aux pays disposant de systèmes de collecte
séparés)
Le symbole sur la batterie, le manuel ou l'emballage indique que les batteries
de ce produit ne doivent pas être éliminées en fin de vie avec les autres déchets
ménagers. L'indication éventuelle des symboles chimiques Hg, Cd ou Pb signifie
que la batterie contient des quantités de mercure, de cadmium ou de plomb
supérieures aux niveaux de référence stipulés dans la directive CE 2006/66. Si
les batteries ne sont pas correctement éliminées, ces substances peuvent porter
préjudice à la santé humaine ou à l'environnement.
Afin de protéger les ressources naturelles et d'encourager la réutilisation du
matériel, veillez à séparer les batteries des autres types de déchets et à les
recycler via votre système local de collecte gratuite des batteries.
Les bons gestes de mise au rebut de ce produit
(Déchets d’équipements électriques et électroniques)
(Applicable aux pays disposant de systèmes de collecte séparés)
Ce symbole sur le produit, ses accessoires ou sa documentation indique que ni le
produit, ni ses accessoires électroniques usagés (chargeur, casque audio, câble
USB, etc.) ne peuvent être jetés avec les autres déchets ménagers. La mise au
rebut incontrôlée des déchets présentant des risques environnementaux et de santé
publique, veuillez séparer vos produits et accessoires usagés des autres déchets.
Vous favoriserez ainsi le recyclage de la matière qui les compose dans le cadre d’un
développement durable.
Les particuliers sont invités à contacter le magasin leur ayant vendu le produit ou à se
renseigner auprès des autorités locales pour connaître les procédures et les points de
collecte de ces produits en vue de leur recyclage.
Les entreprises et particuliers sont invités à contacter leurs fournisseurs et à consulter
les conditions de leur contrat de vente. Ce produit et ses accessoires ne peuvent être
jetés avec les autres déchets.
Zone Centre de contact � Site Internet
AUSTRIA 0800 - SAMSUNG (0800 -
7267864) www.samsung.com/at/support
BELGIUM 02-201-24-18
www.samsung.com/be/support
(Dutch)
www.samsung.com/be_fr/
support (French)
BOSNIA 051 331 999 www.samsung.com/support
BULGARIA 07001 33 11 , sharing cost www.samsung.com/bg/support
CROATIA 062 726 786 www.samsung.com/hr/support
CZECH 800 - SAMSUNG (800-726786) www.samsung.com/cz/support
DENMARK 70 70 19 70 www.samsung.com/dk/support
FINLAND 030-6227 515 www.samsung.com/fi/support
FRANCE 01 48 63 00 00 www.samsung.com/fr/support
GERMANY
0180 6 SAMSUNG bzw.
0180 6 7267864*
(*0,20 €/Anruf aus dem dt.
Festnetz, aus dem Mobilfunk
max. 0,60 €/Anruf)
www.samsung.com/de/support
CYPRUS 8009 4000 only from landline, toll
free
www.samsung.com/gr/support
GREECE
80111-SAMSUNG (80111 726
7864) only from land line
(+30) 210 6897691 from mobile
and land line
HUNGARY 0680SAMSUNG (0680-726-786)
0680PREMIUM (0680-773-648)
http://www.samsung.com/hu/
support
ITALIA 800-SAMSUNG (800.7267864) www.samsung.com/it/support
LUXEMBURG 261 03 710 www.samsung.com/support
Zone Centre de contact � Site Internet
MONTENEGRO 020 405 888 www.samsung.com/support
SLOVENIA 080 697 267
090 726 786 www.samsung.com/si/support
NETHERLANDS 0900-SAMSUNG (0900-7267864)
(€ 0,10/Min) www.samsung.com/nl/support
NORWAY 815 56480 www.samsung.com/no/support
POLAND
0 801-172-678* lub +48 22
607-93-33 **
* (całkowity koszt połączenia jak za
1 impuls według taryfy operatora)
** (koszt połączenia według
taryfy operatora)
www.samsung.com/pl/support
PORTUGAL 808 20 7267 www.samsung.com/pt/support
ROMANIA 08008 SAMSUNG (08008 726
7864) TOLL FREE No. www.samsung.com/ro/support
SERBIA 011 321 6899 www.samsung.com/rs/support
SLOVAKIA 0800 - SAMSUNG(0800-726 786) www.samsung.com/sk/support
SPAIN 0034902172678 www.samsung.com/es/support
SWEDEN 0771 726 7864 (SAMSUNG) www.samsung.com/se/support
SWITZERLAND 0848 726 78 64
(0848-SAMSUNG)
www.samsung.com/ch/support
(German)
www.samsung.com/ch_fr/
support (French)
U.K 0330 SAMSUNG (7267864) www.samsung.com/uk/support
EIRE 0818 717100 www.samsung.com/ie/support
LITHUANIA 8-800-77777 www.samsung.com/lt/support
LATVIA 8000-7267 www.samsung.com/lv/support
ESTONIA 800-7267 www.samsung.com/ee/support
Crystal Surround Air Track
(sistema di diffusori attivi)
manuale utente
immagina le possibilità
Grazie per aver acquistato un prodotto Samsung.
Per ricevere un servizio più completo,
registrare il prodotto all'indirizzo
www.samsung.com/register
HW-F350
HW-F355
2
caratteristiche
SoundShare
La funzione SoundShare fa sì che l'audio della TV venga emesso dal SAT attraverso una connessione Bluetooth e controlla l'audio.
3D SOUND PLUS
La funzione 3D SOUND PLUS aggiunge profondità e il senso dello spazio durante l'ascolto dei brani.
Tipi speciali di campo sonoro
È possibile scegliere tra 7 diversi modi audio - MUSIC, NEWS, DRAMA, CINEMA, SPORTS, GAME, e OFF (suono originale)
- a seconda del tipo di contenuti che si intende ascoltare.
Telecomando multifunzione
Il telecomando fornito in dotazione può essere utilizzato per comandare il televisore collegato all'unità. (Funziona solo per i
televisori Samsung)
Il telecomando dispone di un tasto di scelta rapida TV ed è possibile eseguire diverse operazioni semplicemente
premendolo.
Sistema di diffusori attivi
Questa unità comprende il sistema di diffusori attivi che fornisce una qualità del suono elevata in una singola unità sottile.
Questa unità non richiede altoparlanti e cablaggio satellitari, generalmente previsti per i sistemi audio surround convenzionali.
Supporto host USB
Utilizzando la funzione host USB dell'Air Track è possibile collegare e riprodurre file musicali da dispositivi di memorizzazione
USB esterni come lettori MP3, memorie flash USB ecc.
Funzione Bluetooth
È possibile collegare un dispositivo Bluetooth al SAT per ascoltare musica con audio stereo di alta qualità, tutto senza fili!
LICENZA
Prodotto su licenza di Dolby Laboratories. Dolby e il simbolo della doppia D sono marchi di Dolby Laboratories.
Prodotto su licenza, brevetti U.S.A. n.: 5,956,674; 5,974,380; 6,487,535 e altri brevetti U.S.A. e mondiali
registrati e in attesa di registrazione. DTS, il simbolo, e DTS e il simbolo insieme sono marchi registrati e DTS 2.0 Channel è
un marchio di DTS, Inc. Software incluso nel prodotto. © DTS, Inc. Tutti i diritti riservati.
- Per inviare domande riguardanti le open source, contattare Samsung via email (oss.request@samsung.com).
3
ITA
informazioni sulla sicurezza
NORME PER LA SICUREZZA
Per ridurre i rischi di folgorazione, non rimuovere il coperchio (o il retro), all'interno vi sono componenti non
riparabili dall'utente Per l'assistenza tecnica fare riferimento a personale qualificato.
ATTENZIONE
RISCHIO DIFOLGORAZIONE .
NON APRIRE .
Questo simbolo indica la presenza,
all'interno del prodotto, di tensioni
pericolose che costituiscono un potenziale
rischio di scosse elettriche.
Questo simbolo indica istruzioni di
particolare importanza per il prodotto.
AVVERTENZA : PER RIDURRE I RISCHI D’INCENDIO E DI SCOSSE ELETTRICHE NON ESPORRE L’ APPARECCHIO
A PIOGGIA O UMIDITÀ.
ATTENZIONE : PER EVITARE SCOSSE ELETTRICHE, INSERIRE CORRETTAMENTE E COMPLETAMENTE LA SPINA.
• Questo dispositivo deve essere sempre collegato ad una presa elettrica dotata di messa a terra di protezione.
• Per scollegare il dispositivo dalla rete elettrica, lo spinotto deve essere estratto dalla presa, pertanto esso deve essere
facilmente raggiungibile.
ATTENZIONE
• Non schizzare o sgocciolare liquidi sull'apparecchio. Non sistemare oggetti pieni di liquidi, come dei vasi,
sull'apparecchio.
• Per spegnere completamente l'apparecchio, estrarre la spina di alimentazione dalla presa di rete. Di conseguenza, la
spina di alimentazione deve essere facilmente e prontamente accessibile in qualsiasi momento.
4
PRECAUZIONI
Verificare che le caratteristiche degli alimentatori CA presenti in casa corrispondano all'etichetta di identificazione posta sul retro del
prodotto. Installare il prodotto orizzontalmente, su un supporto adeguato (mobile), verificando che vi sia spazio sufficiente per una corretta
ventilazione (7 - 10 cm). Assicurarsi che le aperture di ventilazione non siano coperte. Non sistemare l'unità su amplificatori o altri
dispositivi che possono diventare caldi. Questa unità è progettata per un uso continuo. Per spegnere completamente l'unità, scollegare il
connettore CA dalla presa di rete. Scollegare l'unità dalla presa se si prevede di non utilizzarla per un periodo prolungato.
Durante i temporali, scollegare la spina di alimentazione dalla presa.
I picchi di alta tensione provocati dai fulmini potrebbero danneggiare l'unità.
Tenere il prodotto lontano da fonti di umidità (ad es. vasi) e calore eccessivo
(ad es. fuoco) o da apparecchi che generano un forte campo magnetico
o elettrico. In caso di malfunzionamento dell'unità, scollegare il cavo
di alimentazione dalla presa di corrente. Il prodotto non è destinato all'uso
industriale. Questo prodotto è destinato esclusivamente all'uso personale.
Se il prodotto o il disco vengono conservati a basse temperature, potrebbe
formarsi della condensa. Trasportando l'unità in inverno, attendere circa
2 ore prima di utilizzarla, in modo che ritorni a temperatura ambiente.
Non esporre l'unità alla luce diretta del sole o ad altre fonti di calore.
Questo potrebbe causare il surriscaldamento e il malfunzionamento
dell'unità.
Le batterie utilizzate con questo prodotto contengono sostanze chimiche
dannose per l'ambiente.
Non smaltirle con i comuni rifiuti domestici.
Non gettare le batterie nel fuoco.
Non disassemblare, surriscaldare o far entrare le batterie in cortocircuito.
Una installazione scorretta delle batterie può causarne l'esplosione.
Sostituire solo con batterie dello stesso tipo o equivalenti.
Phones
3.9 inch 3.9 inch
2.7 inch
3.9 inch 99.1mm
99.1mm 99.1mm
68.6mm
Ɣ Le fi gure e le illustrazioni del presente manuale utente sono fornite soltanto come riferimento. Possono
differire rispetto all'aspetto effettivo del prodotto.
Ɣ È possibile che vengano addebitate delle spese amministrative nei seguenti casi:
(a) l'uscita del tecnico in seguito a una chiamata non rileva difetti nel prodotto (ad es. nel caso l'utente abbia
omesso di leggere questo manuale utente).
(b) utente ha portato l'unità presso un centro di riparazione che non rileva difetti nel prodotto (ad es. nel caso
l'utente abbia omesso di leggere questo manuale utente).
Ɣ L'importo di tali spese amministrative verrà comunicato all'utente prima di eseguire una visita a domicilio o un
eventuale intervento di manutenzione.
5
ITA
Thi
5,06
6,77
7,14
7,20
7,28
Thi
6,83
sommario
CARATTERISTICHE
2
2 Caratteristiche
2 Licenza
INFORMAZIONI SULLA SICUREZZA
3
3 Norme per la sicurezza
4 Precauzioni
PER COMINCIARE
6
6 Prima di leggere il manuale utente
6 Accessori forniti
DESCRIZIONI
7
7 Pannello anteriore
8 Lato Posteriore
8 Installazione del nucleo in ferrite sul cavo
del diffusore subwoofer
TELECOMANDO
9
9 Informazioni generali sul telecomando
COLLEGAMENTI
11
11 Installazione del supporto per montaggio a
parete
12 Connessione di un dispositivo esterno con
un cavo audio (analogico) o ottico (digitale)
RISOLUZIONE DEI PROBLEMI
21
21 Risoluzione dei problemi
APPENDICE
22
22 Specifiche
FUNZIONI
13
13 Modo di ingresso
13 Bluetooth (solo per il modello HW-F355)
15 SoundShare (solo per il modello HW-F355)
16 USB
17 Utilizzo del telecomando
20 Aggiornamento software
6
PRIMA DI LEGGERE IL MANUALE UTENTE
Osservare le seguenti indicazioni prima di leggere il manuale utente.
Icone utilizzate nel manuale
Icona Indicazione Definizione
Attenzione Indica una situazione in cui una funzione non è attiva o in cui è possibile
che le impostazioni vengano cancellate.
Nota Indica un suggerimento o un'istruzione nella pagina che aiutano a
comprendere il funzionamento dell'unità.
Istruzioni di sicurezza e risoluzione dei problemi
1) Leggere attentamente le istruzioni relative alla sicurezza prima di utilizzare questo prodotto. (Vedere pagina 3)
2) Se si verifica un problema, consultare la sezione relativa alla risoluzione dei problemi. (Vedere pagina 21)
Copyright
©2013 Samsung Electronics Co.,Ltd.
Tutti i diritti riservati; è vietata la riproduzione di una parte o dell'intero manuale utente senza
l'autorizzazione scritta di Samsung Electronics Co., Ltd
per cominciare
ƒ L'aspetto degli accessori può variare leggermente dalle illustrazioni riportate sopra.
ƒ Utilizzare il cavo USB dedicato per collegare i dispositivi USB esterni all'unità.
ACCESSORI FORNITI
Controllare gli accessori forniti indicati di seguito.
POWER TV POWER
AH59-02548A
TV VOL TV CH AUDIO SYNC
AUX USB TV SOURCE
TV PRE-CH TV EXIT
SOUND EFFECT SMART VOLUME
S/W
LEVEL S/W
LEVEL
VOL
VOL
3D SOUND PLUS DRC
TV MUTE TV INFO
AUTO POWER
REPEAT DIMMER
OPTICAL
MUTE (Viti: 2EA)
(Rondelle di
fissaggio: 2EA)
Telecomando /
batterie (formato aaa) Manuale Utente Staffa per montaggio
a parete Viti Cavo USB
Cavo di alimentazione Cavo di alimentazione Cavo Aux Nucleo toroidale
in ferrite
7
ITA
● DESCRIZIONI
descrizioni
PANNELLO ANTERIORE
TASTO DI
ALIMENTAZIONE Accende e spegne l'unità Crystal Surround Air Track.
TASTO FUNZIONI
Seleziona l'ingresso D.IN, AUX, BT, TV, USB.
- Con l'unità accesa, premendo il tasto ( ) per più di 3 secondi,
questo viene impostato per funzionare come tasto MUTE. Per
annullare l'impostazione del tasto come MUTE, premere di nuovo il tasto
( ) per più di 3 secondi.
VOLUME +/- Regola il volume.
DISPLAY Visualizza il modo corrente.
ƒ Quando si accende l'unità vi è un ritardo di 4, 5 secondi prima che venga riprodotto il
suono.
1 2 3
4
8
TERMINALE PER
LA CONNESSIONE
DEL SUBWOOFER
Collega il jack di connessione del subwoofer.
INGRESSO
ALIMENTAZIONE
Collegare correttamente il connettore dell'alimentatore CA
all'ingresso dell'alimentazione, quindi collegare la spina
dell'alimentatore CA alla presa di rete.
PORTA USB
Collegare qui i dispositivi USB (per esempio il lettore MP3) per
riprodurre i file in essi presenti.
- Utilizzare il cavo USB fornito se il prodotto è installato a parete.
INGRESSO
OTTICO Collegare all'uscita digitale (ottica) di un dispositivo esterno.
5 INGRESSO AUX Per il collegamento all'uscita analogica di un dispositivo esterno.
ƒ Tenere l'alimentatore CA dalla spina quando lo si scollega dalla presa di rete. Non tirare il
cavo.
ƒ Non collegare questa unità o altri componenti all'uscita CA finché non sono stati collegati tutti
i componenti.
descrizioni
LATO POSTERIORE
INSTALLAZIONE DEL NUCLEO IN FERRITE SUL CAVO DEL DIFFUSORE SUBWOOFER
Sollevare i fermi per
sbloccare il nucleo ed
aprirlo.
Collocare il cavo del
diffusore subwoofer nel
nucleo aperto.
Richiudere i fermi.
3
AUX IN OPTICAL IN
5 4
1
2
9
ITA
● TELECOMANDO
TV INFO, TV PRE-CH (CAN-PREC TV)
Visualizza lo stato attuale del televisore.
Passa al canale TV precedente.
telecomando
INFORMAZIONI GENERALI SUL TELECOMANDO
HW-F350
Inserimento delle batterie nel telecomando
1. Sollevare il coperchio sul retro
del telecomando tirandolo verso
l'alto come indicato.
2. Inserire due batterie di tipo AAA.
Assicurarsi che la batteria venga posta con i
poli positivo e negativo in corrispondenza dei
simboli "+" e "-" riportati nell'apposito vano.
3. Rimettere il coperchio.
Se impiegate per la TV in
modo standard, le batterie
durano circa un anno.
Portata del telecomando
Il telecomando ha una portata di circa 7 metri in linea d'aria. Funziona anche con un angolo orizzontale fino
a 30° rispetto al sensore del telecomando.
TASTO DI POWER
Accende e spegne l'unità
Crystal Surround Air Track.
TASTO TV POWER
Accende e spegne il televisore Samsung.
OPTICAL (OTTICO)
Premere per selezionare il modo
Optical (Ottico).
TASTO DI COMANDO
Riprodurre, sospendere o arrestare la
riproduzione di un file musicale, oppure
cercare il file musicale in avanti o indietro.
TV MUTE
Disattiva l'audio del televisore. Premerlo
di nuovo per riportare l'audio al livello
precedente.
AUX (AUX)
Premere per selezionare il modo AUX (AUX).
USB(USB)
Premere per selezionare il modo USB (USB).
DRC
Questa funzione permette di
apprezzare l'audio Dolby Digital
quando si guardano film a basso
volume di notte (Standard, MAX, MIN).
TV EXIT (USCITA TV)
Esce dalla TV (funziona in modo
analogo al tasto EXIT del telecomando
della TV)
TV SOURCE
Premere per selezionare una sorgente video
collegata del televisore.
VOLUME TV
Scorre i canali televisivi disponibili.
Regola il livello del volume TV.
SOUND EFFECT
Seleziona l'effetto audio: (MUSIC,
NEWS, DRAMA, CINEMA, SPORTS,
GAME, OFF (Suono originale)) MUTE
Disattiva l'audio dell'unità. Premerlo di nuovo
per riportare l'audio al livello precedente.
3D SOUND PLUS
Questa funzione aggiunge profondità e
il senso dello spazio al suono.
SMART VOLUME
Regola e stabilizza il volume in modo che
non possa cambiare improvvisamente.
POWER TV POWER
AH59-02548A
TV VOL TV CH AUDIO SYNC
AUX USB TV SOURCE
TV PRE-CH TV EXIT
SOUND EFFECT SMART VOLUME
S/W
LEVEL S/W
LEVEL
VOL
VOL
3D SOUND PLUS DRC
TV MUTE TV INFO
AUTO POWER
REPEAT DIMMER
OPTICAL
MUTE
REPEAT
Selezionare Repeat File (Ripeti file),
All (Tutti), Random (Casuale).
CHANNEL TV, AUDIO SYNC
Scorre i canali televisivi disponibili.
Questa funzione contribuisce a
sincronizzare il video con l'audio quando
si è collegati ad un televisore digitale.
S/W LEVEL, VOLUME
Regola il livello del subwoofer.
Regola il volume dell'unità.
AUTO POWER, DIMMER
Sincronizza l'Air Track attraverso la
connessione ottica con il connettore
ottico in modo che si attivi
automaticamente all'accensione del
televisore.
È possibile regolare la luminosità del
display.
10
TASTO DI ACCENSIONE
Accende e spegne l'unità
Crystal Surround Air Track.
REPEAT
Selezionare Repeat File (Ripeti file),
All (Tutti), Random (Casuale).
TASTO TV POWER
Accende e spegne il televisore Samsung.
AUX (AUX)
Premere per selezionare il modo AUX
(AUX).
POWER TV POWER
AH59-02532A
TV VOL TV CH AUDIO SYNC
AUX TV SOURCE
TV PRE-CH DIMMER
SOUND EFFECT SMART VOLUME
VOL
VOL
DRC
TV MUTE TV INFO
OPTICAL
S/W MUTE LEVEL S/W
LEVEL
3D SOUND PLUS
AUTO POWER SoundShare
USB/
REPEAT
TASTO DI COMANDO
Riprodurre, sospendere o arrestare la
riproduzione di un file musicale, oppure
cercare il file musicale in avanti o indietro.
OPTICAL (OTTICO)
Premere per selezionare il modo
Optical (Ottico).
SOUND EFFECT
Seleziona l'effetto audio: (MUSIC,
NEWS, DRAMA, CINEMA, SPORTS,
GAME, OFF (Suono originale))
S/W LEVEL, VOLUME
Regola il livello del subwoofer.
Regola il volume dell'unità.
USB, BLUETOOTH (USB,BLUETOOTH)
Premere per selezionare il modo USB/
BLUETOOTH (USB/BLUETOOTH).
TV SOURCE
Premere per selezionare una sorgente
video collegata del televisore.
SOUNDSHARE
Questa funzione emette l'audio TV dal SAT
attraverso la connessione Bluetooth e lo
comanda.
AUDIO SYNC
Questa funzione contribuisce a
sincronizzare il video con l'audio quando
si è collegati ad un televisore digitale.
AUTO POWER
Sincronizza l'Air Track attraverso la
connessione ottica con il connettore ottico
in modo che si attivi automaticamente
all'accensione del televisore.
VOLUME TV
Scorre i canali televisivi disponibili.
Regola il livello del volume TV.
CHANNEL TV
Scorre i canali televisivi disponibili.
TV MUTE
Disattiva l'audio del televisore. Premerlo di
nuovo per riportare l'audio al livello
precedente.
SMART VOLUME
Regola e stabilizza il volume in modo che
non possa cambiare improvvisamente.
3D SOUND PLUS
Questa funzione aggiunge profondità e
il senso dello spazio al suono.
TV INFO, TV PRE-CH (CAN-PREC TV)
Visualizza lo stato attuale del televisore.
Passa al canale TV precedente.
ƒ SAT sta per Surround Air Track, che è il nome proprietario di Samsung.
ƒ Il telecomando può comandare soltanto televisori Samsung.
ƒ A seconda del televisore che si sta utilizzando, potrebbe non essere possibile comandare il televisore con
questo telecomando. Se non si riesce, comandare il televisore con il relativo telecomando.
DIMMER
È possibile regolare la luminosità del
display.
DRC
Questa funzione permette di
apprezzare l'audio Dolby Digital
quando si guardano film a basso
volume di notte (Standard, MAX, MIN).
MUTE
Disattiva l'audio dell'unità. Premerlo
di nuovo per riportare l'audio al livello
precedente.
telecomando
INFORMAZIONI GENERALI SUL TELECOMANDO
HW-F355
11
ITA
● COLLEGAMENTI
INSTALLAZIONE DEL SUPPORTO PER MONTAGGIO A PARETE
È possibile utilizzare la staffa per montaggio a parete per montare questa unità sulla parete.
Precauzioni per l'installazione
• Installare esclusivamente su una parete verticale.
• Per l'installazione, evitare luoghi con temperature o tassi di umidità elevati; in caso contrario la parete non
può sostenere il peso dell'unità.
• Verificare la resistenza della parete. Se la parete non è sufficientemente robusta per sostenere l'unità,
rinforzarla o installare l'unità su un'altra parete in grado di sopportarne il peso.
• Acquistare e utilizzare viti di fissaggio o tasselli adeguati al tipo di parete (cartongesso, acciaio, legno,
ecc.). Se possibile, fissare le viti di supporto al telaio della parete.
• Collegare i cavi tra l'unità e i dispositivi esterni prima di installarla a parete.
• Assicurarsi che l'unità sia spenta e scollegata prima di effettuare l'installazione. Vi è il rischio di scosse
elettriche.
1. Posizionare la staffa per montaggio a parete su un muro,
quindi fissarla con due viti (non fornite).
Se l'unità viene installata sotto un televisore, assicurarsi di
installare la staffa per montaggio a parete in modo che la freccia
( ) si trovi al centro del televisore.
Assicurarsi inoltre che l'unità sia ad almeno 5 cm sotto il
televisore.
2. Allineare i fori delle viti su entrambi i lati dell’UNITÀ PRINCIPALE
ai fori delle RONDELLE DI FISSAGGIO e inserire le viti.
3. Inserire il cavo USB nel retro dell'unità prima installarla alla
parete.
4. Quindi inserire l'unità nelle corrispondenti fessure della staffa
per montaggio a parete. Per un'installazione sicura, accertarsi
che i perni di fissaggio arrivino saldamente fino in fondo alla
fessura.
5. L'installazione è terminata.
ƒ Non aggrapparsi all’unità installata ed evitare di sottoporla ad urti.
ƒ Fissare saldamente l'unità alla parete in modo che non cada. Cadendo, potrebbe
provocare lesioni o danneggiarsi.
ƒ Quando l'unità viene installata su una parete, assicurarsi che i cavi di connessione non
possano essere tirati da bambini, rischiando di farla cadere.
ƒ Per garantire prestazioni ottimali nelle installazioni a parete, tenere il sistema di diffusori a
collegamenti
5 cm o più
1 2
12
collegamenti
CONNESSIONE DI UN DISPOSITIVO ESTERNO CON UN CAVO
AUDIO (ANALOGICO) O OTTICO (DIGITALE)
Questa sezione spiega due modi (digitale e analogico) per collegare l'unità al televisore.
Questa unità è dotata di jack digitale ottico e di jack analogico audio per il collegamento ad un televisore.
o
AUX IN
OPTICAL IN
AUX IN
AUDIO
OUT
L
R
Red White
Cavo audio
OPTICAL IN
OPTICAL
OUT
Cavo ottico
(non fornito)
Lettore BD/DVD/
set-top box/
console giochi
Rosso Bianco
INGRESSO AUX
Collegare l'ingresso AUX (audio) dell'unità principale all'USCITA AUDIO del televisore o del dispositivo sorgente.
Prestare attenzione ai diversi colori.
o,
INGRESSO OTTICO
Collegare l'ingresso digitale sull'unità principale a OPTICAL OUT sul televisore o sul dispositivo sorgente.
ƒ Non collegare il cavo di alimentazione di questo prodotto o del televisore alla presa di
corrente finché non sono stati collegati tutti i componenti.
ƒ Prima di spostare o installare il prodotto, spegnere l'apparecchio e staccare il cavo di
alimentazione.
13
ITA
● FUNZIONI
MODO DI INGRESSO
È possibile selezionare l'ingresso D.IN, AUX, BT, TV o USB.
Premere il tasto appropriato del telecomando per selezionare il modo desiderato, oppure premere il tasto ( ) per
selezionare una delle seguenti opzioni:
Modo D.IN, AUX, BT, TV o USB.
Tipo di ingresso Display
Ingresso ottico digitale D.IN
Ingresso AUX AUX
Modo BLUETOOTH BT (solo per il modello HW-F355)
Modo TV TV (solo per il modello HW-F355)
Modo USB USB
L'unità si spegne automaticamente nei seguenti casi:
• MODO BT/TV/USB/D.IN
- In assenza di segnale audio per 20 minuti.
• Modo Aux
- Se non vengono effettuati inserimenti dal TELECOMANDO per 8 ore
quando il cavo è collegato.
- Se il cavo Aux non è collegato per 20 minuti.
ƒ Se la memoria flash USB non può essere collegata direttamente all'unità, utilizzare il cavo fornito in
dotazione.
BLUETOOTH (SOLO PER IL MODELLO HW-F355)
Con i dispositivi Bluetooth è possibile ascoltare musica con elevata qualità del suono stereo, tutto senza fili!
Che cos'è il Bluetooth?
Bluetooth è una tecnologia che permette di collegare facilmente tra di loro dispositivi compatibili con
Bluetooth attraverso una connessione wireless a breve raggio.
• Il dispositivo Bluetooth può provocare rumorosità o malfunzionamenti, a seconda delle condizioni di
utilizzo, se:
- Una parte del corpo è a contatto con il sistema di ricezione/di trasmissione del dispositivo Bluetooth
o dell'Air Track.
- È soggetto a variazioni elettriche dovute a interferenze derivanti da riflessioni dei segnali su pareti,
spigoli o tramezzature d'ufficio.
- È esposto a interferenze elettriche derivanti da dispositivi della stessa banda di frequenza, incluse
apparecchiature mediche, forni a microonde e LAN wireless.
• Collegare l'Air Track al dispositivo Bluetooth mantenendo una distanza ravvicinata.
• Maggiore è la distanza tra l'Air Track e il dispositivo Bluetooth, peggiore è la qualità. Se la distanza
supera il raggio d'azione del Bluetooth, la connessione si interrompe.
• In aree a bassa sensibilità di ricezione, la connessione Bluetooth potrebbe non funzionare correttamente.
• Il collegamento Bluetooth funziona solo nelle vicinanze del dispositivo. La connessione viene
automaticamente interrotta se la distanza è superiore a questo limite. La qualità del suono si riduce in
presenza di ostacoli quali pareti o porte, anche entro il limite indicato.
• Questo dispositivo wireless può provocare interferenze elettriche durante il funzionamento.
funzioni
POWER TV POWER
HW-F350
AUX USB TV SOURCE
AUTO POWER
REPEAT DIMMER
OPTICAL AUX USB TV SOURCE
AUTO POWER
REPEAT DIMMER
OPTICAL AUX USB L
HW-F355
OPTICAL AUX TV SOURCE
AUTO POWER SoundShare
USB/
REPEAT
OPTICAL AUX TV SOURCE
AUTO POWER SoundShare
USB/
REPEAT
OPTICAL AUX
14
funzioni
Per collegare l'Air Track a un dispositivo Bluetooth
Verificare che il dispositivo Bluetooth supporti la funzione di auricolare stereo compatibile con Bluetooth.
Collegare
Dispositivo Bluetooth
1. Premere il tasto USB/Bluetooth del telecomando dell'Air Track per visualizzare il messaggio BT.
• Viene visualizzato il messaggio WAIT per 4 secondi e poi il messaggio BT READY sul display
anteriore dell'Air Track.
2.Selezionare il menu Bluetooth sul dispositivo Bluetooth da collegare. (Vedere il manuale utente del
dispositivo Bluetooth)
3.Selezionare il menu dell'auricolare stereo sul dispositivo Bluetooth.
• Viene visualizzato un elenco dei dispositivi scanditi.
4. Selezionare "[Samsung] AirTrack" dall'elenco.
• Quando l'Air Track è collegato al dispositivo Bluetooth, sul display frontale viene visualizzata la scritta
BT CONNECTED ➡ BT.
• Se il dispositivo Bluetooth non riesce a stabilire il collegamento con l'Air Track, eliminare il precedente
"[Samsung] AirTrack" trovato dal dispositivo Bluetooth e cercare nuovamente l'Air Track.
5. Riprodurre la musica sul dispositivo collegato.
• È possibile ascoltare la musica riprodotta sul dispositivo Bluetooth collegato attraverso il sistema
Crystal Surround Air Track.
• In modo BT le funzioni Play(Riproduci)/Repeat(Ripeti)/Stop/Next(Succ)/Prev(Prec) non sono disponibili.
ƒ Per collegare il dispositivo Bluetooth all'Air Track può essere richiesto di inserire un codice PIN
(password). Se viene visualizzata la finestra di inserimento del codice PIN, inserire <0000>.
ƒ L'Air Track supporta i dati SBC (44.1kHz, 48kHz).
ƒ La funzione AVRCP non è supportata.
ƒ Effettuare il collegamento esclusivamente a un dispositivo Bluetooth che supporti la funzione
A2DP (AV).
ƒ Non è possibile effettuare il collegamento a un dispositivo Bluetooth che supporti soltanto la
funzione HF (Hands Free).
ƒ È possibile collegare un solo dispositivo Bluetooth per volta.
ƒ Dopo aver disattivato l'Air Track e interrotto il collegamento, il collegamento non viene ripristinato
automaticamente. Per ristabilire la connessione si deve collegare nuovamente il dispositivo.
ƒ L'Air Track potrebbe non eseguire correttamente la ricerca o la connessione nei seguenti casi:
- In presenza di un forte campo elettrico attorno all'Air Track.
- Se vi sono più dispositivi Bluetooth collegati contemporaneamente all'Air Track.
- Se il dispositivo Bluetooth è spento, non è presente o è difettoso.
- Tenere presente che tutti i dispositivi come forni a microonde, adattatori LAN wireless, luci a
fluorescenza e fornelli a gas utilizzano la stessa gamma di frequenza del dispositivo Bluetooth,
con possibili interferenze elettriche.
15
ITA
● FUNZIONI
Per scollegare il dispositivo Bluetooth dall'Air Track
È possibile scollegare il dispositivo Bluetooth dall'Air Track. Per le istruzioni, vedere il manuale utente del
dispositivo Bluetooth.
• L'Air Track viene scollegato.
• Quando l'Air Track è scollegato dal dispositivo Bluetooth, l'Air Track visualizza BT DISCONNECTED sul
display frontale.
Per scollegare l'Air Track dal dispositivo Bluetooth
Premere il tasto ( ) sul pannello anteriore dell'Air Track per passare BT a un altro modo o per disattivare
l'Air Track.
• Il dispositivo Bluetooth collegato deve attendere un certo tempo for ottenere una risposta dall'Air Track
prima di terminare la connessione.
(Il tempo necessario a scollegarsi può differire a seconda del dispositivo Bluetooth)
• Il dispositivo attualmente collegato viene scollegato.
ƒ In modo di connessione Bluetooth, la connessione cade se la distanza tra l’Air Track e il
dispositivo Bluetooth supera 5 metri.
ƒ Se il dispositivo Bluetooth torna nel campo di ricezione effettivo e poi si ricollega dopo essersi
disconnesso, è possibile riavviarlo per ripristinare il collegamento con il dispositivo Bluetooth.
ƒ L'Air Track si spegne automaticamente dopo 20 minuti in modo Ready.
SOUNDSHARE (SOLO PER IL MODELLO HW-F355)
Questa sezione spiega come collegare il Crystal Surround Air Track a una TV SAMSUNG compatibile
Bluetooth.
Per collegare il Crystal Surround Air Track a una TV Samsung
compatibile Bluetooth
Collegare
Toccare il tasto ( ) per selezionare il modo TV, quindi collegare la TV al Crystal Surround Air Track.
• L'unità riproduce l'audio dalla TV quando è collegata alla TV.
• Se si cambia il modo SoundShare della TV o lo si disattiva, si sentirà nuovamente l’audio dalla TV.
Per riprodurre l'audio della TV sull'Air Track attraverso la connessione Bluetooth, è necessario collegare
innanzitutto il sistema ad una TV compatibile Bluetooth. Una volta stabilita la connessione, le relative
informazioni vengono registrate e conservate e in seguito non vengono più visualizzati messaggi sulla
connessione Bluetooth. Avvicinare l'Air Track alla TV prima di effettuare la connessione.
16
funzioni
1. Accendere la TV Samsung e l'Air Track.
• Impostare Aggiungi nuovo dispositivo del menu Impostazioni SoundShare della TV su On.
2. Quando si passa dall'Air Track alla TV viene visualizzato un messaggio che chiede se si desidera procedere
alla connessione Bluetooth. Sullo schermo della TV viene visualizzato il messaggio "[Samsung] AirTrack".
3. Selezionando sulla schermata della TV, la connessione con Air Track viene completata.
• Se, dopo aver stabilito la connessione, si cambia il modo TV, viene instaurato automaticamente il
collegamento con la TV.
• Sull'Air Track, passando dal modo TV ad un altro modo, la connessione SoundShare viene annullata.
• Per annullare la connessione esistente nel SAT e collegare il SAT a un'altra TV,
- Premere per 5 secondi il tasto PLAY/PAUSE (RIPRODUCI/PAUSA) del SAT nel modo di ingresso
TV per annullare la connessione esistente. A questo punto è possibile stabilire una connessione a
una TV diversa.
• È possibile regolare il volume e silenziare utilizzando il telecomando TV o SAT in modo SoundShare.
ƒ Raggio di azione del SoundShare della TV
- campo di connessione raccomandato: entro 50cm
- raggio d'azione raccomandato: entro 5m
ƒ Se la distanza tra il SAT e la TV Samsung è superiore a 5m, la connessione o l'audio possono subire
interruzioni. In questo caso, collegarsi nuovamente al dispositivo Bluetooth entro il raggio d'azione.
ƒ Prima di utilizzare questa funzione assicurarsi che il modo SoundShare della TV Samsung sia attivato.
ƒ I tasti PLAY (RIPRODUCI), NEXT (SUCC), PREV (PREC), STOP non funzionano in modo
SoundShare.
ƒ Funzione Standby Bluetooth attiva
- L’Air Track viene attivato automaticamente quando si accende la TV se la TV e l’Air Track sono stati
collegati con la funzione SoundShare.
- Questa funzione può essere attivata/disattivata premendo il tasto ( ) del pannello frontale per
almeno 5 secondi quando l’Air Track viene spento. Disattivando questa funzione il prodotto si
spegne automaticamente, ma non si riaccende automaticamente.
- Questa funzione è supportata dalle TV prodotte dal 2013.
ƒ La funzione SoundShare è supportata dai modelli selezionati prodotti dal 2012. Controllare se la TV
supporta la funzione. Per ulteriori informazioni, vedere la Guida utente della TV.
USB
1.Collegare il dispositivo USB alla porta USB a lato dell'unità.
2.Premere il tasto ( ) sul pannello anteriore dell’Air Track ripetutamente finché non compare USB.
3.USB appare sulla schermata di visualizzazione e poi scompare.
• La connessione Crystal Surround Air Track è completa.
• Si spegne automaticamente (Spegnimento automatico disattivato) se per più di 20 minuti non viene
collegato nessun dispositivo USB.
Prima di collegare un dispositivo USB
Tenere presente quanto segue:
• Se la cartella del nome file di un dispositivo USB supera 10
caratteri, non viene visualizzata sul OLED.
• Questo prodotto può non essere compatibile con alcuni tipi di
supporto di memorizzazione USB.
• Sono supportati il file system FAT16 e FAT32.
- Il file system NTFS non è supportato.
17
ITA
● FUNZIONI
• Collegare un dispositivo USB direttamente alla porta USB del prodotto. In caso contrario può verificarsi
un problema di compatibilità USB.
• Non collegare più dispositivi di memorizzazione al prodotto attraverso un lettore multischede.
Potrebbe non funzionare correttamente.
• I protocolli PTP per videocamere digitali non sono supportati.
• Non rimuovere il dispositivo USB mentre viene letto.
• I file musicali protetti da DRM (MP3, WMA) provenienti da un sito Web commerciale non vengono
riprodotti.
• Gli HDD esterni non sono supportati.
• I telefoni cellulari non sono supportati.
• Elenco della compatibilità
Formato Codec
*.mp3
MPEG 1 Layer2
MPEG 1 Layer3
MPEG 2 Layer3
*.wma Wave_Format_MSAudio1
Wave_Format_MSAudio2
*.aac
AAC
AAC-LC
HE-AAC
*.wav -
*.Ogg OGG 1.1.0
*.Flac FLAC 1.1.0, FLAC 1.2.1
※ Supporta frequenze di campionamento oltre i 16 kHz
UTILIZZO DEL TELECOMANDO
Riproduzione/pausa/stop
Durante la riproduzione, premere il tasto ►,.
• Premere di nuovo il tasto ► per arrestare temporaneamente la
riproduzione del file.
Premere il tasto ► per riprodurre il file selezionato.
• Per interrompere la riproduzione, premere il tasto Stop () durante la
riproduzione.
Riproduzione a salti avanti/indietro
Durante la riproduzione, premere il tasto #,$.
• Sono presenti più file, premendo il tasto $ viene selezionato il file successivo.
• Se sono presenti più file, premendo il tasto # viene selezionato il file precedente.
Utilizzo della funzione REPEAT
La ripetizione della riproduzione consente di riprodurre ripetutamente un
file, di ripetere tutti i file, di ripetere i file in modo casuale o di disattivare la
funzione di ripetizione.
Premere il tasto REPEAT.
• REPEAT OFF : Annulla la riproduzione ripetuta.
• REPEAT FILE : Ripete la riproduzione di una traccia.
• REPEAT ALL : Ripete la riproduzione di tutte le tracce.
• REPEAT RANDOM : Riproduce le tracce in ordine casuale. (Una
traccia già riprodotta può essere riprodotta
nuovamente).
ƒ È possibile impostare la funzione REPEAT durante la
riproduzione della musica dall'unità USB.
HW-F350 TV PRE-CH TV EXIT
SOUND EFFECT SMART VOLUME
TV MUTE TV INFO TV PRE-CH TV EXIT
SOUND EFFECT SMART VOLUME
TV MUTE TV INFO
HW-F355
HW-F350 TV PRE-CH TV EXIT
SOUND EFFECT SMART VOLUME
TV MUTE TV INFO TV PRE-CH TV EXIT
SOUND EFFECT SMART VOLUME
TV MUTE TV INFO
HW-F355
HW-F350
TV VOL TV CH AUDIO SYNC
AUTO POWER
REPEAT DIMMER
TV VOL TV CH AUDIO SYNC
AUTO POWER
DIMMER
HW-F355
TV VOL TV CH AUDIO SYNC
AUTO POWER SoundShare
REPEAT
TV VOL TV CH AUDIO SYNC
AUTO POWER SoundShare
18
funzioni
Disattivazione dell'audio
Questa funzione è utile se si deve rispondere al campanello o a una telefonata.
1. Per disattivare l'audio dell'unità, premere il tasto MUTE del telecomando.
2. Per disattivare l'audio del televisore, premere il tasto TV MUTE ( ) del
telecomando.
3. Premere nuovamente il tasto MUTE / TV MUTE ( ) del telecomando
(oppure premere il tasto VOLUME +/–) per riattivare l'audio.
Utilizzo della funzione 3D SOUND PLUS
La funzione 3D Sound Plus aggiunge profondità e il senso dello spazio al suono.
Premere 3D SOUND PLUS sul telecomando.
• Ogni volta che si preme questo tasto, la selezione cambia nella sequenza
indicata di seguito : 3D SOUND PLUS OFF ➡ 3D SOUND PLUS MUSIC
➡ 3D SOUND PLUS MOVIE
ƒ Quando si attiva la funzione 3D Sound Plus, la funzione Sound Effect
(Effetti Audio) commuta automaticamente su OFF.
Utilizzo della funzione SMART VOLUME
Questa funzione regola e stabilizza il livello del volume in modo che non
possa cambiare improvvisamente in caso di cambio di canale o di passaggio
di scena.
Premere SMART VOLUME sul telecomando.
• Ogni volta che si preme questo tasto, la selezione cambia nella sequenza
indicata di seguito : SMART VOLUME ON ➡ SMART VOLUME OFF
Utilizzo della funzione SOUND EFFECT
È possibile scegliere tra 7 diversi modi audio - MUSIC, NEWS, DRAMA,
CINEMA, SPORTS, GAME, e OFF (Suono Originale) - a seconda del tipo
di contenuti che si intende ascoltare.
Premere SOUND EFFECT sul telecomando.
• Selezionare il modo OFF per ascoltare il suono originale.
ƒ Raccomandiamo di selezionare un effetto audio a seconda del
materiale sorgente e del proprio gusto personale.
ƒ Quando si seleziona un effetto audio (eccetto OFF), la funzione
3D Sound Plus si disattiva automaticamente.
Utilizzo della funzione S/W LEVEL
È possibile regolare il volume di base con il tasto S/W Level sul telecomando.
1.Premere il tasto S/W LEVEL sul telecomando.
2.Sul display appare “SW 0”
3. Premere il pulsante o sul tasto LEVEL (LIVELLO) per aumentare o
ridurre il volume del subwoofer. È possibile impostarlo tra SW -6 e SW +6.
HW-F350
LEVEL LEVEL
VOL
3D SOUND PLUS DRC
LEVEL LEVEL
VOL
3D SOUND PLUS
HW-F355 3D SOUND DRC
HW-F350 SOUND EFFECT SMART VOLUME
S/W S/W
VOL
MUTE
SOUND EFFECT SMART VOLUME
S/W S/W
VOL
MUTE
SMART VOLUME
HW-F355
HW-F350 SOUND EFFECT SMART VOLUME
S/W S/W
VOL
S/W MUTE S/W
VOL
MUTE
SOUND EFFECT
HW-F355
HW-F350 S/W
LEVEL S/W
LEVEL S/W MUTE LEVEL S/W LEVEL S/W MUTE LEVEL S/W
LEVEL
HW-F355
HW-F350 TV PRE-CH TV EXIT
SOUND EFFECT SMART VOLUME
S/W
LEVEL S/W
LEVEL
VOL
VOL
3D SOUND PLUS DRC
TV MUTE TV INFO
MUTE
TV PRE-CH TV EXIT
SOUND EFFECT SMART VOLUME
S/W LEVEL S/W LEVEL
VOL
VOL
3D SOUND PLUS DRC
TV MUTE TV MUTE TV INFO
HW-F355
19
ITA
● FUNZIONI
Utilizzo della funzione AUTO POWER LINK
Il Crystal Surround Air Track si attiva automaticamente quando si accende
il televisore o un dispositivo collegato all'Air Track mediante cavo ottico.
Premere il tasto AUTO POWER sul telecomando dell'unità.
• La funzione di collegamento in spegnimento automatico si attiva e si
disattiva ogni volta che si preme AUTO POWER.
AUTO POWER LINK Display
ATTIVATA POWER LINK ON
DISATTIVATA POWER LINK OFF
ƒ Se un televisore o qualsiasi dispositivo collegato con Air Track
con cavo ottico è spento e non vi è un ingresso digitale, Air
Track si spegne dopo 20 minuti.
Utilizzo della funzione DIMMER
Premere Dimmer per regolare la luminosità del display.
Premere DIMMER sul telecomando di questa unità.
• Ogni volta che si preme questo tasto, la selezione cambia nella
sequenza indicata di seguito : DIMMER ON ➡ DIMMER OFF
Utilizzo della funzione AUDIO SYNC
Il video può sembrare in ritardo rispetto all'audio se Air Track è collegato
a un televisore digitale.
Se si verifica questo inconveniente, regolare il ritardo dell'audio per
sincronizzarlo con il video.
Premere AUDIO SYNC +/–. sul telecomando di questa unità.
• È possibile impostare un ritardo dell'audio compreso tra 0 ms e 300
ms premendo i tasti +, -.
ƒ Nei modi USB, TV o BT, la funzione Audio Sync (Sincronia audio)
può non funzionare.
Utilizzo della funzione DRC
Questa funzione effettua il bilanciamento tra i suoni più alti e quelli più
bassi. Questa funzione permette di apprezzare l'audio Dolby Digital
quando si guardano film a basso volume di notte.
Premere DRC sul telecomando di questa unità.
• Ogni volta che si preme questo tasto, la selezione cambia nella sequenza
indicata di seguito : DRC STANDARD ➡ DRC MAX ➡ DRC MIN
HW-F350
TV VOL TV CH AUDIO SYNC
AUTO POWER
REPEAT DIMMER
TV VOL TV CH AUDIO SYNC
AUTO POWER
REPEAT
HW-F355 TV PRE-CH DIMMER
SOUND EFFECT SMART VOLUME
TV MUTE TV INFO TV PRE-CH DIMMER
SOUND EFFECT SMART VOLUME
TV MUTE TV INFO DIMMER
HW-F350
TV VOL TV CH AUDIO SYNC
TV MUTE TV INFO TV PRE CH TV EXIT
TV VOL TV CH AUDIO SYNC
TV MUTE TV INFO TV PRE CH TV EXIT
AUDIO SYNC
HW-F355
HW-F350 LEVEL LEVEL
VOL
3D SOUND PLUS DRC
MUTE LEVEL LEVEL
VOL
3D SOUND PLUS DRC
MUTE
HW-F355
HW-F350 AUTO POWER
REPEAT DIMMER
HW-F355 OPTICAL AUX TV SOURCE
AUTO POWER SoundShare
USB/
REPEAT
OPTICAL AUX TV SOURCE
AUTO POWER SoundShare
USB/
REPEAT
AUTO POWER
20
funzioni
Utilizzo della funzione TV (Solo con TV Samsung)
• Premere TV SOURCE sul telecomando per cambiare la sorgente di
ingresso della TV.
• Premere il tasto TV INFO sul telecomando per visualizzare le informazioni sul
canale TV.
• Pmere il tasto TV CH sul telecomando per selezionare il canale televisivo.
• Premere il tasto TV VOL sul telecomando per aumentare o ridurre il volume.
• Usare il tasto TV PRE-CH per passare al canale TV precedente nel
modo TV.
• Per uscire dal menu della TV, utilizzare il tasto TV EXIT. (funziona in modo
analogo al tasto EXIT del telecomando della TV).
ƒ Premendo il tasto SoundShare, l'audio della TV viene trasmesso
attraverso il sistema Air Track mediante una connessione Bluetooth.
L'Air Track controlla anche il volume audio, la qualità del suono, ecc.
ƒ Il telecomando può comandare soltanto televisori SAMSUNG.
HW-F350
TV VOL TV CH AUDIO SYNC
AUX USB TV SOURCE
TV MUTE TV INFO TV PRE-CH TV EXIT
AUTO POWER
REPEAT DIMMER
OPTICAL
TV VOL TV CH AUDIO SYNC
AUX USB TV SOURCE
TV MUTE TV INFO TV PRE-CH TV EXIT
AUTO POWER
REPEAT DIMMER
OPTICAL
TV INFO
TV VOL TV CH
TV PRE-CH TV EXIT
TV SOURCE
HW-F355
TV VOL TV CH AUDIO SYNC
AUX TV SOURCE
TV MUTE TV INFO TV PRE-CH DIMMER
OPTICAL
AUTO POWER SoundShare
USB/
REPEAT
TV VOL TV CH AUDIO SYNC
AUX TV SOURCE
TV MUTE TV INFO TV PRE-CH DIMMER
OPTICAL
AUTO POWER SoundShare
USB/
REPEAT
TV SOURCE
TV INFO
TV VOL TV CH
TV PRE-CH
HW-F350 S/W
LEVEL S/W
LEVEL S/W MUTE LEVEL S/W LEVEL S/W MUTE LEVEL S/W
LEVEL
HW-F355
AGGIORNAMENTO SOFTWARE
È possibile che Samsung offra in futuro aggiornamenti per la versione
del firmware di Crystal Surround Air Track.
Se viene offerto un aggiornamento, è possibile aggiornare il firmware
collegando un'unità USB su cui è memorizzato l'aggiornamento del
firmware alla porta USB dell'Air Track.
Se sono presenti diversi file di aggiornamento, questi devono essere
caricati singolarmente sull'unità USB e utilizzati uno alla volta per
aggiornare il firmware.
Visitare il sito Samsung.com oppure contattare il call center Samsung
per ulteriori informazioni sullo scaricamento dei file di aggiornamento.
ƒ Inserire un'unità USB con l'aggiornamento firmware nella porta USB dell'unità principale.
ƒ Attenzione a non scollegare l'alimentazione o rimuovere l'unità USB durante l'applicazione degli
aggiornamenti. L'unità principale si spegne automaticamente al termine dell'aggiornamento del
firmware. Al termine dell'aggiornamento del software, vengono ripristinate le impostazioni predefinite.
Si consiglia di prendere nota delle impostazioni effettuate in modo da poterle reimpostare facilmente
dopo l'aggiornamento.
ƒ Una volta terminato l'aggiornamento del software del prodotto, spegnerlo e tenere premuto il tasto
() per un istante per resettare il prodotto.
ƒ Se non si riesce ad effettuare l'aggiornamento del firmware, si raccomanda di formattare il dispositivo
USB in FAT16 e riprovare.
ƒ Ai fini dell'aggiornamento non formattare i dati USB in NTFS perché non è un file system supportato.
ƒ A seconda del costruttore, alcuni dispositivi memorizzazione USB potrebbero non essere supportati.
21
ITA
● RISOLUZIONE DEI PROBLEMI
Prima di rivolgersi all'assistenza, eseguire i controlli indicati di seguito.
Sintomo Controllo Rimedio
L'unità non si accende. • Il cavo di alimentazione è
collegato alla presa?
• Collegare la spina alla presa.
Una funzione non si attiva quando
viene premuto il tasto.
• Nell'aria è presente elettricità
statica?
• Scollegare e ricollegare la
spina.
L’audio non viene riprodotto. • L'unità è collegata
correttamente al televisore?
• La funzione di disattivazione
dell'audio è attivata?
• Il volume è regolato sul
minimo?
• Collegarli correttamente.
• Premere il tasto di
disattivazione dell'audio per
ripristinarlo.
• Regolare il volume.
Quando viene selezionata la
funzione, l'immagine non viene
visualizzata sul televisore.
• Il televisore è collegato
correttamente?
• Collegarlo correttamente.
Il telecomando non funziona. • Le batterie sono scariche?
• La distanza tra il telecomando
e l'unità principale è troppo
elevata?
• Sostituire le batterie.
• Avvicinarsi all'unità.
L'audio dei canali sinistro/ destro è
invertito.
• I cavi di uscita audio sinistro/
destro del televisore sono
collegati correttamente?
• Controllare il canale sinistro/
destro e collegarlo/i
correttamente.
Il SoundShare (connessione TV) non
è riuscito.
• La TV supporta SoundShare?
• Il firmware della TV è
aggiornato?
• Si è verificato un errore
durante la connessione?
• Ripristinare il MODO TV ed
effettuare di nuovo il
collegamento.
• La funzione SoundShare è
supportata dai modelli TV
Samsung commercializzati
dopo il 2012. Controllare se la
TV supporta la funzione.
• Aggiornare la TV all'ultimo
firmware.
• Contattare il call center.
• Premere il tasto per 5
secondi per resettare il
prodotto.
risoluzione dei problemi
22
SPECIFICHE
Nome del modello HW-F350 / HW-F355
GENERALE
USB 5V/0,5A
Peso
Unità principale 1,75 kg
Subwoofer
(PS-EW1-1) 3,0 kg
Dimensioni
(L x A x P)
Unità principale 943 x 49 x 59,9 mm
Subwoofer
(PS-EW1-1) 152 x 300 x 284 mm
Temperatura di esercizio Da +5°C a +35°C
Umidità di esercizio 10 % e 75 %
AMPLIFICATORE
Potenza di
uscita nominale
Unità principale 30W/CH, 8OHM, THD = 10%, 1kHz
Subwoofer
(PS-EW1-1) 60W, 3OHM, THD = 10%, 100Hz
Rapporto S/N (ingresso analogico) 60dB
Separazione (1kHz) 50dB
* I valori rapporto S/N, distorsione, separazione e sensibilità utile si basano sulla misurazione secondo gli
standard AES (Audio Engineering Society).
*: Specifica nominale
- Samsung Electronics Co., Ltd si riserva il diritto di modificare le specifiche senza preavviso.
- Peso e dimensioni sono approssimativi.
- Per l'alimentazione e il consumo di energia, vedere l'etichetta applicata al prodotto.
Samsung Electronics dichiara che questo Crystal Surround Air Track è conforme ai requisiti
essenziali e ad altre disposizioni rilevanti della direttiva 1999/5/EC.
La dichiarazione di conformità ufficiale è reperibile al sito http://www.samsung.com, andare su
Support (Supporto) > Search Product Support (Cerca supporto prodotto) e inserire il nome del modello.
Questo apparecchio può essere utilizzato in tutti i Paesi dell'UE.
appendice
AH68-02614J-05
Contatta SAMSUNG WORLD WIDE
Se avete commenti o domande sui prodotti Samsung, contattate il Servizio Clienti Samsung.
[Corretto smaltimento delle batterie del prodotto]
(Applicabile nei Paesi con sistemi di raccolta differenziata)
Il simbolo riportato sulla batteria o sulla sua documentazione o confezione indica
che le batterie di questo prodotto non devono essere smaltite con altri rifiuti al
termine del ciclo di vita. Dove raffigurati, i simboli chimici Hg, Cd o Pb indicano
che la batteria contiene mercurio, cadmio o piombo in quantità superiori ai livelli
di riferimento della direttiva UE 2006/66. Se le batterie non vengono smaltite
correttamente, queste sostanze possono causare danni alla salute umana o
all'ambiente.
Per proteggere le risorse naturali e favorire il riutilizzo dei materiali, separare le
batterie dagli altri tipi di rifiuti e utilizzare il sistema di conferimento gratuito previsto
nella propria area di residenza.
Corretto smaltimento del prodotto
(rifiuti elettrici ed elettronici)
(Applicabile nei Paesi con sistemi di raccolta differenziata)
Il simbolo riportato sul prodotto, sugli accessori o sulla documentazione indica che il
prodotto e i relativi accessori elettronici (quali caricabatterie, cuffia e cavo USB) non
devono essere smaltiti con altri rifiuti al termine del ciclo di vita. Per evitare eventuali
danni all'ambiente o alla salute causati dallo smaltimento dei rifiuti non corretto,
si invita l'utente a separare il prodotto e i suddetti accessori da altri tipi di rifiuti,
conferendoli ai soggetti autorizzati secondo le normative locali.
Gli utenti domestici sono invitati a contattare il rivenditore presso il quale è stato
acquistato il prodotto o l’autorità competente per tutte le informazioni relative alla
raccolta differenziata di questo tipo di materiali.
Gli utenti professionali (imprese e professionisti) sono invitati a contattare il proprio
fornitore e verificare i termini e le condizioni del contratto di acquisto. Questo prodotto
e i relativi accessori elettronici non devono essere smaltiti unitamente ad altri rifiuti
commerciali.
Area Centro di contatto � Sito Web
AUSTRIA 0800 - SAMSUNG (0800 -
7267864) www.samsung.com/at/support
BELGIUM 02-201-24-18
www.samsung.com/be/support
(Dutch)
www.samsung.com/be_fr/
support (French)
BOSNIA 051 331 999 www.samsung.com/support
BULGARIA 07001 33 11 , sharing cost www.samsung.com/bg/support
CROATIA 062 726 786 www.samsung.com/hr/support
CZECH 800 - SAMSUNG (800-726786) www.samsung.com/cz/support
DENMARK 70 70 19 70 www.samsung.com/dk/support
FINLAND 030-6227 515 www.samsung.com/fi/support
FRANCE 01 48 63 00 00 www.samsung.com/fr/support
GERMANY
0180 6 SAMSUNG bzw.
0180 6 7267864*
(*0,20 €/Anruf aus dem dt.
Festnetz, aus dem Mobilfunk
max. 0,60 €/Anruf)
www.samsung.com/de/support
CYPRUS 8009 4000 only from landline, toll
free
www.samsung.com/gr/support
GREECE
80111-SAMSUNG (80111 726
7864) only from land line
(+30) 210 6897691 from mobile
and land line
HUNGARY 0680SAMSUNG (0680-726-786)
0680PREMIUM (0680-773-648)
http://www.samsung.com/hu/
support
ITALIA 800-SAMSUNG (800.7267864) www.samsung.com/it/support
LUXEMBURG 261 03 710 www.samsung.com/support
Area Centro di contatto � Sito Web
MONTENEGRO 020 405 888 www.samsung.com/support
SLOVENIA 080 697 267
090 726 786 www.samsung.com/si/support
NETHERLANDS 0900-SAMSUNG (0900-7267864)
(€ 0,10/Min) www.samsung.com/nl/support
NORWAY 815 56480 www.samsung.com/no/support
POLAND
0 801-172-678* lub +48 22
607-93-33 **
* (całkowity koszt połączenia jak za
1 impuls według taryfy operatora)
** (koszt połączenia według
taryfy operatora)
www.samsung.com/pl/support
PORTUGAL 808 20 7267 www.samsung.com/pt/support
ROMANIA 08008 SAMSUNG (08008 726
7864) TOLL FREE No. www.samsung.com/ro/support
SERBIA 011 321 6899 www.samsung.com/rs/support
SLOVAKIA 0800 - SAMSUNG(0800-726 786) www.samsung.com/sk/support
SPAIN 0034902172678 www.samsung.com/es/support
SWEDEN 0771 726 7864 (SAMSUNG) www.samsung.com/se/support
SWITZERLAND 0848 726 78 64
(0848-SAMSUNG)
www.samsung.com/ch/support
(German)
www.samsung.com/ch_fr/
support (French)
U.K 0330 SAMSUNG (7267864) www.samsung.com/uk/support
EIRE 0818 717100 www.samsung.com/ie/support
LITHUANIA 8-800-77777 www.samsung.com/lt/support
LATVIA 8000-7267 www.samsung.com/lv/support
ESTONIA 800-7267 www.samsung.com/ee/support
Crystal Surround Air Track
(Sistema de altavoces activo)
manual del usuario
imagine las posibilidades
Gracias por adquirir este producto Samsung.
Para recibir un servicio más completo, registre su
producto en
www.samsung.com/register
HW-F350
HW-F355
2
características
SoundShare
SoundShare genera el sonido del TV en su SAT a través de la conexión de Bluetooth y controla el sonido.
3D Sound Plus
La función 3D SOUND PLUS añade profundidad y sensación de espacio a su experiencia auditiva.
Modo de sonido especial
Puede seleccionar entre 7 modos de sonido de campo diferentes: MUSIC (MÚSICA), NEWS (NOTICIAS), DRAMA, SPORTS
(DEPORTES), GAME (JUEGO), OFF (DES.) (sonido original), dependiendo del tipo de contenido que desee escuchar.
Mando a distancia multifuncional
El mando a distancia que se facilita se puede utilizar para controlar el TV conectado a esta unidad. (Sólo funciona con TV Samsung)
El mando a distancia tiene una tecla directa de TV que permite realizar diversas operaciones con una sola pulsación del botón.
Sistema de altavoces activo
Esta unidad incorpora el Sistema de altavoces activo que proporciona una gran calidad de sonido en una sola unidad
compacta.
Esta unidad no requiere ningún altavoz satélite ni cableado, el cual normalmente viene asociado a los sistemas de sonido
envolvente convencionales.
Soporte de USB Host
Puede conectar y reproducir archivos desde dispositivos de almacenamiento externo USB como reproductores MP3, memoria
flash USB, etc. utilizando la función USB HOST del Air Track.
Función Bluetooth
Se puede utilizar para conectar el dispositivo Bluetooth al SAT para poder disfrutar de la música con un sonido estéreo de gran
calidad, sin necesidad de cables.
LICENCIA
Fabricado con licencia de Dolby Laboratories. Dolby y el símbolo de la doble D marcas comerciales de Dolby Laboratories.
Fabricado bajo licencia bajo números de patente de EE.UU.: 5.956.674, 5.974.380, 6.487.535 u otras patentes de EE.UU. y de
todo el mundo presentadas y pendientes. DTS, el símbolo, y DTS y el símbolo juntos son marcas comerciales registradas y DTS
2.0 Channel es una marca comercial de DTS, Inc. El producto incluye el software. © DTS, Inc. Todos los derechos reservados.
- Para enviar consultas y solicitudes sobre fuentes abiertas, póngase en contacto con Samsung a través del correo
electrónico (oss.request@samsung.com).
3
SPA
Información de seguridad
ADVERTENCIAS
PARA REDUCIR EL RIESGO DE ELECTROCUCIÓN, NO ABRA ESTA UNIDAD.
NO CONTIENE ELEMENTOS QUE DEBA REEMPLAZAR EL USUARIO. EN CASO DE AVERÍA, SOLICITE LA AYUDA DE
PERSONAL ESPECIALIZADO.
PRECAUCIÓN
RIESGO DE ELECTROCUCION.
NO ABRIR.
Este símbolo indica que existe un voltaje
peligroso dentro de esta unidad que puede
producir una descarga eléctrica.
Este símbolo indica que existen instrucciones
importantes de funcionamiento y
mantenimiento en la documentación que se
suministra con esta unidad.
ADVERTENCIA : Para reducir el riesgo de incendio o de descarga eléctrica, no exponga este aparato a la
lluvia ni a la humedad.
PRECAUCIÓN : PARA EVITAR DESCARGAS ELÉCTRICAS, INTRODUZCA TOTALMENTE EL ENCHUFE.
• Este aparato deberá conectarse siempre a una toma de alimentación principal con una conexión a tierra de
protección.
• Para desconectar el aparato de la fuente de alimentación, el enchufe deberá ser desconectado de la toma
principal, lo que significa que deberá disponer de fácil acceso al enchufe principal.
PRECAUCIÓN
• No debe exponer este aparato a gotas ni salpicaduras de agua. No coloque en el aparato objetos con
líquido, como jarrones.
• Para apagar completamente este aparato, debe desconectar su enchufe de la toma de corriente. Por tanto,
el enchufe debe estar accesible en todo momento.
4
PRECAUCIONES
Asegúrese de que la toma de CA de su casa cumpla con los requisitos indicados en la pegatina de identificación de la parte posterior
del producto. Instale el producto horizontalmente, sobre una base adecuada (mueble), con espacio suficiente a su alrededor para
ventilación (7~10 cm). Asegúrese de que los orificios de ventilación no queden tapados. No coloque la unidad sobre amplificadores o
cualquier otro equipo que pueda generar calor. Esta unidad se ha diseñado para utilizarse de forma continua. Para apagar completamente
la unidad, desconecte el enchufe de CA de la toma de corriente. Desenchufe la unidad si no va utilizarla durante un tiempo prolongado.
Durante tormentas, desconecte el enchufe principal de CA de la toma de
corriente. Los picos de tensión debidos a rayos podrían dañar la unidad.
Proteja el reproductor contra la humedad (por ejemplo, jarrones) y calor
excesivo (p. ej.: chimeneas) o equipos que creen campos magnéticos o
eléctricos potentes. Desconecte el cable de alimentación de la fuente de
CA si la unidad no funciona correctamente.
El producto no ha sido creado para uso industrial. Este producto es sólo
para uso personal.
Es posible que se produzca condensación en el producto o en el
disco en situaciones de temperaturas bajas. Si tiene que transportar el
producto durante el invierno, espere 2 horas aproximadamente antes de
usarlo hasta que la unidad haya alcanzado la temperatura de la sala.
No exponga la unidad a la luz directa del sol ni a otras fuentes de calor.
Podrían sobrecalentarla y provocar una avería en la unidad.
Las pilas utilizadas en este producto contienen productos químicos que
son peligrosos para el medio ambiente.
No tire las pilas con el resto de la basura doméstica.
No tire las pilas al fuego.
No cortocircuite, desmonte ni sobrecaliente las pilas.
Si la pila no se reemplaza correctamente se corre el riesgo de una
explosión. Reemplace la pila solo por una igual o de especificaciones
equivalentes.
Phones
3.9 inch 3.9 inch
2.7 inch
3.9 inch 99.1mm
99.1mm 99.1mm
68.6mm
Ɣ Las fi guras e ilustraciones de este Manual del usuario se facilitan solo para referencia y pueden diferir del
aspecto real del producto.
Ɣ Podría aplicársele una tarifa de administración si:
(a) se requiere la asistencia de un ingeniero y el producto no tiene ningún defecto (es decir, no se ha leído el
manual del usuario).
(b) se lleva la unidad a un centro de reparación y el producto no tiene ningún defecto (es decir, no se ha leído
el manual del usuario).
Ɣ El importe de dicha tarifa le será notifi cada antes de realizar el trabajo o de acudir a su domicilio.
5
SPA
Índice
CARACTERÍSTICAS
2
2 Características
2 Licencia
INFORMACIÓN DE SEGURIDAD
3
3 Advertencias
4 Precauciones
INTRODUCCIÓN
6
6 Antes de leer el manual del usuario
6 Componentes
DESCRIPCIÓN
7
7 Panel frontal
8 Panel posterior
8 Instalación del núcleo de ferrita en el cable
del altavoz del subwoofer
MANDO A DISTANCIA
9
9 Descripción del mando a distancia
CONEXIONES
11
11 Instalación del soporte para montaje en
pared
12 Conexión de un dispositivo externo utilizando
un cable de audio (analógico) o un cable
óptico (digital)
SOLUCIÓN DE PROBLEMAS
21
21 Solución de problemas
APÉNDICE
22
22 Especificaciones
FUNCIONES
13
13 Modo de entrada
13 Bluetooth (Solo el modelo HW-F355)
15 SoundShare (Solo el modelo HW-F355)
16 USB
17 Utilización de mando a distancia
20 Actualización de software
6
ANTES DE LEER EL MANUAL DEL USUARIO
Tenga en cuenta lo siguiente antes de leer el manual del usuario.
Iconos que se utilizarán en el manual
Icono Término Definición
Precaución Indica una situación en la que la función no está operativa o pueden
cancelarse los ajustes.
Nota Esto implica sugerencias o instrucciones en la página que ayudan a utilizar
cada función.
Instrucciones de seguridad y solución de problemas
1) Asegúrese de conocer las instrucciones de seguridad antes de utilizar este producto.
(Consulte la página 3)
2) Si se produce un problema, compruebe Solución de problemas. (Consulte las páginas 21)
Copyright
©2013 Samsung Electronics Co.,Ltd.
Todos los derechos reservados. Ninguna parte o la totalidad de este manual del usuario pueden
reproducirse o copiarse sin la autorización previa por escrito de Samsung Electronics Co., Ltd.
introducción
ƒ El aspecto de los accesorios puede diferir ligeramente de las ilustraciones anteriores.
ƒ Indica una situación en la que la función no está operativa o pueden cancelarse los ajustes.
COMPONENTES
Compruebe los accesorios suministrados que se incluyen a continuación.
POWER TV POWER
AH59-02548A
TV VOL TV CH AUDIO SYNC
AUX USB TV SOURCE
TV PRE-CH TV EXIT
SOUND EFFECT SMART VOLUME
S/W
LEVEL S/W
LEVEL
VOL
VOL
3D SOUND PLUS DRC
TV MUTE TV INFO
AUTO POWER
REPEAT DIMMER
OPTICAL
MUTE (Tornillo: 2EA)
(Soporte-tornillo: 2EA)
Mando a distancia / Pilas
(tamaño AAA) Manual del usuario Soporte de montaje
en pared Tornillo Cable USB
Cable de alimentación Adaptador Cable Aux Núcleo de ferrita toroidal
7
SPA
● DESCRIPCIÓN
descripción
PANEL FRONTAL
BOTÓN POWER Enciende y apaga la unidad Crystal Surround Air Track.
BOTÓN DE
FUNCIONES
Selecciona la entrada D.IN, AUX, BT, TV, USB.
- Con la unidad encendida, si pulsa el botón ( ) durante más de
3 segundos el botón se define para que actúe como el botón de
SILENCIO.Para cancelar la configuración del botón SILENCIO,
pulse de nuevo el botón ( ) durante más de 3 segundos.
VOLUMEN +/- Controla el nivel del volumen.
PANTALLA Muestra el modo actual.
ƒ Cuando encienda la unidad, pasarán entre 4 y 5 segundos antes de poder reproducir sonido.
1 2 3
4
8
TERMINAL DEL
CONECTOR DEL
SUBWOOFER
Conecta la clavija del conector del Subwoofer.
ENTR. ALIM.
ELÉCTRICA
Conecte el terminal del adaptador de alimentación de CA a la toma de
alimentación y, a continuación, enchufe el adaptador de alimentación
de CA a la toma de corriente.
PUERTO USB
Conecte aquí los dispositivos USB como reproductores MP3 para
reproducir archivos en los dispositivos.
- Utilice el cable USB suministrado si ha instalado el producto en una
pared.
ENTR. ÓPTICA Se conecta a la salida digital (óptico) de un dispositivo externo.
5 ENTR. AUX. Se conecta a la salida analógica de un dispositivo externo.
ƒ Al desconectar el cable de alimentación del adaptador de alimentación de CA, sujete el
enchufe. No tire del cable.
ƒ No conecte esta unidad u otros componentes a la toma de CA hasta haber realizado todas
las conexiones entre componentes.
descripción
PANEL POSTERIOR
INSTALACIÓN DEL NÚCLEO DE FERRITA EN EL CABLE DEL ALTAVOZ DEL SUBWOOFER
Levántelo para quitar el
cierre y abrir el núcleo.
Coloque el cable del
altavoz del Subwoofer
en el núcleo abierto.
Vuelva a cerrarlo.
3
AUX IN OPTICAL IN
5 4
1
2
9
SPA
● MANDO A DISTANCIA
mando a distancia
DESCRIPCIÓN DEL MANDO A DISTANCIA
HW-F350
Instalación de las pilas en el mando a distancia
1. Levante la tapa de la parte
trasera del mando a distancia
como se muestra.
2. Instale dos pilas de tamaño AAA.
Asegúrese de respetar los extremos “+” y "–" de
las pilas que se indican en el diagrama del interior
del compartimento.
3. Vuelva a colocar la tapa.
Basado en el uso normal
del TV, las pilas duran
aproximadamente un año.
Alcance de funcionamiento del mando a distancia
El mando a distancia se puede utilizar a una distancia de unos 7 metros (23 pies) en línea recta. También se
puede utilizar en un ángulo horizontal de hasta 30° en relación con el sensor del mando a distancia.
BOTÓN TV POWER
Enciende y apaga el TV Samsung.
POWER TV POWER
AH59-02548A
TV VOL TV CH AUDIO SYNC
AUX USB TV SOURCE
TV PRE-CH TV EXIT
SOUND EFFECT SMART VOLUME
S/W
LEVEL S/W
LEVEL
VOL
VOL
3D SOUND PLUS DRC
TV MUTE TV INFO
AUTO POWER
REPEAT DIMMER
OPTICAL
MUTE
USB
Se pulsa para activar el modo USB.
TV EXIT
Sale del TV (funciona igual que el
botón EXIT del mando a distancia
del TV).
TV INFO, TV PRE-CH
Muestra el estado actual del TV.
Va al canal de TV anterior.
DRC
Puede utilizar esta función para disfrutar
del sonido Dolby Digital para ver
películas con un volumen bajo por la
noche (Standard, MAX, MIN).
TV SOURCE
Se pulsa para seleccionar una fuente
de vídeo del TV.
MUTE
Silencia el sonido de la unidad. Se
pulsa de nuevo para recuperar el
sonido con el nivel de volumen anterior.
AUTO POWER, DIMMER
Sincroniza el Air Track a través de la
conexión Óptica a través de la toma
óptica para que se encienda
automáticamente al encender el TV.
Puede controlar el brillo de la pantalla.
SMART VOLUME
Regula y estabiliza el nivel de
volumen frente a un cambio drástico
de volumen.
BOTÓN POWER
Enciende y apaga la unidad Crystal
Surround Air Track.
REPEAT
Selecciona Repetir todo, Todo,
Aleatorio.
AUX
Se pulsa para activar el modo AUX.
BOTÓN DE CONTROL
Reproduce, hace una pausa o detiene
la reproducción de un archivo de
música, o permite buscar el archivo
de música siguiente o anterior.
OPTICAL
Se pulsa para activar el modo Óptico.
SOUND EFFECT
Selecciona el efecto de sonido:
(MUSIC, NEWS, DRAMA, CINEMA,
SPORTS, GAME, OFF (Sonido
original))
S/W LEVEL, VOLUME
Ajusta el nivel del Subwoofer.
Ajusta el nivel de volumen de la unidad.
VOLUMEN DEL TV
Ajusta el nivel de volumen del TV.
CANAL DE TV, AUDIO SYNC
Cambia entre los canales de TV
disponibles.
Se utiliza para ayudar a sincronizar el vídeo
con el audio al conectarse a un TV digital.
TV MUTE
Silencia el sonido del TV. Se pulsa
de nuevo para recuperar el sonido
con el nivel de volumen anterior.
3D SOUND PLUS
Con esta opción se genera el sonido del
TV en su SAT a través de la conexión de
Bluetooth y controla el sonido.
10
mando a distancia
DESCRIPCIÓN DEL MANDO A DISTANCIA
HW-F355
BOTÓN TV POWER
Enciende y apaga el TV Samsung.
USB, Bluetooth
Se pulsa para activar el modo USB/
Bluetooth.
AUDIO SYNC
Se utiliza para ayudar a sincronizar el vídeo
con el audio al conectarse a un TV digital.
TV INFO, TV PRE-CH
Muestra el estado actual del TV.
Va al canal de TV anterior.
DRC
Puede utilizar esta función para disfrutar
del sonido Dolby Digital para ver
películas con un volumen bajo por la
noche (Standard, MAX, MIN).
TV SOURCE
Se pulsa para seleccionar una fuente
de vídeo del TV.
MUTE
Silencia el sonido de la unidad. Se
pulsa de nuevo para recuperar el
sonido con el nivel de volumen anterior.
SoundShare
Con esta opción se genera el sonido del TV
en su SAT a través de la conexión de
Bluetooth y controla el sonido.
AUTO POWER
Sincroniza el Air Track a través de la
conexión Óptica a través de la toma
óptica para que se encienda
automáticamente al encender el TV.
SMART VOLUME
Regula y estabiliza el nivel de
volumen frente a un cambio drástico
de volumen.
BOTÓN POWER
Enciende y apaga la unidad Crystal
Surround Air Track.
REPEAT
Selecciona Repetir todo, Todo, Aleatorio.
AUX
Se pulsa para activar el modo AUX.
BOTÓN DE CONTROL
Reproduce, hace una pausa o detiene
la reproducción de un archivo de
música, o permite buscar el archivo
de música siguiente o anterior.
OPTICAL
Se pulsa para activar el modo Óptico.
SOUND EFFECT
Selecciona el efecto de sonido:
(MUSIC, NEWS, DRAMA, CINEMA,
SPORTS, GAME, OFF (Sonido
original))
S/W LEVEL, VOLUME
Ajusta el nivel del Subwoofer.
Ajusta el nivel de volumen de la unidad.
VOLUMEN DEL TV
Ajusta el nivel de volumen del TV.
CANAL DE TV
Cambia entre los canales de TV
disponibles.
TV MUTE
Silencia el sonido del TV. Se pulsa
de nuevo para recuperar el sonido
con el nivel de volumen anterior.
3D SOUND PLUS
Con esta opción se genera el sonido del
TV en su SAT a través de la conexión de
Bluetooth y controla el sonido.
POWER TV POWER
AH59-02532A
TV VOL TV CH AUDIO SYNC
AUX TV SOURCE
TV PRE-CH DIMMER
SOUND EFFECT SMART VOLUME
VOL
VOL
DRC
TV MUTE TV INFO
OPTICAL
S/W MUTE LEVEL S/W
LEVEL
3D SOUND PLUS
AUTO POWER SoundShare
USB/
REPEAT
DIMMER
Puede controlar el brillo de la pantalla.
ƒ SAT viene de “Surround Air Track”, que es un nombre propiedad de Samsung.
ƒ El mando a distancia sólo está operativo en modo TV de Samsung.
ƒ Dependiendo del TV que utilice, es posible que no pueda controlar el TV con este mando a distancia.
Si no puede, controle el TV con el mando a distancia del TV.
11
SPA
● CONEXIONES
INSTALACIÓN DEL SOPORTE PARA MONTAJE EN PARED
Puede utilizar el soporte de montaje en pared para montar esta unidad en la pared.
ƒ No cuelgue nada de la unidad instalada y evite cualquier impacto en la unidad.
ƒ Fije bien la unidad a la pared para que no se caiga. Si la unidad se cae, puede provocar
lesiones personales o daños en el producto.
ƒ Una vez instalada la unidad en la pared, evite que los niños tiren de los cables de conexión.
ƒ Para un rendimiento óptimo en la instalación de montaje, mantenga el sistema de altavoces a
menos a una distancia de 5 cm del TV.
conexiones
Precauciones en la instalación
• Se instala sólo en una pared.
• Para la instalación, evite altas temperaturas o humedad, y también paredes que no soporten el peso del equipo.
• Compruebe la solidez de la pared. Si la pared no es lo suficientemente sólida para soportar la unidad, refuerce
la pared o instale la unidad en otra pared que pueda soportar su peso.
• Compre y utilice los tornillos de fijación o colgadores apropiados para el tipo de pared (pladur, hierro, madera,
etc.). Si es posible, fije los tornillos del soporte con tacos.
• Conecte los cables desde la unidad a los dispositivos externos antes de instalarlo en la pared.
• Asegúrese de tener apagada y desenchufada la unidad antes de realizar la instalación. De lo contrario, podría
provocar una descarga eléctrica.
1. Coloque el soporte de montaje en pared en una superficie
de la pared y fíjelo con dos tornillos (no suministrados).
Si va a colocar la unidad debajo de un TV, asegúrese de
instalar el soporte de montaje en pared con la flecha ( )
colocada en el centro del TV.
Asegúrese también de que la unidad esté al menos 5 cm (2
pulg.) por debajo del TV.
2. Alinee los orificios de los tornillos en ambos lados de la
UNIDAD PRINCIPAL con los orificios de los tornillos del
SOPORTE-TORNILLO, y fíjelo con los tornillos.
3. Inserte el cable USB en la parte trasera de la unidad antes
de instalarla en la pared.
4. A continuación, coloque la unidad en las ranuras
correspondientes del soporte de montaje en la pared. Para
una instalación segura, asegúrese de que los espárragos de
montaje se deslicen de forma firme por debajo de la parte
inferior de las ranuras.
5. La instalación queda completada.
5 cm (2 pulg.) o más
1 2
12
CONEXIÓN DE UN DISPOSITIVO EXTERNO UTILIZANDO UN CABLE
DE AUDIO (ANALÓGICO) O UN CABLE ÓPTICO (DIGITAL)
En esta sección se explican dos formas (digital y analógica) de conectar la unidad al TV.
Esta unidad está equipada con una toma digital óptica y una toma analógica de audio para conectar un TV.
o
AUX IN
OPTICAL IN
AUX IN
AUDIO
OUT
L
R
Red White
Cable de audio
OPTICAL IN
OPTICAL
OUT
Cable óptico
(no suministrados)
Reproductor de
BD/DVD/
Descodificador/
Consola de juegos
Rojo Blanco
ENTR. AUX.
Conecte AUDIO IN (AUDIO) de la unidad principal a AUDIO OUT del TV o del dispositivo de fuente.
Be sure to match connector colors.
o bien,
ENTR. ÓPTICA
Conecte la entrada digital de la unidad principal a OPTICAL OUT del TV o dispositivo de fuente.
ƒ No conecte el cable de alimentación de este producto del TV a la toma de corriente hasta
realizar todas las conexiones entre componentes.
ƒ Antes de trasladar o instalar este producto, asegúrese de apagar y desconectar el cable de
alimentación.
conexiones
13
SPA
● FUNCIONES
MODO DE ENTRADA
Puede seleccionar la entrada D.IN, AUX, BT, TV o USB. Pulse el botón apropiado del mando a distancia para
seleccionar el modo que desee, o pulse ( ) para seleccionar uno entre:
Modo D.IN, AUX, BT, TV o USB.
Modo de entrada Pantalla
Entrada digital óptica D.IN
Entrada AUX AUX
Modo BLUETOOTH BT (Solo el modelo HW-F355)
Modo TV TV (Solo el modelo HW-F355)
Modo USB USB
La unidad se apaga automáticamente en los siguientes casos:
• MODO BT/TV/USB/D.IN
- Si no hay señal de audio durante 20 minutos.
• Modo AUX
- Si no se ingresa la CLAVE durante 8 horas cuando está conectado el cable.
- Si el cable AUX no se conecta antes de 20 minutos.
ƒ Utilice el cable suministrado si la memoria Flash USB no está conectada directamente en la unidad.
BLUETOOTH (SOLO EL MODELO HW-F355)
Puede utilizar el dispositivo Bluetooth para poder disfrutar de la música con un sonido estéreo de gran calidad, sin
necesidad de cables.
¿Qué es Bluetooth?
Bluetooth es una tecnología que permite que los dispositivos externos compatibles con Bluetooth puedan
fácilmente interconectarse entre sí utilizando una conexión inalámbrica corta.
• Un dispositivo Bluetooth puede causar ruidos o un funcionamiento defectuoso, dependiendo del uso, cuando:
- Una parte del cuerpo está en contacto con el sistema de recepción/transmisión del dispositivo
Bluetooth o del Air Track.
- Exista variación eléctrica por obstrucciones causadas por una pared, un rincón o paneles de división de
la oficina.
- Esté expuesto a interferencias eléctricas de dispositivos con la misma banda de frecuencia incluido
equipo médico, hornos microondas y LAN inalámbrica.
• Empareje el Air Track con el dispositivo Bluetooth a una distancia corta.
• Cuando mayor sea la distancia entre el Air Track y el dispositivo Bluetooth, peor será la calidad.
Si la distancia sobrepasa el alcance de funcionamiento de Bluetooth, se pierde la conexión.
• En áreas con sensibilidad/recepción pobre es posible que la conexión Bluetooth no funcione
correctamente.
• La conexión Bluetooth sólo funciona cuando está cerca del equipo. La conexión se corta
automáticamente si la distancia es superior a la indicada. Incluso dentro de esta distancia, es posible que
la calidad del sonido se degrade debido a obstáculos como muros o puertas.
• El dispositivo inalámbrico puede causar interferencias eléctricas durante su funcionamiento.
funciones
POWER TV POWER
HW-F350
AUX USB TV SOURCE
AUTO POWER
REPEAT DIMMER
OPTICAL AUX USB TV SOURCE
AUTO POWER
REPEAT DIMMER
OPTICAL AUX USB PTICAL
HW-F355
OPTICAL AUX TV SOURCE
AUTO POWER SoundShare
USB/
REPEAT
OPTICAL AUX TV SOURCE
AUTO POWER SoundShare
USB/
REPEAT
OPTICAL AUX
14
funciones
Para conectar el Air Track a un dispositivo Bluetooth
Compruebe si el dispositivo Bluetooth admite la función de cascos con auriculares estéreo compatibles con
Bluetooth.
Conectar
Dispositivo Bluetooth
1. Pulse el botón USB/Bluetooth del mando a distancia de Air Track para ver el mensaje de BT.
• La pantalla del Air Track mostrará WAIT durante 4 segundos y luego BT READY.
2.Seleccione el menú de Bluetooth o el dispositivo Bluetooth que desea conectar. (Consulte el manual del
usuario del dispositivo Bluetooth.)
3.Seleccione el menú de los cascos estéreo en un dispositivo Bluetooth.
• Podrá ver la lista de dispositivos rastreados.
4. Seleccione "[Samsung] AirTrack" en la lista.
• Cuando se conecte el Air Track al dispositivo Bluetooth, aparecerá BT CONNECTED ➡ BT en la pantalla
frontal.
• Si el dispositivo Bluetooth no se empareja con al Air Track, borre el "[Samsung] AirTrack" anteriormente
encontrado por el dispositivo Bluetooth y realice una búsqueda del Air Track de nuevo.
5. Reproduzca música en el dispositivo conectado.
• Puede escuchar la música que se esté reproduciendo en el dispositivo Bluetooth conectado desde el
sistema Crystal Surround Air Track.
• El modo BT, las funciones Reproducir/Repetir/Parar/Siguiente/Anterior no están disponibles.
ƒ Es posible que se le pida que introduzca un código PIN (contraseña) al conectar el dispositivo
Bluetooth al Air Track. Si aparece la ventana de introducción del código PIN, introduzca <0000>.
ƒ El Air Track admite datos SBC (44,1 kHz, 48 kHz).
ƒ La función AVRCP no se admite.
ƒ Conecte sólo a un dispositivo Bluetooth que admita la función A2DP (AV).
ƒ No puede conectar a un dispositivo Bluetooth que admita sólo la función HF (manos libres).
ƒ Sólo es posible emparejar un dispositivo Bluetooth al mismo tiempo.
ƒ Una vez que se haya desactivado el Air Track y se haya desconectado el emparejamiento, éste no se
recuperará automáticamente. Para volver a conectar, debe emparejar de nuevo el dispositivo.
ƒ La búsqueda o la conexión no se pueden realizar correctamente con el Air Track en los siguientes casos:
- Si hay un campo eléctrico potente alrededor del Air Track.
- Si varios dispositivos Bluetooth están simultáneamente emparejados con Air Track.
- Si el dispositivo Bluetooth está desactivado, no está en su sitio o sufre una avería.
- Tenga en cuenta que dispositivos como hornos microondas, adaptadores de LAN inalámbrica,
luces fluorescentes y hornos de gas utilizan el mismo rango de frecuencias que el dispositivo
Bluetooth, que puede causar interferencias eléctricas.
15
SPA
● FUNCIONES
Para desconectar el dispositivo Bluetooth del Air Track
Puede desconectar el dispositivo Bluetooth del Air Track. Para obtener instrucciones, consulte el manual del
usuario del dispositivo Bluetooth.
• Air Track se desconectará.
• Cuando se desconecte Air Track del dispositivo Bluetooth, Air Track mostrará BT DISCONNECTED en la
pantalla frontal.
Para desconectar Air Track del dispositivo Bluetooth
Pulse el botón ( ) del panel lateral del Air Track para cambiar de BT a otro modo o para apagar el Air Track.
• El dispositivo Bluetooth conectado esperará una respuesta del Air Track durante cierto tiempo antes de
terminar la conexión.
(El tiempo de desconexión puede diferir dependiendo del dispositivo Bluetooth.)
• Se desconectará el dispositivo actualmente conectado.
ƒ En el modo de conexión Bluetooth, la conexión Bluetooth se perderá si la distancia entre el Air Track y
el dispositivo Bluetooth supera los 5 m.
ƒ Si el dispositivo Bluetooth vuelve a recuperar la distancia efectiva y se conecta de nuevo tras
desconectar, puede volver a intentar recuperar el emparejamiento con el dispositivo Bluetooth.
ƒ El Air Track se apaga automáticamente después de 20 minutos en modo Listo.
SOUNDSHARE (SOLO EL MODELO HW-F355)
En esta sección se explica la forma de conectar el Crystal Surround Air Track a TV SAMSUNG compatibles con
Bluetooth.
Para conectar el Crystal Surround Air Track a un TV Samsung
compatible con Bluetooth
Conexión
Toque el botón ( ) para seleccionar el modo TV y, a continuación, conecte el TV al Crystal Surround Air Track.
• La unidad reproducirá el audio del TV cuando esté conectado al TV.
• Si cambia a otro modo excepto el modo TV SoundShare o lo apaga, oirá el audio de nuevo desde el TV.
Para reproducir sonido del TV en el Air Track a través de la conexión Bluetooth, primero tiene que emparejar el
sistema al TV compatible con Bluetooth.Una vez establecido el emparejamiento, la información de emparejamiento
se registra y se guarda, y no aparecerá más el mensaje de conexión Bluetooth.Mantenga el Air Track y el TV juntos
al realizar el emparejamiento.
16
funciones
1. Encienda el TV Samsung y el Air Track.
• Establezca Add New Device (Añadir nuevo dispositivo) del menú SoundShare Setting (Config. SoundShare)
del TV en On (Activado).
2. Cuando cambie el modo del Air Track al TV, aparecerá un mensaje preguntando si desea continuar con el
emparejamiento Bluetooth. Aparece el mensaje "[Samsung] AirTrack" en la pantalla del TV.
3. Seleccione en la pantalla del TV y se completará el emparejamiento con el Air Track.
• Una vez establecido el emparejamiento, cuando cambie el modo TV desde otro modo de entrada, se
conectará automáticamente al TV.
• Si se cambia el Air Track desde el modo TV a otro modo, se cancelará la conexión SoundShare.
• Si desea cancelar el emparejamiento existente en SAT y empareja SAT con un TV nuevo,
- Pulse el botón REPRODUCIR/PAUSA del SAT durante 5 segundos en el modo de entrada de TV para
cancelar el emparejamiento existente. Ahora puede emparejarlo con un TV diferente.
• Puede controlar el volumen y el silencio utilizando tanto el mando a distancia del TV y el mando a distancia
de SAT en el modo SoundShare.
ƒ Alcance de funcionamiento de TV SoundShare
- Rango de emparejamiento recomendado: no más de 50 cm
- Rango de funcionamiento recomendado: no más de 5 m
ƒ Si la distancia entre el SAT y el TV Samsung es superior a 5 m, puede cortarse la conexión o el sonido.
Si esto sucede, conecte de nuevo al dispositivo Bluetooth dentro del alcance de funcionamiento.
ƒ Asegúrese de que esté activo el modo SoundShare del TV Samsung antes de utilizar esta función.
ƒ Los botones REPRODUCIR, SIGUIENTE, ANTERIOR, PARAR no funcionarán en el modo SoundShare.
ƒ Función de activación de espera Bluetooth
- El Air Track se encenderá automáticamente cuando encienda el TV si ha conectado el TV y el Air Track
con la función SoundShare.
- Puede activar/desactivar esta función pulsando la tecla de ( ) durante más de 5 segundos cuando el
Air Track está apagado. Si desactiva esta función, el producto se apagará automáticamente, pero no se
activará automáticamente.
- Esta función es compatible con TV fabricados a partir de 2013.
ƒ La función SoundShare es compatible con determinados modelos fabricados a partir de 2012.
Compruebe si su TV admite la función. (Para más información, consulte la guía del usuario del TV.)
USB
1. Conecte el dispositivo USB al puerto USB del lateral de la unidad.
2.Pulse el botón ( ) del panel lateral del Air Track de forma repetida hasta que aparezca USB.
3.Aparece en pantalla USB y, a continuación, desaparece.
• Conexión de Crystal Surround Air Track completada.
• Se apaga automáticamente (Auto Power Off) si no se ha conectado ningún dispositivo USB durante más de
20 minutos.
Antes de conectar un dispositivo USB
Tenga en cuenta lo siguiente:
• Si una carpeta o un nombre de archivo en un dispositivo USB
supera los 10 caracteres, no aparece en la OLED.
• Es posible que este producto no sea compatible con ciertos tipos
de soportes de almacenamiento USB.
• Se admiten los sistemas de archivos FAT16 y FAT32.
- No se admite el sistema de archivos NTFS.
17
SPA
● FUNCIONES
• Conecte el dispositivo USB directamente al puerto USB de este producto. De lo contrario, es posible
que detecte un problema de compatibilidad de USB.
• No conecte varios dispositivos de almacenamiento al producto a través del lector de varias tarjetas.
Puede que no funcione correctamente.
• No se admiten los protocolos PTP de cámaras digitales.
• No retire el dispositivo USB mientras se lee.
• No se reproducirán los archivos de música con protección DRM (MP3, WMA) de un sitio web comercial.
• No se admiten HDD externos.
• No se admiten los dispositivos de teléfonos móviles.
• Lista de compatibilidad
Formato Códec
*.mp3
MPEG 1 Layer2
MPEG 1 Layer3
MPEG 2 Layer3
*.wma Wave_Format_MSAudio1
Wave_Format_MSAudio2
*.aac
AAC
AAC-LC
HE-AAC
*.wav -
*.Ogg OGG 1.1.0
*.Flac FLAC 1.1.0, FLAC 1.2.1
※Admite una velocidad de muestreo superior a 16 KHz
UTILIZACIÓN DEL MANDO A DISTANCIA
Reproducir / Pausa / Detener
Durante la reproducción, pulse el botón ►,.
• Pulse de nuevo el botón ► para detener temporalmente la reproducción
del archivo.
Pulse el botón ► para reproducir el archivo seleccionado.
• Para detener la reproducción, pulse el botón Parar () durante la reproducción.
Salto adelante/atrás
Durante la reproducción, pulse el botón #,$.
• Cuando hay más de un archivo y pulsa el botón $, se selecciona el
archivo siguiente.
• Cuando hay más de un archivo y pulsa el botón #, se selecciona el
archivo anterior.
Utilización de la función REPEAT
Repetir reproducción le permite reproducir de forma repetida un archivo,
repetir todo, reproducir archivos de forma aleatoria o desactivar la repetición.
Pulse el botón REPEAT.
• REPETIR DES.: Cancela la repetición de reproducción.
• REPETIR ARCHIVO: Repite la reproducción de una pista.
• REPETIR TODO: Repite la reproducción de todas las pistas.
• REPETICIÓN ALEATORIA: Reproduce las pistas en forma aleatoria.
(Una pista ya reproducida puede reproducirse de nuevo.)
ƒ Puede definir la función REPETIR durante la reproducción de
música desde una unidad USB.
HW-F350 TV PRE-CH TV EXIT
SOUND EFFECT SMART VOLUME
TV MUTE TV INFO TV PRE-CH TV EXIT
SOUND EFFECT SMART VOLUME
TV MUTE TV INFO
HW-F355
HW-F350 TV PRE-CH TV EXIT
SOUND EFFECT SMART VOLUME
TV MUTE TV INFO TV PRE-CH TV EXIT
SOUND EFFECT SMART VOLUME
TV MUTE TV INFO
HW-F355
HW-F350
TV VOL TV CH AUDIO SYNC
AUTO POWER
REPEAT DIMMER
TV VOL TV CH AUDIO SYNC
AUTO POWER
DIMMER
HW-F355
TV VOL TV CH AUDIO SYNC
AUTO POWER SoundShare
REPEAT
TV VOL TV CH AUDIO SYNC
AUTO POWER SoundShare
18
funciones
Silenciamiento del sonido
Esta función resulta de utilidad para contestar a un timbre o a una llamada
de teléfono.
1.Para silenciar la unidad, pulse el botón MUTE del mando a distancia.
2.Para silenciar el TV, pulse el botón TV MUTE ( ) del mando a
distancia.
3.Pulse MUTE / TV MUTE ( ) en el mando a distancia de nuevo
(o pulse VOLUME +/–) para recuperar el sonido.
Utilización de la función 3D SOUND PLUS
La función 3D Sound Plus añade profundidad y sensación de espacio al sonido.
Pulse 3D SOUND PLUS en el mando a distancia.
• Cada vez que pulse el botón, la selección cambiará como se muestra a
continuación : 3D SOUND PLUS OFF ➡ 3D SOUND PLUS MUSIC ➡ 3D
SOUND PLUS MOVIE
ƒ Cuando active 3D Sound Plus, el efecto de sonido cambiará
automáticamente a OFF.
Utilización de la función SMART VOLUME
Este botón regulará y estabilizará el nivel de volumen frente a un cambio
drástico de volumen en caso de que se produzca un cambio de canal o una
transición de escenas.
Pulse SMART VOLUME del mando a distancia.
• Cada vez que pulse el botón, la selección cambiará como se muestra
a continuación : SMART VOLUME ON ➡ SMART VOLUME OFF
Utilización de la función SOUND EFFECT
Puede seleccionar entre 7 modos de sonido de campo diferentes -MUSIC,
NEWS, DRAMA, CINEMA, SPORTS, GAME, OFF (Sonido original)-
dependiendo del tipo de fuente que desee escuchar.
Pulse SOUND EFFECT en el mando a distancia.
• Seleccione el modo OFF si desea disfrutar del sonido original.
ƒ Se recomienda seleccionar un efecto de sonido basándose en el
material de origen y en sus preferencias personales.
ƒ Cuando elija el efecto de sonido (excepto OFF), 3D Sound Plus se
desactivará automáticamente.
Utilización de la función S/W LEVEL
Puede controlar el volumen básico con la tecla S/W Level del mando a distancia.
1.Pulse el botón S/W LEVEL del mando a distancia.
2. “SW 0” aparece en pantalla.
3.Pulse el botón o en la tecla LEVEL si desea subir o bajar el volumen
del subwoofer. Puede definirlo de SW-6 a SW+6.
HW-F350 TV PRE-CH TV EXIT
SOUND EFFECT SMART VOLUME
S/W
LEVEL S/W
LEVEL
VOL
VOL
3D SOUND PLUS DRC
TV MUTE TV INFO
MUTE
TV PRE-CH TV EXIT
SOUND EFFECT SMART VOLUME
S/W LEVEL S/W
LEVEL
VOL
VOL
3D SOUND PLUS DRC
TV MUTE TV MUTE TV INFO
HW-F355
HW-F350
LEVEL LEVEL
VOL
3D SOUND PLUS DRC
LEVEL LEVEL
VOL
3D SOUND PLUS
HW-F355 3D SOUND DRC
HW-F350 SOUND EFFECT SMART VOLUME
S/W S/W
VOL
MUTE
SOUND EFFECT SMART VOLUME
S/W S/W
VOL
MUTE
SMART VOLUME
HW-F355
HW-F350 SOUND EFFECT SMART VOLUME
S/W S/W
VOL
S/W MUTE S/W
VOL
MUTE
SOUND EFFECT
HW-F355
HW-F350 S/W
LEVEL S/W
LEVEL S/W MUTE LEVEL S/W LEVEL S/W MUTE LEVEL S/W
LEVEL
HW-F355
19
SPA
● FUNCIONES
Utilización de la función AUTO POWER LINK
El Crystal Surround Air Track se activa automáticamente al encender el TV
o cualquier dispositivo conectado a Air Track con el cable óptico.
Pulse AUTO POWER en el mando a distancia de esta unidad.
• La función de enlace potente automático se activa y se desactiva cada
vez que pulse AUTO POWER.
AUTO POWER LINK Pantalla
ON POWER LINK ON
OFF POWER LINK OFF
ƒ Si está apagado el TV o cualquier dispositivo conectado al Air Track
con el cable óptico y no hay ninguna entrada digital, el Air Track se
apaga transcurridos 20 minutos.
Utilización de la función DIMMER
Puede Dimmer para controlar el brillo de la pantalla.
Pulse DIMMER en el mando a distancia de esta unidad.
• Cada vez que pulse el botón, la selección cambiará como se muestra a
continuación : DIMMER ON ➡ DIMMER OFF
Utilización de la función AUDIO SYNC
Es posible que el vídeo llegue más tarde que al audio cuando esté
conectado el Air Track a un TV digital. Si esto ocurre, ajuste el tiempo de
demora de audio para que coincida con el vídeo.
Pulse AUDIO SYNC +/–. en el mando a distancia de esta unidad.
• Puede utilizar el botón para definir el tiempo de demora de audio entre 0
ms y 300 ms.
ƒ En modo USB, TV o BT, es posible que la función de
sincronización de audio no esté operativa.
Utilización de la función DRC
Esta función equilibra el rango entre los sonidos más altos y más bajos.
Puede utilizar esta función para disfrutar del sonido Dolby Digital para ver
películas con un volumen bajo por la noche.
Pulse DRC en el mando a distancia de esta unidad.
• Cada vez que pulse el botón, la selección cambiará como se muestra a
continuación : DRC STANDARD ➡ DRC MAX ➡ DRC MIN
HW-F350 AUTO POWER
REPEAT DIMMER
HW-F355 OPTICAL AUX TV SOURCE
AUTO POWER SoundShare
USB/
REPEAT
OPTICAL AUX TV SOURCE
AUTO POWER SoundShare
USB/
REPEAT
AUTO POWER
HW-F350
TV VOL TV CH AUDIO SYNC
AUTO POWER
REPEAT DIMMER
TV VOL TV CH AUDIO SYNC
AUTO POWER
REPEAT
HW-F355 TV PRE-CH DIMMER
SOUND EFFECT SMART VOLUME
TV MUTE TV INFO TV PRE-CH DIMMER
SOUND EFFECT SMART VOLUME
TV MUTE TV INFO DIMMER
HW-F350
TV VOL TV CH AUDIO SYNC
TV MUTE TV INFO TV PRE CH TV EXIT
TV VOL TV CH AUDIO SYNC
TV MUTE TV INFO TV PRE CH TV EXIT
AUDIO SYNC
HW-F355
HW-F350 LEVEL LEVEL
VOL
3D SOUND PLUS DRC
MUTE LEVEL LEVEL
VOL
3D SOUND PLUS DRC
MUTE
HW-F355
20
funciones
Utilización de la función TV (Solo con TV Samsung)
• Pulse TV SOURCE en el mando a distancia para cambiar la fuente de
entrada del TV.
• Pulse TV INFO en el mando a distancia para ver la información del canal
de TV.
• Pulse TV CH en el mando a distancia para seleccionar el canal de TV.
• Pulse TV VOL en el mando a distancia para subir o bajar el nivel de
volumen.
• Utilice el botón TV PRE-CH para ir al canal de TV anterior en modo TV.
• Para salir del menú de TV, utilice el botón TV EXIT. (Funciona igual que
el botón EXIT del mando a distancia del TV.)
ƒ Cuando pulse el botón SoundShare, el sonido del TV se transmite
a través del sistema del Air Track a través de la conexión Bluetooth.
El Air Track también controla el volumen del sonido, la calidad del
sonido, etc.
ƒ El mando a distancia sólo está operativo en modo TV de SAMSUNG.
ACTUALIZACIÓN DE SOFTWARE
Samsung puede ofrecer en el futuro actualizaciones para el firmware
del sistema de Crystal Surround Air Track.
Si existe una actualización, puede actualizar el firmware conectando una
unidad USB con la actualización de firmware al puerto USB del Air
Track.
Tenga en cuenta que si hay varios archivos de actualización, debe
cargarlos en la unidad USB por separado y usarlos para actualizar el
firmware de uno en uno.
Visite Samsung.com o póngase en contacto con el centro de atención
al cliente de Samsung para recibir información sobre la descarga de
archivos de actualizaciones.
ƒ Inserte en el puerto USB de la unidad principal una unidad USB que contenga la actualización del firmware.
ƒ Tenga cuidado de no desconectar la alimentación o retirar la unidad USB mientras se realizan las
actualizaciones. La unidad principal se apagará automáticamente tras completar la actualización del
firmware. Una vez actualizado el software, los ajustes realizados volverán a sus valores predeterminados
(de fábrica). Recomendamos tomar nota de los ajustes para poder reinicializarlos tras la actualización.
ƒ Una vez completada la actualización del producto del producto, apague el producto y, a continuación,
mantenga pulsado el botón () durante un momento para reiniciar el producto.
ƒ Si no se actualiza el firmware, se recomienda formatear el dispositivo USB en FAT16 e intentarlo de nuevo.
ƒ Para actualizaciones, no formatee los datos USB en NTFS ya que no es un sistema de archivos admitido.
ƒ Dependiendo del fabricante, es posible que no se admitan algunos dispositivos de almacenamiento USB.
HW-F350
TV VOL TV CH AUDIO SYNC
AUX USB TV SOURCE
TV MUTE TV INFO TV PRE-CH TV EXIT
AUTO POWER
REPEAT DIMMER
OPTICAL
TV VOL TV CH AUDIO SYNC
AUX USB TV SOURCE
TV MUTE TV INFO TV PRE-CH TV EXIT
AUTO POWER
REPEAT DIMMER
OPTICAL
TV INFO
TV VOL TV CH
TV PRE-CH TV EXIT
TV SOURCE
HW-F355
TV VOL TV CH AUDIO SYNC
AUX TV SOURCE
TV MUTE TV INFO TV PRE-CH DIMMER
OPTICAL
AUTO POWER SoundShare
USB/
REPEAT
TV VOL TV CH AUDIO SYNC
AUX TV SOURCE
TV MUTE TV INFO TV PRE-CH DIMMER
OPTICAL
AUTO POWER SoundShare
USB/
REPEAT
TV SOURCE
TV INFO
TV VOL TV CH
TV PRE-CH
21
SPA
● SOLUCIÓN DE PROBLEMAS
Antes de solicitar servicio técnico, compruebe lo siguiente:
Síntoma Comprobación Remedio
La unidad no se encenderá. • ¿Está enchufado el cable de
alimentación en la toma de
corriente?
• Conecte el enchufe de
alimentación en la toma de
corriente.
Una función no está operativa
cuando se pulsa el botón.
• ¿Existe electricidad estática en
el ambiente?
• Desconecte la toma de
alimentación y conéctela de
nuevo.
No se produce sonido. • ¿Está la unidad debidamente
conectada al TV?
• ¿Está la función de silencio
activada?
• ¿Tiene el volumen al mínimo?
• Conéctelo correctamente.
• Pulse el botón Mute para
cancelar la función.
• Ajuste el volumen.
La imagen no aparece en un TV
cuando se selecciona la función.
• ¿Está el TV correctamente
conectado?
• Conéctelo correctamente.
El mando a distancia no funciona. • ¿Se han agotado las pilas?
• ¿Está el mando a distancia
situado a demasiada distancia
con respecto a la unidad
principal?
• Cambie las pilas.
• Acérquelo más a la unidad
principal.
Se invierte el sonido de los canales
izquierdo/derecho.
• ¿Están debidamente
conectados desde el TV los
cables de salida de audio
izquierdo/derecho?
• Compruebe el canal izquierdo/
derecho y conéctelo(s)
correctamente.
Fallo de SoundShare
(emparejamiento del TV).
• ¿Admite el TV SoundShare?
• ¿Tiene la última versión del
firmware del TV?
• ¿Se produce un error al
conectar?
• Reinicie el MODO TV y conecte
de nuevo.
• SoundShare es compatible en
los modelos de TV Samsung
comercializados después de
2012. Compruebe si su TV
admite la función.
• Actualice el TV con la versión
más reciente.
• Póngase en contacto con el
centro de atención telefónica.
• Pulse el botón durante 5
segundos para reiniciar el
producto.
solución de problemas
22
ESPECIFICACIONES
Nombre del modelo HW-F350/ HW-F355
GENERAL
USB 5V / 0,5 A
Peso
Unidad principal 1,75 kg
Subwoofer
(PS-EW1-1) 3,0 kg
Dimensiones
(Al x An x Pr)
Unidad principal 943 x 49 x 59,9 mm
Subwoofer
(PS-EW1-1) 152 x 300 x 284 mm
Rango de temperatura de servicio de +5 ºC a +35 ºC
Rango de humedad de servicio 10 % a 75 %
AMPLIFICADOR
Potencia
nominal de
salida
Unidad principal 30 W/can, 8 OHM, THD = 10%, 1 kHz
Subwoofer
(PS-EW1-1) 60 W, 3 OHM, THD = 10%, 100 Hz
Índice S/N (entrada analógica) 60dB
Separación (1 kHz) 50dB
* El índice S/N, la distorsión, la separación y la sensibilidad utilizable se basan en la medición utilizando las
instrucciones de AES (Audio Engineering Society).
*: Especificación nominal
- Samsung Electronics Co., Ltd se reserva el derecho a cambiar las especificaciones sin previo aviso.
- Los pesos y dimensiones son aproximados.
- Para la fuente de alimentación y el consumo de energía, consulte la etiqueta pegada en el producto.
En el presente documento, Samsung Electronics, declara que este Crystal Surround Air Track está en
conformidad con los requisitos esenciales y otras provisiones relevantes de la Directiva 1999/5/EC.
La Declaración de conformidad oficial puede encontrarse en http://www.samsung.com,
vaya a Asistencia al cliente > Búsqueda de productos e introduzca el nombre del modelo.
Este equipo puede utilizarse en todos los países de la UE.
apéndice
AH68-02614J-05
Contacte con SAMSUNG WORLD WIDE
Si tiene alguna pregunta o comentario acerca de productos Samsung, por favor contacte con el servicio de
atención al cliente de SAMSUNG.
[Eliminación correcta de las baterías de este
producto]
(Se aplica en países con sistemas de recolección por
separado)
La presencia de esta marca en las baterías, el manual o el paquete del producto
indica que cuando haya finalizado la vida útil de las baterías no deberán
eliminarse junto con otros residuos domésticos. Los símbolos químicos Hg, Cd
o Pb, si aparecen, indican que la batería contiene mercurio, cadmio o plomo en
niveles superiores a los valores de referencia admitidos por la Directiva 2006/66
de la Unión Europea. Si las baterías no se desechan convenientemente, estas
sustancias podrían provocar lesiones personales o dañar el medioambiente.
Para proteger los recursos naturales y promover el reciclaje, separe las baterías
de los demás residuos y recíclelas mediante el sistema de recogida gratuito de
su localidad.
Eliminación correcta de este producto
(Residuos de aparatos eléctricos y electrónicos)
(Se aplica en países con sistemas de recolección por separado)
La presencia de este símbolo en el producto, accesorios o material informativo que
lo acompañan, indica que al finalizar su vida útil ni el producto ni sus accesorios
electrónicos (como el cargador, cascos, cable USB) deberán eliminarse junto con
otros residuos domésticos. Para evitar los posibles daños al medio ambiente o a la
salud humana que representa la eliminación incontrolada de residuos, separe estos
productos de otros tipos de residuos y recíclelos correctamente. De esta forma se
promueve la reutilización sostenible de recursos materiales.
Los usuarios particulares pueden contactar con el establecimiento donde adquirieron
el producto o con las autoridades locales pertinentes para informarse sobre cómo y
dónde pueden llevarlo para que sea sometido a un reciclaje ecológico y seguro.
Los usuarios comerciales pueden contactar con su proveedor y consultar las
condiciones del contrato de compra. Este producto y sus accesorios electrónicos no
deben eliminarse junto a otros residuos comerciales.
Área Centro de Contacto � Sítio da Web
AUSTRIA 0800 - SAMSUNG (0800 -
7267864) www.samsung.com/at/support
BELGIUM 02-201-24-18
www.samsung.com/be/support
(Dutch)
www.samsung.com/be_fr/
support (French)
BOSNIA 051 331 999 www.samsung.com/support
BULGARIA 07001 33 11 , sharing cost www.samsung.com/bg/support
CROATIA 062 726 786 www.samsung.com/hr/support
CZECH 800 - SAMSUNG (800-726786) www.samsung.com/cz/support
DENMARK 70 70 19 70 www.samsung.com/dk/support
FINLAND 030-6227 515 www.samsung.com/fi/support
FRANCE 01 48 63 00 00 www.samsung.com/fr/support
GERMANY
0180 6 SAMSUNG bzw.
0180 6 7267864*
(*0,20 €/Anruf aus dem dt.
Festnetz, aus dem Mobilfunk
max. 0,60 €/Anruf)
www.samsung.com/de/support
CYPRUS 8009 4000 only from landline, toll
free
www.samsung.com/gr/support
GREECE
80111-SAMSUNG (80111 726
7864) only from land line
(+30) 210 6897691 from mobile
and land line
HUNGARY 0680SAMSUNG (0680-726-786)
0680PREMIUM (0680-773-648)
http://www.samsung.com/hu/
support
ITALIA 800-SAMSUNG (800.7267864) www.samsung.com/it/support
LUXEMBURG 261 03 710 www.samsung.com/support
Área Centro de Contacto � Sítio da Web
MONTENEGRO 020 405 888 www.samsung.com/support
SLOVENIA 080 697 267
090 726 786 www.samsung.com/si/support
NETHERLANDS 0900-SAMSUNG (0900-7267864)
(€ 0,10/Min) www.samsung.com/nl/support
NORWAY 815 56480 www.samsung.com/no/support
POLAND
0 801-172-678* lub +48 22
607-93-33 **
* (całkowity koszt połączenia jak za
1 impuls według taryfy operatora)
** (koszt połączenia według
taryfy operatora)
www.samsung.com/pl/support
PORTUGAL 808 20 7267 www.samsung.com/pt/support
ROMANIA 08008 SAMSUNG (08008 726
7864) TOLL FREE No. www.samsung.com/ro/support
SERBIA 011 321 6899 www.samsung.com/rs/support
SLOVAKIA 0800 - SAMSUNG(0800-726 786) www.samsung.com/sk/support
SPAIN 0034902172678 www.samsung.com/es/support
SWEDEN 0771 726 7864 (SAMSUNG) www.samsung.com/se/support
SWITZERLAND 0848 726 78 64
(0848-SAMSUNG)
www.samsung.com/ch/support
(German)
www.samsung.com/ch_fr/
support (French)
U.K 0330 SAMSUNG (7267864) www.samsung.com/uk/support
EIRE 0818 717100 www.samsung.com/ie/support
LITHUANIA 8-800-77777 www.samsung.com/lt/support
LATVIA 8000-7267 www.samsung.com/lv/support
ESTONIA 800-7267 www.samsung.com/ee/support
Crystal Surround Air Track
(Sistema de colunas activas)
manual do utilizador
imagine as possibilidades
Obrigado por ter adquirido um produto Samsung.
Para receber assistência completa, registe o produto
em
www.samsung.com/register
HW-F350
HW-F355
2
funcionalidades
SoundShare (Partilha de Som)
A função SoundShare reproduz o som do televisor no SAT por ligação Bluetooth e controla o som.
3D SOUND PLUS (Som 3D Plus)
A função 3D SOUND PLUS (SOM 3D PLUS) confere maior profundidade e amplitude à experiência auditiva.
Modo de som especial
Pode seleccionar entre sete modos de campo acústico diferentes (MUSIC, NEWS, DRAMA, CINEMA, SPORTS, GAME,
OFF (Som original)) consoante o tipo de conteúdo que pretender ouvir.
Controlo remoto multi-funções
O controlo remoto fornecido pode ser utilizado para controlar o televisor ligado a esta unidade. (Funciona apenas com
televisores da Samsung)
O controlo remoto inclui uma tecla activa de TV que permite executar várias operações através de um único botão.
Sistema de colunas activas
Esta unidade inclui o sistema de colunas activas que proporciona som de elevada qualidade numa unidade de dimensões
reduzidas. Esta unidade não requer qualquer coluna satélite nem cabos, elementos normalmente necessários em sistemas
de som surround convencionais.
Suporte de Anfitrião USB
Pode ligar e reproduzir ficheiros de música a partir de dispositivos de armazenamento USB externos, tais como leitores de
MP3, memória flash USB, etc., utilizando a função USB HOST do Air Track.
Função Bluetooth
Pode ligar um dispositivo Bluetooth a SAT e ouvir música com som estéreo de alta qualidade, sem fios!
LICENÇAS
Fabricado sob licença da Dolby Laboratories. Dolby e o símbolo de duplo-D são marcas comerciais da Dolby Laboratories.
Fabricado ao abrigo das licenças de patentes americanas nºs: 5,956,674; 5,974,380; 6,487,535 & outras
patentes americanas e mundiais emitidas e pendentes. DTS, o símbolo, e DTS e o respectivo símbolo em
conjunto são marcas comerciais registadas e DTS 2.0 Channel é uma marca comercial da DTS, Inc. O
produto inclui software. © DTS, Inc. Todos os direitos reservados.
- Para enviar dúvidas ou questões relativamente a software “open source”, contacte a Samsung por e-mail
(oss.request@samsung.com).
3
POR
informações de segurança
COMPONENTES INCLUÍDOSAVISOS DE SEGURANÇA
PARA REDUZIR O RISCO DE CHOQUES ELÉCTRICOS, NÃO RETIRE A TAMPA POSTERIOR.
O INTERIOR NÃO CONTÉM PEÇAS PASSÍVEIS DE REPARAÇÃO PELO UTILIZADOR. A MANUTENÇÃO DEVE SER EFECTUADA
POR PESSOAL TÉCNICO QUALIFICADO.
ATENÇÃO
RISCO DE CHOQUE
ELÉCTRICO.NÃO ABRIR.
Este símbolo indica a existência de "tensão
perigosa" no interior do aparelho, o que
representa risco de choque eléctrico ou
ferimentos.
Este símbolo identifica informações
importantes que acompanham o produto
AVISO : Para reduzir o risco de fogo ou de choque elétrico, não exponha este aparelho à chuva ou à humidade.
CUIDADO : Para evitar choques eléctricos, insira totalmente a parte larga da ficha na ranhura larga.
• Este aparelho deve ser sempre ligado a uma tomada com ligação à terra.
• Para desligar o aparelho da corrente, tem de retirar a ficha da tomada eléctrica, pelo que a ficha tem de
estar facilmente acessível.
CUIDADO
• Não exponha o aparelho a gotas ou salpicos. Não coloque objectos com líquidos, tais como vasos, em
cima do aparelho.
• Para desligar completamente o aparelho, tem de desligar o cabo de alimentação da tomada de parede.
Por este motivo, o cabo de alimentação tem de estar sempre facilmente acessível.
4
PRECAUÇÕES
Certifique-se de que a fonte de alimentação de CA em sua casa está em conformidade com o indicado no autocolante de identificação,
situado na parte de trás do produto. Instale o produto na horizontal, sobre uma base adequada (móvel), com espaço suficiente para
permitir a ventilação (7~10 cm). Certifique-se de que os orifícios de ventilação não estão tapados. Não coloque a unidade sobre
amplificadores ou sobre outro tipo de equipamento que possa aquecer. Esta unidade foi concebida para uma utilização contínua. Para
desligar completamente a unidade, desligue a ficha CA da tomada de parede. Desligue a unidade quando não tencionar utilizá-la durante
muito tempo.
Durante trovoadas, desligue a ficha de corrente da rede eléctrica.
Os picos de tensão durante uma trovoada podem danificar a unidade.
Proteja o produto da humidade (por exemplo, vasos) e de calor
(por exemplo, uma lareira) ou de equipamento que crie campos
magnéticos ou eléctricos fortes. Desligue o cabo de alimentação
da tomada eléctrica se a unidade não funcionar correctamente.
O produto não se destina a utilização industrial. Utilize este
produto apenas para fins pessoais.
Pode ocorrer condensação se o produto ou o disco tiverem sido
arm zenados em temperaturas baixas. Se transportar a unidade
no Inverno, aguarde aproximadamente 2 horas para que a
unidade fique à temper tura ambiente, antes de utilizar.
Não exponha a unidade à luz solar directa nem a outras fontes de calor.
A unidade poderá sobreaquecer e ficar danificada.
As pilhas utilizadas neste produto contêm químicos nocivos para o
ambiente.
Não deite as pilhas no lixo doméstico.
Não elimine as pilhas através de fogo.
Não provoque um curto-circuito, não desmonte nem sobreaqueça as
pilhas.
Pode provocar uma explosão, se substituir as pilhas incorrectamente.
Substitua-as apenas pelo mesmo tipo de pilhas ou por um tipo
equivalente.
As pilhas utilizadas neste produto contêm químicos nociv
Phones
3.9 inch 3.9 inch
2.7 inch
3.9 inch 99.1mm
99.1mm 99.1mm
68.6mm
Ɣ As imagens e ilustrações neste Manual do Utilizador são fornecidas apenas para referência, podendo ser
diferentes do produto real.
Ɣ Poderá ser cobrada uma taxa administrativa se
(a) for enviado um técnico a casa do cliente, a pedido do cliente, e não existir qualquer avaria no produto
(ou seja, o utilizador não consultou devidamente o manual do utilizador).
(b) levar a unidade a um centro de reparação e não existir qualquer avaria no produto (ou seja, o utilizador
não consultou devidamente o manual do utilizador).
Ɣ O valor dessa taxa administrativa ser-lhe-á comunicado antes de ser realizada qualquer reparação ou visita
ao domicílio.
5
POR
conteúdos
FUNCIONALIDADES
2
2 Funcionalidades
2 Licenças
INFORMAÇÕES DE SEGURANÇA
3
3 Componentes incluídosavisos de segurança
4 Precauções
ANTES DE UTILIZAR
6
6 Antes de ler o manual do utilizador
6 Componentes incluídos
DESCRIÇÕES
7
7 Painel anterior
8 Painel posterior
8 Instalar o núcleo de ferrite no cabo da
coluna do subwoofer
CONTROLO REMOTO
9
9 Apresentação do controlo remoto
LIGAÇÕES
11
11 Instalar a fixação de parede
12 Ligar um dispositivo externo utilizando
um cabo de áudio (analógico) ou um cabo
óptico (digital)
RESOLUÇÃO DE PROBLEMAS
21
21 Resolução de problemas
APÊNDICE
22
22 Especificações
FUNÇÕES
13
13 Modo de entrada
13 Bluetooth (Apenas para o modelo HW-F355)
15 SoundShare (Apenas para o modelo HWF355)
16 USB
17 Utilizar o controlo remoto
20 Actualização do software
6
ANTES DE LER O MANUAL DO UTILIZADOR
Antes de proceder à leitura deste manual, tenha em atenção os seguintes termos.
Ícones utilizados no manual
Ícone Termo Definição
Cuidado Indica uma situação em que uma função não pode ser utilizada ou em que as
definições possam ter sido canceladas.
Nota Refere-se a sugestões ou instruções na página, que ajudam na utilização de
cada função.
Instruções de segurança e resolução de problemas
1) Antes de utilizar este produto, certifique-se de que está familiarizado com as instruções de
segurança. (Consulte a página 3)
2) Se surgir um problema, consulte a secção de Resolução de problemas. (Consulte a página 21)
Copyright
©2013 Samsung Electronics Co.,Ltd.
Todos os direitos reservados. Não é permitido reproduzir ou copiar partes ou a totalidade deste
manual do utilizador sem autorização prévia, por escrito, da Samsung Electronics Co., Ltd.
antes de utilizar
ƒ O aspecto real dos acessórios poderá ser ligeiramente diferente das seguintes ilustrações.
ƒ Utilize o cabo USB dedicado para ligar dispositivos USB externos à unidade.
COMPONENTES INCLUÍDOS
Verifique, abaixo, os acessórios fornecidos.
POWER TV POWER
AH59-02548A
TV VOL TV CH AUDIO SYNC
AUX USB TV SOURCE
TV PRE-CH TV EXIT
SOUND EFFECT SMART VOLUME
S/W
LEVEL S/W
LEVEL
VOL
VOL
3D SOUND PLUS DRC
TV MUTE TV INFO
AUTO POWER
REPEAT DIMMER
OPTICAL
MUTE (Parafuso: 2 EA)
(Suporte-parafuso: 2 EA)
Controlo remoto / Pilhas
(tamanho AAA) Manual do utilizador Suporte de fixação
na parede Parafuso Cabo USB
Cabo de alimentação Adaptador Cabo auxiliar Núcleo de ferrite toroidal
7
POR
● DESCRIÇÕES
descrições
PAINEL ANTERIOR
BOTÃO DE
ALIMENTAÇÃO Liga e desliga o Crystal Surround Air Track.
BOTÃO DE
FUNÇÕES
Selecciona a entrada D.IN, AUX, BT, TV, USB.
- Enquanto a unidade está ligada, premir o botão ( ) durante
mais de 3 segundos configura o botão para funcionar como o
botão MUTE (SILENCIAR). Para cancelar a configuração do
botão MUTE (SILENCIAR), prima novamente o botão
( ) durante mais de 3 segundos.
VOLUME + / - Controlo o nível do volume.
VISOR Apresenta o modo actual.
ƒ Sempre que liga esta unidade, terá de aguardar 4 a 5 segundos até que seja possível
reproduzir som.
1 2 3
4
8
descrições
PAINEL POSTERIOR
TERMINAL DO
CONECTOR DO
SUBWOOFER
Permite ligar a ficha do Subwoofer.
FONTE DE
ALIMENTAÇÃO
LIGADA
Ligue a tomada do transformador de CA à fonte de alimentação
correctamente e, em seguida, ligue a ficha do transformador de CA à
tomada de parede.
USB PORT
Pode ligar dispositivos USB, tais como leitores MP3, para reproduzir
ficheiros nos dispositivos.
- Utilize o cabo USB fornecido se o produto estiver instalado numa parede.
OPTICAL IN Liga à saída digital (óptica) de um dispositivo externo.
5 AUX IN Ligue à saída analógica de um dispositivo externo.
ƒ Ao desligar o cabo de alimentação do transformador de CA da tomada de parede,
segure a ficha. Não puxe o cabo.
ƒ Não ligue esta unidade ou outros componentes a uma tomada CA até que todas as
ligações entre componentes estejam concluídas.
INSTALAR O NÚCLEO DE FERRITE NO CABO DA COLUNA DO SUBWOOFER
Levante para
desbloquear e abrir o
núcleo.
Coloque o cabo da
coluna do Subwoofer no
núcleo aberto.
Volte a fechar o núcleo.
3
AUX IN OPTICAL IN
5 4
1
2
9
POR
● CONTROLO REMOTO
controlo remoto
APRESENTAÇÃO DO CONTROLO REMOTO
HW-F350
Colocar pilhas no controlo remoto
1. Levante a tampa na parte
posterior do controlo remoto,
como mostra a imagem.
2. Introduza duas pilhas de tamanho AAA.
Certifique-se de que faz corresponder as
extremidades “+” e “-” das pilhas com o
diagrama no interior do compartimento.
3. Coloque novamente a tampa.
Tendo como referência a utilização
típica de um televisor, as pilhas
duram cerca de um ano.
Alcance do controlo remoto
O controlo remoto pode ser utilizado até uma distância de aproximadamente 7 metros em linha recta. Também
pode ser utilizado num ângulo horizontal máximo de 30º em relação ao sensor do controlo remoto.
BOTÃO POWER LIGADO
Liga e desliga o Crystal Surround
Air Track.
BOTÃO TV POWER LIGADO
Liga e desliga o televisor
Samsung.
AUTO POWER, DIMMER
Sincroniza o Air Track através de
ligação Óptica da ficha Óptica, o que
faz com que ligue automaticamente
quando ligar o televisor. Pode controlar
a luminosidade do visor.
BOTÕES DE CONTROLO
Reproduzir, pausar ou parar a
reprodução de um ficheiro de
música ou procurar o ficheiro de
música seguinte ou anterior.
TV MUTE
Corta o som do televisor. Prima
novamente para repor o som ao
último nível de volume utilizado.
AUX
Prima para utilizar o modo AUX.
OPTICAL
Prima para utilizar o modo
Optical (Óptico).
USB
Prima para utilizar o modo USB.
TV CHANNEL , AUDIO SYNC
Alterna entre os canais do
televisor disponíveis.
Utilizado para ajudar a sincronizar
o vídeo com o áudio, quando
ligado a um televisor digital.
TV INFO,TV PRE-CH
Apresenta o estado actual da TV.
Permite aceder ao canal de TV
anterior.
REPEAT
Selecciona o modo de repetição:
Ficheiro, Todos, Aleatório.
S/W LEVEL, VOLUME
Regula o nível do volume do Subwoofer.
Ajusta o nível de volume da unidade.
TV SOURCE
Prima para seleccionar a origem de
vídeo de um televisor ligado.
TV VOLUME
Regula o nível do volume do televisor.
SOUND EFFECT
Selecciona o efeito de som: (MUSIC,
NEWS, DRAMA, CINEMA, SPORTS,
GAME, OFF (Som original)) MUTE
Corta o som da unidade. Prima
novamente para repor o som com
o último nível de volume utilizado.
DRC
Pode utilizar esta função para ouvir
som Dolby Digital quando assistir a
filmes com o volume baixo, à noite
(Standard, MAX, MIN).
TV EXIT
Permite sair do televisor (funciona da
mesma forma que o botão EXIT do
controlo remoto do televisor)
SMART VOLUME
Ajusta e estabiliza o nível do volume em
relação a uma alteração súbita do volume.
3D SOUND PLUS
Esta função adiciona
profundidade e amplitude ao som.
POWER TV POWER
AH59-02548A
TV VOL TV CH AUDIO SYNC
AUX USB TV SOURCE
TV PRE-CH TV EXIT
SOUND EFFECT SMART VOLUME
S/W
LEVEL S/W
LEVEL
VOL
VOL
3D SOUND PLUS DRC
TV MUTE TV INFO
AUTO POWER
REPEAT DIMMER
OPTICAL
MUTE
10
controlo remoto
APRESENTAÇÃO DO CONTROLO REMOTO
HW-F355
BOTÃO POWER LIGADO
Liga e desliga o Crystal Surround
Air Track.
BOTÃO TV POWER LIGADO
Liga e desliga o televisor
Samsung.
AUTO POWER
Sincroniza o Air Track através de ligação
Óptica da ficha Óptica, o que faz com
que ligue automaticamente quando ligar o
televisor.
BOTÕES DE CONTROLO
Reproduzir, pausar ou parar a
reprodução de um ficheiro de
música ou procurar o ficheiro de
música seguinte ou anterior.
TV MUTE
Corta o som do televisor. Prima
novamente para repor o som ao
último nível de volume utilizado.
AUX
Prima para utilizar o modo AUX.
OPTICAL
Prima para utilizar o modo
Optical (Óptico).
USB, Bluetooth
Prima para utilizar o modo USB/
Bluetooth.
TV CHANNEL
Alterna entre os canais do
televisor disponíveis.
AUDIO SYNC
Utilizado para ajudar a sincronizar
o vídeo com o áudio, quando
ligado a um televisor digital.
TV INFO,TV PRE-CH
Apresenta o estado actual da TV.
Permite aceder ao canal de TV anterior.
DIMMER
Pode controlar a luminosidade do
visor.
S/W LEVEL, VOLUME
Regula o nível do volume do Subwoofer.
Ajusta o nível de volume da unidade.
TV SOURCE
Prima para seleccionar a origem de
vídeo de um televisor ligado.
TV VOLUME
Regula o nível do volume do televisor.
SOUND EFFECT
Selecciona o efeito de som: (MUSIC,
NEWS, DRAMA, CINEMA, SPORTS,
GAME, OFF (Som original))
MUTE
Corta o som da unidade. Prima
novamente para repor o som com
o último nível de volume utilizado.
DRC
Pode utilizar esta função para ouvir
som Dolby Digital quando assistir a
filmes com o volume baixo, à noite
(Standard, MAX, MIN).
SMART VOLUME
Ajusta e estabiliza o nível do volume em
relação a uma alteração súbita do volume.
3D SOUND PLUS
Esta função adiciona
profundidade e amplitude ao
som.
REPEAT
Selecciona o modo de repetição:
Ficheiro, Todos, Aleatório.
POWER TV POWER
AH59-02532A
TV VOL TV CH AUDIO SYNC
AUX TV SOURCE
TV PRE-CH DIMMER
SOUND EFFECT SMART VOLUME
VOL
VOL
DRC
TV MUTE TV INFO
OPTICAL
S/W MUTE LEVEL S/W
LEVEL
3D SOUND PLUS
AUTO POWER SoundShare
USB/
REPEAT SoundShare
Reproduz o som do televisor no SAT por
ligação Bluetooth e controla o som.
ƒ SAT significa Surround Air Track e é um nome proprietário da Samsung.
ƒ O controlo remoto pode controlar apenas televisores Samsung.
ƒ Consoante o televisor, poderá não ser possível comandar a televisão com este controlo remoto.
Se não conseguir, utilize o televisor através do controlo remoto do próprio televisor.
11
POR
● LIGAÇÕES
INSTALAR A FIXAÇÃO DE PAREDE
Pode utilizar o suporte de fixação na parede desta unidade.
ƒ Não exerça força sobre a unidade instalada e tenha o cuidado de evitar impactos.
ƒ Fixe bem a unidade à parede para que não caia. Se a unidade cair, poderá provocar
danos pessoais ou danificar o produto.
ƒ Se a unidade estiver instalada numa parede, não deixe crianças puxarem os cabos de
ligação, de modo a evitar a queda do produto.
ƒ Para obter o melhor desempenho numa instalação do suporte de parede, mantenha o
sistema de colunas a uma distância de, pelo menos, 5 cm da TV.
Precauções de instalação
• Instale apenas numa parede vertical.
• No que diz respeito à instalação, evite paredes sujeitas a temperaturas elevadas ou humidade, caso
contrário a parede pode não aguentar o peso do aparelho.
• Verifique a solidez da parede. Se a parede não for suficientemente resistente para suportar a unidade,
reforce a parede ou instale a unidade noutro local que suporte o peso da unidade.
• Pode adquirir e utilizar os parafusos de fixação ou as buchas adequadas ao tipo de parede (placas de
estuque, placas de ferro, madeira, etc.). Se possível, fixe os parafusos de suporte em rebites na parede.
• Ligue os cabos a partir da unidade aos dispositivos externos antes de o instalar na parede.
• Certifique-se de que desliga a unidade antes da instalação. Caso contrário, poderá provocar um choque
eléctrico.
1. Posicione o suporte de fixação numa parede e, em
seguida, fixe-o com dois parafusos (não fornecidos).
Se pendurar a unidade sob um televisor, certifique-se de que
instala o suporte de parede de forma a que a seta ( ) fique
colocada a meio do televisor.
Certifique-se também de que a unidade se encontra a
uma distância mínima de 2 polegadas (5 cm) do televisor.
2. Alinhe os orifícios dos parafusos em ambos os lados da
UNIDADE PRINCIPAL com os orifícios das PORCAS, e
fixe com os parafusos.
3. Insira o cabo USB no painel anterior da unidade antes de
instalar o produto na parede.
4. Em seguida, encaixe a unidade nas ranhuras
correspondentes do suporte de parede. Para uma
instalação segura, certifique-se de os rebites de fixação
ficam completamente inseridos nas ranhuras.
5. A instalação está concluída.
5 cm ou mais
1 2
ligações
12
ligações
LIGAR UM DISPOSITIVO EXTERNO UTILIZANDO UM CABO DE ÁUDIO
(ANALÓGICO) OU UM CABO ÓPTICO (DIGITAL)
Esta secção apresenta duas formas (digital e analógica) de ligar a unidade a um televisor.
Esta unidade está equipada com um ficha digital óptica e uma ficha analógica para ligar a um televisor.
AUX IN
Ligue a AUX IN (Áudio) da unidade principal à AUDIO OUT do televisor ou dispositivo fonte.
Certifique-se de que faz corresponder as cores dos conectores.
ou,
OPTICAL IN
Ligue a Entrada Digital na unidade principal à SAÍDA ÓPTICA do televisor ou dispositivo fonte.
ƒ Não ligue o cabo de alimentação deste produto ou o televisor à rede eléctrica até que
todas as ligações entre componentes estejam concluídas.
ƒ Antes de deslocar ou instalar o produto, certifique-se de que desliga o aparelho e o cabo
de alimentação.
ou
AUX IN
OPTICAL IN
AUX IN
AUDIO
OUT
L
R
Red White
Cabo de áudio
OPTICAL IN
OPTICAL
OUT
Cabo óptico
(não fornecidos)
Leitor BD/DVD,
descodificador de
TV por satélite,
consola de jogos
Vermelho Branco
13
POR
● FUNÇÕES
MODO DE ENTRADA
Pode seleccionar a entrada D.IN, AUX, BT, TV ou USB.
Prima o botão adequado no controlo remoto para seleccionar o modo pretendido ou prima ( ) para seleccionar
um dos seguintes modos: Modo D.IN, AUX, BT, TV ou USB.
Modo de entrada Visor
Entrada Digital óptica D.IN
Entrada AUX AUX
Modo BLUETOOTH BT (Apenas para o modelo HW-F355)
TV mode (Modo TV) TV (Apenas para o modelo HW-F355)
Modo USB USB
A unidade desliga-se automaticamente nas seguintes condições:
• MODO BT/TV/USB/D.IN
- Se não houver sinal de áudio por 20 minutos.
• Modo AUX
- Se não houver entrada de chave em oito horas, quando o cabo estiver
conectado.
- Se o cabo AUX não estiver conectado por 20 minutos.
ƒ Utilize o cabo fornecido, se não for possível ligar a memória USB directamente à unidade.
BLUETOOTH (APENAS PARA O MODELO HW-F355)
Pode utilizar um dispositivo Bluetooth para ouvir música com som estéreo de alta qualidade, sem fios!
O que é o Bluetooth?
O Bluetooth é uma tecnologia que permite aos dispositivos compatíveis com Bluetooth serem facilmente
interligados, através de uma ligação sem fios de curta distância.
• Um dispositivo Bluetooth pode emitir ruído ou apresentar um funcionamento incorrecto, conforme a
respectiva utilização, quando:
- Uma parte do aparelho está em contacto com o sistema receptor/transmissor do dispositivo
Bluetooth ou do Air Track.
- Sujeito a variações de corrente resultantes de obstruções provocadas por paredes, esquinas ou
divisórias.
- Exposto a interferências eléctricas de dispositivos com a mesma banda de frequência, incluindo
equipamento médico, fornos micro-ondas e redes sem fios.
• Emparelhe o Air Track com o dispositivo Bluetooth, mantendo uma distância curta.
• Quanto maior for a distância entre o Air Track e o dispositivo Bluetooth, pior é a qualidade.
Se a distância ultrapassar o limite de funcionamento do Bluetooth, a ligação perde-se.
• Em áreas de fraca receptividade, a ligação Bluetooth poderá não funcionar correctamente.
• A ligação Bluetooth funciona apenas quando está próxima do dispositivo. A ligação será
automaticamente cortada se a distância for superior a este limite. Mesmo respeitando este limite, a
qualidade de som poderá ser inferior na presença de obstáculos como paredes ou portas.
• Este dispositivo sem fios poderá provocar interferências durante o respectivo funcionamento.
funções
POWER TV POWER
HW-F350
AUX USB TV SOURCE
AUTO POWER
REPEAT DIMMER
OPTICAL AUX USB TV SOURCE
AUTO POWER
REPEAT DIMMER
OPTICAL AUX USB PTICAL
HW-F355
OPTICAL AUX TV SOURCE
AUTO POWER SoundShare
USB/
REPEAT
OPTICAL AUX TV SOURCE
AUTO POWER SoundShare
USB/
REPEAT
OPTICAL AUX
14
funções
Para ligar o Air Track a um dispositivo Bluetooth
Verifique se o dispositivo Bluetooth suporta a função de auscultadores estéreo compatíves com Bluetooth.
Ligar
Dispositivo Bluetooth
1. Prima o botão USB/Bluetooth no controlo remoto do Air Track para apresentar a mensagem BT.
• A indicação WAIT é apresentada durante aproximadamente 4 segundos e, em seguida, é apresentada
a indicação BT READY no ecrã frontal do Air Track.
2. Seleccione o menu Bluetooth no dispositivo Bluetooth que pretende ligar. (consulte o manual do utilizador
do dispositivo Bluetooth)
3.Seleccione o menu auscultadores estéreo no dispositivo Bluetooth.
• Será apresentada uma lista dos dispositivos encontrados.
4. Seleccione "[Samsung] AirTrack" da lista.
• Quando o Air Track está ligado ao dispositivo Bluetooth, é apresentada a indicação BT CONNECTED
➡ BT no ecrã anterior.
• Se o emparelhamento do dispositivo Bluetooth com o Air Track falhar, apague a entrada anterior
"[Samsung] AirTrack" encontrada pelo dispositivo Bluetooth e procure o Air Track novamente.
5. Reproduza música no dispositivo ligado.
• Pode ouvir música a ser reproduzida no dispositivo Bluetooth ligado através do sistema Crystal Surround
Air Track.
• No modo BT, as funções para reproduzir/repetir/parar/seguinte/anterior não estão disponíveis.
ƒ Poderá ser necessário introduzir um código PIN (palavra-passe) ao ligar o dispositivo Bluetooth
ao Air Track. Se aparecer a janela de introdução do código PIN, introduza <0000>.
ƒ O Air Track suporta dados SBC (44,1 kHz, 48 kHz).
ƒ A funcionalidade AVRCP não é suportada.
ƒ Estabeleça ligação apenas a um dispositivo Bluetooth que suporte a função A2DP (AV).
ƒ Não é possível estabelecer ligação a um dispositivo Bluetooth que apenas suporte a função HF
(Mãos-livres).
ƒ Apenas é possível emparelhar um dispositivo Bluetooth de cada vez.
ƒ Quando desligar o Air Track e o emparelhamento for desligado, o emparelhamento não será restaurado
automaticamente. Para restabelecer a ligação, tem de emparelhar o dispositivo novamente.
ƒ A procura ou ligação poderá não ser efectuada correctamente pelo Air Track nos seguintes casos:
- Se existir um campo eléctrico forte à volta do Air Track.
- Se vários dispositivos Bluetooth estiverem emparelhados com o Air Track em simultâneo.
- Se o dispositivo Bluetooth estiver desligado, mal colocado ou avariado.
- Tenha em atenção que dispositivos como fornos micro-ondas, adaptadores de redes sem fios,
luzes florescentes e fogões a gás utilizam o mesmo intervalo de frequência que o dispositivo
Bluetooth, o que pode provocar interferências eléctricas.
15
POR
● FUNÇÕES
Para desligar o dispositivo Bluetooth do Air Track
Pode desligar o dispositivo Bluetooth do Air Track. Para obter instruções, consulte o manual do utilizador
do dispositivo Bluetooth.
• O Air Track será desligado.
• Quando o Air Track é desligado do dispositivo Bluetooth, apresenta a indicação BT DISCONNECTED
no visor frontal.
Para desligar o Air Track do dispositivo Bluetooth
Prima o botão ( ) no painel lateral do Air Track para mudar do modo BT para outro modo ou para desligar
o Air Track.
• O dispositivo Bluetooth ligado irá aguardar algum tempo até que o Air Track responda, antes de interromper
a ligação.
(O tempo até desligar pode variar conforme o dispositivo Bluetooth)
• É desligado o dispositivo actualmente ligado.
ƒ No modo de ligação Bluetooth, a ligação Bluetooth será desactivada se a distância entre o sistema
Air Track e o dispositivo Bluetooth for superior a 5 m.
ƒ Se o dispositivo Bluetooth entrar novamente no raio de alcance do sistema, após se ter desligado,
poderá reiniciá-lo para restaurar o emparelhamento com o dispositivo Bluetooth.
ƒ O Air Track desliga-se automaticamente ao fim de 20 no estado Ready.
SOUNDSHARE (APENAS PARA O MODELO HW-F355)
Esta secção indica como ligar o Crystal Surround Air Track a televisores SAMSUNG compatíveis com Bluetooth.
Para ligar o Crystal Surround Air Track a um televisor Samsung de
compatível com Bluetooth
Ligar
Toque no botão ( ) para seleccionar o modo TV e, em seguida, ligue o televisor ao Crystal Surround Air Track.
• A unidade irá reproduzir o som do televisor, uma vez ligada ao mesmo.
• Se mudar para outro modo, que não o modo TV SoundShare (Partilha de som do televisor) ou se
desligar o produto, o som volta a ser emitido pelo televisor.
Para emitir o som do televisor no Air Track por ligação Bluetooth, é necessário começar por sincronizar o
sistema com o televisor compatível com Bluetooth. Após efectuar a sincronização, as informações de
sincronização são gravadas e mantidas, não sendo apresentada qualquer mensagem de ligação Bluetooth
na utilização seguinte. Mantenha o Air Track e o televisor próximos antes de sincronizar.
16
funções
1. Ligue o televisor Samsung e o Air Track.
• Defina a opção Add New Device (Adicionar novo dispositivo) do menu SoundShare Settings
(Definições de partilha de som) do televisor como On (Ligado).
2. Quando alterar o modo do Air Track para TV, é apresentada uma mensagem para confirmar a
sincronização Bluetooth. A mensagem "[Samsung] AirTrack" é apresentada no ecrã do televisor.
3. Seleccione no ecrã do televisor e, em seguida, a sincronização com o Air Track será concluída.
• Após efectuar a sincronização, ao alterar de outro modo de entrada para o modo TV, será automaticamente
ligado ao televisor.
• Alterar o Air Track do modo TV para qualquer outro modo, irá cancelar a ligação SoundShare (Partilha de Som).
• Se pretender cancelar a sincronização existente no SAT e sincronizar o SAT com um novo televisor,
- Prima o botão PLAY/PAUSE (REPRODUZIR/PAUSA) no SAT durante 5 segundos, no modo de
entrada de TV para cancelar o emparelhamento existente. Poderá agora efectuar o emparelhamento
com outro televisor.
• Pode controlar o volume e o silêncio, utilizando o controlo remoto do televisor e do SAT no modo Partilha de Som.
ƒ Distância de funcionamento da função SoundShare (Partilha de som) do televisor
- distância de emparelhamento recomendada: até 50 cm
- distância de funcionamento recomendada: até 5 m
ƒ Se a distância entre o SAT e o televisor Samsung for superior a 5 m, a ligaçãoou o
sompodemserinterrompidos. Neste caso, ligue ao dispositivo Bluetooth novamente respeitando o limite
de funcionamento.
ƒ Certifique-se de que o modo SoundShare (Partilha de Som) do televisor Samsung está ligado antes de
utilizar esta função.
ƒ Os botõesPLAY, NEXT, PREV, STOP (REPRODUZIR, SEGUINTE, ANTERIOR, PARAR) não
funcionam no modo SoundShare (Partilha de som).
ƒ Nção de modo de espera de Bluetooth Ligado
- O Air Track irá ligar automaticamente quando ligar o televisor se o televisor e o Air Track tiverem sido
ligados com a função SoundShare (Partilha de som).
- Pode Ligar/Desligar esta função premindo a ( ) tecla durante mais de 5 segundos quando o Air
Track está desligado. Se desligar esta função produto irá desligar-se automaticamente, mas o não
voltar a ligar automaticamente.
- Esta função é suportada pelos televisores comercializados a partir de 2013.
ƒ A função SoundShare é suportada pelos modelos seleccionados comercializados a partir de 2012.
Verifique se o seu televisor suporta a função. (Para obter mais informações, consulte o manual de
utilizador do televisor)
USB
1.Ligue o dispositivo USB à porta USB existente na parte lateral da unidade.
2.Prima o botão ( ) no painel lateral do Air Track repetidamente até a unidade USB ser apresentada.
3.A indicação USB é apresentada no ecrã e em seguida desaparece.
• A ligação do Crystal Surround Air Track está concluída.
• Desliga-se automaticamente (Desligar automático) se nenhum dispositivo USB for ligado ao fim de 20 minutos.
Antes de ligar um dispositivo USB
Tenha em atenção o seguinte:
• Se a pasta ou o nome do ficheiro no dispositivo USB ultrapassar
os 10 caracteres, não será apresentada no OLED.
• Este produto poderá não ser compatível com determinados tipos
de suporte de armazenamento USB.
• Os sistemas de ficheiro FAT16 e FAT32 são suportados.
- O sistema de ficheiros NTFS não é suportado.
17
POR
● FUNÇÕES
• Ligue o dispositivo USB directamente à porta USB do produto. Caso contrário, poderá deparar-se
com um problema de compatibilidade USB.
• Não ligue vários dispositivos de armazenamento ao produto através de um leitor de vários cartões. O
mesmo poderá não funcionar correctamente.
• Não são suportados protocolos PTP para câmaras digitais.
• Não retire o dispositivo USB enquanto a leitura do mesmo está a ser processada.
• Ficheiros de música (MP3, WMA) de um sítio da Web comercial com protecção DRM não serão
reproduzidos.
• Não são suportados HDDs externos.
• Não são suportados dispositivos móveis.
• Lista de compatibilidade
Formato Tenha em atenção o seguinte:
*.mp3
MPEG 1 Layer2
MPEG 1 Layer3
MPEG 2 Layer3
*.wma Wave_Format_MSAudio1
Wave_Format_MSAudio2
*.aac
AAC
AAC-LC
HE-AAC
*.wav -
*.Ogg OGG 1.1.0
*.Flac FLAC 1.1.0, FLAC 1.2.1
※ Suporta frequência de amostragem acima de 16 KHz
UTILIZAR O CONTROLO REMOTO
Reproduzir/Pausar/Parar
Durante a reprodução, prima os botões ►,.
• Prima o botão ► novamente para parar de reproduzir o ficheiro
temporariamente.
Prima o botão ► para reproduzir o ficheiro seleccionado.
• Para parar a reprodução, prima o botão Parar () durante a reprodução.
Avançar/Retroceder
Durante a reprodução, prima os botões #,$.
• Quando existe mais do que um ficheiro, se premir o botão $, o ficheiro
seguinte é seleccionado.
• Quando existe mais do que um ficheiro, se premir o botão #, o ficheiro
anterior é seleccionado.
Utilizar a função REPEAT
A função de repetição da reprodução permite repetir a reprodução de um
só ficheiro ou de todos os ficheiros, reproduzir ficheiros aleatoriamente ou
desligar a função Repeat.
Prima o botão REPEAT.
• REPEAT OFF : Cancela a reprodução repetitiva.
• REPEAT FILE : Repete a reprodução de uma faixa.
• REPEAT ALL : Repete a reprodução de todas as faixas.
• REPEAT RANDOM : Reproduz as faixas em ordem aleatória.
(É possível que uma faixa que já tenha sido
reproduzida seja reproduzida novamente.)
ƒ Pode definir a função REPEAT durante a reprodução de música
localizada numa unidade USB.
HW-F350 TV PRE-CH TV EXIT
SOUND EFFECT SMART VOLUME
TV MUTE TV INFO TV PRE-CH TV EXIT
SOUND EFFECT SMART VOLUME
TV MUTE TV INFO
HW-F355
HW-F350 TV PRE-CH TV EXIT
SOUND EFFECT SMART VOLUME
TV MUTE TV INFO TV PRE-CH TV EXIT
SOUND EFFECT SMART VOLUME
TV MUTE TV INFO
HW-F355
HW-F350
TV VOL TV CH AUDIO SYNC
AUTO POWER
REPEAT DIMMER
TV VOL TV CH AUDIO SYNC
AUTO POWER
DIMMER
HW-F355
TV VOL TV CH AUDIO SYNC
AUTO POWER SoundShare
REPEAT
TV VOL TV CH AUDIO SYNC
AUTO POWER SoundShare
18
funções
Cortar o som
Esta função é útil quanto atender uma chamada telefónica ou a porta.
1.Para cortar o som desta unidade, prima o botão MUTE do controlo
remoto.
2. Para cortar o som do televisor, prima o botão TV MUTE ( ) do controlo
remoto.
3.Prima novamente MUTE / TV MUTE ( ) no controlo remoto (ou prima
VOLUME +/–) para repor o som.
Utilizar a função 3D SOUND PLUS
Funkcja 3D Sound Plus dodaje dźwiękowi głębi i przestrzeni.
Prima o botão 3D SOUND PLUS no controlo remoto.
• Sempre que premir o botão, a selecção muda da seguinte forma :
3D SOUND PLUS OFF ➡ 3D SOUND PLUS MUSIC ➡ 3D SOUND
PLUS MOVIE
ƒ Ao activar a função 3D Sound Plus (Som 3D Plus), a função Sound
Effect (Efeito de som) será automaticamente alterada para OFF
(DESLIGADO).
Utilizar a função SMART VOLUME
Esta função regula e estabiliza o nível de volume sempre que ocorre uma
mudança de volume drástica ao mudar de canal ou durante uma transição
de cenas.
Prima o botão SMART VOLUME no controlo remoto.
• Sempre que premir o botão, a selecção muda da seguinte forma :
SMART VOLUME ON ➡ SMART VOLUME OFF
Utilizar a função SOUND EFFECT
Pode seleccionar entre sete modos de campo acústico diferentes -MUSIC,
NEWS, DRAMA, CINEMA, SPORTS, GAME, OFF (Som original)- consoante
o tipo de fonte que pretender ouvir.
Prima o botão SOUND EFFECT no controlo remoto.
• Seleccione o modo OFF se pretender desfrutar do som original.
ƒ É recomendado que seleccione um Efeito de som com base no
material de origem e no seu gosto pessoal.
ƒ Ao seleccionar Sound Effect (Efeito de som) (excepto em OFF),
a função 3D Sound Plus (Som 3D Plus) será automaticamente
desactivada.
Utilizar a função S/W LEVEL
Pode controlar o volume de base com a tecla S/W Level no Controlo
Remoto.
1.Prima o botão S/W LEVEL no Controlo Remoto.
2. “SW 0” é apresentado no visor.
3.Prima os botões ou na tecla LEVEL se pretender aumentar ou
diminuir o volume do subwoofer. Pode defini-lo de SW -6 até SW +6.
HW-F350 TV PRE-CH TV EXIT
SOUND EFFECT SMART VOLUME
S/W
LEVEL S/W
LEVEL
VOL
VOL
3D SOUND PLUS DRC
TV MUTE TV INFO
MUTE
TV PRE-CH TV EXIT
SOUND EFFECT SMART VOLUME
S/W LEVEL S/W LEVEL
VOL
VOL
3D SOUND PLUS DRC
TV MUTE TV MUTE TV INFO
HW-F355
HW-F350
LEVEL LEVEL
VOL
3D SOUND PLUS DRC
LEVEL LEVEL
VOL
3D SOUND PLUS
HW-F355 3D SOUND DRC
HW-F350 SOUND EFFECT SMART VOLUME
S/W S/W
VOL
MUTE
SOUND EFFECT SMART VOLUME
S/W S/W
VOL
MUTE
SMART VOLUME
HW-F355
HW-F350 SOUND EFFECT SMART VOLUME
S/W S/W
VOL
S/W MUTE S/W
VOL
MUTE
SOUND EFFECT
HW-F355
HW-F350 S/W
LEVEL S/W
LEVEL S/W MUTE LEVEL S/W LEVEL S/W MUTE LEVEL S/W
LEVEL
HW-F355
19
POR
● FUNÇÕES
Utilizar a função AUTO POWER LINK
O Crystal Surround Air Track é activado automaticamente quando liga um
televisor ou qualquer dispositivo ligado ao Air Track com o cabo óptico.
Prima AUTO POWER no controlo remoto desta unidade.
• A função de ligar/desligar automático é activada e desactivada sempre
que premir AUTO POWER.
AUTO POWER LINK Visor
LIGADO POWER LINK ON
DESLIGADO POWER LINK OFF
ƒ Se um televisor ou qualquer dispositivo ligado ao Air Track com
o cabo óptico estiver desligado e não existir uma entrada digital,
o Air Track é desactivado após 20 minutos.
Utilizar a função DIMMER
Prima Dimmer para controlar a luminosidade do visor.
Prima DIMMER no controlo remoto desta unidade.
• Sempre que premir o botão, a selecção muda da seguinte forma :
DIMMER ON ➡ DIMMER OFF
Utilizar a função AUDIO SYNC
O vídeo pode mostrar atrasos em relação ao som se o Air Track estiver
ligado a um televisor digital. Se tal acontecer, regule o tempo de atraso
do som de modo a coincidir com o vídeo.
Prima AUDIO SYNC +/–. no controlo remoto desta unidade.
• Pode utilizar o botão + , - para definir o tempo de atraso de áudio entre
0 e 300 ms.
ƒ No modo USB ou no modo TV ou BT, a função Audio Sync
(Sinc. Áudio) poderá não funcionar.
Utilizar a função DRC
Esta função permite harmonizar o intervalo entre os sons mais altos e
mais baixos. Pode utilizar esta função para ouvir som Dolby Digital
quando vir filmes com o volume baixo à noite.
Prima DRC no controlo remoto desta unidade.
• Sempre que premir o botão, a selecção muda da seguinte forma :
DRC STANDARD ➡ DRC MAX ➡ DRC MIN
HW-F350 AUTO POWER
REPEAT DIMMER
HW-F355 OPTICAL AUX TV SOURCE
AUTO POWER SoundShare
USB/
REPEAT
OPTICAL AUX TV SOURCE
AUTO POWER SoundShare
USB/
REPEAT
AUTO POWER
HW-F350
TV VOL TV CH AUDIO SYNC
AUTO POWER
REPEAT DIMMER
TV VOL TV CH AUDIO SYNC
AUTO POWER
REPEAT
HW-F355 TV PRE-CH DIMMER
SOUND EFFECT SMART VOLUME
TV MUTE TV INFO TV PRE-CH DIMMER
SOUND EFFECT SMART VOLUME
TV MUTE TV INFO DIMMER
HW-F350
TV VOL TV CH AUDIO SYNC
TV MUTE TV INFO TV PRE CH TV EXIT
TV VOL TV CH AUDIO SYNC
TV MUTE TV INFO TV PRE CH TV EXIT
AUDIO SYNC
HW-F355
HW-F350 LEVEL LEVEL
VOL
3D SOUND PLUS DRC
MUTE LEVEL LEVEL
VOL
3D SOUND PLUS DRC
MUTE
HW-F355
20
funções
Utilizar a função TV (apenas com televisores
Samsung)
• Prima TV SOURCE no controlo remoto para alterar a origem da entrada
do televisor.
• Prima TV INFO no controlo remoto para que as informações dos canais
da televisão sejam apresentadas.
• Prima TV CH no controlo remoto para seleccionar o canal da televisão.
• Prima TV VOL no controlo remoto para aumentar ou reduzir o nível
de volume.
• Utilize o botão TV PRE-CH para retroceder para o canal de televisão
anterior no modo TV.
• Para sair do menu TV, utilize o botão TV EXIT. (Funciona da mesma
forma que o botão EXIT do controlo remoto do televisor.)
ƒ Ao premir o botão SoundShare, o som do televisor é transmitido
pelo sistema Air Track através de ligação Bluetooth. O Air Track
controla também o volume do som, a qualidade do som, etc.
ƒ O controlo remoto pode controlar apenas televisores Samsung.
ACTUALIZAÇÃO DO SOFTWARE
A Samsung poderá vir a disponibilizar actualizações para o firmware
do sistema Crystal Surround Air Track.
Se for disponibilizada uma actualização, actualize o firmware ligando
uma unidade USB com a actualização do firmware armazenada à
porta USB do Air Track.
Tenha em atenção que se existirem vários ficheiros de actualização,
tem de os carregar na unidade USB individualmente e utilizá-los para
actualizar o firmware, um de cada vez.
Visite o sítio da Web Samsung.com ou contacte o centro de
assistência da Samsung para obter mais informações acerca da
transferência de ficheiros de actualização.
ƒ Insira uma unidade USB com a actualização de firmware na porta USB da unidade principal.
ƒ Tenha especial cuidado para não desligar a alimentação ou remover a unidade USB enquanto as actualizações
estão a ser aplicadas. A unidade principal será automaticamente desligada após a conclusão da actualização
do firmware. Quando o software for actualizado, as definições definidas por si voltarão às definições predefinidas
(de fábrica). Recomenda-se que escreva as suas definições para que as possa repor facilmente após a actualização.
ƒ Uma vez concluída a actualização do software do produto, desligue o produto e prima sem soltar o botão ()
durante alguns instantes para repor as definições do produto.
ƒ Se não for possível actualizar o firmware, é recomendável formatar os dados na unidade USB no formato FAT16
e tentar novamente.
ƒ Para efeitos de actualização, não formate os dados na unidade USB em formato NTFS, uma vez que este
sistema de ficheiros não é suportado.
ƒ Consoante o fabricante, alguns dispositivos de armazenamento USB poderão não ser suportados.
HW-F350
TV VOL TV CH AUDIO SYNC
AUX USB TV SOURCE
TV MUTE TV INFO TV PRE-CH TV EXIT
AUTO POWER
REPEAT DIMMER
OPTICAL
TV VOL TV CH AUDIO SYNC
AUX USB TV SOURCE
TV MUTE TV INFO TV PRE-CH TV EXIT
AUTO POWER
REPEAT DIMMER
OPTICAL
TV INFO
TV VOL TV CH
TV PRE-CH TV EXIT
TV SOURCE
HW-F355
TV VOL TV CH AUDIO SYNC
AUX TV SOURCE
TV MUTE TV INFO TV PRE-CH DIMMER
OPTICAL
AUTO POWER SoundShare
USB/
REPEAT
TV VOL TV CH AUDIO SYNC
AUX TV SOURCE
TV MUTE TV INFO TV PRE-CH DIMMER
OPTICAL
AUTO POWER SoundShare
USB/
REPEAT
TV SOURCE
TV INFO
TV VOL TV CH
TV PRE-CH
21
POR
● RESOLUÇÃO DE PROBLEMAS
Antes de solicitar assistência, verifique o seguinte.
Sintoma Verificação Solução
A unidade não liga. • O cabo de alimentação está
ligado à tomada?
• Ligue a ficha à tomada.
Um função não é executada quando
se carrega no botão.
• Há electricidade estática no ar? • Desligue a ficha e volte a ligá-la.
Não é emitido som. • A unidade está correctamente
ligada ao televisor?
• A função Mute está ligada?
• O volume está no mínimo?
• Ligue-os correctamente.
• Carregue no botão Mute para
cancelar a função.
• Regule o volume.
A imagem não aparece na televisão
quando se selecciona a função.
• O televisor está correctamente
ligado?
• Ligue-o correctamente.
O controlo remoto não funciona. • As pilhas estão gastas?
• A distância entre o controlo
remoto e a unidade principal é
demasiado grande?
• Substitua-as por pilhas novas.
• Aproxime-se da unidade
O som dos canais esquerda/ direita
está invertido.
• Os cabos de entrada de áudio
esquerdo/directo do televisor
estão ligados correctamente?
• Verifique o canal esquerdo/
direito e ligue-os correctamente.
A Partilha de Som (sincronização
com TV) falhou.
• O televisor suporta
SoundShare (Partilha de
som)?
• O televisor tem a versão de
firmware mais recente?
• Ocorre um erro ao ligar?
• Reponha o modo TV e
liguenovamente.
• A função SoundShare (Partilha
de som) é suportada pelos
modelos de televisores da
Samsung comercializados após
2012. Verifique se o seu
televisor suporta a função.
• Actualize o televisor com a
versão mais recente de
firmware.
• Contacte o centro de
assistência.
• Prima o botão durante 5
segundo para repor as
definições do produto.
resolução de problemas
22
ESPECIFICAÇÕES
Nome do
modelo HW-F350/ HW-F355
GERAL
USB 5V/0,5A
Peso
Unidade principal 1,75 kg
Subwoofer
(PS-EW1-1) 3,0 kg
Dimensões (L x A x P)
Unidade principal 943 x 49 x 59,9 mm
Subwoofer
(PS-EW1-1) 152 x 300 x 284 mm
Limites da temperatura de funcionamento +5 °C a +35 °C
Limites de humidade de funcionamento 10 % 75 %
AMPLIFICADOR
Potência nominal de
saída
Unidade principal 30 W/CH, 8 OHM, THD = 10%, 1 kHz
Subwoofer
(PS-EW1-1) 60 W, 3 OHM, THD = 10%, 100 Hz
Taxa S/N (entrada analógica) 60dB
Separação (1kHz) 50dB
* A relação S/R, a distorção, a separação e a sensibilidade útil baseiam-se numa medição através das linhas
de orientação da AES (Audio Engineering Society).
*: Especificação nominal
- A Samsung Electronics Co., Ltd reserva-se ao direito de alterar as especificações sem aviso prévio.
- O peso e as dimensões indicados são aproximados.
- Para obter informações sobre alimentação e consumo de energia, consulte a etiqueta no produto.
Firma Samsung Electronics niniejszym oświadcza, że Crystal Surround Air Track jest zgodne z
istotnymi wymogami i innymi, odpowiednimi postanowieniami Dyrektywy 1999/5/WE.
Oficjalną Deklarację zgodności można znaleźć na stronie http://www.samsung.com:
przejdź do: Pomoc techniczna > Wyszukaj pomoc techniczną dla produktu i wpisz nazwę modelu.
To urządzenie można użytkować we wszystkich krajach EU.
apêndice
AH68-02614J-05
C i d ENERGY STAR
Contacte a Samsung Internacional
Se tem algumas dúvidas ou comentários sobre os nossos produtos, por favor contacte a linha de apoio a
Clientes Samsung.
[Eliminação correcta das baterias existentes
neste produto]
(Aplicável a países cujos sistemas de recolha sejam
separados)
Esta marca, apresentada na bateria, manual ou embalagem, indica que as baterias
existentes neste produto não devem ser eliminadas juntamente com os resíduos
domésticos indiferenciados no final do seu período de vida útil. Onde existentes,
os símbolos químicos Hg, Cd ou Pb indicam que a bateria contém mercúrio,
cádmio ou chumbo acima dos níveis de referência indicados na Directiva CE
2006/66. Se as baterias não forem correctamente eliminadas, estas substâncias
poderão ser prejudiciais para a saúde humana ou para o meio ambiente.
Para proteger os recursos naturais e promover a reutilização dos materiais, separe
as baterias dos outros tipos de resíduos e recicle-as através do sistema gratuito de
recolha local de baterias.
Eliminação Correcta Deste Produto
(Resíduos de Equipamentos Eléctricos e Electrónicos)
(Aplicável a países cujos sistemas de recolha sejam separados)
Esta marca apresentada no produto, nos acessórios ou na literatura – indica que o
produto e os seus acessórios electrónicos (por exemplo, o carregador, o auricular,
o cabo USB) não deverão ser eliminados juntamente com os resíduos domésticos
no final do seu período de vida útil. Para impedir danos ao ambiente ou à saúde
humana causados pela eliminação incontrolada de resíduos, deverá separar estes
equipamentos de outros tipos de resíduos e reciclá-los de forma responsável, para
promover uma reutilização sustentável dos recursos materiais.
Os utilizadores domésticos deverão contactar o estabelecimento onde adquiriram
este produto ou as entidades oficiais locais para obterem informações sobre onde
e de que forma podem entregar estes equipamentos para permitir efectuar uma
reciclagem segura em termos ambientais.
Os utilizadores profissionais deverão contactar o seu fornecedor e consultar os
termos e condições do contrato de compra. Este produto e os seus acessórios
electrónicos não deverão ser misturados com outros resíduos comerciais para
eliminação.
Country Contact Centre � Web Site
AUSTRIA 0800 - SAMSUNG (0800 -
7267864) www.samsung.com/at/support
BELGIUM 02-201-24-18
www.samsung.com/be/support
(Dutch)
www.samsung.com/be_fr/
support (French)
BOSNIA 051 331 999 www.samsung.com/support
BULGARIA 07001 33 11 , sharing cost www.samsung.com/bg/support
CROATIA 062 726 786 www.samsung.com/hr/support
CZECH 800 - SAMSUNG (800-726786) www.samsung.com/cz/support
DENMARK 70 70 19 70 www.samsung.com/dk/support
FINLAND 030-6227 515 www.samsung.com/fi/support
FRANCE 01 48 63 00 00 www.samsung.com/fr/support
GERMANY
0180 6 SAMSUNG bzw.
0180 6 7267864*
(*0,20 €/Anruf aus dem dt.
Festnetz, aus dem Mobilfunk
max. 0,60 €/Anruf)
www.samsung.com/de/support
CYPRUS 8009 4000 only from landline, toll
free
www.samsung.com/gr/support
GREECE
80111-SAMSUNG (80111 726
7864) only from land line
(+30) 210 6897691 from mobile
and land line
HUNGARY 0680SAMSUNG (0680-726-786)
0680PREMIUM (0680-773-648)
http://www.samsung.com/hu/
support
ITALIA 800-SAMSUNG (800.7267864) www.samsung.com/it/support
LUXEMBURG 261 03 710 www.samsung.com/support
Country Contact Centre � Web Site
MONTENEGRO 020 405 888 www.samsung.com/support
SLOVENIA 080 697 267
090 726 786 www.samsung.com/si/support
NETHERLANDS 0900-SAMSUNG (0900-7267864)
(€ 0,10/Min) www.samsung.com/nl/support
NORWAY 815 56480 www.samsung.com/no/support
POLAND
0 801-172-678* lub +48 22
607-93-33 **
* (całkowity koszt połączenia jak za
1 impuls według taryfy operatora)
** (koszt połączenia według
taryfy operatora)
www.samsung.com/pl/support
PORTUGAL 808 20 7267 www.samsung.com/pt/support
ROMANIA 08008 SAMSUNG (08008 726
7864) TOLL FREE No. www.samsung.com/ro/support
SERBIA 011 321 6899 www.samsung.com/rs/support
SLOVAKIA 0800 - SAMSUNG(0800-726 786) www.samsung.com/sk/support
SPAIN 0034902172678 www.samsung.com/es/support
SWEDEN 0771 726 7864 (SAMSUNG) www.samsung.com/se/support
SWITZERLAND 0848 726 78 64
(0848-SAMSUNG)
www.samsung.com/ch/support
(German)
www.samsung.com/ch_fr/
support (French)
U.K 0330 SAMSUNG (7267864) www.samsung.com/uk/support
EIRE 0818 717100 www.samsung.com/ie/support
LITHUANIA 8-800-77777 www.samsung.com/lt/support
LATVIA 8000-7267 www.samsung.com/lv/support
ESTONIA 800-7267 www.samsung.com/ee/support
Crystal Surround Air Track
(Active Speaker System)
user manual
imagine the possibilities
Thank you for purchasing this Samsung product.
To receive a more complete service,
please register your product at
www.samsung.com/register
HW-F350
HW-F355
2
features
SoundShare
SoundShare produces TV sound on your SAT via a Bluetooth connection and controls the sound.
3D SOUND PLUS
The 3D SOUND PLUS feature adds depth and spaciousness to your listening experience.
Special Sound mode
You can select from 7 different sound modes - MUSIC, NEWS, DRAMA, CINEMA, SPORTS, GAME, and OFF (Original Sound) -
depending on the type of content you want to enjoy.
Multi-function Remote Control
The supplied remote control can be used to control the TV connected to this unit. (Works only for Samsung TVs)
The remote control has a TV hotkey that enables you to perform various operations with the simple press of a button.
Active Speaker System
This unit features an Active Speaker System that provides high sound quality in a single slim unit.
This unit does not require any satellite loudspeakers or speaker cabling, which are normally associated with conventional surround
sound systems.
USB Host support
You can connect and play music files from external USB storage devices such as MP3 players,
USB flash memory, etc. using the Air Track's USB HOST function.
Bluetooth Function
You can use connect a Bluetooth device to the SAT and enjoy music with high quality stereo sound, all without wires!
LICENCE
Manufactured under licence from Dolby Laboratories. Dolby and the double-D symbol are trademarks of Dolby Laboratories.
Manufactured under licence under U.S. Patent No.s: 5,956,674; 5,974,380; 6,487,535 & other U.S. and worldwide patents
issued & pending. DTS, the Symbol, & DTS and the Symbol together are registered trademarks & DTS 2.0 Channel is a
trademark of DTS, Inc. Product includes software. © DTS, Inc. All Rights Reserved.
- To send inquiries and requests regarding open sources, contact Samsung via Email (oss.request@samsung.com).
3
ENG
safety information
SAFETY WARNINGS
TO REDUCE THE RISK OF ELECTRIC SHOCK, DO NOT REMOVE THE COVER(OR BACK).
NO USER-SERVICEABLE PARTS ARE INSIDE. REFER SERVICING TO QUALIFIED SERVICE PERSONNEL.
CAUTION
RISK OF ELECTRIC SHOCK
DO NOT OPEN
This symbol indicates “dangerous voltage”
inside the product that presents a risk of
electric shock or personal injury.
This symbol indicates important instructions
accompanying the product.
WARNING : To reduce the risk of fire or electric shock, do not expose this appliance to rain or moisture.
CAUTION : TO PREVENT ELECTRIC SHOCK, MATCH WIDE BLADE OF PLUG TO WIDE SLOT, FULLY INSERT.
• This apparatus shall always be connected to a AC outlet with a protective grounding connection.
• To disconnect the apparatus from the mains, the plug must be pulled out from the mains socket, therefore the mains
plug shall be readily operable.
CAUTION
• Do not expose this apparatus to dripping or splashing. Do not put objects filled with liquids, such as vases on the
apparatus.
• To turn this apparatus off completely, you must pull the power plug out of the wall socket. Consequently, the power
plug must be easily and readily accessible at all times.
4
PRECAUTIONS
3.9 inch 3.9 inch
2.7 inch
3.9 inch 99.1mm
99.1mm 99.1mm
68.6mm
Ensure that the AC power supply in your house complies with the power requirements listed on the identification sticker located on the
back of your product. Install your product horizontally, on a suitable base (furniture), with enough space around it for ventilation (3~4 inches,
7~10 cm). Make sure the ventilation slots are not covered. Do not place the unit on amplifiers or other equipment which may become
hot. This unit is designed for continuous use. To fully turn off the unit, disconnect the AC plug from the wall outlet. Unplug the unit if you
intend to leave it unused for a long period of time.
6m
During thunderstorms, disconnect the AC plug from the
wall outlet. Voltage peaks due to lightning could damage the unit.
Protect the product from moisture (vases, coffee cups, etc.), and excess
heat (fireplaces, heaters, etc.) or equipment creating strong magnetic or
electric fields. Disconnect the power cable from the AC supply if the unit
malfunctions. Your product is not intended for industrial use. This product
is for personal use only.
Condensation may occur if your product has been stored in cold temperatures.
If transporting the unit during the winter, wait approximately 2
hours until the unit has reached room temperature before using.
Do not expose the unit to direct sunlight or other heat sources.
This could lead to overheating and cause the unit to malfunction.
The batteries used with this product contain chemicals that are harmful to
the environment.
Do not dispose of batteries in the general household trash.
Do not dispose of batteries in a fire.
Do not short circuit, disassemble or overheat the batteries.
Danger of explosion if battery is incorrectly replaced.
Replace only with the same or equivalent type.
The batteries used with this product contain chemicals tha
Phones
Ɣ Figures and illustrations in this User Manual are provided for reference only and may differ from actual
product appearance.
Ɣ An administration fee may be charged if either
(a) an engineer is called out at your request and there is no defect with the product (i.e. where the user
manual has not been read).
(b) you bring the unit to a repair centre and there is no defect with the product (i.e. where the user manual
has not been read).
Ɣ You will be informed of the administration fee amount before a technician visits.
5
ENG
contents
FEATURES 2 Features
2 Licence
2
SAFETY INFORMATION 3 Safety warnings
4 Precautions
3
GETTING STARTED 6 Before reading the user’s manual
6 What’s included
6
DESCRIPTIONS 7 Front Panel
8 Rear Panel
8 Installing the ferrite core on the Subwoofer 7 speaker cable
REMOTE CONTROL 9 Tour of the remote control
9
CONNECTIONS 11 Installing the wall mount
12 Connecting an external device using Audio
(Analogue) cable or Optical (Digital) cable 11
FUNCTIONS 13 Input mode
13 Bluetooth (HW-F355 model only)
15 SoundShare (HW-F355 model only)
16 USB
17 Using the remote control
20 Software upgrade
13
TROUBLESHOOTING 21 Troubleshooting
21
APPENDIX 22 Specifications
22
6
BEFORE READING THE USER’S MANUAL
Note the following terms before reading the user manual.
Icons used in this manual
Icon Term Definition
Caution Indicates a situation where a function does not operate or settings may be
cancelled.
Note Indicates tips or instructions on the page that help you operate a function.
Safety Instructions and Troubleshooting
1) Be sure to familiarize yourself with the Safety Instructions before using this product. (See page 3)
2) If a problem occurs, check Troubleshooting. (See page 21)
Copyright
©2013 Samsung Electronics Co.,Ltd.
All rights reserved; no part or whole of this user’s manual may be reproduced or copied without the prior
written permission of Samsung Electronics Co.,Ltd.
getting started
WHAT’S INCLUDED
Check for the supplied accessories shown below.
POWER TV POWER
AH59-02548A
TV VOL TV CH AUDIO SYNC
AUX USB TV SOURCE
TV PRE-CH TV EXIT
SOUND EFFECT SMART VOLUME
S/W
LEVEL S/W
LEVEL
VOL
VOL
3D SOUND PLUS DRC
TV MUTE TV INFO
AUTO POWER
REPEAT DIMMER
OPTICAL
MUTE (Screw:2EA)
(Holder-screw:2EA)
Remote Control /
Batteries (AAA size) User Manual Bracket-Wall Mount Screw USB Cable
Power Cord Adapter Audio Cable Toroidal Ferrite Core
ƒ The appearance of the accessories may differ slightly from the illustrations above.
ƒ Use the dedicated USB cable to connect external USB devices to the unit.
7
ENG
● DESCRIPTIONS
descriptions
FRONT PANEL
POWER BUTTON Turns the Crystal Surround Air Track on and off.
FUNCTION
BUTTON
Selects the D.IN, AUX, BT, TV, USB input.
- While the unit is powered, pressing the ( ) button for more than
3 seconds sets the button to act as MUTE button.
To cancel MUTE button setup, press ( ) button for more than 3
seconds again.
VOLUME +/- Controls the volume level.
DISPLAY Displays the current mode.
ƒ When you turn on this unit, there will be a 4 to 5 second delay before it produces sound.
1 2 3
4
8
SUBWOOFER
CONNECTOR
TERMINAL
Connects the connector jack of the Subwoofer.
POWER SUPPLY
IN
Connect the AC power adaptor jack to the power supply in jack, and
then connect the AC power adaptor plug to a wall outlet.
USB PORT
Connect USB devices such as MP3 players here to the play files on
the devices.
- Use the supplied USB Cable if you have installed the product on a
wall.
OPTICAL IN Connect to the digital (optical) output of an external device.
5 AUX IN Connect to the Analogue output of an external device.
ƒ When disconnecting the power cable of the AC power adaptor from the wall outlet, pull
the plug. Do not pull the cable.
ƒ Do not connect this unit or other components to an AC outlet until all connections
between components are complete.
descriptions
REAR PANEL
INSTALLING THE FERRITE CORE ON THE SUBWOOFER SPEAKER CABLE
Lift up to release the lock
and open the core.
Place the Subwoofer
speaker cable on the
opened core.
Close the lock.
3
AUX IN OPTICAL IN
5 4
1
2
9
ENG
● REMOTE CONTROL
remote control
TOUR OF THE REMOTE CONTROL
HW-F350
Installing batteries in the Remote Control
1. Lift the cover at the back of
the remote control upward as
shown.
2. Install two AAA size batteries.
Make sure to match the “+” and “–” ends
of the batteries with the diagram inside the
compartment.
3. Replace the cover.
Assuming typical TV usage,
the batteries last for about
one year.
Operational Range of the Remote Control
You can use the remote control up to 23 feet (7 meters) in a straight line from the unit. You can also operate the
remote at a horizontal angle of up to 30° from the remote control sensor.
TV POWER BUTTON
Turns your Samsung TV on and off.
POWER TV POWER
AH59-02548A
TV VOL TV CH AUDIO SYNC
AUX USB TV SOURCE
TV PRE-CH TV EXIT
SOUND EFFECT SMART VOLUME
S/W
LEVEL S/W
LEVEL
VOL
VOL
3D SOUND PLUS DRC
TV MUTE TV INFO
AUTO POWER
REPEAT DIMMER
OPTICAL
MUTE
USB
Press the USB mode.
TV EXIT
Exits TV (functions the same as the
EXIT button of the TV remote
control)
TV INFO, TV PRE-CH
Displays the current TV status.
Moves to the previous TV channel.
DRC
You can use this function to enjoy Dolby
Digital sound when watching movies at
low volume at night (Standard, MAX, MIN).
TV SOURCE
Press to select a connected TV's
video source.
MUTE
Mutes the sound from the unit. Press
again to restore the sound to the
previous volume level.
AUTO POWER, DIMMER
Synchronizes the Air Track to a
connected Optical source via the Optical
jack so it turns on automatically when
you turn on your TV.
You can control the brightness of
the Display.
SMART VOLUME
Regulates and stabilizes the volume
level against a drastic volume
change.
POWER BUTTON
Turns the Crystal Surround Air Track
on and off.
REPEAT
Select Repeat File, All, Random.
AUX
Press the AUX mode.
CONTROL BUTTON
Play, pause, or stop playing
a music file, or search forwards or
backwards for a music file.
OPTICAL
Press the Optical mode.
SOUND EFFECT
Selects the Sound Effect:
(MUSIC, NEWS, DRAMA, CINEMA,
SPORTS, GAME, OFF (Original
Sound))
S/W LEVEL, VOLUME
Adjusts the Subwoofer level.
Adjusts the volume level of the unit.
TV VOLUME
Adjusts the TV volume level.
TV CHANNEL, AUDIO SYNC
Switches between the available TV
channels.
Used to help sync video to audio
when connected to a digital TV.
TV MUTE
Mutes the sound from the TV. Press
again to restore the sound to the
previous volume level.
3D SOUND PLUS
This feature adds depth and
spaciousness to the sound.
10
remote control
POWER BUTTON
Turns the Crystal Surround Air Track
on and off.
REPEAT
Select Repeat File, All, Random.
TV POWER BUTTON
Turns your Samsung TV on and off.
AUX
Press the AUX mode.
POWER TV POWER
AH59-02532A
TV VOL TV CH AUDIO SYNC
AUX TV SOURCE
TV PRE-CH DIMMER
SOUND EFFECT SMART VOLUME
VOL
VOL
DRC
TV MUTE TV INFO
OPTICAL
S/W MUTE LEVEL S/W
LEVEL
3D SOUND PLUS
AUTO POWER SoundShare
USB/
REPEAT
CONTROL BUTTON
Play, pause, or stop playing
a music file, or search forwards or
backwards for a music file.
OPTICAL
Press the Optical mode.
SOUND EFFECT
Selects the Sound Effect:
(MUSIC, NEWS, DRAMA, CINEMA,
SPORTS, GAME, OFF (Original
Sound))
S/W LEVEL, VOLUME
Adjusts the Subwoofer level.
Adjusts the volume level of the unit.
USB, BLUETOOTH
Press the USB/ BLUETOOTH mode.
TV SOURCE
Press to select a connected TV's
video source.
SoundShare
This produces TV sound on your
SAT via a Bluetooth connection and
controls the sound.
AUDIO SYNC
Used to help sync video to audio
when connected to a digital TV.
AUTO POWER
Synchronizes the Air Track to a
connected Optical source via the
Optical jack so it turns on automatically
when you turn on your TV.
TV VOLUME
Adjusts the TV volume level.
TV CHANNEL
Switches between the available TV
channels.
TV MUTE
Mutes the sound from the TV. Press
again to restore the sound to the
previous volume level.
SMART VOLUME
Regulates and stabilizes the volume
level against a drastic volume change.
3D SOUND PLUS
This feature adds depth and
spaciousness to the sound.
TV INFO, TV PRE-CH
Displays the current TV status.
Moves to the previous TV channel.
ƒ SAT stands for Surround Air Track, which is Samsung’s proprietary name.
ƒ The remote control can operate TVs made by SAMSUNG only.
ƒ Depending on the TV you are using, you may not be able to operate your TV with this remote
control. If you can't, operate the TV using the TV's remote control.
DIMMER
You can control the brightness of the
Display.
DRC
You can use this function to enjoy Dolby
Digital sound when watching movies at
low volume at night (Standard, MAX, MIN).
MUTE
Mutes the sound from the unit.
Press again to restore the sound to
the previous volume level.
TOUR OF THE REMOTE CONTROL
HW-F355
11
ENG
● CONNECTIONS
INSTALLING THE WALL MOUNT
You can use the wall mount bracket to mount this unit on a wall.
ƒ Do not hang onto the installed unit and avoid any impact to the unit.
ƒ Secure the unit firmly to the wall so that it does not fall off. If the unit falls off, it may cause an
injury or damage the product.
ƒ When the unit is installed on a wall, please make sure that children do not pull any of the
connecting cables, as it may cause it to fall.
ƒ For the optimal performance of a wall mount installation, install the speaker system at least 2
inches (5 cm) below the TV.
connections
Installation Precautions
• Install on a vertical wall only.
• For the installation, avoid a location with high temperature or humidity, or a wall that cannot sustain the
weight of the set.
• Check the strength of the wall. If the wall is not strong enough to support the unit, reinforce the wall or
install the unit on different wall that can support the unit's weight.
• Purchase and use the fixing screws or mollys appropriate for the kind of wall you have (plaster board, iron
board, wood, etc.). If possible, fix the support screws into wall studs.
• Connect cables from the unit to external devices before you install it on the wall.
• Make sure the unit is turned off and unplugged before you install it. Otherwise, it may cause an electric shock.
2 inches (5 cm) or more
1. Place the wall mount bracket on a wall surface and then
secure it with two screws (not supplied).
If you are hanging the unit below a TV, be sure to install the
wall mount bracket so that the arrow ( ) is placed in the
centre of the TV.
Also make sure the unit is at least two inches (5 cm)
below the TV.
2. Align the screw holders (Holder-screw, AH61-03342A)
with the screw holes on the back of the Main Unit. Insert
the supplied screws through the screw holders, and then
screw them into the Main Unit.
3. Insert the USB cable into the back of the unit before
installing it on the wall.
4. Fit the unit into the corresponding slots of the wall mount
bracket. For secure installation, make sure the mounting
studs slide firmly down into the bottom of the slots.
5. The installation is complete.
1 2
12
connections
CONNECTING AN EXTERNAL DEVICE USING AUDIO (ANALOGUE)
CABLE OR OPTICAL (DIGITAL) CABLE
This unit comes equipped with one optical in digital jack and one audio analogue in jack, giving you two ways
to connect it to a TV.
or
AUX IN
OPTICAL IN
AUX IN
AUDIO
OUT
L
R
Red White
Audio Cable
OPTICAL IN
OPTICAL
OUT
Optical Cable
(not supplied)
BD/DVD player/
Set-top box/
Game console
AUX IN
Connect AUX IN (Audio) on the main unit to the AUDIO OUT of the TV or Source Device.
Be sure to match connector colours.
or,
OPTICAL IN
Connect the Digital Input on the main unit to the OPTICAL OUT of the TV or Source Device.
ƒ Do not connect the power cord of this product or your TV to the wall outlet until all
connections between components are complete.
ƒ Before moving or installing this product, be sure to turn off the power and disconnect the power
cord.
13
ENG
● FUNCTIONS
functions
INPUT MODE
You can select D.IN, AUX, BT, TV input or USB input.
Press an appropriate button on the remote control to select a desired mode, or press ( ) to select one from:
D.IN, AUX, BT, TV or USB mode.
Input mode Display
Optical Digital input D.IN
AUX input AUX
BLUETOOTH mode BT (HW-F355 model only)
TV mode TV (HW-F355 model only)
USB mode USB
The unit turns off automatically in the following situations:
• BT/TV/USB/D.IN MODE
- If there is no audio signal for 20 minutes.
• AUX Mode
- If no KEY input is entered for 8 hours when the cable is connected.
- If the AUX cable is disconnected for 20 minutes.
ƒ Use the provided cable if a USB flash memory device cannot be connected directly to the unit.
BLUETOOTH (HW-F355 MODEL ONLY)
You can use a Bluetooth device to enjoy music with high quality stereo sound, all without wires!
What is Bluetooth?
Bluetooth is a technology that enables Bluetooth-compliant devices to interconnect easily with each other using
a short wireless connection.
• A Bluetooth device may cause noise or malfunction, depending on usage, when:
- A part of your body is in contact with the receiving/transmitting system of the Bluetooth device or the Air
Track.
- It is subject to electrical variation from obstructions caused by a wall, corner, or office partition.
- It is exposed to electrical interference from same frequency-band devices including medical equipment,
microwave ovens, and wireless LANs.
• Pair the Air Track with the Bluetooth device while they are close together.
• The further the distance is between Air Track and Bluetooth device, the worse the quality is.
If the distance exceeds the Bluetooth operational range, the connection is lost.
• In poor reception-sensitivity areas, the Bluetooth connection may not work properly.
• The Bluetooth connection only works when the Bluetooth device is close to the set. The connection will be
automatically cut off if the Bluetooth device is out of range. Even within range, the sound quality may be
degraded by obstacles such as walls or doors.
• This wireless device may cause electric interference during its operation.
POWER TV POWER
HW-F350
AUX USB TV SOURCE
AUTO POWER
REPEAT DIMMER
OPTICAL AUX USB TV SOURCE
AUTO POWER
REPEAT DIMMER
OPTICAL AUX USB PTICAL
HW-F355
OPTICAL AUX TV SOURCE
AUTO POWER SoundShare
USB/
REPEAT
OPTICAL AUX TV SOURCE
AUTO POWER SoundShare
USB/
REPEAT
OPTICAL AUX
14
functions
To connect the Air Track to a Bluetooth device
Check if the Bluetooth device supports the Bluetooth compliant stereo headset function.
Connect
Bluetooth device
1. Press the USB/Bluetooth button on the remote control of the Air Track to display the BT message.
• You will see WAIT for 4 seconds and then BT READY on the front display of the Air Track.
2. Select the Bluetooth menu on the Bluetooth device you want to connect. (Refer to the Bluetooth
device's user manual.)
3. Select the Stereo headset menu on the Bluetooth device.
• You will see a list of scanned devices.
4. Select "[Samsung] AirTrack" from the list.
• When the Air Track is connected to the Bluetooth device, it will display BT CONNECTED ➡ BT on the front
display.
• If the Bluetooth device has failed to pair with the Air Track, delete the previous “[Samsung] AirTrack” found
by the Bluetooth device and have it search for the Air Track again.
5. Play music on the connected device.
• You can listen to the music playing on the connected Bluetooth device over the Crystal Surround Air Track
system.
• In BT mode, Play/Repeat/Stop/Next/Prev functions are not available.
ƒ You may be required to enter a PIN code (password) when connecting the Bluetooth device to
the Air Track. If the PIN code input window appears, enter <0000>.
ƒ The Air Track supports SBC data (44.1kHz, 48kHz).
ƒ The AVRCP feature is not supported.
ƒ Connect only to a Bluetooth device that supports the A2DP (AV) function.
ƒ You cannot connect to a Bluetooth device that supports only the HF (Hands Free) function.
ƒ Only one Bluetooth device can be paired at a time.
ƒ Once you have turned off Air Track and the pairing is disconnected, the pairing will not be
restored automatically. To reconnect, you must pair the device again.
ƒ Search or connection may not be performed properly by Air Track in the following cases:
- If there is a strong electrical field around Air Track.
- If several Bluetooth devices are simultaneously paired with Air Track.
- If the Bluetooth device is turned off, not in place, or malfunctions.
- Note that such devices as microwave ovens, wireless LAN adaptors, fluorescent lights, and gas
stoves use the same frequency range as the Bluetooth device, which can cause electric
interference.
15
ENG
● FUNCTIONS
To disconnect the Bluetooth device from the Air Track
You can disconnect the Bluetooth device from the Air Track.
For instructions, see the Bluetooth device's user manual.
• The Air Track will be disconnected.
• When the Air Track is disconnected from the Bluetooth device the Air Track will display BT DISCONNECTED
on the front display.
To disconnect the Air Track from the Bluetooth device
Press the ( ) button on the front panel of the Air Track to switch from BT to another mode or turn off the Air
Track.
• The connected Bluetooth device will wait a certain amount of time for a response from the Air Track before
terminating the connection.
(Disconnection time may differ, depending on the Bluetooth device)
• The currently connected device will be disconnected.
ƒ In Bluetooth connection mode, the Bluetooth connection will be lost if the distance between the Air
Track and the Bluetooth device exceeds 16.25 ft. (5m).
ƒ If the Bluetooth device comes back into the effective range after disconnecting, you can restart the Air
Track to restore the pairing with the Bluetooth device.
ƒ The Air Track automatically turns off after 20 minutes in the Ready state.
SOUNDSHARE (HW-F355 MODEL ONLY)
This section explains how to connect the Crystal Surround Air Track to a Bluetooth compatible SAMSUNG TV.
To connect the Crystal Surround Air Track to a Bluetooth compatible
Samsung TV
Connect
Press the ( ) button to select the TV mode, and then connect the TV to the Crystal Surround Air Track.
• The unit will play the TV's audio when it is connected to the TV.
• If you change to another mode, except the TV SoundShare mode, or turn off the Air Track, you will hear audio
from the TV again.
To produce TV sound on your Air Track via a Bluetooth connection, you need to pair your system to the
Bluetooth compliant TV first. Once the pairing is established, the pairing information is recorded and kept and no
further Bluetooth connection message will appear. Bring the Air Track and the TV close together before pairing.
16
functions
1. Turn on the Samsung TV and Air Track.
• Set Add New Device in the TV's SoundShare Setting menu to On.
2. When you change the mode of the Air Track to TV, a message asking whether to proceed with
Bluetooth pairing is displayed. "[Samsung] AirTrack" appears on the TV screen.
3. Select on the TV screen. The pairing with the Air Track will be completed.
• Once the pairing is established, when you change the Air Track to the TV mode from other input modes, it will
automatically connect to the TV.
• Changing the Air Track from TV mode to any other mode will cancel the SoundShare connection.
• If you want to cancel the existing pairing of the SAT to a TV and pair your SAT to a different TV:
- Press the PLAY/PAUSE button on the SAT for 5 seconds in the TV input mode to cancel the existing pairing.
You can now pair it to a different TV.
• In the SoundShare mode, you can control the volume and mute using either the TV remote or the SAT remote.
ƒ TV SoundShare operation range
- recommended pairing range: within 20 inches (within 50cm)
- recommended operation range: within 16.25 ft. (5m)
ƒ If the distance between the Air Track and Samsung TV is over 16.25 ft. (5m), the connection or the
sound can be cut off. If this occurs, connect to the Bluetooth device again within the operational range.
ƒ Make sure the Samsung TV's SoundShare mode is on before you use this function.
ƒ The PLAY, NEXT, PREV, STOP buttons will not work in the SoundShare mode.
ƒ Bluetooth Standby On function
- Air Track will be powered on automatically when you turn the TV on if you connected TV and Air Track with
SoundShare function.
- You can toggle this function On/Off by pressing ( ) button of front panel over 5 seconds when Air Track is
powered off. If set to Off, the product turns off automatically when the TV turns off, but it does not turn on
automatically.
- This feature is supported by TVs released from 2013.
ƒ The SoundShare feature is supported by select models released from 2012.
Check whether your TV supports SoundShare before you begin.
For more information, refer to the user's guide of your TV.
USB
1. Connect the USB device to the USB port on the side of the unit.
2. Press the ( ) button on the front panel of the Air Track repeatedly until USB appears.
3. USB appears on the display screen and then disappears.
• The Crystal Surround Air Track connection is complete.
• The SAT automatically turns off (Auto Power Off) if no USB device has been connected for more than 20 minutes.
Before you connect a USB device
Be aware of the following:
• If the file name of a folder on a USB device exceeds 10
characters, it is not displayed on the OLED.
• This product may not be compatible with certain types of USB
storage media.
• The Air Track supports the FAT16 and FAT32 file systems.
- The NTFS file system is not supported.
17
ENG
● FUNCTIONS
• Connect USB devices directly to the USB port of the product. Otherwise, you may encounter a USB
compatibility problem.
• Do not connect multiple storage devices to the product via a multi-card reader. It may not operate
properly.
• Digital camera PTP protocols are not supported.
• Do not remove the USB device while it is being read.
• DRM-protected music files (MP3, WMA) from a commercial web site will not be played.
• External HDDs are not supported.
• Mobile phone devices are not supported.
• File Format Type Compatibility list:
Format Codec
*.mp3
MPEG 1 Layer2
MPEG 1 Layer3
MPEG 2 Layer3
*.wma Wave_Format_MSAudio1
Wave_Format_MSAudio2
*.aac
AAC
AAC-LC
HE-AAC
*.wav -
*.Ogg OGG 1.1.0
*.Flac FLAC 1.1.0, FLAC 1.2.1
※ Supporting Sampling Rate above 16KHz
USING THE REMOTE CONTROL
Play/Pause/Stop
During playback, press the ►, button.
• Press the ► button again to stop playing the file temporarily.
Press the ► button to play the selected file.
• To stop playback, press the Stop () button during playback.
Skip Forward/Back
During playback, press the #,$ button.
• When there is more than one file and you press the $ button, the next file
is selected.
• When there is more than one file and you press the # button, the
previous file is selected.
Using the REPEAT function
Repeat playback allows you to repeatedly play a file, repeat all, randomly play
files, or turn Repeat off.
Press the REPEAT button.
• REPEAT OFF : Cencells Repeat Playback.
• REPEAT FILE : Repeat playing a track.
• REPEAT ALL : Repeat playing all tracks.
• REPEAT RANDOM : Plays tracks in random order. (A track that has
already been played may be played again.)
ƒ You can set the REPEAT function during the playback of music from
a USB drive.
HW-F350 TV PRE-CH TV EXIT
SOUND EFFECT SMART VOLUME
TV MUTE TV INFO TV PRE-CH TV EXIT
SOUND EFFECT SMART VOLUME
TV MUTE TV INFO
HW-F355
HW-F350 TV PRE-CH TV EXIT
SOUND EFFECT SMART VOLUME
TV MUTE TV INFO TV PRE-CH TV EXIT
SOUND EFFECT SMART VOLUME
TV MUTE TV INFO
HW-F355
HW-F350
TV VOL TV CH AUDIO SYNC
AUTO POWER
REPEAT DIMMER
TV CH AUDIO SYNC
AUTO POWER
DIMMER
HW-F355
TV VOL TV CH AUDIO SYNC
AUTO POWER SoundShare
REPEAT
TV CH AUDIO SYNC
AUTO POWER SoundShare
18
functions
Muting the sound
This is useful when answering a doorbell or telephone call.
1. To mute the sound of this unit, press the MUTE button on the remote
control.
2. To mute the TV, press the TV MUTE ( ) button on the remote
control.
3. Press MUTE/ TV MUTE ( ) on the remote control again (or press
VOLUME +/–) to restore the sound.
Using the 3D SOUND PLUS function
The 3D SOUND PLUS feature adds depth and spaciousness to the sound.
Press 3D SOUND PLUS on the remote control.
• Each time the button is pressed, the selection changes as follows :
3D SOUND PLUS OFF ➡ 3D SOUND PLUS MUSIC ➡ 3D SOUND
PLUS MOVIE
ƒ When you turn on 3D Sound Plus, the Sound Effect function will
automatically change to OFF.
Using the SMART VOLUME function
This will regulate and stabilize the volume level against a drastic volume
change caused by a channel change or scene transition.
Press SMART VOLUME on the remote control.
• Each time the button is pressed, the selection changes as follows :
SMART VOLUME ON ➡ SMART VOLUME OFF
Using the SOUND EFFECT function
You can select from 7 different sound modes - MUSIC, NEWS, DRAMA,
CINEMA, SPORTS, GAME, and OFF (Original Sound) - depending on the
type of sources you want to enjoy.
Press SOUND EFFECT on the remote control.
• Select the OFF mode if you want to enjoy the original sound.
ƒ We recommend that you select a Sound Effect based on the
source material and your personal taste.
ƒ When you choose a Sound Effect mode (except OFF), 3D Sound
Plus will automatically be turned OFF.
Using the S/W LEVEL function
You can control the base volume with the S/W Level button on the remote
control.
1. Press the S/W LEVEL button on the remote control.
2. “SW 0” appears on the display.
3. Press or button on the LEVEL key if you want to increase or decrease
the subwoofer volume. You can set it from SW -6 to SW +6.
HW-F350 TV PRE-CH TV EXIT
SOUND EFFECT SMART VOLUME
S/W
LEVEL S/W
LEVEL
VOL
VOL
3D SOUND PLUS DRC
TV MUTE TV INFO
MUTE
TV PRE-CH TV EXIT
SOUND EFFECT SMART VOLUME
S/W LEVEL S/W LEVEL
VOL
VOL
3D SOUND PLUS DRC
TV MUTE TV MUTE TV INFO
HW-F355
HW-F350
LEVEL LEVEL
VOL
3D SOUND PLUS DRC
LEVEL LEVEL
VOL
3D SOUND PLUS 3D SOUND DRC PLUS
HW-F355
HW-F350 SOUND EFFECT SMART VOLUME
S/W S/W
VOL
MUTE
SOUND EFFECT SMART VOLUME
S/W S/W
VOL
MUTE
SMART VOLUME
HW-F355
HW-F350 SOUND EFFECT SMART VOLUME
S/W S/W
VOL
MUTE
SOUND EFFECT SMART VOLUME
S/W S/W
VOL
MUTE
SOUND EFFECT
HW-F355
HW-F350 S/W
LEVEL S/W
LEVEL S/W MUTE LEVEL S/W LEVEL S/W MUTE LEVEL S/W
LEVEL
HW-F355
19
ENG
● FUNCTIONS
Using the AUTO POWER LINK function
The Crystal Surround Air Track is automatically turned on when you turn on the
TV or any device connected to the Air Track with the optical cable.
Press AUTO POWER on the remote control of this unit.
• The Auto power link function turns on and off each time you press AUTO POWER.
AUTO POWER LINK Display
ON POWER LINK ON
OFF POWER LINK OFF
ƒ If a TV or any device connected to Air Track with the optical cable is
off and there is no digital input, the Air Track is turned off after 20
minutes.
Using the DIMMER function
This feature control the brightness of the Display.
Press DIMMER on the remote control of this unit.
Each time the button is pressed, the selection changes as follows :
DIMMER ON ➡ DIMMER OFF
Using the AUDIO SYNC function
Video may appear out of synch with the audio if the Air Track is connected to
a digital TV. If this occurs, adjust the audio delay time to match the video.
Press AUDIO SYNC +/–. on the remote control of this unit.
• You can use the + , - buttons to set the audio delay time between 0 ms
and 300 ms.
ƒ In USB mode TV mode or BT mode, the Audio Sync function may
not work.
Using the DRC function
This feature balances the range between the loudest and quietest sounds.
You can use this function to enjoy Dolby Digital sound when watching movies
at low volume at night.
Press DRC on the remote control of this unit.
• Each time the button is pressed, the selection changes as follows :
DRC STANDARD ➡ DRC MAX ➡ DRC MIN
HW-F350 AUTO POWER
REPEAT DIMMER
AUTO POWE AUTO POWER
HW-F355 OPTICAL AUX TV SOURCE
AUTO POWER SoundShare
USB/
REPEAT
OPTICAL AUX TV SOURCE
AUTO POWER SoundShare
USB/
REPEAT
AUTO POWER
HW-F350
TV VOL TV CH AUDIO SYNC
AUTO POWER
REPEAT DIMMER
TV CH AUDIO SYNC
AUTO POWER
REPEAT
HW-F355 TV PRE-CH DIMMER
SOUND EFFECT SMART VOLUME
TV MUTE TV INFO TV PRE-CH DIMMER
SOUND EFFECT SMART VOLUME
TV MUTE TV INFO DIMMER
HW-F350
TV VOL TV CH AUDIO SYNC
TV MUTE TV INFO TV PRE CH TV EXIT
TV VOL TV CH AUDIO SYNC
TV MUTE TV INFO TV PRE CH TV EXIT
AUDIO SYNC
HW-F355
HW-F350 LEVEL LEVEL
VOL
3D SOUND PLUS DRC
MUTE LEVEL LEVEL
VOL
3D SOUND PLUS DRC
MUTE
DRC
HW-F355
20
functions
Using the TV functions (with Samsung TVs only)
• Press TV SOURCE on the remote control to change the TV's input
source.
• Press TV INFO on the remote control to display the TV channel
information.
• Press TV CH on the remote control to select the TV channel.
• Press TV VOL on the remote control to increase or decrease the volume
level.
• Use TV PRE-CH button to move to the previous TV channel in TV mode.
• To exit the TV menu, use the TV EXIT button. (It functions the same as the
EXIT button of the TV remote control.)
ƒ When you press the SoundShare button, the TV's sound is
transmitted through the Air Track system via a Bluetooth
connection. The Air Track also controls the sound volume,
sound quality, etc.
ƒ The remote control can operate TVs made by SAMSUNG only.
HW-F350
TV VOL TV CH AUDIO SYNC
AUX USB TV SOURCE
TV MUTE TV INFO TV PRE-CH TV EXIT
AUTO POWER
REPEAT DIMMER
OPTICAL
TV VOL TV CH AUDIO SYNC
AUX USB TV SOURCE
TV MUTE TV INFO TV PRE-CH TV EXIT
AUTO POWER
REPEAT DIMMER
OPTICAL
TV INFO
TV VOL TV CH
TV PRE-CH TV EXIT
TV SOURCE
HW-F355
TV VOL TV CH AUDIO SYNC
AUX TV SOURCE
TV MUTE TV INFO TV PRE-CH DIMMER
OPTICAL
AUTO POWER SoundShare
USB/
REPEAT
TV VOL TV CH AUDIO SYNC
AUX TV SOURCE
TV MUTE TV INFO TV PRE-CH DIMMER
OPTICAL
AUTO POWER SoundShare
USB/
REPEAT
TV SOURCE
TV INFO
TV VOL TV CH
TV PRE-CH
SOFTWARE UPGRADE
Samsung may offer upgrades for the Crystal Surround Air Track's system
firmware in the future.
If an upgrade is offered, you can upgrade the firmware by connecting a USB
drive with the firmware upgrade stored on it to the USB port on your Air
Track.
Note that if there are multiple upgrade files, you must load them onto the
USB drive singly and use them to upgrade the firmware one at a time.
Please visit Samsung.com or contact the Samsung call centre to receive
more information about downloading upgrade files.
ƒ Insert a USB drive containing the firmware upgrade into the USB port on the main unit.
ƒ Do not disconnect the power or remove the USB drive while upgrades are being applied. The main unit will turn
off automatically after completing the firmware upgrade.
When software is upgraded, settings you have made will return to their default (factory) settings.
We recommend you write down your settings so that you can easily reset them after the upgrade.
ƒ Once upgrading the product software is completed, turn off the product and then press and hold () button for
a while to reset the product.
ƒ If the firmware fails to upgrade, we recommend formatting the USB device in FAT16 and trying again.
ƒ For upgrading purposes, do not format the USB drive in NTFS format because it is not a supported file system.
ƒ Depending on the manufacturer, some USB devices may not be supported.
21
ENG
● TROUBLESHOOTING
Before requesting service, please check the following.
Symptom Check Remedy
The unit will not turn on. • Is the power cord plugged into
the outlet?
• Connect the power plug to the
outlet.
A function does not work when the
button is pressed.
• Is there static electricity in the
air?
• Disconnect the power plug and
connect it again.
Sound is not produced. • Is the unit properly connected
to your TV?
• Is the Mute function on?
• Is the volume set to minimum?
• Connect it correctly.
• Press the Mute button to
cancel the function.
• Adjust the volume.
The Picture does not appear on a TV
when the function is selected.
• Is the TV connected properly? • Connect it correctly.
The remote control does not work. • Are the batteries drained?
• Is the distance between remote
control and main unit too far?
• Replace with new batteries.
• Move closer to the unit.
The sound from the left/right
channels are reversed.
• Are the left/right audio output
cables from the TV connected
properly?
• Check the left/right channel and
connect it/them correctly.
The SoundShare (TV pairing) failed. • Does your TV support
SoundShare?
• Is your TV firmware the latest
version?
• Does an error occur when
connecting?
• Reset the TV MODE and
connect again.
• SoundShare is supported by
some Samsung TVs released
after 2012. Check your TV to
see if it supports SoundShare.
• Update your TV with the latest
firmware.
• Contact the call centre.
• Press button for 5 seconds
to reset the product.
troubleshooting
22
SPECIFICATIONS
Model name HW-F350/ HW-F355
GENERAL
USB 5V/0.5A
Weight
Main unit 1.75 kg
Subwoofer
(PS-EW1-1) 3.0 kg
Dimensions
(W x H x D)
Main unit 943 x 49 x 59.9 mm
Subwoofer
(PS-EW1-1) 152 x 300 x 284 mm
Operating temperature range +5 °C to +35 °C
Operating humidity range 10 % to 75 %
AMPLIFIER
Rated output
power
Main unit 30W/CH, 8OHM, THD = 10%, 1kHz
Subwoofer
(PS-EW1-1) 60W, 3OHM, THD = 10%, 100Hz
S/N ratio (analogue input) 60 dB
Separation(1kHz) 50 dB
* S/N ratio, distortion, separation and usable sensitivity are based on measurement using AES (Audio
Engineering Society) guidelines.
*: Nominal specification
- Samsung Electronics Co., Ltd reserves the right to change the specifications without notice.
- Weight and dimensions are approximate.
- For the power supply and Power Consumption, refer to the label attached to the product.
Hereby, Samsung Electronics, declares that this Crystal Surround Air Track is in compliance
with the essential requirements and other relevant provisions of Directive 1999/5/EC.
The official Declaration of Conformity may be found at http://www.samsung.com,
go to Support > Search Product Support and enter the model name.
This equipment may be operated in all EU countries.
appendix
[Correct disposal of batteries in this product]
(Applicable in countries with separate collection systems)
This marking on the battery, manual or packaging indicates that the batteries in
this product should not be disposed of with other household waste at the end of
their working life. Where marked, the chemical symbols Hg, Cd or Pb indicate that
the battery contains mercury, cadmium or lead above the reference levels in EC
Directive 2006/66. If batteries are not properly disposed of, these substances can
cause harm to human health or the environment.
To protect natural resources and to promote material reuse, please separate
batteries from other types of waste and recycle them through your local, free
battery return system.
Correct Disposal of This Product
(Waste Electrical & Electronic Equipment)
(Applicable in countries with separate collection systems)
This marking on the product, accessories or literature indicates that the product and
its electronic accessories (e.g. charger, headset, USB cable) should not be disposed
of with other household waste at the end of their working life. To prevent possible
harm to the environment or human health from uncontrolled waste disposal, please
separate these items from other types of waste and recycle them responsibly to
promote the sustainable reuse of material resources.
Household users should contact either the retailer where they purchased this product,
or their local government office, for details of where and how they can take these
items for environmentally safe recycling.
Business users should contact their supplier and check the terms and conditions
of the purchase contract. This product and its electronic accessories should not be
mixed with other commercial wastes for disposal.
AH68-02614G-03
Contact SAMSUNG WORLD WIDE
If you have any questions or comments relating to Samsung products, please contact the SAMSUNG customer
care Centre.
Country Contact Centre � Web Site
AUSTRIA 0800 - SAMSUNG (0800 -
7267864) www.samsung.com/at/support
BELGIUM 02-201-24-18
www.samsung.com/be/support
(Dutch)
www.samsung.com/be_fr/
support (French)
BOSNIA 051 331 999 www.samsung.com/support
BULGARIA 07001 33 11 , sharing cost www.samsung.com/bg/support
CROATIA 062 726 786 www.samsung.com/hr/support
CZECH 800 - SAMSUNG (800-726786) www.samsung.com/cz/support
DENMARK 70 70 19 70 www.samsung.com/dk/support
FINLAND 030-6227 515 www.samsung.com/fi/support
FRANCE 01 48 63 00 00 www.samsung.com/fr/support
GERMANY
0180 6 SAMSUNG bzw.
0180 6 7267864*
(*0,20 €/Anruf aus dem dt.
Festnetz, aus dem Mobilfunk
max. 0,60 €/Anruf)
www.samsung.com/de/support
CYPRUS 8009 4000 only from landline, toll
free
www.samsung.com/gr/support
GREECE
80111-SAMSUNG (80111 726
7864) only from land line
(+30) 210 6897691 from mobile
and land line
HUNGARY 0680SAMSUNG (0680-726-786)
0680PREMIUM (0680-773-648)
http://www.samsung.com/hu/
support
ITALIA 800-SAMSUNG (800.7267864) www.samsung.com/it/support
LUXEMBURG 261 03 710 www.samsung.com/support
Country Contact Centre � Web Site
MONTENEGRO 020 405 888 www.samsung.com/support
SLOVENIA 080 697 267
090 726 786 www.samsung.com/si/support
NETHERLANDS 0900-SAMSUNG (0900-7267864)
(€ 0,10/Min) www.samsung.com/nl/support
NORWAY 815 56480 www.samsung.com/no/support
POLAND
0 801-172-678* lub +48 22
607-93-33 **
* (całkowity koszt połączenia jak za
1 impuls według taryfy operatora)
** (koszt połączenia według
taryfy operatora)
www.samsung.com/pl/support
PORTUGAL 808 20 7267 www.samsung.com/pt/support
ROMANIA 08008 SAMSUNG (08008 726
7864) TOLL FREE No. www.samsung.com/ro/support
SERBIA 011 321 6899 www.samsung.com/rs/support
SLOVAKIA 0800 - SAMSUNG(0800-726 786) www.samsung.com/sk/support
SPAIN 0034902172678 www.samsung.com/es/support
SWEDEN 0771 726 7864 (SAMSUNG) www.samsung.com/se/support
SWITZERLAND 0848 726 78 64
(0848-SAMSUNG)
www.samsung.com/ch/support
(German)
www.samsung.com/ch_fr/
support (French)
U.K 0330 SAMSUNG (7267864) www.samsung.com/uk/support
EIRE 0818 717100 www.samsung.com/ie/support
LITHUANIA 8-800-77777 www.samsung.com/lt/support
LATVIA 8000-7267 www.samsung.com/lv/support
ESTONIA 800-7267 www.samsung.com/ee/support
Crystal Surround Air Track
(Active Speaker System)
user manual
imagine the possibilities
Thank you for purchasing this Samsung product.
To receive more complete service,
please register your product at
www.samsung.com/register
HW-F350
HW-F355
2
features
SoundShare
SoundShare produces TV sound on your SAT via a Bluetooth connection and controls the sound.
3D SOUND PLUS
The 3D SOUND PLUS feature adds depth and spaciousness to your listening experience.
Special Sound mode
You can select from 7 different sound modes - MUSIC, NEWS, DRAMA, CINEMA, SPORTS, GAME, and OFF (Original Sound) -
depending on the type of content you want to enjoy.
Multi-function Remote Control
The supplied remote control can be used to control the TV connected to this unit. (Works only for Samsung TVs)
The remote control has a TV hotkey that enables you to perform various operations with the simple press of a button.
Active Speaker System
This unit features an Active Speaker System that provides high sound quality in a single slim unit.
This unit does not require any satellite loudspeakers or speaker cabling, which are normally associated with conventional surround
sound systems.
USB Host support
You can connect and play music files from external USB storage devices such as MP3 players,
USB flash memory, etc. using the Air Track's USB HOST function.
Bluetooth Function
You can use connect a Bluetooth device to the SAT and enjoy music with high quality stereo sound, all without wires!
LICENSE
Manufactured under license from Dolby Laboratories. Dolby and the double-D symbol are trademarks of Dolby Laboratories.
Manufactured under license under U.S. Patent No.s: 5,956,674; 5,974,380; 6,487,535 & other U.S. and worldwide patents
issued & pending. DTS, the Symbol, & DTS and the Symbol together are registered trademarks & DTS 2.0 Channel is a
trademark of DTS, Inc. Product includes software. © DTS, Inc. All Rights Reserved.
- To send inquiries and requests regarding open sources, contact Samsung via Email (oss.request@samsung.com).
3
ENG
safety information
SAFETY WARNINGS
TO REDUCE THE RISK OF ELECTRIC SHOCK, DO NOT REMOVE THE COVER(OR BACK).
NO USER-SERVICEABLE PARTS ARE INSIDE. REFER SERVICING TO QUALIFIED SERVICE PERSONNEL.
CAUTION
RISK OF ELECTRIC SHOCK
DO NOT OPEN
This symbol indicates “dangerous voltage”
inside the product that presents a risk of
electric shock or personal injury.
This symbol indicates important instructions
accompanying the product.
WARNING : To reduce the risk of fire or electric shock, do not expose this appliance to rain or moisture.
CAUTION : TO PREVENT ELECTRIC SHOCK, MATCH WIDE BLADE OF PLUG TO WIDE SLOT, FULLY INSERT.
• This apparatus shall always be connected to a AC outlet with a protective grounding connection.
• To disconnect the apparatus from the mains, the plug must be pulled out from the mains socket, therefore the mains
plug shall be readily operable.
CAUTION
• Do not expose this apparatus to dripping or splashing. Do not put objects filled with liquids, such as vases on the
apparatus.
• To turn this apparatus off completely, you must pull the power plug out of the wall socket. Consequently, the power
plug must be easily and readily accessible at all times.
4
PRECAUTIONS
3.9 inch 3.9 inch
2.7 inch
3.9 inch 99.1mm
99.1mm 99.1mm
68.6mm
Ensure that the AC power supply in your house complies with the power requirements listed on the identification sticker located on the
back of your product. Install your product horizontally, on a suitable base (furniture), with enough space around it for ventilation (3~4 inches,
7~10 cm). Make sure the ventilation slots are not covered. Do not place the unit on amplifiers or other equipment which may become
hot. This unit is designed for continuous use. To fully turn off the unit, disconnect the AC plug from the wall outlet. Unplug the unit if you
intend to leave it unused for a long period of time.
6m
During thunderstorms, disconnect the AC plug from the
wall outlet. Voltage peaks due to lightning could damage the unit.
Protect the product from moisture (vases, coffee cups, etc.), and excess
heat (fireplaces, heaters, etc.) or equipment creating strong magnetic or
electric fields. Disconnect the power cable from the AC supply if the unit
malfunctions. Your product is not intended for industrial use. This product
is for personal use only.
Condensation may occur if your product has been stored in cold temperatures.
If transporting the unit during the winter, wait approximately 2
hours until the unit has reached room temperature before using.
Do not expose the unit to direct sunlight or other heat sources.
This could lead to overheating and cause the unit to malfunction.
The batteries used with this product contain chemicals that are harmful to
the environment.
Do not dispose of batteries in the general household trash.
Do not dispose of batteries in a fire.
Do not short circuit, disassemble or overheat the batteries.
Danger of explosion if battery is incorrectly replaced.
Replace only with the same or equivalent type.
The batteries used with this product contain chemicals tha
Phones
Ɣ Figures and illustrations in this User Manual are provided for reference only and may differ from actual
product appearance.
Ɣ An administration fee may be charged if either
(a) an engineer is called out at your request and there is no defect with the product (i.e. where the user
manual has not been read).
(b) you bring the unit to a repair centre and there is no defect with the product (i.e. where the user manual
has not been read).
Ɣ You will be informed of the administration fee amount before a technician visits.
5
ENG
contents
FEATURES 2 Features
2 License
2
SAFETY INFORMATION 3 Safety warnings
4 Precautions
3
GETTING STARTED 6 Before reading the user’s manual
6 What’s included
6
DESCRIPTIONS 7 Front Panel
8 Rear Panel
8 Installing the ferrite core on the Subwoofer 7 speaker cable
REMOTE CONTROL 9 Tour of the remote control
9
CONNECTIONS 11 Installing the wall mount
12 Connecting an external device using Audio
(Analog) cable or Optical (Digital) cable 11
FUNCTIONS 13 Input mode
13 Bluetooth (HW-F355 model only)
15 SoundShare (HW-F355 model only)
16 USB
17 Using the remote control
20 Software upgrade
13
TROUBLESHOOTING 21 Troubleshooting
21
APPENDIX 22 Specifications
22
6
BEFORE READING THE USER’S MANUAL
Note the following terms before reading the user manual.
Icons used in this manual
Icon Term Definition
Caution Indicates a situation where a function does not operate or settings may be
canceled.
Note Indicates tips or instructions on the page that help you operate a function.
Safety Instructions and Troubleshooting
1) Be sure to familiarize yourself with the Safety Instructions before using this product. (See page 3)
2) If a problem occurs, check Troubleshooting. (See page 21)
Copyright
©2013 Samsung Electronics Co.,Ltd.
All rights reserved; no part or whole of this user’s manual may be reproduced or copied without the prior
written permission of Samsung Electronics Co.,Ltd.
getting started
WHAT’S INCLUDED
Check for the supplied accessories shown below.
POWER TV POWER
AH59-02548A
TV VOL TV CH AUDIO SYNC
AUX USB TV SOURCE
TV PRE-CH TV EXIT
SOUND EFFECT SMART VOLUME
S/W
LEVEL S/W
LEVEL
VOL
VOL
3D SOUND PLUS DRC
TV MUTE TV INFO
AUTO POWER
REPEAT DIMMER
OPTICAL
MUTE (Screw:2EA)
(Holder-screw:2EA)
Remote Control /
Batteries (AAA size) User Manual Bracket-Wall Mount Screw USB Cable
Power Cord Adapter Audio Cable Toroidal Ferrite Core
ƒ The appearance of the accessories may differ slightly from the illustrations above.
ƒ Use the dedicated USB cable to connect external USB devices to the unit.
7
ENG
● DESCRIPTIONS
descriptions
FRONT PANEL
POWER BUTTON Turns the Crystal Surround Air Track on and off.
FUNCTION
BUTTON
Selects the D.IN, AUX, BT, TV, USB input.
- While the unit is powered, pressing the ( ) button for more than
3 seconds sets the button to act as MUTE button.
To cancel MUTE button setup, press ( ) button for more than 3
seconds again.
VOLUME +/- Controls the volume level.
DISPLAY Displays the current mode.
ƒ When you turn on this unit, there will be a 4 to 5 second delay before it produces sound.
1 2 3
4
8
SUBWOOFER
CONNECTOR
TERMINAL
Connects the connector jack of the Subwoofer.
POWER SUPPLY
IN
Connect the AC power adaptor jack to the power supply in jack, and
then connect the AC power adaptor plug to a wall outlet.
USB PORT
Connect USB devices such as MP3 players here to the play files on
the devices.
- Use the supplied USB Cable if you have installed the product on a
wall.
OPTICAL IN Connect to the digital (optical) output of an external device.
5 AUX IN Connect to the Analog output of an external device.
ƒ When disconnecting the power cable of the AC power adaptor from the wall outlet, pull
the plug. Do not pull the cable.
ƒ Do not connect this unit or other components to an AC outlet until all connections
between components are complete.
descriptions
REAR PANEL
INSTALLING THE FERRITE CORE ON THE SUBWOOFER SPEAKER CABLE
Lift up to release the lock
and open the core.
Place the Subwoofer
speaker cable on the
opened core.
Close the lock.
3
AUX IN OPTICAL IN
5 4
1
2
9
ENG
● REMOTE CONTROL
remote control
TOUR OF THE REMOTE CONTROL
HW-F350
Installing batteries in the Remote Control
1. Lift the cover at the back of
the remote control upward as
shown.
2. Install two AAA size batteries.
Make sure to match the “+” and “–” ends
of the batteries with the diagram inside the
compartment.
3. Replace the cover.
Assuming typical TV usage,
the batteries last for about
one year.
Operational Range of the Remote Control
You can use the remote control up to 23 feet (7 meters) in a straight line from the unit. You can also operate the
remote at a horizontal angle of up to 30° from the remote control sensor.
TV POWER BUTTON
Turns your Samsung TV on and off.
POWER TV POWER
AH59-02548A
TV VOL TV CH AUDIO SYNC
AUX USB TV SOURCE
TV PRE-CH TV EXIT
SOUND EFFECT SMART VOLUME
S/W
LEVEL S/W
LEVEL
VOL
VOL
3D SOUND PLUS DRC
TV MUTE TV INFO
AUTO POWER
REPEAT DIMMER
OPTICAL
MUTE
USB
Press the USB mode.
TV EXIT
Exits TV (functions the same as the
EXIT button of the TV remote
control)
TV INFO, TV PRE-CH
Displays the current TV status.
Moves to the previous TV channel.
DRC
You can use this function to enjoy Dolby
Digital sound when watching movies at
low volume at night (Standard, MAX, MIN).
TV SOURCE
Press to select a connected TV's
video source.
MUTE
Mutes the sound from the unit. Press
again to restore the sound to the
previous volume level.
AUTO POWER, DIMMER
Synchronizes the Air Track to a
connected Optical source via the Optical
jack so it turns on automatically when
you turn on your TV.
You can control the brightness of
the Display.
SMART VOLUME
Regulates and stabilizes the volume
level against a drastic volume
change.
POWER BUTTON
Turns the Crystal Surround Air Track
on and off.
REPEAT
Select Repeat File, All, Random.
AUX
Press the AUX mode.
CONTROL BUTTON
Play, pause, or stop playing
a music file, or search forwards or
backwards for a music file.
OPTICAL
Press the Optical mode.
SOUND EFFECT
Selects the Sound Effect:
(MUSIC, NEWS, DRAMA, CINEMA,
SPORTS, GAME, OFF (Original
Sound))
S/W LEVEL, VOLUME
Adjusts the Subwoofer level.
Adjusts the volume level of the unit.
TV VOLUME
Adjusts the TV volume level.
TV CHANNEL, AUDIO SYNC
Switches between the available TV
channels.
Used to help sync video to audio
when connected to a digital TV.
TV MUTE
Mutes the sound from the TV. Press
again to restore the sound to the
previous volume level.
3D SOUND PLUS
This feature adds depth and
spaciousness to the sound.
10
remote control
POWER BUTTON
Turns the Crystal Surround Air Track
on and off.
REPEAT
Select Repeat File, All, Random.
TV POWER BUTTON
Turns your Samsung TV on and off.
AUX
Press the AUX mode.
POWER TV POWER
AH59-02532A
TV VOL TV CH AUDIO SYNC
AUX TV SOURCE
TV PRE-CH DIMMER
SOUND EFFECT SMART VOLUME
VOL
VOL
DRC
TV MUTE TV INFO
OPTICAL
S/W MUTE LEVEL S/W
LEVEL
3D SOUND PLUS
AUTO POWER SoundShare
USB/
REPEAT
CONTROL BUTTON
Play, pause, or stop playing
a music file, or search forwards or
backwards for a music file.
OPTICAL
Press the Optical mode.
SOUND EFFECT
Selects the Sound Effect:
(MUSIC, NEWS, DRAMA, CINEMA,
SPORTS, GAME, OFF (Original
Sound))
S/W LEVEL, VOLUME
Adjusts the Subwoofer level.
Adjusts the volume level of the unit.
USB, BLUETOOTH
Press the USB/ BLUETOOTH mode.
TV SOURCE
Press to select a connected TV's
video source.
SoundShare
This produces TV sound on your
SAT via a Bluetooth connection and
controls the sound.
AUDIO SYNC
Used to help sync video to audio
when connected to a digital TV.
AUTO POWER
Synchronizes the Air Track to a
connected Optical source via the
Optical jack so it turns on automatically
when you turn on your TV.
TV VOLUME
Adjusts the TV volume level.
TV CHANNEL
Switches between the available TV
channels.
TV MUTE
Mutes the sound from the TV. Press
again to restore the sound to the
previous volume level.
SMART VOLUME
Regulates and stabilizes the volume
level against a drastic volume change.
3D SOUND PLUS
This feature adds depth and
spaciousness to the sound.
TV INFO, TV PRE-CH
Displays the current TV status.
Moves to the previous TV channel.
ƒ SAT stands for Surround Air Track, which is Samsung’s proprietary name.
ƒ The remote control can operate TVs made by SAMSUNG only.
ƒ Depending on the TV you are using, you may not be able to operate your TV with this remote
control. If you can't, operate the TV using the TV's remote control.
DIMMER
You can control the brightness of the
Display.
DRC
You can use this function to enjoy Dolby
Digital sound when watching movies at
low volume at night (Standard, MAX, MIN).
MUTE
Mutes the sound from the unit.
Press again to restore the sound to
the previous volume level.
TOUR OF THE REMOTE CONTROL
HW-F355
11
ENG
● CONNECTIONS
INSTALLING THE WALL MOUNT
You can use the wall mount bracket to mount this unit on a wall.
ƒ Do not hang onto the installed unit and avoid any impact to the unit.
ƒ Secure the unit firmly to the wall so that it does not fall off. If the unit falls off, it may cause an
injury or damage the product.
ƒ When the unit is installed on a wall, please make sure that children do not pull any of the
connecting cables, as it may cause it to fall.
ƒ For the optimal performance of a wall mount installation, install the speaker system at least 2
inches (5 cm) below the TV.
connections
Installation Precautions
• Install on a vertical wall only.
• For the installation, avoid a location with high temperature or humidity, or a wall that cannot sustain the
weight of the set.
• Check the strength of the wall. If the wall is not strong enough to support the unit, reinforce the wall or
install the unit on different wall that can support the unit's weight.
• Purchase and use the fixing screws or mollys appropriate for the kind of wall you have (plaster board, iron
board, wood, etc.). If possible, fix the support screws into wall studs.
• Connect cables from the unit to external devices before you install it on the wall.
• Make sure the unit is turned off and unplugged before you install it. Otherwise, it may cause an electric shock.
2 inches (5 cm) or more
1. Place the wall mount bracket on a wall surface and then
secure it with two screws (not supplied).
If you are hanging the unit below a TV, be sure to install the
wall mount bracket so that the arrow ( ) is placed in the
center of the TV.
Also make sure the unit is at least two inches (5 cm)
below the TV.
2. Align the screw holders (Holder-screw, AH61-03342A)
with the screw holes on the back of the Main Unit. Insert
the supplied screws through the screw holders, and then
screw them into the Main Unit.
3. Insert the USB cable into the back of the unit before
installing it on the wall.
4. Fit the unit into the corresponding slots of the wall mount
bracket. For secure installation, make sure the mounting
studs slide firmly down into the bottom of the slots.
5. The installation is complete.
1 2
12
connections
CONNECTING AN EXTERNAL DEVICE USING AUDIO (ANALOG)
CABLE OR OPTICAL (DIGITAL) CABLE
This unit comes equipped with one optical in digital jack and one audio analog in jack, giving you two ways to
connect it to a TV.
or
AUX IN
OPTICAL IN
AUX IN
AUDIO
OUT
L
R
Red White
Audio Cable
OPTICAL IN
OPTICAL
OUT
Optical Cable
(not supplied)
BD/DVD player/
Set-top box/
Game console
AUX IN
Connect AUX IN (Audio) on the main unit to the AUDIO OUT of the TV or Source Device.
Be sure to match connector colors.
or,
OPTICAL IN
Connect the Digital Input on the main unit to the OPTICAL OUT of the TV or Source Device.
ƒ Do not connect the power cord of this product or your TV to the wall outlet until all
connections between components are complete.
ƒ Before moving or installing this product, be sure to turn off the power and disconnect the power
cord.
13
ENG
● FUNCTIONS
functions
INPUT MODE
You can select D.IN, AUX, BT, TV input or USB input.
Press an appropriate button on the remote control to select a desired mode, or press ( ) to select one from:
D.IN, AUX, BT, TV or USB mode.
Input mode Display
Optical Digital input D.IN
AUX input AUX
BLUETOOTH mode BT (HW-F355 model only)
TV mode TV (HW-F355 model only)
USB mode USB
The unit turns off automatically in the following situations:
• BT/TV/USB/D.IN MODE
- If there is no audio signal for 20 minutes.
• AUX Mode
- If no KEY input is entered for 8 hours when the cable is connected.
- If the AUX cable is disconnected for 20 minutes.
ƒ Use the provided cable if a USB flash memory device cannot be connected directly to the unit.
BLUETOOTH (HW-F355 MODEL ONLY)
You can use a Bluetooth device to enjoy music with high quality stereo sound, all without wires!
What is Bluetooth?
Bluetooth is a technology that enables Bluetooth-compliant devices to interconnect easily with each other using
a short wireless connection.
• A Bluetooth device may cause noise or malfunction, depending on usage, when:
- A part of your body is in contact with the receiving/transmitting system of the Bluetooth device or the Air
Track.
- It is subject to electrical variation from obstructions caused by a wall, corner, or office partition.
- It is exposed to electrical interference from same frequency-band devices including medical equipment,
microwave ovens, and wireless LANs.
• Pair the Air Track with the Bluetooth device while they are close together.
• The further the distance is between Air Track and Bluetooth device, the worse the quality is.
If the distance exceeds the Bluetooth operational range, the connection is lost.
• In poor reception-sensitivity areas, the Bluetooth connection may not work properly.
• The Bluetooth connection only works when the Bluetooth device is close to the set. The connection will be
automatically cut off if the Bluetooth device is out of range. Even within range, the sound quality may be
degraded by obstacles such as walls or doors.
• This wireless device may cause electric interference during its operation.
POWER TV POWER
HW-F350
AUX USB TV SOURCE
AUTO POWER
REPEAT DIMMER
OPTICAL AUX USB TV SOURCE
AUTO POWER
REPEAT DIMMER
OPTICAL AUX USB PTICAL
HW-F355
OPTICAL AUX TV SOURCE
AUTO POWER SoundShare
USB/
REPEAT
OPTICAL AUX TV SOURCE
AUTO POWER SoundShare
USB/
REPEAT
OPTICAL AUX
14
functions
To connect the Air Track to a Bluetooth device
Check if the Bluetooth device supports the Bluetooth compliant stereo headset function.
Connect
Bluetooth device
1. Press the USB/Bluetooth button on the remote control of the Air Track to display the BT message.
• You will see WAIT for 4 seconds and then BT READY on the front display of the Air Track.
2. Select the Bluetooth menu on the Bluetooth device you want to connect. (Refer to the Bluetooth
device's user manual.)
3. Select the Stereo headset menu on the Bluetooth device.
• You will see a list of scanned devices.
4. Select "[Samsung] AirTrack" from the list.
• When the Air Track is connected to the Bluetooth device, it will display BT CONNECTED ➡ BT on the front
display.
• If the Bluetooth device has failed to pair with the Air Track, delete the previous “[Samsung] AirTrack” found
by the Bluetooth device and have it search for the Air Track again.
5. Play music on the connected device.
• You can listen to the music playing on the connected Bluetooth device over the Crystal Surround Air Track
system.
• In BT mode, Play/Repeat/Stop/Next/Prev functions are not available.
ƒ You may be required to enter a PIN code (password) when connecting the Bluetooth device to
the Air Track. If the PIN code input window appears, enter <0000>.
ƒ The Air Track supports SBC data (44.1kHz, 48kHz).
ƒ The AVRCP feature is not supported.
ƒ Connect only to a Bluetooth device that supports the A2DP (AV) function.
ƒ You cannot connect to a Bluetooth device that supports only the HF (Hands Free) function.
ƒ Only one Bluetooth device can be paired at a time.
ƒ Once you have turned off Air Track and the pairing is disconnected, the pairing will not be
restored automatically. To reconnect, you must pair the device again.
ƒ Search or connection may not be performed properly by Air Track in the following cases:
- If there is a strong electrical field around Air Track.
- If several Bluetooth devices are simultaneously paired with Air Track
- If the Bluetooth device is turned off, not in place, or malfunctions
- Note that such devices as microwave ovens, wireless LAN adaptors, fluorescent lights, and gas
stoves use the same frequency range as the Bluetooth device, which can cause electric
interference.
15
ENG
● FUNCTIONS
To disconnect the Bluetooth device from the Air Track
You can disconnect the Bluetooth device from the Air Track.
For instructions, see the Bluetooth device's user manual.
• The Air Track will be disconnected.
• When the Air Track is disconnected from the Bluetooth device the Air Track will display BT DISCONNECTED
on the front display.
To disconnect the Air Track from the Bluetooth device
Press the ( ) button on the front panel of the Air Track to switch from BT to another mode or turn off the Air
Track.
• The connected Bluetooth device will wait a certain amount of time for a response from the Air Track before
terminating the connection.
(Disconnection time may differ, depending on the Bluetooth device)
• The currently connected device will be disconnected.
ƒ In Bluetooth connection mode, the Bluetooth connection will be lost if the distance between the Air
Track and the Bluetooth device exceeds 16.25 ft. (5m).
ƒ If the Bluetooth device comes back into the effective range after disconnecting, you can restart the Air
Track to restore the pairing with the Bluetooth device.
ƒ The Air Track automatically turns off after 20 minutes in the Ready state.
SOUNDSHARE (HW-F355 MODEL ONLY)
This section explains how to connect the Crystal Surround Air Track to a Bluetooth compatible SAMSUNG TV.
To connect the Crystal Surround Air Track to a Bluetooth compatible
Samsung TV
Connect
Press the ( ) button to select the TV mode, and then connect the TV to the Crystal Surround Air Track.
• The unit will play the TV's audio when it is connected to the TV.
• If you change to another mode, except the TV SoundShare mode, or turn off the Air Track, you will hear audio
from the TV again.
To produce TV sound on your Air Track via a Bluetooth connection, you need to pair your system to the
Bluetooth compliant TV first. Once the pairing is established, the pairing information is recorded and kept and no
further Bluetooth connection message will appear. Bring the Air Track and the TV close together before pairing.
16
functions
1. Turn on the Samsung TV and Air Track.
• Set Add New Device in the TV's SoundShare Setting menu to On.
2. When you change the mode of the Air Track to TV, a message asking whether to proceed with
Bluetooth pairing is displayed. "[Samsung] AirTrack" appears on the TV screen.
3. Select on the TV screen. The pairing with the Air Track will be completed.
• Once the pairing is established, when you change the Air Track to the TV mode from other input modes, it will
automatically connect to the TV.
• Changing the Air Track from TV mode to any other mode will cancel the SoundShare connection.
• If you want to cancel the existing pairing of the SAT to a TV and pair your SAT to a different TV:
- Press the PLAY/PAUSE button on the SAT for 5 seconds in the TV input mode to cancel the existing pairing.
You can now pair it to a different TV.
• In the SoundShare mode, you can control the volume and mute using either the TV remote or the SAT remote.
ƒ TV SoundShare operation range
- recommended pairing range: within 20 inches (within 50cm)
- recommended operation range: within 16.25 ft. (5m)
ƒ If the distance between the Air Track and Samsung TV is over 16.25 ft. (5m), the connection or the
sound can be cut off. If this occurs, connect to the Bluetooth device again within the operational range.
ƒ Make sure the Samsung TV's SoundShare mode is on before you use this function.
ƒ The PLAY, NEXT, PREV, STOP buttons will not work in the SoundShare mode.
ƒ Bluetooth Standby On function
- Air Track will be powered on automatically when you turn the TV on if you connected TV and Air Track with
SoundShare function.
- You can toggle this function On/Off by pressing ( ) button of front panel over 5 seconds when Air Track is
powered off. If set to Off, the product turns off automatically when the TV turns off, but it does not turn on
automatically.
- This feature is supported by TVs released from 2013.
ƒ The SoundShare feature is supported by select models released from 2012. Check whether your TV
supports SoundShare before you begin. For more information, refer to the user's guide of your TV.
USB
1. Connect the USB device to the USB port on the side of the unit.
2. Press the ( ) button on the front panel of the Air Track repeatedly until USB appears.
3. USB appears on the display screen and then disappears.
• The Crystal Surround Air Track connection is complete.
• The SAT automatically turns off (Auto Power Off) if no USB device has been connected for more than 20 minutes.
Before you connect a USB device
Be aware of the following:
• If the file name of a folder on a USB device exceeds 10
characters, it is not displayed on the OLED.
• This product may not be compatible with certain types of USB
storage media.
• The Air Track supports the FAT16 and FAT32 file systems.
- The NTFS file system is not supported.
17
ENG
● FUNCTIONS
• Connect USB devices directly to the USB port of the product. Otherwise, you may encounter a USB
compatibility problem.
• Do not connect multiple storage devices to the product via a multi-card reader. It may not operate
properly.
• Digital camera PTP protocols are not supported.
• Do not remove the USB device while it is being read.
• DRM-protected music files (MP3, WMA) from a commercial web site will not be played.
• External HDDs are not supported.
• Mobile phone devices are not supported.
• File Format Type Compatibility list:
Format Codec
*.mp3
MPEG 1 Layer2
MPEG 1 Layer3
MPEG 2 Layer3
*.wma Wave_Format_MSAudio1
Wave_Format_MSAudio2
*.aac
AAC
AAC-LC
HE-AAC
*.wav -
*.Ogg OGG 1.1.0
*.Flac FLAC 1.1.0, FLAC 1.2.1
※ Supporting Sampling Rate above 16KHz
USING THE REMOTE CONTROL
Play/Pause/Stop
During playback, press the ►, button.
• Press the ► button again to stop playing the file temporarily.
Press the ► button to play the selected file.
• To stop playback, press the Stop () button during playback.
Skip Forward/Back
During playback, press the #,$ button.
• When there is more than one file and you press the $ button, the next file
is selected.
• When there is more than one file and you press the # button, the
previous file is selected.
Using the REPEAT function
Repeat playback allows you to repeatedly play a file, repeat all, randomly play
files, or turn Repeat off.
Press the REPEAT button.
• REPEAT OFF : Cancels Repeat Playback.
• REPEAT FILE : Repeat playing a track.
• REPEAT ALL : Repeat playing all tracks.
• REPEAT RANDOM : Plays tracks in random order. (A track that has
already been played may be played again.)
ƒ You can set the REPEAT function during the playback of music from
a USB drive.
HW-F350 TV PRE-CH TV EXIT
SOUND EFFECT SMART VOLUME
TV MUTE TV INFO TV PRE-CH TV EXIT
SOUND EFFECT SMART VOLUME
TV MUTE TV INFO
HW-F355
HW-F350 TV PRE-CH TV EXIT
SOUND EFFECT SMART VOLUME
TV MUTE TV INFO TV PRE-CH TV EXIT
SOUND EFFECT SMART VOLUME
TV MUTE TV INFO
HW-F355
HW-F350
TV VOL TV CH AUDIO SYNC
AUTO POWER
REPEAT DIMMER
TV VOL TV CH AUDIO SYNC
AUTO POWER
DIMMER
HW-F355
TV VOL TV CH AUDIO SYNC
AUTO POWER SoundShare
REPEAT
TV VOL TV CH AUDIO SYNC
AUTO POWER SoundShare
18
functions
Muting the sound
This is useful when answering a doorbell or telephone call.
1. To mute the sound of this unit, press the MUTE button on the remote
control.
2. To mute the TV, press the TV MUTE ( ) button on the remote
control.
3. Press MUTE/ TV MUTE ( ) on the remote control again (or press
VOLUME +/–) to restore the sound.
Using the 3D SOUND PLUS function
The 3D SOUND PLUS feature adds depth and spaciousness to the sound.
Press 3D SOUND PLUS on the remote control.
• Each time the button is pressed, the selection changes as follows :
3D SOUND PLUS OFF ➡ 3D SOUND PLUS MUSIC ➡ 3D SOUND
PLUS MOVIE
ƒ When you turn on 3D Sound Plus, the Sound Effect function will
automatically change to OFF.
Using the SMART VOLUME function
This will regulate and stabilize the volume level against a drastic volume
change caused by a channel change or scene transition.
Press SMART VOLUME on the remote control.
• Each time the button is pressed, the selection changes as follows :
SMART VOLUME ON ➡ SMART VOLUME OFF
Using the SOUND EFFECT function
You can select from 7 different sound modes - MUSIC, NEWS, DRAMA,
CINEMA, SPORTS, GAME, and OFF (Original Sound) - depending on the
type of sources you want to enjoy.
Press SOUND EFFECT on the remote control.
• Select the OFF mode if you want to enjoy the original sound.
ƒ We recommend that you select a Sound Effect based on the
source material and your personal taste.
ƒ When you choose a Sound Effect mode (except OFF), 3D Sound
Plus will automatically be turned OFF.
Using the S/W LEVEL function
You can control the base volume with the S/W Level button on the remote
control.
1. Press the S/W LEVEL button on the remote control.
2. “SW 0” appears on the display.
3. Press or button on the LEVEL key if you want to increase or decrease
the subwoofer volume. You can set it from SW -6 to SW +6.
HW-F350 TV PRE-CH TV EXIT
SOUND EFFECT SMART VOLUME
S/W
LEVEL S/W
LEVEL
VOL
VOL
3D SOUND PLUS DRC
TV MUTE TV INFO
MUTE
TV PRE-CH TV EXIT
SOUND EFFECT SMART VOLUME
S/W LEVEL S/W LEVEL
VOL
VOL
3D SOUND PLUS DRC
TV MUTE TV MUTE TV INFO
HW-F355
HW-F350
LEVEL LEVEL
VOL
3D SOUND PLUS DRC
LEVEL LEVEL
VOL
3D SOUND PLUS
HW-F355 3D SOUND DRC
HW-F350 SOUND EFFECT SMART VOLUME
S/W S/W
VOL
MUTE
SOUND EFFECT SMART VOLUME
S/W S/W
VOL
MUTE
SMART VOLUME
HW-F355
HW-F350 SOUND EFFECT SMART VOLUME
S/W S/W
VOL
S/W MUTE S/W
VOL
MUTE
SOUND EFFECT
HW-F355
HW-F350 S/W
LEVEL S/W
LEVEL S/W MUTE LEVEL S/W LEVEL S/W MUTE LEVEL S/W
LEVEL
HW-F355
19
ENG
● FUNCTIONS
Using the AUTO POWER LINK function
The Crystal Surround Air Track is automatically turned on when you turn on the
TV or any device connected to the Air Track with the optical cable.
Press AUTO POWER on the remote control of this unit.
• The Auto power link function turns on and off each time you press AUTO POWER.
AUTO POWER LINK Display
ON POWER LINK ON
OFF POWER LINK OFF
ƒ If a TV or any device connected to Air Track with the optical cable is
off and there is no digital input, the Air Track is turned off after 20
minutes.
Using the DIMMER function
This feature control the brightness of the Display.
Press DIMMER on the remote control of this unit.
Each time the button is pressed, the selection changes as follows :
DIMMER ON ➡ DIMMER OFF
Using the AUDIO SYNC function
Video may appear out of synch with the audio if the Air Track is connected to
a digital TV. If this occurs, adjust the audio delay time to match the video.
Press AUDIO SYNC +/–. on the remote control of this unit.
• You can use the + , - buttons to set the audio delay time between 0 ms
and 300 ms.
ƒ In USB mode TV mode or BT mode, the Audio Sync function may
not work.
Using the DRC function
This feature balances the range between the loudest and quietest sounds.
You can use this function to enjoy Dolby Digital sound when watching movies
at low volume at night.
Press DRC on the remote control of this unit.
• Each time the button is pressed, the selection changes as follows :
DRC STANDARD ➡ DRC MAX ➡ DRC MIN
HW-F350 AUTO POWER
REPEAT DIMMER
HW-F355 OPTICAL AUX TV SOURCE
AUTO POWER SoundShare
USB/
REPEAT
OPTICAL AUX TV SOURCE
AUTO POWER SoundShare
USB/
REPEAT
AUTO POWER
HW-F350
TV VOL TV CH AUDIO SYNC
AUTO POWER
REPEAT DIMMER
TV VOL TV CH AUDIO SYNC
AUTO POWER
REPEAT
HW-F355 TV PRE-CH DIMMER
SOUND EFFECT SMART VOLUME
TV MUTE TV INFO TV PRE-CH DIMMER
SOUND EFFECT SMART VOLUME
TV MUTE TV INFO DIMMER
HW-F350
TV VOL TV CH AUDIO SYNC
TV MUTE TV INFO TV PRE CH TV EXIT
TV VOL TV CH AUDIO SYNC
TV MUTE TV INFO TV PRE CH TV EXIT
AUDIO SYNC
HW-F355
HW-F350 LEVEL LEVEL
VOL
3D SOUND PLUS DRC
MUTE LEVEL LEVEL
VOL
3D SOUND PLUS DRC
MUTE
HW-F355
20
functions
Using the TV functions (with Samsung TVs only)
• Press TV SOURCE on the remote control to change the TV's input
source.
• Press TV INFO on the remote control to display the TV channel
information.
• Press TV CH on the remote control to select the TV channel.
• Press TV VOL on the remote control to increase or decrease the volume
level.
• Use TV PRE-CH button to move to the previous TV channel in TV mode.
• To exit the TV menu, use the TV EXIT button. (It functions the same as the
EXIT button of the TV remote control.)
ƒ When you press the SoundShare button, the TV's sound is
transmitted through the Air Track system via a Bluetooth
connection. The Air Track also controls the sound volume,
sound quality, etc.
ƒ The remote control can operate TVs made by SAMSUNG only.
HW-F350
TV VOL TV CH AUDIO SYNC
AUX USB TV SOURCE
TV MUTE TV INFO TV PRE-CH TV EXIT
AUTO POWER
REPEAT DIMMER
OPTICAL
TV VOL TV CH AUDIO SYNC
AUX USB TV SOURCE
TV MUTE TV INFO TV PRE-CH TV EXIT
AUTO POWER
REPEAT DIMMER
OPTICAL
TV INFO
TV VOL TV CH
TV PRE-CH TV EXIT
TV SOURCE
HW-F355
TV VOL TV CH AUDIO SYNC
AUX TV SOURCE
TV MUTE TV INFO TV PRE-CH DIMMER
OPTICAL
AUTO POWER SoundShare
USB/
REPEAT
TV VOL TV CH AUDIO SYNC
AUX TV SOURCE
TV MUTE TV INFO TV PRE-CH DIMMER
OPTICAL
AUTO POWER SoundShare
USB/
REPEAT
TV SOURCE
TV INFO
TV VOL TV CH
TV PRE-CH
SOFTWARE UPGRADE
Samsung may offer upgrades for the Crystal Surround Air Track's system
firmware in the future.
If an upgrade is offered, you can upgrade the firmware by connecting a USB
drive with the firmware upgrade stored on it to the USB port on your Air
Track.
Note that if there are multiple upgrade files, you must load them onto the
USB drive singly and use them to upgrade the firmware one at a time.
Please visit Samsung.com or contact the Samsung call center to receive
more information about downloading upgrade files.
ƒ Insert a USB drive containing the firmware upgrade into the USB port on the main unit.
ƒ Do not disconnect the power or remove the USB drive while upgrades are being applied. The main unit will turn
off automatically after completing the firmware upgrade.
When software is upgraded, settings you have made will return to their default (factory) settings.
We recommend you write down your settings so that you can easily reset them after the upgrade.
ƒ Once upgrading the product software is completed, turn off the product and then press and hold () button for
a while to reset the product.
ƒ If the firmware fails to upgrade, we recommend formatting the USB device in FAT16 and trying again.
ƒ For upgrading purposes, do not format the USB drive in NTFS format because it is not a supported file system.
ƒ Depending on the manufacturer, some USB devices may not be supported.
21
ENG
● TROUBLESHOOTING
Before requesting service, please check the following.
Symptom Check Remedy
The unit will not turn on. • Is the power cord plugged into
the outlet?
• Connect the power plug to the
outlet.
A function does not work when the
button is pressed.
• Is there static electricity in the
air?
• Disconnect the power plug and
connect it again.
Sound is not produced. • Is the unit properly connected
to your TV?
• Is the Mute function on?
• Is the volume set to minimum?
• Connect it correctly.
• Press the Mute button to
cancel the function.
• Adjust the volume.
The Picture does not appear on a TV
when the function is selected.
• Is the TV connected properly? • Connect it correctly.
The remote control does not work. • Are the batteries drained?
• Is the distance between remote
control and main unit too far?
• Replace with new batteries.
• Move closer to the unit.
The sound from the left/right
channels are reversed.
• Are the left/right audio output
cables from the TV connected
properly?
• Check the left/right channel and
connect it/them correctly.
The SoundShare (TV pairing) failed. • Does your TV support
SoundShare?
• Is your TV firmware the latest
version?
• Does an error occur when
connecting?
• Reset the TV MODE and
connect again.
• SoundShare is supported by
some Samsung TVs released
after 2012. Check your TV to
see if it supports SoundShare.
• Update your TV with the latest
firmware.
• Contact the call center.
• Press button for 5 seconds
to reset the product.
troubleshooting
22
SPECIFICATIONS
Model name HW-F350/ HW-F355
GENERAL
USB 5V/0.5A
Weight
Main unit 1.75 kg
Subwoofer
(PS-EW1-1) 3.0 kg
Dimensions
(W x H x D)
Main unit 943 x 49 x 59.9 mm
Subwoofer
(PS-EW1-1) 152 x 300 x 284 mm
Operating temperature range +5 °C to +35 °C
Operating humidity range 10 % to 75 %
AMPLIFIER
Rated output
power
Main unit 30W/CH, 8OHM, THD = 10%, 1kHz
Subwoofer
(PS-EW1-1) 60W, 3OHM, THD = 10%, 100Hz
S/N ratio (analog input) 60 dB
Separation(1kHz) 50 dB
* S/N ratio, distortion, separation and usable sensitivity are based on measurement using AES (Audio
Engineering Society) guidelines.
*: Nominal specification
- Samsung Electronics Co., Ltd reserves the right to change the specifications without notice.
- Weight and dimensions are approximate.
- For the power supply and Power Consumption, refer to the label attached to the product.
Hereby, Samsung Electronics, declares that this Crystal Surround Air Track is in compliance
with the essential requirements and other relevant provisions of Directive 1999/5/EC.
The official Declaration of Conformity may be found at http://www.samsung.com,
go to Support > Search Product Support and enter the model name.
This equipment may be operated in all EU countries.
appendix
[Correct disposal of batteries in this product]
(Applicable in countries with separate collection systems)
This marking on the battery, manual or packaging indicates that the batteries in
this product should not be disposed of with other household waste at the end of
their working life. Where marked, the chemical symbols Hg, Cd or Pb indicate that
the battery contains mercury, cadmium or lead above the reference levels in EC
Directive 2006/66. If batteries are not properly disposed of, these substances can
cause harm to human health or the environment.
To protect natural resources and to promote material reuse, please separate
batteries from other types of waste and recycle them through your local, free
battery return system.
Correct Disposal of This Product
(Waste Electrical & Electronic Equipment)
(Applicable in countries with separate collection systems)
This marking on the product, accessories or literature indicates that the product and
its electronic accessories (e.g. charger, headset, USB cable) should not be disposed
of with other household waste at the end of their working life. To prevent possible
harm to the environment or human health from uncontrolled waste disposal, please
separate these items from other types of waste and recycle them responsibly to
promote the sustainable reuse of material resources.
Household users should contact either the retailer where they purchased this product,
or their local government office, for details of where and how they can take these
items for environmentally safe recycling.
Business users should contact their supplier and check the terms and conditions
of the purchase contract. This product and its electronic accessories should not be
mixed with other commercial wastes for disposal.
AH68-02614L-05
Contact SAMSUNG WORLD WIDE
If you have any questions or comments relating to Samsung products, please contact the SAMSUNG customer
care Centre.
Country Contact Centre � Web Site
AUSTRIA 0800 - SAMSUNG (0800 -
7267864) www.samsung.com/at/support
BELGIUM 02-201-24-18
www.samsung.com/be/support
(Dutch)
www.samsung.com/be_fr/
support (French)
BOSNIA 051 331 999 www.samsung.com/support
BULGARIA 07001 33 11 , sharing cost www.samsung.com/bg/support
CROATIA 062 726 786 www.samsung.com/hr/support
CZECH 800 - SAMSUNG (800-726786) www.samsung.com/cz/support
DENMARK 70 70 19 70 www.samsung.com/dk/support
FINLAND 030-6227 515 www.samsung.com/fi/support
FRANCE 01 48 63 00 00 www.samsung.com/fr/support
GERMANY
0180 6 SAMSUNG bzw.
0180 6 7267864*
(*0,20 €/Anruf aus dem dt.
Festnetz, aus dem Mobilfunk
max. 0,60 €/Anruf)
www.samsung.com/de/support
CYPRUS 8009 4000 only from landline, toll
free
www.samsung.com/gr/support
GREECE
80111-SAMSUNG (80111 726
7864) only from land line
(+30) 210 6897691 from mobile
and land line
HUNGARY 0680SAMSUNG (0680-726-786)
0680PREMIUM (0680-773-648)
http://www.samsung.com/hu/
support
ITALIA 800-SAMSUNG (800.7267864) www.samsung.com/it/support
LUXEMBURG 261 03 710 www.samsung.com/support
Country Contact Centre � Web Site
MONTENEGRO 020 405 888 www.samsung.com/support
SLOVENIA 080 697 267
090 726 786 www.samsung.com/si/support
NETHERLANDS 0900-SAMSUNG (0900-7267864)
(€ 0,10/Min) www.samsung.com/nl/support
NORWAY 815 56480 www.samsung.com/no/support
POLAND
0 801-172-678* lub +48 22
607-93-33 **
* (całkowity koszt połączenia jak za
1 impuls według taryfy operatora)
** (koszt połączenia według
taryfy operatora)
www.samsung.com/pl/support
PORTUGAL 808 20 7267 www.samsung.com/pt/support
ROMANIA 08008 SAMSUNG (08008 726
7864) TOLL FREE No. www.samsung.com/ro/support
SERBIA 011 321 6899 www.samsung.com/rs/support
SLOVAKIA 0800 - SAMSUNG(0800-726 786) www.samsung.com/sk/support
SPAIN 0034902172678 www.samsung.com/es/support
SWEDEN 0771 726 7864 (SAMSUNG) www.samsung.com/se/support
SWITZERLAND 0848 726 78 64
(0848-SAMSUNG)
www.samsung.com/ch/support
(German)
www.samsung.com/ch_fr/
support (French)
U.K 0330 SAMSUNG (7267864) www.samsung.com/uk/support
EIRE 0818 717100 www.samsung.com/ie/support
LITHUANIA 8-800-77777 www.samsung.com/lt/support
LATVIA 8000-7267 www.samsung.com/lv/support
ESTONIA 800-7267 www.samsung.com/ee/support
Crystal Surround Air Track
(système avec enceintes actives)
Manuel d'utilisation
imaginez les possibilités
Merci d’avoir choisi un appareil Samsung.
Pour recevoir une assistance plus complète,
veuillez enregistrer votre produit sur
www.samsung.com/register
HW-F350
HW-F355
2
caractéristiques
SoundShare
Le SoundShare émet le son du téléviseur sur votre le Crystal Surround Air Track (SAT) via une connexion Bluetooth et le son
est contrôlé.
3D SOUND PLUS
La fonctionnalité 3D SOUND PLUS ajoute de la profondeur et de la grandeur au son.
Mode sonore spécial
Vous avez le choix entre sept modes de sons différents - MUSIC, NEWS, DRAMA, CINEMA, SPORTS, GAME, et OFF (son
original) - selon le type de contenu dont vous souhaitez profiter.
Télécommande multifonction
La télécommande fournie peut également être utilisée pour commander le téléviseur connecté à cet ensemble. (Fonctionne
uniquement avec les téléviseurs Samsung)
Elle est pourvue d'une touche d'accès rapide au téléviseur permettant d'activer plusieurs options d'une simple pression sur
les touches.
Système avec enceintes actives
Cet ensemble est doté d'un système avec enceintes actives qui offre une haute qualité sonore dans une seule unité peu
encombrante.
Cet ensemble ne nécessite aucun haut-parleur satellite ni câbles, généralement présents dans les systèmes ambiophoniques
classiques.
Prise en charge de la fonction Hôte USB
Vous pouvez connecter des périphériques de stockage USB externes (lecteur MP3, mémoire flash USB, etc.) afin d’en lire
les fichiers musicaux à l’aide de la fonction USB HOST du système Air Track.
Fonction Bluetooth
Vous pouvez connecter un périphérique Bluetooth à le Crystal Surround Air Track pour écouter de la musique avec un son
stéréo de haute qualité, tout cela sans fil!
LICENCE
Fabriqué sous licence par Dolby Laboratories. Dolby et le symbole représentant deux D sont des marques de commerce de
Dolby Laboratories.
Fabriqué sous licence sous les brevets américains suivants : 5,956,674; 5,974,380; 6,487,535 et autres brevets déposés
ou en attente aux États-Unis ou dans d'autres pays. DTS, le Symbole, ainsi que DTS et le Symbole ensemble sont des
marques déposées et DTS 2.0 Channel est une marque de commerce de DTS, Inc. Le produit inclut le logiciel. © DTS, Inc.
Tous droits réservés.
- Pour toute requête et demande concernant les questions sur les sources ouvertes, contactez Samsung via
e-mail (oss.request@ samsung.com).
3
FRA
informations relatives à la sécurité
AVERTISSEMENTS
POUR ÉVITER LES RISQUES DE CHOC ÉLECTRIQUE, NE DÉMONTEZ PAS LE CAPOT. L’APPAREIL NE CONTIENT PAS DE
PIÈCES RÉPARABLES PAR L’UTILISATEUR ; S’ADRESSER À UN SERVICE APRÈS-VENTE QUALIFIÉ.
ATTENTION
RISQUE DE CHOC ÉLECTRIQUE.
NE PAS OUVRIR
Ce symbole avertit l’utilisateur de la
présence d’une tension dangereuse à
l’intérieur de l’appareil.
Ce symbole avertit l’utilisateur de la
présence de directives importantes dans la
documentation accompagnant cet appareil.
AVERTISSEMENT : Afin de diminuer les risques d’incendie ou de choc électrique, n’exposez pas cet appareil à la pluie ou à l’
humidité.
MISE EN GARDE : POUR PRÉVENIR LES CHOCS ÉLECTRIQUES, BRANCHEZ LA FICHE AU FOND, EN PRENANT SOIN
D'INSÉRER LA TIGE LARGE DANS LA FENTE LARGE.
• Cet appareil doit toujours être branché à une prise terre.
• Pour déconnecter l’appareil du circuit principal, la prise doit être débranchée de la prise principale ; il est de ce fait
nécessaire que la prise principale soit facile d'accès.
ATTENTION
• Évitez toute projection d’eau sur l’appareil. Ne posez jamais d’objet contenant un liquide (ex : un vase) dessus.
• Pour éteindre complètement l'appareil, vous devez retirer le cordon d'alimentation de la prise murale. Par conséquent,
le cordon d'alimentation doit être facilement accessible à tout moment.
4
PRÉCAUTIONS
Assurez-vous que l'alimentation électrique de votre maison est conforme à la plaque d'identification située au dos de votre produit.
Posez votre produit à plat sur un meuble stable en veillant à laisser un espace de 7 à 10 cm autour de l'appareil afin d’assurer une ventilation
correcte de celui-ci. Faites attention à ne pas obstruer les orifices de ventilation. Ne posez pas l'ensemble sur un amplificateur ou
un autre appareil susceptible de chauffer. Cet ensemble est conçu pour une utilisation en continu. Pour entièrement éteindre l'appareil,
débranchez la fiche CA de la prise murale. Débranchez l'appareil si vous envisagez de ne pas l'utiliser durant une longue période.
En cas d'orage, débranchez la fiche de l'appareil de la prise murale.
Les surtensions occasionnées par l'orage pourraient endommager votre
appareil.
Protégez le produit de l'humidité (comme les vases) et d'une chaleur
excessive (comme une cheminée) ou de tout équipement capable de
créer des champs magnétiques ou électriques. Débranchez le câble
d'alimentation en cas de dysfonctionnement.
Votre produit n'est pas prévu pour un usage industriel. Ce produit ne peut
être utilisé qu'à des fins personnelles.
Une condensation peut se former si le produit ou un disque a été stocké
à basse température. Si vous devez transporter l'ensemble pendant
l'hiver, attendez environ 2 heures que l'appareil ait atteint la température
de la pièce avant de l'utiliser.
N'exposez pas l'ensemble aux rayons directs du soleil ou à toute autre
source de chaleur. Ceci pourrait entraîner une surchauffe et un dysfonctionnement
de l’appareil.
Les piles utilisées dans ce produit peuvent contenir des produits
chmiques dangereux pour l'environnement.
Ne jetez pas les piles dans votre poubelle habituelle.
Ne vous débarrassez pas des piles en les faisant brûler.
Les piles ne doivent pas être court-circuitées, démontées ou subir de
surchauffe.
Le remplacement incorrect de la batterie entraîne un risque d'explosion.
Ne la remplacez que par une batterie du même type.
pp
Phones
3.9 inch 3.9 inch
2.7 inch
3.9 inch 99.1mm
99.1mm 99.1mm
68.6mm
Ɣ Les fi gures et les illustrations du présent Manuel d'utilisation sont fournies à titre de référence uniquement et
peuvent différer de l'apparence du produit réel.
Ɣ Des frais supplémentaires pourront vous être facturés dans les cas suivants :
(a) Vous demandez l'intervention d'un ingénieur, mais il s'avère que l'appareil ne présente aucune anomalie
(par ex. vous n'avez pas lu ce Manuel d'utilisation).
(b) Vous portez l'unité à un centre de réparation, mais il s'avère que celle-ci ne présente aucune défaillance
(par ex. vous n'avez pas lu ce Manuel d'utilisation).
Ɣ Le montant de ces frais administratifs vous sera notifi é avant que tout travail ou toute visite à votre domicile
ne soit effectuée).
5
FRA
sommaire
CARACTÉRISTIQUES
2
2 Caractéristiques
2 Licence
INFORMATIONS RELATIVES À LA
SÉCURITÉ
3
3 Avertissements
4 Précautions
DÉMARRAGE
6
6 Avant de lire le manuel d'utilisation
6 Contenu
DESCRIPTIONS
7
7 Façade
8 Panneau arrière
8 Installation du noyau torique en ferrite sur le
câble des enceintes du caisson de graves
TÉLÉCOMMANDE
9
9 Présentation de la télécommande
BRANCHEMENTS
11
11 Installation de la fixation murale
12 Connexion d'un périphérique externe à
l'aide d'un câble audio (analogique) ou
optique (numérique)
DÉPANNAGE
21
21 Dépannage
ANNEXE
22
22 Spécifications
FONCTIONS
13
13 Mode d’entrée
13 Bluetooth (Modèle HW-F355 uniquement)
15 SoundShare (Modèle HW-F355 uniquement)
16 USB
17 Utilisation de la télécommande
20 Mise à jour du logiciel
6
AVANT DE LIRE LE MANUEL D'UTILISATION
Prenez connaissance des termes suivants avant de lire le manuel d'utilisation.
Icônes utilisées dans le présent manuel
Icône Terme Définition
Attention Indique une situation pour laquelle une fonction ne fonctionne pas ou que
des paramètres peuvent être annulés.
Remarque Donne des conseils ou des instructions permettant d'améliorer l'utilisation
de chaque fonction.
Consignes de sécurité et dépannage
1) Familiarisez-vous avec les Consignes de sécurité avant d'utiliser ce produit. (Reportez-vous à la page 3)
2) En cas de problème, consultez la section Dépannage. (Reportez-vous à la page 21)
Copyright
©2013 Samsung Electronics Co.,Ltd.
Tous droits réservés. Le présent manuel d'utilisation ne peut être reproduit ou copié, en partie ou
dans son intégralité, sans l'autorisation écrite préalable de Samsung Electronics Co., Ltd.
démarrage
ƒ L'aspect des accessoires peut légèrement différer des illustrations ci-dessus.
ƒ Utilisez le câble USB dédié pour connecter des périphériques USB à l'unité.
CONTENU
Vérifiez la présence des accessoires fournis présentés ci-dessous.
POWER TV POWER
AH59-02548A
TV VOL TV CH AUDIO SYNC
AUX USB TV SOURCE
TV PRE-CH TV EXIT
SOUND EFFECT SMART VOLUME
S/W
LEVEL S/W
LEVEL
VOL
VOL
3D SOUND PLUS DRC
TV MUTE TV INFO
AUTO POWER
REPEAT DIMMER
OPTICAL
MUTE (Vis : 2EA)
(Vis du support : 2EA)
Télécommande/ Piles
(type AAA) Manuel d'utilisation Fixation de support mural Vis Câble USB
Cordon d'alimentation Adaptateur Câble auxiliaire Noyau torique en ferrite
7
FRA
● DESCRIPTIONS
descriptions
FAÇADE
BOUTON POWER Permet d'allumer/d'éteindre le Crystal Surround Air Track.
BOUTON DE
FONCTIONS
Permet de sélectionner les entrées D.IN, AUX, BT, TV, USB.
- Lorsque l’appareil est sous tension, si vous appuyez sur le bouton
( ) pendant plus de 3 secondes, le bouton fonctionne en MUTE
(SILENCIEUX). Pour annuler la configuration du bouton MUTE
(SILENCIEUX), appuyez à nouveau sur le bouton ( ) pendant
plus de 3 secondes.
VOLUME +/- Permet de régler le volume.
AFFICHAGE Affiche le mode actuellement sélectionné.
ƒ Lorsque vous mettez l'unité sous tension, il faut compter 4 ou 5 secondes de retard avant
le déclenchement du son.
1 2 3
4
8
BORNE DU
CONNECTEUR DU
CAISSON DE
GRAVES
Permet de connecter la prise du connecteur au caisson de graves.
ENTRÉE DE
L'ALIMENTATION
Branchez correctement la prise de l'adaptateur CA au secteur, puis
branchez la fiche de l'adaptateur CA dans la prise murale.
PORT USB
Connectez ici des périphériques USB comme des lecteurs MP3
pour lire des fichiers sur les périphériques.
- Utilisez le câble USB fourni si vous avez installé l'appareil sur un
mur.
ENTRÉE
OPTIQUE Permet la connexion à la sortie (optique) numérique d’un appareil externe.
5 ENTRÉE AUX Permet la connexion à la sortie analogique d’un périphérique externe.
ƒ Lorsque vous débranchez le câble d’alimentation de l'adaptateur CA de la prise murale,
veillez à maintenir la fiche. Ne tirez pas sur le câble.
ƒ Ne branchez pas cette unité ou d'autres composants sur une prise CA jusqu'à ce que
tous ces branchements entre les composants soient terminés.
descriptions
PANNEAU ARRIÈRE
INSTALLATION DU NOYAU TORIQUE EN FERRITE SUR LE CÂBLE
DES ENCEINTES DU CAISSON DE GRAVES
Soulevez pour
déverrouiller et ouvrir le
noyau en ferrite.
Placez le câble des
enceintes du caisson de
graves sur le noyau ouvert.
Verrouillez à nouveau le noyau.
3
AUX IN OPTICAL IN
5 4
1
2
9
FRA
● TÉLÉCOMMANDE
télécommande
PRÉSENTATION DE LA TÉLÉCOMMANDE
HW-F350
Installation des piles dans la télécommande
1. Soulevez le couvercle situé à
l'arrière de la télécommande
comme indiqué.
2. Insérez deux piles de type AAA.
Vérifiez bien que les pôles + et - des piles
sont placés comme indiqué sur le diagramme
représenté à l'intérieur du compartiment.
3. Repositionnez le couvercle.
Dans un schéma d'utilisation
classique, les piles durent
environ un an.
Portée de la Télécommande
La portée de la télécommande en ligne droite est d'environ 7 mètres. Elle fonctionne également inclinée
selon un angle horizontal de 30° maximum par rapport au capteur de la télécommande.
BOUTON POWER
Permet d'allumer/d'éteindre
le Crystal Surround Air Track.
OPTICAL
Appuyez sur le mode optique.
BOUTON TV POWER
Permet d'allumer/d'éteindre le
téléviseur Samsung.
AUTO POWER, DIMMER
Synchronise le système Air Track par la
connexion optique via la prise Optique de
façon à ce qu’il s’active automatiquement
lorsque vous allumez votre téléviseur.
Vous pouvez régler la luminosité de
l'affichage.
BOUTON DE COMMANDE
Permet de lire, mettre en pause ou arrêter
la lecture d'un fichier musical, ou de
rechercher le fichier musical suivant ou
précédent.
TV MUTE
Permet de couper le son du téléviseur.
Appuyez à nouveau pour rétablir le son
à son niveau de volume précédent.
AUX
Appuyez sur le mode AUX.
USB
Appuyez sur le mode USB.
CHAÎNE DE TÉLÉVISION, AUDIO SYNC
Permet de commuter entre les
chaînes TV disponibles.
Permet de synchroniser les signaux
vidéo et audio lors de la connexion de
l’appareil à un téléviseur numérique. TV INFO, TV PRE-CH
Permet de visionner les informations
relatives aux chaînes de télévision.
Permet de revenir à la chaîne de
télévision précédente.
REPEAT
Sélectionnez Répéter le fichier, Tout,
Aléatoire.
S/W LEVEL, VOLUME
Règle le niveau du caisson de basses.
Règle le niveau de volume de l’unité.
TV SOURCE
Appuyez ici pour connecter une source
vidéo du téléviseur.
VOLUME SONORE DU TÉLÉVISEUR
Règle le niveau de volume du téléviseur.
SOUND EFFECT
Permet de sélectionner les Effets sonores:
(MUSIC, NEWS, DRAMA, CINEMA, SPORTS,
GAME, OFF (Son original))
MUTE
Permet de mettre l'appareil en
sourdine. Appuyez de nouveau sur cette
touche pour restaurer le volume initial.
DRC
Vous pouvez utiliser cette fonction pour
bénéficier du son Dolby Digital lorsque
vous regardez un film à un faible volume
sonore la nuit (Standard, MAX, MIN).
TV EXIT
Permet de quitter le téléviseur. (fonctionne de
la même manière que le bouton EXIT de la
télécommande du téléviseur)
SMART VOLUME
Contrôle et stabilise le niveau du
volume pour éviter toute variation
sonore spectaculaire.
3D SOUND PLUS
Cette fonction ajoute de la
profondeur et de l’espace au
son.
POWER TV POWER
AH59-02548A
TV VOL TV CH AUDIO SYNC
AUX USB TV SOURCE
TV PRE-CH TV EXIT
SOUND EFFECT SMART VOLUME
S/W
LEVEL S/W
LEVEL
VOL
VOL
3D SOUND PLUS DRC
TV MUTE TV INFO
AUTO POWER
REPEAT DIMMER
OPTICAL
MUTE
10
BOUTON POWER
Permet d'allumer/d'éteindre
le Crystal Surround Air Track.
REPEAT
Sélectionnez Répéter le fichier, Tout, Aléatoire.
BOUTON TV POWER
Permet d'allumer/d'éteindre le téléviseur
Samsung.
AUX
Appuyez sur le mode AUX.
POWER TV POWER
AH59-02532A
TV VOL TV CH AUDIO SYNC
AUX TV SOURCE
TV PRE-CH DIMMER
SOUND EFFECT SMART VOLUME
VOL
VOL
DRC
TV MUTE TV INFO
OPTICAL
S/W MUTE LEVEL S/W
LEVEL
3D SOUND PLUS
AUTO POWER SoundShare
USB/
REPEAT
BOUTON DE COMMANDE
Permet de lire, mettre en pause ou arrêter la
lecture d'un fichier musical, ou de rechercher
le fichier musical suivant ou précédent.
OPTICAL
Appuyez sur le mode optique.
SOUND EFFECT
Permet de sélectionner les Effets sonores:
(MUSIC, NEWS, DRAMA, CINEMA,
SPORTS, GAME, OFF (Son original))
S/W LEVEL, VOLUME
Règle le niveau du caisson de
basses.
Règle le niveau de volume de l’unité.
USB, Bluetooth
Appuyez sur le mode USB/Bluetooth.
TV SOURCE
Appuyez ici pour connecter une
source vidéo du téléviseur.
SoundShare
Le son du téléviseur est émis sur votre
enceinte satellite (SAT) via une connexion
Bluetooth et le son est contrôlé.
AUDIO SYNC
Permet de synchroniser les signaux
vidéo et audio lors de la connexion de
l’appareil à un téléviseur numérique.
AUTO POWER
Synchronise le système Air Track par la
connexion optique via la prise Optique de
façon à ce qu’il s’active automatiquement
lorsque vous allumez votre téléviseur.
VOLUME SONORE DU TÉLÉVISEUR
Règle le niveau de volume du téléviseur.
CHAÎNE DE TÉLÉVISION
Permet de commuter entre les
chaînes TV disponibles.
TV MUTE
Permet de couper le son du téléviseur.
Appuyez à nouveau pour rétablir le son
à son niveau de volume précédent.
SMART VOLUME
Contrôle et stabilise le niveau du
volume pour éviter toute variation
sonore spectaculaire.
3D SOUND PLUS
Cette fonction ajoute de la
profondeur et de l’espace au son.
TV INFO, TV PRE-CH
Permet de visionner les informations relatives
aux chaînes de télévision. Permet de revenir
à la chaîne de télévision précédente.
ƒ SAT signifie Surround Air Track (Système Air Track) qui est un nom de propriété Samsung.
ƒ La télécommande n'est opérationnelle que sur les téléviseurs Samsung.
ƒ Cette télécommande risque de ne pas fonctionner sur tous les téléviseurs. Si vous ne pouvez pas, utilisez le
téléviseur via sa télécommande.
DIMMER
Vous pouvez régler la luminosité de l'affichage.
DRC
Vous pouvez utiliser cette fonction pour
bénéficier du son Dolby Digital lorsque
vous regardez un film à un faible volume
sonore la nuit (Standard, MAX, MIN).
MUTE
Permet de mettre l'appareil en
sourdine. Appuyez de nouveau sur cette
touche pour restaurer le volume initial.
télécommande
PRÉSENTATION DE LA TÉLÉCOMMANDE
HW-F355
11
FRA
● BRANCHEMENTS
INSTALLATION DE LA FIXATION MURALE
Vous pouvez utiliser le support de fixation mural pour fixer l’unité au mur.
ƒ Ne vous appuyez pas sur l'unité montée et protégez celle-ci de tout risque d’impact.
ƒ Fixez fermement l’unité au mur afin qu’elle ne tombe pas. La chute de l’appareil peut
provoquer des blessures ou endommager le produit.
ƒ Lorsque l’unité est fixée au mur, veillez à ce qu’un enfant ne tire pas sur les câbles de
connexion au risque de faire tomber l’appareil.
ƒ Pour qu'une installation avec fixation murale fonctionne de manière optimale, veillez à ce
que le système d'enceintes et le téléviseur soient séparés d'au moins 5 cm.
Précautions d’installation
• Procédez à l'installation sur un mur vertical uniquement.
• Pour l’installation, évitez les températures extrêmes et l’humidité ou encore un mur pas assez solide pour
supporter le poids de l’appareil.
• Vérifiez la solidité du mur. Si le mur n'est pas assez solide pour supporter l'appareil, renforcez le mur ou
installez l'appareil sur un autre mur pouvant supporter son poids.
• Achetez et utilisez les vis de fixation ou les boulons appropriés au type de mur dont vous disposez
(plaque de plâtre, fer forgé, bois, etc.). Si possible, fixez les vis de fixation dans les poteaux du mur.
• Branchez les câbles entre l'appareil et les périphériques externes avant de l'installer sur le mur.
• Veillez à éteindre et débrancher l’unité avant installation. Autrement, vous vous exposeriez à un risque de
décharge électrique.
1. Placez le support de fixation sur la surface du mur puis
fixez-le à l’aide de deux vis (non fournies).
Si vous suspendez l'appareil en dessous d'un téléviseur,
assurez-vous d'installer le support mural de telle sorte que la
flèche ( ) soit placée au centre du téléviseur.
Assurez-vous également que l'appareil est placé à au
moins 5 cm (2 pouces) en dessous du téléviseur.
2. Alignez les trous à vis sur les deux côtés de l'UNITÉ
PRINCIPALE avec les trous à vis du SUPPORT AUX VIS
et fixez-le avec les vis.
3. Insérez le câble USB à l’arrière de l'unité avant de
l’installer sur le mur.
4. Introduisez l’unité dans les fentes correspondantes
du support de fixation mural. - Pour une sécurité
d’ installation optimale, veillez à ce que les goujons
descendent jusqu’en butée à l’intérieur des fentes.
5. L'installation est terminée.
5 cm (2 pouces) minimum
1 2
branchements
12
branchements
CONNEXION D'UN PÉRIPHÉRIQUE EXTERNE À L'AIDE D'UN CÂBLE
AUDIO (ANALOGIQUE) OU OPTIQUE (NUMÉRIQUE)
Cette section présente les deux méthodes (numérique et analogique) de connexion de l’unité au téléviseur.
Cet appareil est équipé d'une prise numérique optique et d'une prise analogique audio pour la connexion à un
téléviseur.
ou
AUX IN
OPTICAL IN
AUX IN
AUDIO
OUT
L
R
Red White
Câble Audio
OPTICAL IN
OPTICAL
OUT
Câble Optique
(non fourni)
Lecteur BD/
DVD/Décodeur/
Console de jeux
Rouge Blanc
AUX IN (ENTRÉE AUX)
Connectez la prise AUX IN (ENTRÉE AUX) (Audio) de l’unité principale à la prise AUDIO OUT (SORTIE AUDIO)
du téléviseur ou du périphérique source.
Veillez à respecter les codes couleur.
ou,
OPTICAL IN (ENTRÉE OPTIQUE)
Branchez la prise d’entrée numérique de l’unité principale sur la sortie OPTICAL OUT du téléviseur ou de
l’appareil source.
ƒ Ne branchez pas le cordon d’alimentation de ce produit ou de votre téléviseur dans la
prise murale avant que toutes les connexions entre les différents composants n’aient été
effectuées.
ƒ Avant de déplacer ou d'installer ce produit, éteignez-le et débranchez le cordon
d'alimentation.
13
FRA
● FONCTIONS
MODE D’ENTRÉE
Vous pouvez sélectionner l'entrée D.IN, AUX, BT, TV ou bien l'entrée USB.
Actionnez le bouton approprié sur la télécommande pour sélectionner le mode souhaité ou appuyez sur ( ) pour
sélectionner l'un des modes suivants :
Mode D.IN, AUX, BT, TV ou USB.
Mode d'entrée Affichage
Entrée Optique numérique D.IN
Entrée AUX AUX
Mode BLUETOOTH BT (Modèle HW-F355 uniquement)
Mode TV TV (Modèle HW-F355 uniquement)
Mode USB USB
L'appareil s'éteint automatiquement sous les conditions suivantes:
• MODE BT/TV/USB/D.IN
- S'il n'y a aucun signal audio pendant 20 minutes.
• Mode AUX
- Si aucune entrée de TOUCHE n'est reçue durant 8 heures lorsque le
câble est branché.
- Si le câble AUX n'est pas connecté pendant 20 minutes.
ƒ Utilisez le câble fourni si la mémoire flash USB ne peut pas être connectée directement à l'appareil.
BLUETOOTH (MODÈLE HW-F355 UNIQUEMENT)
Vous pouvez utiliser un périphérique Bluetooth pour écouter de la musique avec un son stéréo de haute
qualité, tout cela sans fil!
Qu'est-ce que le système Bluetooth ?
Le système Bluetooth est une technologie qui permet de connecter facilement entre eux des
périphériques compatibles Bluetooth à l'aide d'une liaison sans fil courte distance.
• Ce périphérique Bluetooth peut générer du bruit ou créer des dysfonctionnements en fonction des
conditions d'utilisation lorsque:
- Une partie du corps de l’appareil est en contact avec le système de réception/transmission du
périphérique Bluetooth ou du système Air Track.
- Il est soumis à des variations électriques provenant d'obstructions provoquées par un mur, un coin
ou des cloisonnements de bureaux.
- Il est exposé à des interférences électriques provenant d'appareils utilisant la même bande de
fréquences (exemple : équipements médicaux, fours à micro-ondes et réseaux LAN sans fil).
• Associer le système Air Track et le périphérique Bluetooth tout en maintenant une faible distance.
• Plus la distance est grande entre le système Air Track et le périphérique Bluetooth, plus la qualité de la
transmission se dégrade. Si la distance excède la plage opérationnelle Bluetooth, la connexion est perdue.
• Dans les zones où la réception est faible, la connexion Bluetooth peut ne pas fonctionner correctement.
• La connexion Bluetooth ne fonctionne que lorsqu'elle est proche de l'appareil. La connexion
s’interrompt automatiquement lorsque cette plage est dépassée. Même si la distance est respectée, il
est possible que la qualité sonore soit détériorée par des obstacles (ex. : murs, portes).
• Ce périphérique sans fil peut provoquer des interférences électriques durant son fonctionnement.
fonctions
POWER TV POWER
HW-F350
AUX USB TV SOURCE
AUTO POWER
REPEAT DIMMER
OPTICAL AUX USB TV SOURCE
AUTO POWER
REPEAT DIMMER
OPTICAL AUX USB PTICAL
HW-F355
OPTICAL AUX TV SOURCE
AUTO POWER SoundShare
USB/
REPEAT
OPTICAL AUX TV SOURCE
AUTO POWER SoundShare
USB/
REPEAT
OPTICAL AUX
14
fonctions
Pour connecter le système Air Track à un périphérique Bluetooth
Vérifiez si le périphérique Bluetooth prend en charge la fonction des écouteurs stéréo compatible Bluetooth.
Connexion
Périphérique Bluetooth
1. Appuyez sur le bouton USB/Bluetooth de la télécommande du système Air Track pour afficher le
message BT (Bluetooth).
• Le message WAIT reste affiché pendant 4 secondes, puis le message BT READY apparaît sur la
façade du système Air Track.
2.Sélectionnez le menu Bluetooth sur le périphérique Bluetooth que vous désirez connecter. (Reportezvous
pour cela au manuel d'utilisation de ce périphérique.)
3.Sélectionnez le menu des écouteurs stéréo sur le périphérique Bluetooth.
• Vous afficherez la liste des périphériques connectés.
4. Sélectionnez "[Samsung] AirTrack" dans la liste.
• Lorsque le système Air Track est connecté au périphérique Bluetooth, BT CONNECTED ➡ BT
s'affiche sur la façade.
• Si le fait d'associer le périphérique Bluetooth et le système Air Track a échoué, supprimez le
précédent "[Samsung] AirTrack" identifié par le périphérique Bluetooth et faites-lui rechercher le
système Air Track à nouveau.
5. Lisez de la musique sur le périphérique connecté.
• Vous pouvez écouter de la musique lue sur le périphérique Bluetooth connecté via le système Crystal
Surround Air Track.
• En mode BT, les fonctions Play/Repeat/Stop/Next/Prev (Lecture/Répétition/Arrêt/Suivant/Précédent)
ne sont pas disponibles.
ƒ Il peut vous être demandé de saisir un code PIN (mot de passe) lors de la connexion du
périphérique Bluetooth au système Air Track. Si la fenêtre de saisie du code PIN apparaît, entrez
<0000>.
ƒ Le système Air Track prend en charge les données SBC (44,1 kHz, 48 kHz).
ƒ La fonctionnalité AVRCP n'est pas prise en charge.
ƒ Effectuez uniquement la connexion à un périphérique Bluetooth qui prend en charge la fonction
A2DP (AV).
ƒ Vous ne pouvez pas effectuer une connexion à un périphérique Bluetooth qui prend en charge
uniquement la fonction HF (Mains libres).
ƒ Un seul périphérique Bluetooth peut être associé à la fois.
ƒ Une fois le système Air Track éteint et le périphérique associé déconnecté, l'association ne sera
pas restaurée automatiquement. Pour les reconnecter, vous devez associer le périphérique à
nouveau.
ƒ La recherche ou la connexion peut ne pas être effectuée correctement le système Air Track dans
les cas suivants:
- En présence d'un champ électrique puissant autour du système Air Track.
- Si plusieurs périphériques Bluetooth sont associés simultanément au système Air Track.
- Si le périphérique Bluetooth est éteint, mal positionné ou s'il connaît des
dysfonctionnements.
- Notez que des appareils tels que des fours à micro-ondes, des adaptateurs LAN sans fil, des
lampes fluorescentes et des fours à gaz pour chauffage des locaux utilisent la même plage de
fréquences que le périphérique Bluetooth, ce qui peut provoquer des interférences électriques.
15
FRA
● FONCTIONS
Pour déconnecter le périphérique Bluetooth du système Air Track
Vous pouvez déconnecter le périphérique Bluetooth du système Air Track. (Pour les instructions, reportezvous
au manuel d'utilisation de ce périphérique.)
• Le système Air Track sera déconnecté.
• Lorsque le système Air Track est déconnecté du périphérique Bluetooth, le système Air Track affiche BT
DISCONNECTED en façade.
Pour déconnecter le système Air Track du périphérique Bluetooth
Appuyez sur le bouton ( ) en façade du système Air Track pour passer du mode BT (Bluetooth) à un
autre mode ou éteindre le système Air Track.
• Le périphérique Bluetooth attend un certain temps la réponse du système Air Track avant de mettre fin à
la connexion.
(Le temps de déconnexion peut varier en fonction du périphérique Bluetooth.)
• Le périphérique actuellement connecté est déconnecté.
ƒ En mode Bluetooth, la connexion sera perdue si la distance entre le système Air Track et le
périphérique Bluetooth dépasse 5 m.
ƒ Si le périphérique Bluetooth est replacé dans la portée conseillée puis est à nouveau connecté
après avoir été déconnecté, vous pouvez redémarrer pour rétablir la liaison avec ce périphérique.
ƒ Le système Air Track s'éteint après 20 minutes en état Prêt.
SOUNDSHARE (MODÈLE HW-F355 UNIQUEMENT)
Cette section explique comment connecter le Crystal Surround Air Track aux téléviseurs compatibles Bluetooth.
Pour connecter Le Crystal Surround Air Track à un téléviseur Samsung
compatible avec le Bluetooth
Connexion
Appuyez sur le bouton ( ) pour sélectionner le mode TV, puis branchez le téléviseur sur le Crystal
Surround Air Track.
• L’appareil lit le son du téléviseur lorsqu’il est connecté à celui-ci.
• Si vous passez à un autre mode sauf le mode TV SoundShare ou si vous le désactivez, le son est à
nouveau émis par le téléviseur.
Afin que le son du téléviseur soit émis sur le système Air Track via une connexion Bluetooth, vous devez
commencer par apparier votre station avec le téléviseur compatible avec le Bluetooth. Une fois l’appariement
terminé, les informations correspondantes sont enregistrées et conservées, et plus aucun message de
connexion Bluetooth ne s’affiche. Maintenez le système Air Track et le téléviseur à proximité avant l’appariement.
16
fonctions
1. Allumez le téléviseur Samsung et le système Air Track.
• Activez l'option Add New Device (Ajouter nouveau périphérique) dans le menu SoundShare Setting
(Réglage SoundShare) du téléviseur.
2. Lorsque vous remplacez le mode du système Air Track par TV, un message vous demandant si vous
souhaitez poursuivre l’appariement Bluetooth s'affiche. Le message "[Samsung] AirTrack" apparaît sur l’écran
du téléviseur.
3. Sélectionnez (Oui) sur l’écran du téléviseur. L’appariement avec le système Air Track est alors terminé.
• Une fois que l'appariement est établi, lorsque vous remplacez le mode d'entrée par le mode TV, la
connexion au téléviseur est établie automatiquement.
• Le remplacement d'un autre mode par le mode TV du système Air Track annule la connexion
SoundShare.
• Si vous voulez annuler l'appariement existant dans l'enceinte satellite (SAT) et apparier votre enceinte
satellite à un nouveau téléviseur,
- Appuyez sur le bouton PLAY/PAUSE (LECTURE/PAUSE) du système Air Track en mode d'entrée TV pour
annuler l'appariement existant. Vous pouvez maintenant l'apparier à un autre téléviseur.
• Vous pouvez contrôler le volume et le mode silencieux en utilisant la télécommande du téléviseur et celle
de l'enceinte satellite en mode SoundShare.
ƒ Plage de fonctionnement SoundShare du téléviseur
- portée de l'appariement recommandée : 50 cm maxi.
- portée de fonctionnement recommandée : 5 m maxi.
ƒ Si la distance entre le système Air Track et le téléviseur Samsung est supérieure à 5 m, la connexion ou
le son peut être coupé(e). Le cas échéant, connectez-vous à nouveau au périphérique Bluetooth dans
la plage opérationnelle.
ƒ Assurez-vous que le mode SoundShare du téléviseur est activé avant d'utiliser cette fonction.
ƒ Les boutons PLAY (LECTURE), NEXT (SUIVANT), PREV (PRÉCÉDENT), STOP (ARRÊT) ne fonctionnent
pas en mode SoundShare.
ƒ Fonction d'activation de la mise en veille du Bluetooth
- Le système Air Track est mis sous tension automatiquement dès que vous allumez le téléviseur si vous
avez connecté le téléviseur et le système Air Track avec la fonction SoundShare
- Vous pouvez alterner l'activation/la désactivation de cette fonction en appuyant sur le bouton ( ) situé en
façade pendant plus de 5 secondes lorsque l’ensemble système Air Track est hors tension. Si vous
désactivez cette fonction, l'appareil s'éteint automatiquement, mais il ne s'allume pas automatiquement.
- Cette fonction est prise en charge par les téléviseurs sortis à partir de 2013.
ƒ La fonction SoundShare est prise en charge sur certains téléviseurs fabriqués à partir de 2012. Vérifiez
si votre téléviseur prend en charge la fonction. (Pour plus d'informations, reportez-vous au manuel
d'utilisation du téléviseur.)
USB
1. Branchez le périphérique USB sur le port USB situé sur le côté de l'appareil.
2. Appuyez plusieurs fois sur le bouton ( ) situé en façade du système Air Track jusqu’à ce que le message USB
s’affiche.
3. La mention USB apparaît brièvement à l’écran.
• La connexion à au Crystal Surround Air Track.
• Il s'éteint automatiquement (Auto Power Off) si aucun périphérique USB n'a été connecté après plus de 20 minutes.
Avant de connecter un périphérique USB
L'utilisateur doit connaître les points suivants :
• Si le dossier du nom de fichier d'un périphérique USB dépasse 10
caractères, il ne s'affiche pas sur le OLED.
• Ce produit peut ne pas être compatible avec certains types de
support de stockage USB.
• Les systèmes de fichiers FAT16 et FAT32 sont pris en charge.
- Le système de fichiers NTFS n’est pas pris en charge.
17
FRA
● FONCTIONS
• Connectez un périphérique USB directement au port USB du produit.
Dans le cas contraire, vous pouvez rencontrer un problème de compatibilité USB.
• Ne connectez pas plusieurs périphériques de stockage au produit via un lecteur à cartes multiples Il peut ne
pas fonctionner correctement.
• Les protocoles PTP des caméras numériques ne sont pas pris en charge.
• Ne retirez pas le périphérique USB lorsqu'il est en cours de lecture.
• Les fichiers musicaux protégés par la technologie DRM (MP3, WMA) d'un site Web commercial ne seront
pas lus.
• Les disques durs externes ne sont pas pris en charge.
• Les téléphones mobiles ne sont pas pris en charge.
• Liste de compatibilités
Format Codec
*.mp3
MPEG 1 Couche 2
MPEG 1 Couche 3
MPEG 2 Couche 3
*.wma Wave_Format_MSAudio1
Wave_Format_MSAudio2
*.aac
AAC
AAC-LC
HE-AAC
*.wav -
*.Ogg OGG 1.1.0
*.Flac FLAC 1.1.0, FLAC 1.2.1
※ Prend en charge un débit d'échantillonnage supérieur à 16 KHz
UTILISATION DE LA TÉLÉCOMMANDE
Lecture/Pause/Arrêt
Pendant la lecture, appuyez sur les boutons ►,.
• Appuyez à nouveau sur le bouton ► pour arrêter temporairement la
lecture du fichier.
Appuyez sur le bouton ► pour lire le fichier sélectionné.
• Pour interrompre la lecture, appuyez sur le bouton Arrêt () durant la lecture.
Saut en Avant/en Arrière
Pendant la lecture, appuyez sur les boutons #,$.
• Lorsqu'il y a plusieurs fichiers et si vous appuyez sur le bouton $, le
fichier suivant est sélectionné.
• Lorsqu'il y a plusieurs fichiers et si vous appuyez sur le bouton #, le
fichier précédent est sélectionné.
Utilisation de la fonction REPEAT
Répéter la lecture vous permet de lire un fichier de manière répétée, de
répéter tout, de lire les fichiers de manière aléatoire ou de désactiver la
fonction Repeat.
Appuyez sur le bouton REPEAT.
• REPEAT OFF : permet d'annuler la lecture répétée.
• REPEAT FILE : permet de répéter la lecture d'une plage.
• REPEAT ALL : permet de répéter la lecture de toutes les plages.
• REPEAT RANDOM : permet de lire les plages dans un ordre aléatoire.
(Une plage qui a déjà été lue peut être lue à nouveau.)
ƒ Vous pouvez régler la fonction REPEAT durant la lecture de la
musique d'un périphérique USB.
HW-F350 TV PRE-CH TV EXIT
SOUND EFFECT SMART VOLUME
TV MUTE TV INFO TV PRE-CH TV EXIT
SOUND EFFECT SMART VOLUME
TV MUTE TV INFO
HW-F355
HW-F350
TV VOL TV CH AUDIO SYNC
AUTO POWER
REPEAT DIMMER
TV VOL TV CH AUDIO SYNC
AUTO POWER
DIMMER
HW-F355
TV VOL TV CH AUDIO SYNC
AUTO POWER SoundShare
REPEAT
TV VOL TV CH AUDIO SYNC
AUTO POWER SoundShare
HW-F350 TV PRE-CH TV EXIT
SOUND EFFECT SMART VOLUME
TV MUTE TV INFO TV PRE-CH TV EXIT
SOUND EFFECT SMART VOLUME
TV MUTE TV INFO
HW-F355
18
fonctions
Mise en sourdine
Cette fonction se révèle particulièrement utile lorsqu’il vous faut aller
ouvrir votre porte d’entrée ou répondre à un appel téléphonique.
1.Pour couper le son de cet appareil, appuyez sur le bouton MUTE de la
télécommande.
2.Pour couper le son du téléviseur, appuyez sur le bouton TV MUTE
( ) de la télécommande.
3.Appuyez sur MUTE / TV MUTE ( ) de la télécommande à nouveau
(ou appuyez sur VOLUME +/–) pour rétablir le son.
Utilisation de la fonction 3D SOUND PLUS
La fonctionnalité 3D Sound Plus permet d'ajouter de la profondeur et de
la grandeur au son.
Appuyez sur le bouton 3D SOUND PLUS de la télécommande.
• Chaque fois que vous appuyez sur cette touche, vous modifiez la
sélection comme suit : 3D SOUND PLUS OFF ➡ 3D SOUND PLUS
MUSIC ➡ 3D SOUND PLUS MOVIE
ƒ Lorsque vous activez le 3D Sound Plus, les Effets sonores sont
automatiquement désactivés.
Utilisation de la fonction SMART VOLUME
Cette fonction contrôle et stabilise le volume en cas de fortes variations
sonores lors d'un changement de canal ou d’une transition de scène.
Appuyez sur le bouton SMART VOLUME de la télécommande.
• Chaque fois que vous appuyez sur cette touche, vous modifiez la
sélection comme suit : SMART VOLUME ON ➡ SMART VOLUME OFF
Utilisation des SOUND EFFECT
Vous avez le choix entre sept modes de champs acoustiques différents
- MUSIC, NEWS, DRAMA, CINEMA, SPORTS, GAME, et OFF (Son
original) - selon le type de contenu que vous souhaitez.
Appuyez sur le bouton SOUND EFFECT de la télécommande.
• Sélectionnez le mode OFF si vous souhaitez bénéficier du son original.
ƒ Nous vous recommandons de sélectionner un Effet sonore basé
sur l'équipement source et votre goût personnel.
ƒ Lorsque vous choisissez les Effets sonores (OFF excepté), le 3D
Sound Plus est automatiquement désactivé.
Utilisation de la fonction S/W LEVEL
Vous pouvez contrôler le volume de base à l’aide de la touche S/W Level
de la télécommande.
1.Appuyez sur la touche S/W LEVEL de la télécommande.
2.La mention “SW 0” s’affiche.
3.Appuyez sur le bouton ou de la touche LEVEL pour augmenter ou
baisser le volume du caisson de graves. Vous pouvez effectuer le
réglage sur une valeur comprise entre SW -6 et SW +6.
HW-F350 TV PRE-CH TV EXIT
SOUND EFFECT SMART VOLUME
S/W
LEVEL S/W
LEVEL
VOL
VOL
3D SOUND PLUS DRC
TV MUTE TV INFO
MUTE
TV PRE-CH TV EXIT
SOUND EFFECT SMART VOLUME
S/W LEVEL S/W
LEVEL
VOL
VOL
3D SOUND PLUS DRC
TV MUTE TV MUTE TV INFO
HW-F355
HW-F350
LEVEL LEVEL
VOL
3D SOUND PLUS DRC
LEVEL LEVEL
VOL
3D SOUND PLUS
HW-F355 3D SOUND DRC
HW-F350 SOUND EFFECT SMART VOLUME
S/W S/W
VOL
MUTE
SOUND EFFECT SMART VOLUME
S/W S/W
VOL
MUTE
SMART VOLUME
HW-F355
HW-F350 SOUND EFFECT SMART VOLUME
S/W S/W
VOL
S/W MUTE S/W
VOL
MUTE
SOUND EFFECT
HW-F355
HW-F350 S/W
LEVEL S/W
LEVEL S/W MUTE LEVEL S/W LEVEL S/W MUTE LEVEL S/W
LEVEL
HW-F355
19
FRA
● FONCTIONS
Utilisation de la fonction AUTO POWER LINK
Le Crystal Surround Air Track est automatiquement activé lorsque vous
mettez sous tension le téléviseur ou tout autre périphérique connecté au
système Air Track à l'aide du câble optique.
Appuyez sur la touche AUTO POWER de la télécommande de cet
ensemble.
• La fonction Auto Power Link s’active ou se désactive à chaque fois
que vous appuyez sur AUTO POWER.
AUTO POWER LINK Affichage
ACTIVÉ POWER LINK ON
DÉSACTIVÉ POWER LINK OFF
ƒ Si le téléviseur ou tout autre appareil relié au système Air Track
via le câble optique est hors tension et qu'il n'y a aucune entrée
numérique, l'unité s'éteindra au bout de 20 minutes.
Utilisation de la fonction DIMMER
Appuyez sur la touche Dimmer pour régler la luminosité de l'affichage.
Appuyez sur la touche DIMMER de la télécommande de l’unité.
• Chaque fois que vous appuyez sur cette touche, vous modifiez la
sélection comme suit : DIMMER ON ➡ DIMMER OFF
Utilisation de la fonction AUDIO SYNC
Il est possible que la vidéo soit décalée par rapport à l’audio si le système
Air Track est connecté à un téléviseur numérique.
Si cela se produit, ajustez le temps de retard audio en fonction de la vidéo.
Appuyez sur la touche AUDIO SYNC +/–. de la télécommande de l’unité.
• Vous pouvez utiliser le bouton + , - pour régler le retard audio sur une
valeur comprise entre 0 ms et 300 ms.
ƒ En mode USB, en mode TV ou en mode BT, la fonction Audio
Sync (Synchr. Audio) peut ne pas fonctionner.
Utilisation de la fonction DRC
Cette fonction permet d’équilibrer la plage sonore allant des sons les plus
forts aux plus faibles. Vous pouvez utiliser cette fonction pour bénéficier
du son Dolby Digital lorsque vous regardez un film à un faible volume
sonore la nuit.
Appuyez sur la touche DRC de la télécommande de l’unité.
• Chaque fois que vous appuyez sur cette touche, vous modifiez la
sélection comme suit : DRC STANDARD ➡ DRC MAX ➡ DRC MIN
HW-F350 AUTO POWER
REPEAT DIMMER
HW-F355 OPTICAL AUX TV SOURCE
AUTO POWER SoundShare
USB/
REPEAT
OPTICAL AUX TV SOURCE
AUTO POWER SoundShare
USB/
REPEAT
AUTO POWER
HW-F350
TV VOL TV CH AUDIO SYNC
AUTO POWER
REPEAT DIMMER
TV VOL TV CH AUDIO SYNC
AUTO POWER
REPEAT
HW-F355 TV PRE-CH DIMMER
SOUND EFFECT SMART VOLUME
TV MUTE TV INFO TV PRE-CH DIMMER
SOUND EFFECT SMART VOLUME
TV MUTE TV INFO DIMMER
HW-F350 LEVEL LEVEL
VOL
3D SOUND PLUS DRC
MUTE LEVEL LEVEL
VOL
3D SOUND PLUS DRC
MUTE
HW-F355
HW-F350
TV VOL TV CH AUDIO SYNC
TV MUTE TV INFO TV PRE CH TV EXIT
TV VOL TV CH AUDIO SYNC
TV MUTE TV INFO TV PRE CH TV EXIT
AUDIO SYNC
HW-F355
20
fonctions
Utilisation de la fonction TV (uniquement avec
les téléviseurs Samsung)
• Appuyez sur le bouton TV SOURCE situé sur la télécommande pour
changer la source d’entrée du téléviseur.
• Appuyez sur le bouton TV INFO de la télécommande pour afficher les
informations concernant les chaînes de télévision.
• Appuyez sur le bouton TV CH de la télécommande pour sélectionner la
chaîne de télévision.
• Appuyez sur le bouton TV VOL de la télécommande pour augmenter ou
réduire le volume sonore.
• Utilisez le bouton TV PRE-CH pour revenir à la chaîne de télévision
précédente en mode TV.
• Pour quitter le menu du téléviseur, utilisez le bouton TV EXIT. (Il
fonctionne de la même manière que le bouton EXIT (QUITTER) de la
télécommande du téléviseur)
ƒ Lorsque vous appuyez sur le bouton SoundShare le son du
téléviseur est transmis à travers le système Air Track via une
connexion Bluetooth. Le système Air Track contrôle également
le volume du son, la qualité du son, etc.
ƒ La télécommande n'est opérationnelle que sur les téléviseurs
SAMSUNG.
MISE À JOUR DU LOGICIEL
Samsung peut proposer à l’avenir des mises à niveau pour le
micrologiciel du système Crystal Surround Air Track.
Si une mise à niveau est proposée, vous pouvez mettre le micrologiciel
à niveau en connectant un périphérique USB, contenant la mise à
niveau du micrologiciel, au port USB de votre système Air Track.
Notez qu'en présence de plusieurs fichiers de mise à niveau, vous
devez simplement les charger sur le périphérique USB et les utiliser
pour mettre à niveau le micrologiciel l'un après l'autre.
Veuillez visiter le site Web Samsung.com ou contacter le centre
d’assistance téléphonique de Samsung pour recevoir de plus amples
informations concernant le téléchargement des fichiers de mise à niveau.
ƒ Insérez un périphérique USB contenant la mise à niveau du micrologiciel dans le port USB situé sur
l’unité principale.
ƒ Veillez à ne pas débrancher l'alimentation ni à retirer le lecteur USB lorsque les mises à niveau sont
en cours d'exécution. L’unité principale s’éteint automatiquement une fois que la mise à niveau du
micrologiciel est terminée. Une fois le logiciel mis à niveau, les paramètres sont réinitialisés sur leur
valeur par défaut. Nous vous conseillons de consigner vos réglages par écrit afin de pouvoir
facilement les spécifier à nouveau après la mise à niveau.
ƒ Une fois que la mise à niveau de l’appareil est terminée, éteignez-le puis appuyez sur le bouton () et
maintenez-le enfoncé pendant un moment pour réinitialiser l'appareil.
ƒ En cas d’échec de la mise à niveau du micrologiciel, nous vous recommandons de convertir le
périphérique USB au format FAT16 et de réessayer la mise à niveau.
ƒ Pour les besoins de la mise à niveau, ne convertissez jamais les données USB au format NTFS car
ce système de fichiers n'est pas pris en charge sur l'appareil.
ƒ Tout dépendant du fabricant, le périphérique USB pourrait ne pas être compatible.
HW-F350
TV VOL TV CH AUDIO SYNC
AUX USB TV SOURCE
TV MUTE TV INFO TV PRE-CH TV EXIT
AUTO POWER
REPEAT DIMMER
OPTICAL
TV VOL TV CH AUDIO SYNC
AUX USB TV SOURCE
TV MUTE TV INFO TV PRE-CH TV EXIT
AUTO POWER
REPEAT DIMMER
OPTICAL
TV INFO
TV VOL TV CH
TV PRE-CH TV EXIT
TV SOURCE
HW-F355
TV VOL TV CH AUDIO SYNC
AUX TV SOURCE
TV MUTE TV INFO TV PRE-CH DIMMER
OPTICAL
AUTO POWER SoundShare
USB/
REPEAT
TV VOL TV CH AUDIO SYNC
AUX TV SOURCE
TV MUTE TV INFO TV PRE-CH DIMMER
OPTICAL
AUTO POWER SoundShare
USB/
REPEAT
TV SOURCE
TV INFO
TV VOL TV CH
TV PRE-CH
21
FRA
● DÉPANNAGE
dépannage
Avant de contacter l'assistance, veuillez lire ce qui suit.
Problème Vérification Solution
L'ensemble ne s'allume pas. • Le cordon d'alimentation est-il
branché dans la prise?
• Branchez la fiche d'alimentation
électrique dans la prise murale.
La fonction ne s'active pas lorsque
vous appuyez sur le bouton
correspondant.
• L'air est-il chargé en électricité
statique?
• Débranchez la fiche
d'alimentation électrique et
rebranchez-la.
Aucun son n'est émis. • L’unité est-elle correctement
reliée au téléviseur?
• La fonction Mute est-elle
activée?
• Le volume est-il réglé au
minimum?
• Branchez-les correctement.
• Appuyez sur la touche Mute
pour annuler cette fonction.
• Réglez le volume.
Aucune image n'apparaît sur le
téléviseur lorsque la fonction est
sélectionnée.
• Le téléviseur est-il
correctement branché?
• Branchez-le correctement.
La télécommande ne fonctionne pas. • Les piles sont-elles usées?
• La distance entre la
télécommande et l'unité principale
est-elle trop importante?
• Remplacez-les.
• Rapprochez-vous de l’appareil.
Le son provenant des canaux
gauche/droit est inversé.
• L’émission se fait-elle
correctement sur les câbles
audio de sortie gauche/droit
en provenance du téléviseur?
• Vérifiez le canal gauche/droit
et connectez-le correctement.
La fonction SoundShare
(appariement du téléviseur) a
échoué.
• Votre téléviseur prend-il en
charge le SoundShare?
• La version du micrologiciel du
téléviseur est-elle la plus
récente?
• Une erreur s’est-elle produite
lors de la connexion?
• Réinitialisez le MODE TV et
connectez à nouveau.
• Le SoundShare est pris en
charge par les modèles de
téléviseur Samsung sortis après
2012. Vérifiez si votre téléviseur
prend en charge la fonction.
• Mettez votre téléviseur à jour
avec la version du micrologiciel
la plus récente.
• Contactez le centre d'appels.
• Appuyez sur le bouton
pendant 5 secondes pour
réinitialiser le produit.
22
SPÉCIFICATIONS
Nom du modèle HW-F350 / HW-F355
GÉNÉRAL
USB 5 V/0,5 A
Poids
Unité principale 1,75 kg
Caisson de basses
(PS-EW1-1) 3,0 kg
Dimensions
(L x H x P)
Unité principale 943 x 49 x 59,9 mm
Caisson de basses
(PS-EW1-1)
152 x 300 x 284 mm
Plage de températures en fonctionnement de + 5 à + 35°C
Plage d'humidité en fonctionnement de 10 à 75 %
AMPLIFICATEUR
Puissance de
sortie nominale
Unité principale 30W/CH, 8OHM, THD = 10%, 1kHz
Caisson de basses
(PS-EW1-1) 60W, 3OHM, THD = 10%, 100Hz
Rapport signal/bruit (entrée analogique) 60 dB
Séparation (1 kHz) 50 dB
* Le rapport signal/bruit, la distorsion, la séparation et la sensibilité utilisable sont basés sur des mesures
effectuées à l'aide des directives AES (Audio Engineering Society).
*: Caractéristiques nominales
- Samsung Electronics Co., Ltd se réserve le droit de modifier les caractéristiques sans préavis.
- Le poids et les dimensions sont approximatifs.
- Pour l’alimentation et la consommation d’énergie, reportez-vous à l'étiquette apposée sur l'appareil.
Par la présente, Samsung Electronics déclare que ce Crystal Surround Air Track est conforme
avec les exigences essentielles et autres dispositions relatives de la Directive 1999/5/EC.
Vous pouvez visualiser la Déclaration de Conformité via le site Web http://www.samsung.com,
allez sur Support (Assistance) > Search Product Support (Recherche de l'assistance de l'appareil)
puis entrez le nom de modèle.
Cet équipement peut être utilisé dans tous les pays de l'Union Européenne.
annexe
AH68-02614L-05
En qualité de partenaire ENERGY STAR,
Comment contacter Samsung dans le monde
Si vous avez des suggestions ou des questions concernant les produits Samsung, veuillez contacter le
Service Consommateurs Samsung.
[Elimination des batteries de ce produit]
(Applicable aux pays disposant de systèmes de collecte
séparés)
Le symbole sur la batterie, le manuel ou l'emballage indique que les batteries
de ce produit ne doivent pas être éliminées en fin de vie avec les autres déchets
ménagers. L'indication éventuelle des symboles chimiques Hg, Cd ou Pb signifie
que la batterie contient des quantités de mercure, de cadmium ou de plomb
supérieures aux niveaux de référence stipulés dans la directive CE 2006/66. Si
les batteries ne sont pas correctement éliminées, ces substances peuvent porter
préjudice à la santé humaine ou à l'environnement.
Afin de protéger les ressources naturelles et d'encourager la réutilisation du
matériel, veillez à séparer les batteries des autres types de déchets et à les
recycler via votre système local de collecte gratuite des batteries.
Les bons gestes de mise au rebut de ce produit
(Déchets d’équipements électriques et électroniques)
(Applicable aux pays disposant de systèmes de collecte séparés)
Ce symbole sur le produit, ses accessoires ou sa documentation indique que ni le
produit, ni ses accessoires électroniques usagés (chargeur, casque audio, câble
USB, etc.) ne peuvent être jetés avec les autres déchets ménagers. La mise au
rebut incontrôlée des déchets présentant des risques environnementaux et de santé
publique, veuillez séparer vos produits et accessoires usagés des autres déchets.
Vous favoriserez ainsi le recyclage de la matière qui les compose dans le cadre d’un
développement durable.
Les particuliers sont invités à contacter le magasin leur ayant vendu le produit ou à se
renseigner auprès des autorités locales pour connaître les procédures et les points de
collecte de ces produits en vue de leur recyclage.
Les entreprises et particuliers sont invités à contacter leurs fournisseurs et à consulter
les conditions de leur contrat de vente. Ce produit et ses accessoires ne peuvent être
jetés avec les autres déchets.
Zone Centre de contact � Site Internet
AUSTRIA 0800 - SAMSUNG (0800 -
7267864) www.samsung.com/at/support
BELGIUM 02-201-24-18
www.samsung.com/be/support
(Dutch)
www.samsung.com/be_fr/
support (French)
BOSNIA 051 331 999 www.samsung.com/support
BULGARIA 07001 33 11 , sharing cost www.samsung.com/bg/support
CROATIA 062 726 786 www.samsung.com/hr/support
CZECH 800 - SAMSUNG (800-726786) www.samsung.com/cz/support
DENMARK 70 70 19 70 www.samsung.com/dk/support
FINLAND 030-6227 515 www.samsung.com/fi/support
FRANCE 01 48 63 00 00 www.samsung.com/fr/support
GERMANY
0180 6 SAMSUNG bzw.
0180 6 7267864*
(*0,20 €/Anruf aus dem dt.
Festnetz, aus dem Mobilfunk
max. 0,60 €/Anruf)
www.samsung.com/de/support
CYPRUS 8009 4000 only from landline, toll
free
www.samsung.com/gr/support
GREECE
80111-SAMSUNG (80111 726
7864) only from land line
(+30) 210 6897691 from mobile
and land line
HUNGARY 0680SAMSUNG (0680-726-786)
0680PREMIUM (0680-773-648)
http://www.samsung.com/hu/
support
ITALIA 800-SAMSUNG (800.7267864) www.samsung.com/it/support
LUXEMBURG 261 03 710 www.samsung.com/support
Zone Centre de contact � Site Internet
MONTENEGRO 020 405 888 www.samsung.com/support
SLOVENIA 080 697 267
090 726 786 www.samsung.com/si/support
NETHERLANDS 0900-SAMSUNG (0900-7267864)
(€ 0,10/Min) www.samsung.com/nl/support
NORWAY 815 56480 www.samsung.com/no/support
POLAND
0 801-172-678* lub +48 22
607-93-33 **
* (całkowity koszt połączenia jak za
1 impuls według taryfy operatora)
** (koszt połączenia według
taryfy operatora)
www.samsung.com/pl/support
PORTUGAL 808 20 7267 www.samsung.com/pt/support
ROMANIA 08008 SAMSUNG (08008 726
7864) TOLL FREE No. www.samsung.com/ro/support
SERBIA 011 321 6899 www.samsung.com/rs/support
SLOVAKIA 0800 - SAMSUNG(0800-726 786) www.samsung.com/sk/support
SPAIN 0034902172678 www.samsung.com/es/support
SWEDEN 0771 726 7864 (SAMSUNG) www.samsung.com/se/support
SWITZERLAND 0848 726 78 64
(0848-SAMSUNG)
www.samsung.com/ch/support
(German)
www.samsung.com/ch_fr/
support (French)
U.K 0330 SAMSUNG (7267864) www.samsung.com/uk/support
EIRE 0818 717100 www.samsung.com/ie/support
LITHUANIA 8-800-77777 www.samsung.com/lt/support
LATVIA 8000-7267 www.samsung.com/lv/support
ESTONIA 800-7267 www.samsung.com/ee/support
Crystal Surround Air Track
(Aktives Lautsprechersystem)
Bedienungsanleitung
Erleben Sie die Möglichkeiten
Vielen Dank, dass Sie sich für ein Produkt von Samsung
entschieden haben.
Registrieren Sie Ihr Produkt unter
www.samsung.com/register
HW-F350
HW-F355
2
merkmale
SoundShare
SoundShare gibt den Ton des Fernsehgeräts auf Ihrem SAT über eine Bluetooth Verbindung wieder und regelt den Klang.
3D SOUND PLUS
Diese 3D SOUND PLUS fügt Ihrem Klangerlebnis Tiefe und Räumlichkeit hinzu.
Spezial Klangmodus
Sie können unter 7 verschiedenen Tonarten wählen - MUSIC, NEWS, DRAMA, CINEMA, SPORTS, GAME, und OFF
(Original Ton) - je nach Art des Inhalts, den Sie wiedergeben möchten.
Multifunktionsfernbedienung
Die mitgelieferte Fernbedienung kann zur Steuerung des Fernsehgerätes, das an dieses Gerät angeschlossen ist, verwendet
werden. (Nur zusammen mit Samsung-Fernsehgeräten funktionsfähig)
Die Fernbedienung verfügt über eine Hotkey-Taste für das Fernsehgerät, mit der Sie mittels eines einfachen Tastendrucks
verschiedene Operationen ausführen können.
Aktives Lautsprechersystem
Dieses Gerät ist ein aktives Lautsprechersystem, das eine qualitativ hochwertige Tonqualität in einem einzelnen schlanken
Gerät liefert.
Für dieses Gerät benötigt man keine Verkabelung und zusätzlichen Lautsprecher, die normalerweise mit herkömmlichen
Surround- Soundsystemen assoziiert werden.
Unterstützung der USB-Host-Funktion
Mit der USB-Host-Funktion können Sie externe USB-Speichergeräte wie MP3-Player oder USB-Flash-Speicher anschließen
und darauf enthaltene Dateien wiedergeben.
Bluetooth Funktion
Sie können ein Bluetooth-Gerät an den SAT anschließen und Musik in hoher Stereo-Klangqualität genießen - ganz ohne
störende Kabel!
LIZENZ
Hergestellt unter Lizenz von Dolby Laboratories. Dolby sowie das Doppel-D-Symbol sind Warenzeichen der Dolby®
Laboratories.
Hergestellt unter Lizenz und US-Patentnummern: 5,956,674; 5,974,380; 6,487,535 & sowie anderen in den USA und
weltweit ausgestellten und angemeldeten Patenten. DTS, das Symbol, und DTS zusammen mit dem Symbol sind
eingetragene Warenzeichen. DTS 2.0 Channel ist ein Warenzeichen von DTS, Inc. Das Produkt enthält Software. © DTS,
Inc. Alle Rechte vorbehalten.
- Wenn Sie Fragen bezüglich des Themas Open Source haben, wenden Sie sich bitte per E-mail unter der
Adresse oss.request@samsung.com an Samsung.
3
GER
sicherheitsinformationen
HINWEISE ZUR SICHERHEIT
ZUR VERMEIDUNG VON STROMSCHLÄGEN DARF DIESES GERÄT NICHT GEÖFFNET WERDEN. ES ENTHÄLT KEINE
BAUTEILE, DIE VOM BENUTZER GEWARTET ODER REPARIERT WERDEN KÖNNEN.
WARTUNGS- UND REPARATURARBEITEN DÜRFEN NUR VON FACHPERSONAL AUSGEFÜHRT WERDEN.
WARNUNG
Gefahr elektrischer Schläge!
Gerät nicht öffnen!
Im Gerät befinden sich Hochspannung
führende Teile, die elektrische Schläge
verursachen können.
Die Dokumentation zu diesem Gerät enthält
wichtige Hinweise zu Betrieb und Wartung.
ACHTUNG : Um elektrische Schläge zu vermeiden, richten Sie den breiten Kontaktstift des Steckers an dem breiten
Steckplatz aus, und stecken Sie den Stecker voll ein.
WARNUNG : Setzen Sie das Gerät nicht Nässe oder Feuchtigkeit aus, um die Gefahr eines Brandes bzw. eines elektrischen
Schlags zu vermeiden.
• Dieses Gerät darf nur an eine Netzsteckdose mit Schutzerdung angeschlossen werden.
• Um das Gerät vom Netzbetrieb zu trennen, muss der Stecker aus der Netzsteckdose gezogen werden. Deshalb sollte
der Netzstecker jederzeit zugänglich und leicht trennbar sein.
ACHTUNG
• Das Gerät keinem Spritz- oder Tropfwasser aussetzen. Keine mit Flüssigkeit gefüllten Behälter, wie Vasen auf das Gerät
stellen.
• Um das Gerät vollständig auszuschalten, muss der Netzstecker aus der Steckdose gezogen werden. Somit muss der
Netzstecker immer bequem erreichbar sein.
4
HINWEISE
Stellen Sie sicher, dass die Stromversorgung in Ihrem Haus den auf der Rückseite Ihres Produkts angegebenen Anforderungen entpricht.
Stellen Sie Ihr Produkt horizontal auf einer geeigneten Unterlage (Möbel) auf, so dass rundherum ausreichend Platz (7–10 cm)
zur Belüftung bleibt. Achten Sie darauf, dass die Belüftungsöffnungen nicht abgedeckt sind. Stellen Sie das Gerät nicht auf Verstärker
oder andere Geräte, die heiß werden können. Das Gerät ist für Dauerbetrieb eingerichtet. Um das Gerät vollständig auszuschalten, den
Stecker aus der Steckdose ziehen. Ziehen Sie den Netzstecker des Geräts wenn Sie beabsichtigen, es für längere Zeit nicht zu nutzen.
Ziehen Sie bei Gewittern das Stromkabel aus der Steckdose.
Durch Blitze verursachte Spannungsspitzen können zur Beschädigung
des Geräts führen.
Schützen Sie das Produkt vor Feuchtigkeit (z. B. Vasen), übermäßiger
Hitze (z. B. Kamine) oder Geräten, die starke magnetische oder ele
trische Felder erzeugen. Trennen Sie das Netzkabel bei Fehlfunktionen
des Geräts von der Stromversorgung.
Ihr Produkt ist nicht für den gewerblichen Einsatz vorgesehen. Verwenden
Sie dieses Produkt nur für den privaten Bereich.
Wenn Ihr Produkt oder die CD bei kalten Temperaturen aufbewahrt wurden,
kann Kondensation auftreten. Wenn Sie das Gerät bei kaltenTemperaturen
transportiert haben, warten Sie mit der Inbetriebnahme circa 2
Stunden, bis das Gerät Raumtemperatur erreicht hat.
Halten Sie das Gerät von direkter Sonneneinstrahlung oder anderen
Wärmequellen fern. Dies kann zu einer Überhitzung führen und zu einer
Fehlfunktion des Geräts führen.
Die in diesem Produkt verwendeten Batterien enthalten umweltschädliche
Chemikalien.
Entsorgen Sie die Batterien nicht im Hausmüll.
Entsorgen Sie Batterien niemals in einem Feuer.
Schließen Sie die Batterien nicht kurz, zerlegen und überhitzen Sie sie
nicht.
Bei unsachgemäßem Austausch von Batterien besteht Explosionsgefahr.
Setzen Sie nur Batterien des gleichen oder eines gleichwertigen Typs ein.
Phones
Stromversorgung in Ihrem Haus den auf der Rückseite Ihres Produkts angegebenen
3.9 inch 3.9 inch
2.7 inch
3.9 inch 99.1mm
99.1mm 99.1mm
68.6mm
Ɣ Die Abbildungen in dieser Anleitung dienen nur als Referenz und können sich vom aktuellen Produkt unterscheiden.
Ɣ Es kann eine Gebühr erhoben werden, wenn:
(a) Ein Techniker auf Ihre Anfrage bestellt wird und am Gerät kein Defekt vorliegt
(z. B. weil Sie diese Bedienungsanleitung nicht gelesen haben).
(b) Sie das Gerät in einer Reparaturwerkstatt abgegeben haben und am Gerät kein Defekt vorliegt
(z. B. weil Sie diese Bedienungsanleitung nicht gelesen haben).
Ɣ Die Höhe dieser Gebühr wird Ihnen mitgeteilt, bevor irgendwelche Arbeiten durchgeführt werden oder der
Hausbesuch erfolgt.
5
GER
Inhalt
MERKMALE
2
2 Merkmale
2 Lizenz
SICHERHEITSINFORMATIONEN
3
3 Hinweise zur Sicherheit
4 Hinweise
ERSTE SCHRITTE
6
6 Wichtige informationen zum Gebrauch der
Bedienungsanleitung
6 Lieferumfang
BESCHREIBUNGEN
7
7 Vorderseite
8 Rückseite
8 Anbringen des ferrit kerns am
lautsprecherkabel des subwoofers
FERNBEDIENUNG
9
9 Funktionen der Fernbedienung
ANSCHLÜSSE
11
11 Montage der Wandhalterung
12 Anschließen eines externen Geräts mithilfe
eines Audiokabels (analog) oder optischen
Kabels (digital)
FEHLERSUCHE
21
21 Fehlersuche
ANHANG
22
22 Technische Daten
FUNKTIONEN
13
13 Eingangsmodus
13 Bluetooth (nur beim Modell HW-F355)
15 SoundShare (nur beim Modell HW-F355)
16 USB
17 Verwenden der Fernbedienung
20 Software Aktualisierung
6
WICHTIGE INFORMATIONEN ZUM GEBRAUCH DER
BEDIENUNGSANLEITUNG
Achten Sie beim Lesen der Bedienungsanleitung auf die folgenden Hinweise.
Symbole in dieser Bedienungsanleitung
Symbol Begriff Definition
Achtung Zeigt eine Situation an, in der eine Funktion nicht funktioniert oder Einstellungen
abgebrochen werden können.
Hinweis Hierbei handelt es sich um Tipps oder Anweisungen zu den jeweiligen
Funktionen.
Sicherheitsanweisungen und Fehlersuche
1) Machen Sie sich mit den Sicherheitsanweisungen vertraut, bevor Sie dieses Produkt nutzen. (Siehe Seite 3)
2) Falls ein Problem auftritt, schlagen Sie im Kapitel zur Fehlerbehebung nach. (Siehe Seite 21)
Copyright
©2013 Samsung Electronics Co.,Ltd.
Alle Rechte vorbehalten. Ohne vorherige schriftliche Genehmigung von Samsung Electronics Co., Ltd. ist
das vollständige oder teilweise Reproduzieren oder Kopieren dieser Bedienungsanleitung nicht gestattet.
erste schritte
ƒ Das mitgelieferte USB-Kabel dient für den Anschluss eines externen USB-Geräts.
ƒ Verwenden Sie das zugehörige USB-Kabel, um externe USB-Geräte an die Einheit anzuschließen.
LIEFERUMFANG
Überprüfen Sie, ob das im Folgenden aufgeführte Zubehör mitgeliefert wurde.
POWER TV POWER
AH59-02548A
TV VOL TV CH AUDIO SYNC
AUX USB TV SOURCE
TV PRE-CH TV EXIT
SOUND EFFECT SMART VOLUME
S/W
LEVEL S/W
LEVEL
VOL
VOL
3D SOUND PLUS DRC
TV MUTE TV INFO
AUTO POWER
REPEAT DIMMER
OPTICAL
MUTE (Schraube: 2 EA)
(Halterung Schraube:
2 EA)
Fernbedienung /
AAABatterien Benutzerhandbuch Halterung zur
wandbefestigung Schraube USB-Kabel
Netzkabel Netzteil Aux Kabel Ferritringkern
7
GER
● BESCHREIBUNGEN
beschreibungen
VORDERSEITE
TASTEEIN-/
AUSSCHALTEN Schaltet den Crystal Surround Air Track ein oder aus.
EINGANGS
WAHLSCHALTER
Des D.IN, AUX, BT, TV, USB Eingangs.
- Wenn das Gerät eingeschaltet ist und die ( ) Taste länger als 3
Sekunden gedrückt wird, wird die Funktion dieser Taste auf
MUTE umgestellt. Um die MUTE Funktion dieser Taste wieder
aufzuheben, die ( ) Taste erneut für mehr als 3 Sekunden
gedrückt halten.
LAUTSTÄRKE +/- Zum Einstellen der Lautstärke.
ANZEIGE Aktuellen Modus anzeigen.
ƒ Wenn Sie dieses Gerät einschalten, vergeht eine Verzögerungszeit von 4 bis 5 Sekunden,
bevor eine Tonausgabe erfolgt.
1 2 3
4
8
SUBWOOFER
ANSCHLUSSBUCHSE Hier den Anschlussstecker des Subwoofers anschließen.
STROMANSCHLUSSBUCHSE Schließen Sie das Netzteil richtig an das Gerät an und stecken Sie
anschließend den Stecker des Netzteils in die Steckdose.
USB PORT
Schließen Sie USB-Geräte, wie MP3-Player hier an, um die Dateien
auf diesen Geräten wiederzugeben.
- Verwenden Sie das mitgelieferte USB-Kabel, wenn Sie das Gerät
an der Wand installiert haben.
OPTICAL IN Zum Anschließen des digitalen (optischen) Ausgangs eines externen Geräts.
5 AUX IN Für den Anschluss an den Analogausgang eines externen Geräts.
ƒ Beim Herausziehen des Netzteilkabels aus der Steckdose das Kabel am Stecker
anfassen. Ziehen Sie nicht am Kabel.
ƒ Schließen Sie dieses Gerät oder andere Komponenten erst dann an die Steckdose an,
wenn alle Verbindungen zwischen den Komponenten hergestellt wurden.
ANBRINGEN DES FERRIT KERNS AM LAUTSPRECHERKABEL DES SUBWOOFERS
Anheben, um den
Verschluss zu öffnen und
den Kern aufklappen.
Das Lautsprecherkabel
des Subwoofers in den
geöffneten Kern einlegen.
Den Verschluss wieder schließen.
3
AUX IN OPTICAL IN
5 4
1
2
beschreibungen
RÜCKSEITE
9
GER
● FERNBEDIENUNG
fernbedienung
FUNKTIONEN DER FERNBEDIENUNG
HW-F350
Batterien in die Fernbedienung einsetzen
1. Heben Sie die Abdeckung an der
Rückseite der Fernbedienung wie
dargestellt hoch.
2. Legen Sie zwei AAA-Batterien ein.
Achten Sie darauf, dass die Pole der
Batterien wie im Batteriefach angezeigt
ausgerichtet sind.
3. Schieben Sie die Abdeckung
wieder auf die Fernbedienung.
Bei normaler Nutzung des
Fernsehers halten die Batterien
ungefähr ein Jahr.
Reichweite der Fernbedienung
Die Fernbedienung hat eine Reichweite von bis zu ca. 7 Metern. Sie kann auch in einem Winkel von bis zu 30°
zum Fernbedienungssensor verwendet werden.
POWER
Schaltet den Crystal Surround
Air Track ein oder aus.
OPTICAL (OPTISCH)
Drücken, um auf den optischen
Eingang umzuschalten.
TV POWER
Zum Ein- und Ausschalten des
Samsung-Fernsehgerätes.
AUTO POWER, DIMMER
Synchronisiert den Air Track via Optical
Anschluss über den optischen Anschluss,
sodass Air Track automatisch eingeschaltet
wird, wenn Sie Ihr Fernsehgerät einschalten.
Sie können die Helligkeit des Displays
regulieren.
STEUERTASTEN
Wiedergabe, unterbrechen oder anhalten
einer Musikdatei, oder Suche nach einer
Musikdatei vorwärts bzw. rückwärts.
TV MUTE
Schaltet den Ton vom Fernsehgerät stumm. Um
den Ton wieder in der vorherigen Lautstärke zu
hören, drücken Sie diese Taste erneut.
AUX
Drücken, um auf den AUX
Eingang umzuschalten.
USB
Drücken, um auf den USB Eingang
umzuschalten.
TV KANAL , AUDIO SYNC
Zum Wechsel zwischen den
verfügbaren TV-Kanälen.
Hilft bei der Audio Videosynchronisierung
wenn mit einem digitalen Fernseher
verbunden ist. TV INFO, TV PRE-CH
Zeigt den aktuellen TV Status an.
Wechselt zum zuletzt angesehenen
Fernsehsender.
TV EXIT
Verlässt das Fernsehgerät (funktioniert
genauso, wie die EXIT Taste auf der
Fernbedienung des Fernsehgeräts).
TV SOURCE
Zum Auswählen der Fernsehvideoquelle.
TV LAUTSTÄRKE
Stellt die Lautstärke ein.
SOUND EFFECT
Auswahl des Klangeffekts: (MUSIC,
NEWS, DRAMA, CINEMA, SPORTS,
GAME, OFF (Original-Soundtrack)) MUTE
Zum Stummschalten des Geräts. Um den
Ton wieder in der vorherigen Lautstärke zu
hören, drücken diese Taste erneut.
DRC
Diese Funktion sorgt für optimale Dolby
Digital-Klang bei geringer Lautstärke
wenn Sie in der Nacht eine Sendung
sehen (Standard, MAX, MIN).
SMART VOLUME
Regelt und stabilisiert die Lautstärke bei
einer drastischen Lautstärkeänderung.
3D SOUND PLUS
Diese Funktion fügt dem Klang
Tiefe und Räumlichkeit hinzu.
POWER TV POWER
AH59-02548A
TV VOL TV CH AUDIO SYNC
AUX USB TV SOURCE
TV PRE-CH TV EXIT
SOUND EFFECT SMART VOLUME
S/W
LEVEL S/W
LEVEL
VOL
VOL
3D SOUND PLUS DRC
TV MUTE TV INFO
AUTO POWER
REPEAT DIMMER
OPTICAL
MUTE
REPEAT
Auswahl von Datei, Alle, in
zufälliger Reihenfolge wiederholen.
S/W LEVEL, VOLUME
Stellt die Lautstärke des Subwoofers ein.
Stellt die Lautstärke des Gerätes ein.
10
fernbedienung
FUNKTIONEN DER FERNBEDIENUNG
HW-F355
POWER
Schaltet den Crystal Surround
Air Track ein oder aus.
OPTICAL (OPTISCH)
Drücken, um auf den optischen
Eingang umzuschalten.
TV POWER
Zum Ein- und Ausschalten des
Samsung-Fernsehgerätes.
AUTO POWER
Synchronisiert den Air Track via Optical
Anschluss über den optischen Anschluss,
sodass Air Track automatisch eingeschaltet
wird, wenn Sie Ihr Fernsehgerät einschalten.
STEUERTASTEN
Wiedergabe, unterbrechen oder anhalten
einer Musikdatei, oder Suche nach einer
Musikdatei vorwärts bzw. rückwärts.
TV MUTE
Schaltet den Ton vom Fernsehgerät stumm. Um
den Ton wieder in der vorherigen Lautstärke zu
hören, drücken Sie diese Taste erneut.
AUX
Drücken, um auf den AUX
Eingang umzuschalten.
USB, BLUETOOTH
Drücken, um auf den USB/
BLUETOOTH Eingang umzuschalten.
TV KANAL
Zum Wechsel zwischen den
verfügbaren TV-Kanälen. AUDIO SYNC
Hilft bei der Audio Videosynchronisierung
wenn mit einem digitalen Fernseher
verbunden ist.
TV INFO, TV PRE-CH
Zeigt den aktuellen TV Status an.
Wechselt zum zuletzt angesehenen
Fernsehsender.
TV SOURCE
Zum Auswählen der Fernsehvideoquelle.
TV LAUTSTÄRKE
Stellt die Lautstärke ein.
SOUND EFFECT
Auswahl des Klangeffekts: (MUSIC,
NEWS, DRAMA, CINEMA, SPORTS,
GAME, OFF (Original-Soundtrack))
MUTE
Zum Stummschalten des Geräts. Um den
Ton wieder in der vorherigen Lautstärke zu
hören, drücken diese Taste erneut.
DRC
Diese Funktion sorgt für optimale Dolby
Digital-Klang bei geringer Lautstärke
wenn Sie in der Nacht eine Sendung
sehen (Standard, MAX, MIN).
SMART VOLUME
Regelt und stabilisiert die Lautstärke bei
einer drastischen Lautstärkeänderung.
3D SOUND PLUS
Diese Funktion fügt dem Klang
Tiefe und Räumlichkeit hinzu.
DIMMER
Sie können die Helligkeit des
Displays regulieren.
S/W LEVEL, VOLUME
Stellt die Lautstärke des Subwoofers ein.
Stellt die Lautstärke des Gerätes ein.
POWER TV POWER
AH59-02532A
TV VOL TV CH AUDIO SYNC
AUX TV SOURCE
TV PRE-CH DIMMER
SOUND EFFECT SMART VOLUME
VOL
VOL
DRC
TV MUTE TV INFO
OPTICAL
S/W MUTE LEVEL S/W
LEVEL
3D SOUND PLUS
AUTO POWER SoundShare
USB/
REPEAT
ƒ SAT steht für Surround Air Track und ist ein Markenname von Samsung.
ƒ Es können nur Fernsehgeräte von Samsung mit der Fernbedienung bedient werden.
ƒ Es kann vorkommen, dass das von Ihnen verwendete Fernsehgerät mit dieser Fernbedienung nicht
zu steuern ist. Wenn Sie das Fernsehgerät nicht mit dieser Fernbedienung bedienen können,
verwenden Sie bitte die Fernbedienung des Fernsehgeräts.
REPEAT
Auswahl von Datei, Alle, in
zufälliger Reihenfolge wiederholen.
SOUNDSHARE
Diese Funktion gibt den Ton des Fernsehgeräts
auf Ihrem SAT über eine Bluetooth Verbindung
wieder und regelt den Klang.
11
GER
● ANSCHLÜSSE
MONTAGE DER WANDHALTERUNG
Sie können die Wandhalterung verwenden, um diese Einheit an der Wand zu befestigen.
ƒ Hängen Sie nichts an das installierte Gerät und vermeiden Sie Stoßeinwirkungen.
ƒ Befestigen Sie die Einheit sicher an der Wand, so dass sie nicht herunterfallen kann.
Andernfalls kann es zu Verletzungen oder Schäden am Gerät führen.
ƒ Stellen Sie nach der Wandmontage der Einheit sicher, dass Kinder die Verbindungskabel
nicht herausziehen können, da das Gerät sonst möglicherweise herunterfallen kann.
ƒ Bei einer Wandmontage befestigen Sie das Lautsprechersystem in mindestens 5 cm
Entfernung vom Fernsehgerät, damit die optimale Leistung erreicht werden kann.
anschlüsse
Montagehinweise
• Nur an einer senkrechten Wand montieren.
• Achten Sie darauf, dass das Gerät nicht in einer feuchten oder heißen Umgebung angebracht wird und
die Wand das Gewicht der Anlage aushält.
• Überprüfen Sie die Stabilität der Wand. Wenn die Wand nicht stabil genug ist, um dieses Gerät zu halten,
verstärken Sie die Wand oder installieren Sie das Gerät an einer anderen Wand, die das Gewicht des
Geräts tragen kann.
• Verwenden Sie die für Ihre Wand geeigneten Befestigungsschrauben oder Dübel (Gipskartonplatte,
Stahlplatte, Holz, usw.). Wenn möglich die Schrauben in den Wandträgern befestigen.
• Schließen Sie die externen Geräte an dieses Gerät an, bevor Sie es an der Wand installieren.
• Achten Sie darauf, dass das Gerät ausgeschaltet ist, und trennen Sie das Gerät vor der Montage vom
Netzstecker. Ansonsten besteht das Risiko elektrischer Schläge.
1. Bringen Sie die Wandhalterung an der Wand an
und befestigen Sie diese mit 2 Schrauben (nicht im
Lieferumfang enthalten).
Wenn Sie das Gerät unter einem Fernsehgerät aufhängen,
müssen Sie sicherstellen, dass die Wandhalterung so
angebracht wird, dass sie der Pfeil ( ) in der Mitte des
Fernsehgeräts befindet.
Stellen Sie ebenfalls sicher, dass sie das Gerät
mindestens 5 cm unterhalb des Fernsehgeräts befindet.
2. Richten Sie die Schraubenöffnungen an beiden Seiten
des HAUPTGERÄTS auf die Schraubenöffnungen der
HALTERUNG aus und befestigen Sie den Halter mit den
Schrauben.
3. Schließen Sie das USB-Kabel auf der Rückseite des
Geräts an, bevor Sie es an der Wand befestigen.
4. Positionieren Sie die Einheit dann an den entsprechenden
Auslässen der Wandhalterung. Für eine sichere Montage
achten Sie darauf, dass die Halterungsbolzen in den
Auslässen ganz nach unten geschoben werden.
5. Die Installation ist abgeschlossen. 5 cm oder mehr.
1 2
12
anschlüsse
ANSCHLIESSEN EINES EXTERNEN GERÄTS MITHILFE EINES
AUDIOKABELS (ANALOG) ODER OPTISCHEN KABELS (DIGITAL)
In diesem Abschnitt werden zwei Möglichkeiten (digital und analog) erklärt, wie das Gerät an das Fernsehgerät
angeschlossen werden kann.
Dieses Gerät ist mit einem optischen Digitalanschluss und einem analogen Audioanschluss ausgestattet, um
ein Fernsehgerät anzuschließen.
AUX IN
Verbinden Sie den AUX IN Eingang (Audio) am Hauptgerät mit dem AUDIO OUT Ausgang des Fernsehgeräts
oder Quellgeräts.
Achten Sie darauf, dass die Farben der Steckverbinder übereinstimmen.
oder,
OPTICAL IN
Verbinden Sie den AUDIO IN Eingang am Hauptgerät mit dem AUDIO OUT Ausgang des Fernsehgeräts oder
Quellgeräts.
ƒ Stecken Sie das Netzkabel dieses Produkts oder Ihres Fernsehgeräts erst dann in die
Steckdose, wenn alle Verbindungen zwischen den Komponenten hergestellt wurden.
ƒ Bevor Sie dieses Gerät installieren oder an einer anderen Stelle aufstellen, müssen Sie es
ausschalten und den Netzstecker ziehen.
oder
AUX IN
OPTICAL IN
AUX IN
AUDIO
OUT
L
R
Red White
Audiokabel
OPTICAL IN
OPTICAL
OUT
Optisches Kabel
(nicht im Lieferumfang
enthalten)
BD/DVD Player/
Set-Top- Box/
Game Konsole
Rot Weiß
13
GER
● FUNKTIONEN
funktionen
EINGANGSMODUS
Sie können zwischen D.IN, AUX, BT, TV Eingang oder USB Eingang wählen.
Drücken Sie die entsprechende Taste auf der Fernbedienung, um den gewünschten Modus auszuwählen oder
drücken Sie ( ), um zwischen dem
D.IN, AUX, BT, TV oder USB Eingang zu wählen.
Eingangsmodus Display
Optischer Digital Eingang D.IN
AUX-Eingang AUX
BLUETOOTH Modus BT (nur beim Modell HW-F355)
TV-Modus TV (nur beim Modell HW-F355)
USB-Modus USB
Das Gerät schaltet sich unter den folgenden Bedingungen automatisch ab:
• BT/TV/USB/D.IN MODE
- Wenn seit 20 Minuten kein Audiosignal empfangen wurde.
• AUX Modus
- Wenn bei am Eingang angeschlossenem Gerät seit 8 Stunden keine
TASTE betätigt wurde.
- Wenn seit 20 Minuten kein AUX-Kabel angeschlossen ist.
ƒ Verwenden Sie das mitgelieferte Kabel, wenn der USB-Speicher nicht direkt an das Gerät
angeschlossen werden kann.
BLUETOOTH (NUR BEIM MODELL HW-F355)
Hören Sie Ihren Lieblingshit in bestem Stereo-Sound über ein Bluetooth-fähiges Gerät - ganz ohne Kabel!
Was ist Bluetooth?
Bluetooth ist eine neue Technologie, mit der es möglich ist, Bluetooth-fähige Geräte über eine kurze
Funkverbindung miteinander zu verbinden.
• Ein Bluetooth Gerät kann Störungen erzeugen oder falsch funktionieren, wenn:
- Das Empfangs-/Sendesystem eines Bluetooth-Geräts oder der Haupteinheit mit einem Körperteil
berührt wird
- Die Funkübertragung durch Wände, Ecken oder Bürotrennwände behindert wird.
- Interferenzen mit Geräten auftreten, welche dasselbe Frequenzband verwenden, wie medizinische
Geräte, Mikrowellenherde oder Funknetzwerke.
• Wenn Sie Air Track über das Bluetooth Gerät betreiben möchten, stellen Sie sicher, dass der Abstand
kurz gehalten wird.
• Mit zunehmender Entfernung zwischen Air Track und Bluetooth-Gerät nimmt die Qualität der
Bluetooth-Verbindung ab. Wenn die Distanz den Bluetooth-Betriebsbereich übersteigt, geht die
Verbindung verloren.
• In Gebieten mit geringer Empfangssensibilität ist die Funktion der Bluetooth-Verbindung
möglicherweise eingeschränkt.
• Die Bluetooth-Verbindung funktioniert nur mit Geräten in unmittelbarer Nähe. Die Verbindung wird
automatisch unterbrochen, wenn dieser Radius überschritten wird. Selbst innerhalb dieses Radius
kann die Klangqualität durch Hindernisse wie Mauern oder Türen beeinträchtigt werden.
• Dieses Funkgerät kann Interferenzen während des Betriebs verursachen.
POWER TV POWER
HW-F350
AUX USB TV SOURCE
AUTO POWER
REPEAT DIMMER
OPTICAL AUX USB TV SOURCE
AUTO POWER
REPEAT DIMMER
OPTICAL AUX USB PTICAL
HW-F355
OPTICAL AUX TV SOURCE
AUTO POWER SoundShare
USB/
REPEAT
OPTICAL AUX TV SOURCE
AUTO POWER SoundShare
USB/
REPEAT
OPTICAL AUX
14
funktionen
Anschließen von Air Track an ein Bluetooth-Gerät
Vergewissern Sie sich, dass das Bluetooth-Gerät die Stereo-Headsets Funktion unterstützt.
Verbinden
Bluetooth-Gerät
1. Drücken Sie die USB/Bluetooth Taste auf der Fernbedienung des Air Track, um die BT Meldung
anzuzeigen.
• Auf der Anzeige des Air Track wird für 4 Sekunden WAIT und anschließend BT READY angezeigt.
2.Wählen Sie auf dem Bluetooth-Gerät, mit dem Sie eine Verbindung herstellen möchten, das BluetoothMenü
aus. (Weitere Informationen dazu finden Sie der Bedienungsanleitung des Bluetooth-Geräts.)
3.Wählen Sie auf dem Bluetooth-Gerät das Stereo-Headset-Menü aus.
• Wird eine Liste der erkannten Geräte angezeigt.
4. Wählen Sie "[Samsung] AirTrack" aus der Liste.
• Wenn der Air Track an das Bluetooth Gerät angeschlossen ist, wird BT CONNECTED ➡ BT auf dem
Frontdisplay angezeigt.
• Wenn der Verbindungsaufbau zwischen dem Bluetooth-Gerät und Air Track fehlgeschlagen ist,
entfernen Sie das vom Bluetooth-Gerät gefundene "[Samsung] AirTrack" und führen Sie die Suche
erneut durch.
5. Starten sie auf dem verbundenen Gerät die Musikwiedergabe.
• Sie können nun die vom Bluetooth-Gerät wiedergegebenen Musiktitel über das Crystal Surround Air
Track System hören.
• Im BT-Modus sind die Funktionen Wiedergabe/Wiederholen/Stopp/Weiter/Zurück nicht verfügbar.
ƒ Eventuell müssen Sie einen PIN-Code (Kennwort) eingeben, wenn die Verbindung zwischen dem
Bluetooth Gerät und dem Air Track hergestellt werden soll. Wenn Sie zur Eingabe des PIN-Codes
aufgefordert werden, geben Sie <0000> ein.
ƒ Der Air Track unterstützt SBC data (44.1kHz, 48kHz).
ƒ Die AVRCP Funktion wird nicht unterstützt.
ƒ Nur an ein Bluetooth-Gerät anschließen, das die A2DP (AV) Funktion unterstützt.
ƒ Sie können kein Bluetooth-Gerät verwenden, das nur die HF (Hands Free) Funktion unterstützt.
ƒ Es kann nur eine Verbindung zu einem Bluetooth-Gerät hergestellt werden.
ƒ Nachdem Air Track ausgeschaltet und die Verbindung unterbrochen wurde, wird nach erneutem
Einschalten die Verbindung nicht automatisch wieder hergestellt. Die Verbindung muss erneut
hergestellt werden.
ƒ Die Suche oder Verbindungsherstellung kann unter folgenden Umständen eventuell nicht richtig
durchgeführt werden:
- Wenn sich der Air Track in einem starken elektrischen Feld befindet.
- Wenn mit mehreren Bluetooth-Geräten gleichzeitig eine Verbindung zum Air Track hergestellt wurde.
- Wenn das Bluetooth-Gerät ausgeschaltet oder nicht angeschlossen ist oder nicht richtig funktioniert.
- Beachten Sie, dass Geräte, wie Mikrowellenherde, WLAN-Geräte, Leuchtstoffröhren und
Gasöfen denselben Frequenzbereich wie Bluetooth-Geräte verwenden, wodurch es zu
Interferenzen kommen kann.
15
GER
● FUNKTIONEN
Abtrennen des Bluetooth-Geräts vom Air Track
Sie können die Verbindung zwischen dem Bluetooth-Gerät und Air Track trennen. Die Anleitung hierzu
finden Sie in der Bedienungsanleitung des Bluetooth-Geräts.
• Verbindung zum Air Track wird getrennt.
• Wenn Air Track vom Bluetooth-Gerät getrennt ist, wird auf der Air Track Anzeige BT DISCONNECTED angezeigt.
Abtrennen des Air Track vom Bluetooth-Gerät
Drücken Sie die ( ) Taste auf der Vorderseite des Air Track, um von BT auf einen anderen Modus
umzuschalten oder schalten Sie Air Track aus.
• Das angeschlossene Bluetooth-Gerät wartet eine gewisse Zeit auf die Antwort des Air Track, bevor es
die Verbindung unterbricht.
(Je nach Bluetooth-Gerät kann der Zeitraum bis zur Trennung der Verbindung variieren)
• Die Verbindung mit dem aktuell verbundenen Gerät wird getrennt.
ƒ Bei einer Bluetooth Verbindung geht die Bluetooth Verbindung verloren, wenn der Abstand zwischen
dem Air Track und dem Bluetooth Gerät 5 Meter überschreitet.
ƒ Wenn sich das Bluetooth-Gerät wieder im effektiven Bereich befindet und erneut eine Verbindung
nach der Unterbrechung hergestellt wird, können Sie das Gerät neu starten, um die Verbindung
mit dem Bluetooth-Gerät wieder herzustellen.
ƒ Wenn sich der Air Track für mehr als 20 Minuten im Bereitschaftszustand befindet, schaltet er sich
automatisch aus.
SOUNDSHARE (NUR BEIM MODELL HW-F355)
In diesem Abschnitt wird erklärt, wie der Crystal Surround Air Track mit einem Bluetooth kompatiblen Fernsehgerät
verbunden werden kann.
Den Crystal Surround Air Track mit einem Bluetooth kompatiblen
Samsung Fernsehgerät verbinden
Verbindungsaufbau
Tippen Sie auf die ( ) Taste, um den TV-Modus auszuwählen und schließen sie das Fernsehgerät an den
Crystal Surround Air Track anschließen.
• Der Ton des Fernsehgeräts wird über dieses Gerät wiedergegeben, wenn es an ein Fernsehgerät
angeschlossen ist.
• Wenn Sie auf einen anderen Modus als den TV SoundShare Modus umschalten oder das Gerät ausschalten,
wird der Ton wieder über das Fernsehgerät wiedergegeben.
Um den Ton des Fernsehgeräts auf Ihrem Air Track über eine Bluetooth Verbindung wiederzugeben, müssen
Sie zuerst das System mit dem Bluetooth kompatiblen Fernsehgerät verbinden. Nachdem die Verbindung
hergestellt ist, werden die Informationen für den Verbindungsaufbau gespeichert und es wird keine weitere
Bluetooth Verbindungsmeldung angezeigt. Vor dem Verbindungsaufbau müssen sich der Air Track und das
Fernsehgerät nah beieinander befinden.
16
funktionen
1. Schalten Sie das Samsung Fernsehgerät und den Air Track ein.
• Stellen Sie Neues Gerät hinzufügen im SoundShare Einstellungen Menü des Fernsehgeräts auf Ein.
2. Wenn Sie den Modus des Air Track auf TV umschalten, erscheint eine Meldung mit der Frage, ob mit dem Aufbau
der Bluetooth Verbindung fortgefahren werden soll. Die "[Samsung] AirTrack" Meldung erscheint auf dem Bildschirm
des Fernsehgeräts.
3. Wählen Sie auf dem Fernsehbildschirm (Ja) aus und der Verbindungsaufbau mit dem Air Track wird abgeschlossen.
• Nachdem die Verbindung hergestellt ist, wird die Verbindung zum Fernsehgerät automatisch aktiviert, wenn
von einem anderen Modus in den TV-Modus umgeschaltet wird.
• Wenn der Air Track vom TV-Modus in einen anderen Modus umgeschaltet wird, wird die SoundShare
Verbindung unterbrochen.
• Wenn Sie die bestehende Verbindung zum SAT beenden und den SAT mit einem neuen Fernsehgerät verbinden möchten,
- Drücken Sie im TV Modus die PLAY/PAUSE Taste am SAT für 5 Sekunden, um die bestehende Verbindung
abzubrechen. Sie können nun eine Verbindung zu einem anderen Fernsehgerät herstellen.
• Die Lautstärke und die Stummschaltung kann im SoundShare Modus sowohl mit der Fernbedienung des
Fernsehgeräts als auch des SAT eingestellt werden.
ƒ TV SoundShare Reichweite
- Empfohlener Abstand für den Verbindungsaufbau: max. 50cm
- Empfohlener Abstand beim Betrieb: max. 5m
ƒ Wenn der Abstand zwischen dem SAT und dem Fernsehgerät mehr als 5m beträgt, kann die Verbindung
oder der Ton unterbrochen werden. Wenn dieser Fall eintritt, die Verbindung zum Bluetooth-Gerät innerhalb
der Übertragungsreichweite erneut herstellen.
ƒ Stellen Sie sicher, dass der SoundShare Modus des Fernsehgeräts eingeschaltet ist, bevor Sie diese Funktion verwenden.
ƒ Die PLAY, NEXT, PREV, STOP Tasten können sind SoundShare Modus nicht verfügbar.
ƒ Bluetooth Stand-by Ein Funktion
- Der Air Track wird automatisch eingeschaltet, wenn das Fernsehgerät und der Air Track über die SoundShare
Funktion miteinander verbunden sind.
- Sie können diese Funktion ein- und ausschalten, indem Sie die ( ) Taste auf der Vorderseite bei
abgeschaltetem Air Track für mehr als 5 Sekunden gedrückt halten. Wenn Sie diese Funktion
ausschalten, schaltet sich das Gerät automatisch aus, wird jedoch nicht automatisch eingeschaltet.
- Diese Funktion wird von Fernsehgeräten unterstützt, die ab 2013 auf dem Markt erschienen sind.
ƒ Die SoundShare Funktion wird von bestimmten Fernsehgeräten unterstützt, die ab 2012 auf dem Markt
erschienen sind. Prüfen Sie, ob Ihr Fernsehgerät diese Funktion unterstützt. Für weitere Informationen
schlagen Sie bitte in der Bedienungsanleitung des Fernsehgeräts nach.
USB
1. Schließen Sie das USB-Gerät an der USB-Schnittstelle an, die sich seitlich am Gerät befindet.
2. Drücken Sie die ( ) Taste auf der Vorderseite des Air Track solange, bis USB erscheint.
3. Auf dem Display wird kurz USB angezeigt.
• Die Verbindung zum Crystal Surround Air Track ist hergestellt.
• Das Gerät schaltet sich automatisch ab (Automatische Abschaltung), wenn für mehr als 20 Minuten kein USBGerät
angeschlossen wurde.
Bevor Sie ein USB-Gerät anschließen
Beachten Sie das Folgende:
• Wenn die Länge eines Ordner- oder Dateinamens auf dem USB-Gerät
10 Zeichen überschreitet, wird er nicht auf dem OLED angezeigt.
• Dieses Gerät kann unter Umständen nicht mit allen USBSpeichergeräten
kompatibel sein.
• Die Dateisysteme FAT16 und FAT32 werden unterstützt.
- Das NTFS-Dateisystem wird nicht unterstützt.
17
GER
● FUNKTIONEN
• Schließen Sie das USB-Gerät direkt an den USB-Anschluss des Geräts an. Anderenfalls können
Kompatibilitätsprobleme mit dem USB-Gerät auftreten.
• Schließen Sie nicht mehrere Speichergeräte über einen Mehrfach-Kartenleser an das Gerät an. Dies kann
zu Fehlfunktionen führen.
• PTP- Protokolle für Digitalkameras werden nicht unterstützt.
• Das USB-Gerät nicht während des Lesevorgangs abtrennen.
• DRM-geschützte Musikdateien (MP3, WMA) von kommerziellen Webseiten werden nicht wiedergegeben.
• Externe Festplatten werden nicht unterstützt.
• Mobiltelefone werden nicht unterstützt.
• Kompatibilitätsliste
Format Codec
*.mp3
MPEG 1 Layer2
MPEG 1 Layer3
MPEG 2 Layer3
*.wma Wave_Format_MSAudio1
Wave_Format_MSAudio2
*.aac
AAC
AAC-LC
HE-AAC
*.wav -
*.Ogg OGG 1.1.0
*.Flac FLAC 1.1.0, FLAC 1.2.1
※ Unterstützt Abtastfrequenzen über 16KHz
VERWENDEN DER FERNBEDIENUNG
Wiedergabe/Pause/Stopp
Drücken Sie während der Wiedergabe die ►, Taste.
• Drücken Sie die ► Taste erneut, um die Wiedergabe der Datei
vorübergehend zu unterbrechen.
Drücken Sie die ► Taste, um die ausgewählte Datei abzuspielen.
• Drücken Sie während der Wiedergabe die Stopp Taste ().
Vorwärts/Rückwärts springen
Drücken Sie während der Wiedergabe die #,$ Taste.
• Wenn mehrere Dateien vorhanden sind und Sie die $ Taste drücken,
wird die nächste Datei ausgewählt.
• Wenn mehrere Dateien vorhanden sind und Sie die # Taste drücken,
wird die vorherige Datei ausgewählt.
Verwendung der REPEAT-Funktion
Diese Funktion ermöglicht es, eine Datei zu wiederholen, alles zu wiederholen, die Dateien
in zufälliger Reihenfolge wiederzugeben oder die Wiederholfunktion auszuschalten.
Drücken Sie die Taste REPEAT.
• WIEDERHOLUNG AUS : Bricht die wiederholte Wiedergabe ab.
• DATEI WIEDERHOLEN : Wiederholt die Wiedergabe eines Titels.
• ALLE WIEDERHOLEN : Wiederholt die Wiedergabe aller Titel.
• ZUFÄLLIG WIEDERHOLEN : Gibt die Titel in zufälliger Reihenfolge wieder.
(Ein Titel der bereits wiedergegeben wurde, kann erneut abgespielt werden.)
ƒ Sie können die REPEAT Funktion während der Musikwiedergabe
vom USB-Laufwerk einstellen.
HW-F350 TV PRE-CH TV EXIT
SOUND EFFECT SMART VOLUME
TV MUTE TV INFO TV PRE-CH TV EXIT
SOUND EFFECT SMART VOLUME
TV MUTE TV INFO
HW-F355
HW-F350 TV PRE-CH TV EXIT
SOUND EFFECT SMART VOLUME
TV MUTE TV INFO TV PRE-CH TV EXIT
SOUND EFFECT SMART VOLUME
TV MUTE TV INFO
HW-F355
HW-F350
TV VOL TV CH AUDIO SYNC
AUTO POWER
REPEAT DIMMER
TV VOL TV CH AUDIO SYNC
AUTO POWER
DIMMER
HW-F355
TV VOL TV CH AUDIO SYNC
AUTO POWER SoundShare
REPEAT
TV VOL TV CH AUDIO SYNC
AUTO POWER SoundShare
18
funktionen
Stummschaltung
Diese Funktion ist im Falle eines Telefonanrufs oder beim Ertönen einer
Türglocke sehr hilfreich.
1.Um den Ton dieses Geräts stumm zu schalten, müssen Sie die MUTE
Taste auf der Fernbedienung drücken.
2.Um den Ton des Fernsehgeräts stumm zu schalten, müssen Sie die
TV MUTE ( ) aste auf der Fernbedienung drücken.
3.Drücken Sie die MUTE / TV MUTE ( ) auf der Fernbedienung erneut
(oder drücken Sie VOLUME +/–) um den Ton wieder einzuschalten.
Verwenden der 3D SOUND PLUS-Funktion
Diese 3D Sound Plus Funktion fügt dem Klang Tiefe und Räumlichkeit hinzu.
Drücken Sie die 3D SOUND PLUS Taste auf der Fernbedienung.
• Durch wiederholtes Drücken der Taste ändert sich die Auswahl wie folgt :
3D SOUND PLUS OFF ➡ 3D SOUND PLUS MUSIC ➡ 3D SOUND
PLUS MOVIE
ƒ Wenn Sie die 3D Sound Plus Funktion einschalten, werden die
Klangeffekt Funktion automatisch abgeschaltet.
Verwendung der SMART VOLUME-Funktion
Durch diese Funktion, wird die Lautstärke bei einer drastischen
Lautstärkeänderung, z. B. durch das Umschalten auf einen anderen
Kanal oder einen Szenenwechsel, geregelt und stabilisiert.
Drücken Sie die SMART VOLUME Taste auf der Fernbedienung.
• Durch wiederholtes Drücken der Taste ändert sich die Auswahl wie folgt :
SMART VOLUME ON ➡ SMART VOLUME OFF
Verwendung der SOUND EFFECT-Funktion
Sie können unter 7 verschiedenen Tonarten wählen - MUSIC, NEWS,
DRAMA, CINEMA, SPORTS, GAME, und OFF (Original Ton) - je nach Art
des Inhalts, den Sie wiedergeben möchten.
Drücken Sie die SOUND EFFECT Taste auf der Fernbedienung.
• Stellen Sie den OFF Modus ein, wenn Sie den Originalklang wiedergeben möchten.
ƒ Wir empfehlen, den Klangmodus je nach Quellmaterial und Ihren
persönlichen Vorlieben auszuwählen.
ƒ Wenn Sie einen Klangeffekt (außer OFF) einstellen, wird 3D
Sound Plus automatisch ausgeschaltet.
Verwendung der S/W LEVEL-Funktion
Sie können das Base-Volume (die ber Taste S/W Level auf der
Fernbedienung regeln.
1.Drücken Sie die Taste S/W LEVEL auf der Fernbedienung.
2. “SW 0” wird im Display angezeigt.
3.Drücken Sie oder auf der LEVEL (PEGEL) Taste, wenn Sie die
Lautstärke des Subwoofers erhöhen oder verringern wollen. Der Pegel
kann von SW -6 bis SW +6 eingestellt werden.
HW-F350
LEVEL LEVEL
VOL
3D SOUND PLUS DRC
LEVEL LEVEL
VOL
3D SOUND PLUS
HW-F355 3D SOUND DRC
HW-F350 SOUND EFFECT SMART VOLUME
S/W S/W
VOL
MUTE
SOUND EFFECT SMART VOLUME
S/W S/W
VOL
MUTE
SMART VOLUME
HW-F355
HW-F350 SOUND EFFECT SMART VOLUME
S/W S/W
VOL
S/W MUTE S/W
VOL
MUTE
SOUND EFFECT
HW-F355
HW-F350 S/W
LEVEL S/W
LEVEL S/W MUTE LEVEL S/W LEVEL S/W MUTE LEVEL S/W
LEVEL
HW-F355
HW-F350 TV PRE-CH TV EXIT
SOUND EFFECT SMART VOLUME
S/W
LEVEL S/W
LEVEL
VOL
VOL
3D SOUND PLUS DRC
TV MUTE TV INFO
MUTE
TV PRE-CH TV EXIT
SOUND EFFECT SMART VOLUME
S/W LEVEL S/W LEVEL
VOL
VOL
3D SOUND PLUS DRC
TV MUTE TV MUTE TV INFO
HW-F355
19
GER
● FUNKTIONEN
Verwendung der AUTO POWER LINK-Funktion
Crystal Surround Air Track wird automatisch eingeschaltet, wenn Sie das
Fernsehgerät oder ein anderes, über ein optisches Kabel an den Air Track
angeschlossenes Gerät einschalten.
Drücken Sie auf der Fernbedienung für dieses Gerät auf die Taste AUTO POWER.
• Jedes Mal, wenn Sie AUTO POWER drücken, wird die automatische
Power-Link- Funktion entweder ein- oder ausgeschaltet.
AUTO POWER LINK Display
EIN POWER LINK ON
AUS POWER LINK OFF
ƒ Wenn Sie Geräte wie das Fernsehgerät, die mit einer Air TrackVerbindung
und mithilfe des optischen Kabels angeschlossen
sind, ausgeschaltet haben und keinSignal über den Dirgitaleingang
empfangen wird, schaltet sich die Funktion Crystal Surround nach
20 Minuten automatisch aus.
Verwendung der DIMMER-Funktion
Drücken Sie Dimmer um die Helligkeit des Displays zu regulieren.
Drücken Sie auf der Fernbedienung dieses Geräts die Taste DIMMER.
• Durch wiederholtes Drücken der Taste ändert sich die Auswahl wie folgt :
DIMMER ON ➡ DIMMER OFF
Verwenden der AUDIO SYNC-Funktion
Wenn Air Track mit einem digitalen Fernseher verbunden ist, erscheint
das Bild möglicherweise dem Ton gegenüber verzögert.
Regulieren Sie in diesem Fall die Audio-Verzögerung damit Audio und
Video übereinstimmen.
Drücken Sie auf der Fernbedienung dieses Geräts die Taste AUDIO SYNC +/–.
• Sie können die Tasten + , - verwenden um die Audio-Verzögerung auf
einen Wert zwischen 0 und 300 Millisekunden einzustellen.
ƒ Im USB-Modus, TV-Modus oder BT-Modus steht die Audio Sync
Funktion nicht zur Verfügung.
Verwendung der DRC-Funktion
Diese Funktion gleicht den Bereich zwischen den lautesten und leisesten
Tonsignalen aus. Diese Funktion sorgt für optimale Dolby DigitalNachtwiedergabe
bei geringer Lautstärke.
Drücken Sie auf der Fernbedienung dieses Geräts die Taste DRC.
• Durch wiederholtes Drücken der Taste ändert sich die Auswahl wie folgt :
DRC STANDARD ➡ DRC MAX ➡ DRC MIN
HW-F350 AUTO POWER
REPEAT DIMMER
HW-F355 OPTICAL AUX TV SOURCE
AUTO POWER SoundShare
USB/
REPEAT
OPTICAL AUX TV SOURCE
AUTO POWER SoundShare
USB/
REPEAT
AUTO POWER
HW-F350
TV VOL TV CH AUDIO SYNC
AUTO POWER
REPEAT DIMMER
TV VOL TV CH AUDIO SYNC
AUTO POWER
REPEAT
HW-F355 TV PRE-CH DIMMER
SOUND EFFECT SMART VOLUME
TV MUTE TV INFO TV PRE-CH DIMMER
SOUND EFFECT SMART VOLUME
TV MUTE TV INFO DIMMER
HW-F350
TV VOL TV CH AUDIO SYNC
TV MUTE TV INFO TV PRE CH TV EXIT
TV VOL TV CH AUDIO SYNC
TV MUTE TV INFO TV PRE CH TV EXIT
AUDIO SYNC
HW-F355
HW-F350 LEVEL LEVEL
VOL
3D SOUND PLUS DRC
MUTE LEVEL LEVEL
VOL
3D SOUND PLUS DRC
MUTE
HW-F355
20
funktionen
Verwendung der TV-Funktion (nur mit Samsung Fernsehgeräten)
• Drücken Sie TV SOURCE auf der Fernbedienung, um die Eingangsquelle
des Fernsehgeräts umzuschalten.
• Drücken Sie TV INFO auf der Fernbedienung, um die TV-Kanalinformationen
anzuzeigen.
• Drücken Sie zur Auswahl eines TV-Kanals auf der Fernbedienung die Taste
TV CH.
• Drücken Sie TV VOL auf der Fernbedienung, um die Lautstärke zu erhöhen
oder zu verringern.
• Verwenden Sie die TV PRE-CH auf der Fernbedienung, um im TV-Modus
zum vorherigen Kanal zurückzukehren.
• Drücken Sie die TV EXIT Taste, um das TV Menü zu verlassen.
(Erfüllt die gleiche Funktion, wie die EXIT Taste auf der Fernbedienung
des Fernsehgeräts).
ƒ Wenn Sie die SoundShare Taste drücken, wird der Ton des
Fernsehgeräts durch das Air Track System über die Bluetooth
Verbindung übertragen. Die Lautstärke und der Klang wird
ebenfalls vom Air Track gesteuert.
ƒ Es können nur Fernsehgeräte von Samsung mit dieser
Fernbedienung
SOFTWARE AKTUALISIERUNG
Samsung kann unter Umständen in der Zukunft Firmware-Aktualisierungen
für das Crystal Surround Air Track-System zur Verfügung stellen. Wenn ein
Update verfügbar ist, kann die Firmware durch Anschließen eines USBLaufwerks
mit dem Firmware Update an den USB-Anschluss Ihres Air Track
aktualisiert werden.
Beachten Sie, dass wenn mehrere Update Dateien zur Verfügung stehen,
diese einzeln auf das USB-Laufwerk kopiert und nacheinander verwendet
werden müssen, um die Firmware zu aktualisieren. Besuchen Sie bitte
Samsung.com oder setzen Sie sich mit Samsung Kundendienst in
Verbindung, um weitere Informationen über das Herunterladen von
Aktualisierungen zu erhalten.
ƒ Schließen Sie ein USB-Laufwerk mit der Firmware Aktualisierung an den USB-Anschluss des
Hauptgeräts an.
ƒ Beachten Sie, dass während der Aktualisierung den Netzstecker nicht ausgezogen wird, und
entfernen Sie ebenfalls das USB-Gerät nicht. Das Gerät schaltet sich nach Abschluss der
Firmwareaktualisierung automatisch aus. Beim Aktualisieren der Software werden sämtliche
Einstellungen auf den Standard (Werkeinstellung) zurückgesetzt. Sie sollten sich Ihre
Einstellungen notieren, um sie nach der Aktualisierung wieder vornehmen zu können.
ƒ Nachdem die Aktualisierung der Software des Produkts abgeschlossen ist, das Gerät
abschalten und anschließend die () Taste für eine Weile gedrückt halten, um das Gerät
zurückzusetzen.
ƒ Falls die Aktualisierung der Firmware fehlschlägt empfehlen wir, das USB-Gerät im FAT16
Format zu formatieren und die Aktualisierung erneut zu versuchen.
ƒ Zum Zweck der Aktualisierung, formatieren Sie nicht die USB-Dateien auf NTFS weil die
Systemdatei nicht unterstützt wird.
ƒ Je nach Hersteller werden einige USB-Kartenlesegeräte möglicherweise nicht unterstützt.
HW-F350
TV VOL TV CH AUDIO SYNC
AUX USB TV SOURCE
TV MUTE TV INFO TV PRE-CH TV EXIT
AUTO POWER
REPEAT DIMMER
OPTICAL
TV VOL TV CH AUDIO SYNC
AUX USB TV SOURCE
TV MUTE TV INFO TV PRE-CH TV EXIT
AUTO POWER
REPEAT DIMMER
OPTICAL
TV INFO
TV VOL TV CH
TV PRE-CH TV EXIT
TV SOURCE
HW-F355
TV VOL TV CH AUDIO SYNC
AUX TV SOURCE
TV MUTE TV INFO TV PRE-CH DIMMER
OPTICAL
AUTO POWER SoundShare
USB/
REPEAT
TV VOL TV CH AUDIO SYNC
AUX TV SOURCE
TV MUTE TV INFO TV PRE-CH DIMMER
OPTICAL
AUTO POWER SoundShare
USB/
REPEAT
TV SOURCE
TV INFO
TV VOL TV CH
TV PRE-CH
21
GER
● FEHLERSUCHE
Bevor Sie sich an den Kundendienst wenden, überprüfen Sie bitte die folgenden Punkte.
Problem Überprüfung Behebung
Das Gerät lässt sich nicht
einschalten.
• Ist der Netzstecker an eine
Steckdose angeschlossen?
• Schließen Sie den Netzstecker
an die Steckdose an.
Das Gerät reagiert nicht auf das
Drücken von Tasten.
• Ist die Luft elektrostatisch
aufgeladen?
• Ziehen Sie den Netzstecker,
und schließen Sie ihn wieder
an die Steckdose an.
Es wird kein Ton wiedergegeben. • Ist die Einheit richtig an Ihr
Fernsehgerät angeschlossen?
• Wurde das Gerät auf stumm
geschalten?
• Ist die Lautstärke auf minimal
eingestellt?
• Schließen Sie diese korrekt an.
• Drücken Sie die Taste Mute,
um die Funktion zu deaktivieren.
• Stellen Sie die Lautstärke ein.
Bei Auswahl der Funktion wird kein
Bild auf dem Fernsehgerät
angezeigt.
• Ist das Fernsehgerät richtig
angeschlossen?
• Schließen Sie diese richtig an.
Die Fernbedienung funktioniert nicht. • Sind die Batterien leer?
• Ist die Entfernung zwischen
Fernbedienung und Gerät zu
groß?
• Legen Sie neue Batterien ein.
• Näher an das Gerät heranrücken.
Der Ton aus dem linken bzw. rechten
Kanal wird umgekehrt ausgegeben.
• Ist das Kabel für den linken
bzw. rechten Audioausgang
des Fernsehgeräts richtig
angeschlossen?
• Überprüfen Sie, ob eine
Verwechslung zwischen
linkem und rechtem Kanal
vorliegt, und beheben Sie
diese gegebenenfalls.
Das Ausführen der SoundShare
Funktion (Verbindungsaufbau mit
dem Fernsehgerät) ist
fehlgeschlagen.
• Unterstützt Ihr Fernsehgerät
SoundShare?
• Verfügen Sie über die neueste
Firmware Version?
• Tritt ein Fehler beim
Verbindungsaufbau auf?
• Setzen Sie den TV MODE
zurück und stellen Sie erneut
eine Verbindung her.
• SoundShare wird von Samsung
Fernsehgerät nach Baujahr
2012 unterstützt. Prüfen Sie, ob
Ihr Fernsehgerät diese Funktion
unterstützt.
• Aktualisieren Sie die Firmware
Ihres Fernsehgeräts auf die
neueste Version.
• Drücken Sie die Taste 5
Sekunden lang, um das Gerät
zurückzusetzen.
fehlersuche
22
TECHNISCHE DATEN
Modellbezeichnung
HW-F350/ HW-F355
ALLGEMEIN
USB 5V / 0,5A
Gewicht
Haupteinheit 1,75 kg
Subwoofer (PS-EW1-1) 3,0 kg
Abmessungen
(B × H × T)
Haupteinheit 943 x 49 x 59,9 mm
Subwoofer (PS-EW1-1) 152 x 300 x 284 mm
Betriebstemperatur + 5 °C bis 35 °C
Zulässige Luftfeuchtigkeit 10 % bis 75 %
VERSTÄRKER
Nennausgangsleistung
Haupteinheit 30W/Kanal, 8OHM, THD = 10%, 1kHz
Subwoofer (PS-EW1-1) 60W, 3OHM, THD = 10%, 100Hz
Signal-Rausch-Verhältnis (analoger Eingang) 60 dB
Kanaltrennung (1 kHz) 50 dB
* Signal-Rausch-Verhältnis, Kanaltrennung, Signalstörungen und verwendbare Empfindlichkeit basieren auf
den Richtwerten der AES (Audio Engineering Society).
*: Nominelle Spezifikation
- Samsung Electronics Co., Ltd behält sich das Recht auf unangekündigte Änderungen vor.
- Gewicht und Abmessungen können von den Angaben abweichen.
- Informationen bezüglich der Netzspannung und Stromaufnahme könne Sie dem Typenschild am Gerät
entnehmen.
Samsung Electronics erklärt hiermit, dass dieses Crystal Surround Air Track mit den grundlegenden
Anforderungen und anderen maßgeblichen Bestimmungen der Richtlinie 1999/5/EG übereinstimmt.
Die offizielle Übereinstimmungserklärung finden Sie auf der Webseite http://www.samsung.com. Öffnen
Sie Support und geben Sie bei Produktsuche den Modellnamen ein.
Dieses Gerät darf in allen EG-Staaten betrieben werden.
anhang
AH68-02614L-05
Kontakt zu Samsung
Falls Sie Fragen oder Anregungen zu Samsung-Produkten haben, freuen wir uns über Ihre Kontaktaufnahme mit der
Samsung-Kundenbetreuung .
[Korrekte Entsorgung der Batterien dieses
Produkts]
(Gilt für Länder mit Abfalltrennsystemen)
Die Kennzeichnung auf der Batterie bzw. auf der dazugehörigen Dokumentation
oder Verpackung gibt an, dass die Batterie zu diesem Produkt nach seiner
Lebensdauer nicht zusammen mit dem normalen Haushaltsmüll entsorgt
werden darf. Wenn die Batterie mit den chemischen Symbolen Hg, Cd oder Pb
gekennzeichnet ist, liegt der Quecksilber-, Cadmium- oder Blei-Gehalt der Batterie
über den in der EG-Richtlinie 2006/66 festgelegten Referenzwerten. Wenn
Batterien nicht ordnungsgemäß entsorgt werden, können sie der menschlichen
Gesundheit bzw. der Umwelt schaden.
Bitte helfen Sie, die natürlichen Ressourcen zu schützen und die nachhaltige
Wiederverwertung von stofflichen Ressourcen zu fördern, indem Sie die Batterien
von anderen Abfällen getrennt über Ihr örtliches kostenloses AltbatterieRücknahmesystem
entsorgen.
Korrekte Entsorgung von Altgeräten
(Elektroschrott)
(Gilt für Länder mit Abfalltrennsystemen)
Die Kennzeichnung auf dem Produkt, Zubehörteilen bzw. auf der dazugehörigen
Dokumentation gibt an, dass das Produkt und Zubehörteile (z. B.
Ladegerät,Kopfhörer, USB-Kabel) nach ihrer Lebensdauer nicht zusammen mit
dem normalen Haushaltsmüll entsorgt werden dürfen. Entsorgen Sie dieses Gerät
und Zubehörteile bitte getrennt von anderen Abfällen, um der Umwelt bzw. der
menschlichen Gesundheit nicht durch unkontrollierte Müllbeseitigung zu schaden.
Helfen Sie mit, das Altgerät und Zubehörteile fachgerecht zu entsorgen, um die
nachhaltige Wiederverwertung von stofflichen Ressourcen zu fördern.
Private Nutzer wenden sich an den Händler, bei dem das Produkt gekauft wurde,
oder kontaktieren die zuständigen Behörden, um in Erfahrung zu bringen, wo Sie
das Altgerät bzw. Zubehörteile für eine umweltfreundliche Entsorgung abgeben
können. Gewerbliche Nutzer wenden sich an ihren Lieferanten und gehen nach
den Bedingungen des Verkaufsvertrags vor. Dieses Produkt und elektronische
Zubehörteile dürfen nicht zusammen mit anderem Gewerbemüll entsorgt werden.
Region Kontakt Zentrum � Website
AUSTRIA 0800 - SAMSUNG (0800 -
7267864) www.samsung.com/at/support
BELGIUM 02-201-24-18
www.samsung.com/be/support
(Dutch)
www.samsung.com/be_fr/
support (French)
BOSNIA 051 331 999 www.samsung.com/support
BULGARIA 07001 33 11 , sharing cost www.samsung.com/bg/support
CROATIA 062 726 786 www.samsung.com/hr/support
CZECH 800 - SAMSUNG (800-726786) www.samsung.com/cz/support
DENMARK 70 70 19 70 www.samsung.com/dk/support
FINLAND 030-6227 515 www.samsung.com/fi/support
FRANCE 01 48 63 00 00 www.samsung.com/fr/support
GERMANY
0180 6 SAMSUNG bzw.
0180 6 7267864*
(*0,20 €/Anruf aus dem dt.
Festnetz, aus dem Mobilfunk
max. 0,60 €/Anruf)
www.samsung.com/de/support
CYPRUS 8009 4000 only from landline, toll
free
www.samsung.com/gr/support
GREECE
80111-SAMSUNG (80111 726
7864) only from land line
(+30) 210 6897691 from mobile
and land line
HUNGARY 0680SAMSUNG (0680-726-786)
0680PREMIUM (0680-773-648)
http://www.samsung.com/hu/
support
ITALIA 800-SAMSUNG (800.7267864) www.samsung.com/it/support
LUXEMBURG 261 03 710 www.samsung.com/support
Region Kontakt Zentrum � Website
MONTENEGRO 020 405 888 www.samsung.com/support
SLOVENIA 080 697 267
090 726 786 www.samsung.com/si/support
NETHERLANDS 0900-SAMSUNG (0900-7267864)
(€ 0,10/Min) www.samsung.com/nl/support
NORWAY 815 56480 www.samsung.com/no/support
POLAND
0 801-172-678* lub +48 22
607-93-33 **
* (całkowity koszt połączenia jak za
1 impuls według taryfy operatora)
** (koszt połączenia według
taryfy operatora)
www.samsung.com/pl/support
PORTUGAL 808 20 7267 www.samsung.com/pt/support
ROMANIA 08008 SAMSUNG (08008 726
7864) TOLL FREE No. www.samsung.com/ro/support
SERBIA 011 321 6899 www.samsung.com/rs/support
SLOVAKIA 0800 - SAMSUNG(0800-726 786) www.samsung.com/sk/support
SPAIN 0034902172678 www.samsung.com/es/support
SWEDEN 0771 726 7864 (SAMSUNG) www.samsung.com/se/support
SWITZERLAND 0848 726 78 64
(0848-SAMSUNG)
www.samsung.com/ch/support
(German)
www.samsung.com/ch_fr/
support (French)
U.K 0330 SAMSUNG (7267864) www.samsung.com/uk/support
EIRE 0818 717100 www.samsung.com/ie/support
LITHUANIA 8-800-77777 www.samsung.com/lt/support
LATVIA 8000-7267 www.samsung.com/lv/support
ESTONIA 800-7267 www.samsung.com/ee/support
Crystal Surround Air Track
(sistema di diffusori attivi)
manuale utente
immagina le possibilità
Grazie per aver acquistato un prodotto Samsung.
Per ricevere un servizio più completo,
registrare il prodotto all'indirizzo
www.samsung.com/register
HW-F350
HW-F355
2
caratteristiche
SoundShare
La funzione SoundShare fa sì che l'audio della TV venga emesso dal SAT attraverso una connessione Bluetooth e controlla l'audio.
3D SOUND PLUS
La funzione 3D SOUND PLUS aggiunge profondità e il senso dello spazio durante l'ascolto dei brani.
Tipi speciali di campo sonoro
È possibile scegliere tra 7 diversi modi audio - MUSIC, NEWS, DRAMA, CINEMA, SPORTS, GAME, e OFF (suono originale)
- a seconda del tipo di contenuti che si intende ascoltare.
Telecomando multifunzione
Il telecomando fornito in dotazione può essere utilizzato per comandare il televisore collegato all'unità. (Funziona solo per i
televisori Samsung)
Il telecomando dispone di un tasto di scelta rapida TV ed è possibile eseguire diverse operazioni semplicemente
premendolo.
Sistema di diffusori attivi
Questa unità comprende il sistema di diffusori attivi che fornisce una qualità del suono elevata in una singola unità sottile.
Questa unità non richiede altoparlanti e cablaggio satellitari, generalmente previsti per i sistemi audio surround convenzionali.
Supporto host USB
Utilizzando la funzione host USB dell'Air Track è possibile collegare e riprodurre file musicali da dispositivi di memorizzazione
USB esterni come lettori MP3, memorie flash USB ecc.
Funzione Bluetooth
È possibile collegare un dispositivo Bluetooth al SAT per ascoltare musica con audio stereo di alta qualità, tutto senza fili!
LICENZA
Prodotto su licenza di Dolby Laboratories. Dolby e il simbolo della doppia D sono marchi di Dolby Laboratories.
Prodotto su licenza, brevetti U.S.A. n.: 5,956,674; 5,974,380; 6,487,535 e altri brevetti U.S.A. e mondiali
registrati e in attesa di registrazione. DTS, il simbolo, e DTS e il simbolo insieme sono marchi registrati e DTS 2.0 Channel è
un marchio di DTS, Inc. Software incluso nel prodotto. © DTS, Inc. Tutti i diritti riservati.
- Per inviare domande riguardanti le open source, contattare Samsung via email (oss.request@samsung.com).
3
ITA
informazioni sulla sicurezza
NORME PER LA SICUREZZA
Per ridurre i rischi di folgorazione, non rimuovere il coperchio (o il retro), all'interno vi sono componenti non
riparabili dall'utente Per l'assistenza tecnica fare riferimento a personale qualificato.
ATTENZIONE
RISCHIO DIFOLGORAZIONE .
NON APRIRE .
Questo simbolo indica la presenza,
all'interno del prodotto, di tensioni
pericolose che costituiscono un potenziale
rischio di scosse elettriche.
Questo simbolo indica istruzioni di
particolare importanza per il prodotto.
AVVERTENZA : PER RIDURRE I RISCHI D’INCENDIO E DI SCOSSE ELETTRICHE NON ESPORRE L’ APPARECCHIO
A PIOGGIA O UMIDITÀ.
ATTENZIONE : PER EVITARE SCOSSE ELETTRICHE, INSERIRE CORRETTAMENTE E COMPLETAMENTE LA SPINA.
• Questo dispositivo deve essere sempre collegato ad una presa elettrica dotata di messa a terra di protezione.
• Per scollegare il dispositivo dalla rete elettrica, lo spinotto deve essere estratto dalla presa, pertanto esso deve essere
facilmente raggiungibile.
ATTENZIONE
• Non schizzare o sgocciolare liquidi sull'apparecchio. Non sistemare oggetti pieni di liquidi, come dei vasi,
sull'apparecchio.
• Per spegnere completamente l'apparecchio, estrarre la spina di alimentazione dalla presa di rete. Di conseguenza, la
spina di alimentazione deve essere facilmente e prontamente accessibile in qualsiasi momento.
4
PRECAUZIONI
Verificare che le caratteristiche degli alimentatori CA presenti in casa corrispondano all'etichetta di identificazione posta sul retro del
prodotto. Installare il prodotto orizzontalmente, su un supporto adeguato (mobile), verificando che vi sia spazio sufficiente per una corretta
ventilazione (7 - 10 cm). Assicurarsi che le aperture di ventilazione non siano coperte. Non sistemare l'unità su amplificatori o altri
dispositivi che possono diventare caldi. Questa unità è progettata per un uso continuo. Per spegnere completamente l'unità, scollegare il
connettore CA dalla presa di rete. Scollegare l'unità dalla presa se si prevede di non utilizzarla per un periodo prolungato.
Durante i temporali, scollegare la spina di alimentazione dalla presa.
I picchi di alta tensione provocati dai fulmini potrebbero danneggiare l'unità.
Tenere il prodotto lontano da fonti di umidità (ad es. vasi) e calore eccessivo
(ad es. fuoco) o da apparecchi che generano un forte campo magnetico
o elettrico. In caso di malfunzionamento dell'unità, scollegare il cavo
di alimentazione dalla presa di corrente. Il prodotto non è destinato all'uso
industriale. Questo prodotto è destinato esclusivamente all'uso personale.
Se il prodotto o il disco vengono conservati a basse temperature, potrebbe
formarsi della condensa. Trasportando l'unità in inverno, attendere circa
2 ore prima di utilizzarla, in modo che ritorni a temperatura ambiente.
Non esporre l'unità alla luce diretta del sole o ad altre fonti di calore.
Questo potrebbe causare il surriscaldamento e il malfunzionamento
dell'unità.
Le batterie utilizzate con questo prodotto contengono sostanze chimiche
dannose per l'ambiente.
Non smaltirle con i comuni rifiuti domestici.
Non gettare le batterie nel fuoco.
Non disassemblare, surriscaldare o far entrare le batterie in cortocircuito.
Una installazione scorretta delle batterie può causarne l'esplosione.
Sostituire solo con batterie dello stesso tipo o equivalenti.
Phones
3.9 inch 3.9 inch
2.7 inch
3.9 inch 99.1mm
99.1mm 99.1mm
68.6mm
Ɣ Le fi gure e le illustrazioni del presente manuale utente sono fornite soltanto come riferimento. Possono
differire rispetto all'aspetto effettivo del prodotto.
Ɣ È possibile che vengano addebitate delle spese amministrative nei seguenti casi:
(a) l'uscita del tecnico in seguito a una chiamata non rileva difetti nel prodotto (ad es. nel caso l'utente abbia
omesso di leggere questo manuale utente).
(b) utente ha portato l'unità presso un centro di riparazione che non rileva difetti nel prodotto (ad es. nel caso
l'utente abbia omesso di leggere questo manuale utente).
Ɣ L'importo di tali spese amministrative verrà comunicato all'utente prima di eseguire una visita a domicilio o un
eventuale intervento di manutenzione.
5
ITA
Thi
5,06
6,77
7,14
7,20
7,28
Thi
6,83
sommario
CARATTERISTICHE
2
2 Caratteristiche
2 Licenza
INFORMAZIONI SULLA SICUREZZA
3
3 Norme per la sicurezza
4 Precauzioni
PER COMINCIARE
6
6 Prima di leggere il manuale utente
6 Accessori forniti
DESCRIZIONI
7
7 Pannello anteriore
8 Lato Posteriore
8 Installazione del nucleo in ferrite sul cavo
del diffusore subwoofer
TELECOMANDO
9
9 Informazioni generali sul telecomando
COLLEGAMENTI
11
11 Installazione del supporto per montaggio a
parete
12 Connessione di un dispositivo esterno con
un cavo audio (analogico) o ottico (digitale)
RISOLUZIONE DEI PROBLEMI
21
21 Risoluzione dei problemi
APPENDICE
22
22 Specifiche
FUNZIONI
13
13 Modo di ingresso
13 Bluetooth (solo per il modello HW-F355)
15 SoundShare (solo per il modello HW-F355)
16 USB
17 Utilizzo del telecomando
20 Aggiornamento software
6
PRIMA DI LEGGERE IL MANUALE UTENTE
Osservare le seguenti indicazioni prima di leggere il manuale utente.
Icone utilizzate nel manuale
Icona Indicazione Definizione
Attenzione Indica una situazione in cui una funzione non è attiva o in cui è possibile
che le impostazioni vengano cancellate.
Nota Indica un suggerimento o un'istruzione nella pagina che aiutano a
comprendere il funzionamento dell'unità.
Istruzioni di sicurezza e risoluzione dei problemi
1) Leggere attentamente le istruzioni relative alla sicurezza prima di utilizzare questo prodotto. (Vedere pagina 3)
2) Se si verifica un problema, consultare la sezione relativa alla risoluzione dei problemi. (Vedere pagina 21)
Copyright
©2013 Samsung Electronics Co.,Ltd.
Tutti i diritti riservati; è vietata la riproduzione di una parte o dell'intero manuale utente senza
l'autorizzazione scritta di Samsung Electronics Co., Ltd
per cominciare
ƒ L'aspetto degli accessori può variare leggermente dalle illustrazioni riportate sopra.
ƒ Utilizzare il cavo USB dedicato per collegare i dispositivi USB esterni all'unità.
ACCESSORI FORNITI
Controllare gli accessori forniti indicati di seguito.
POWER TV POWER
AH59-02548A
TV VOL TV CH AUDIO SYNC
AUX USB TV SOURCE
TV PRE-CH TV EXIT
SOUND EFFECT SMART VOLUME
S/W
LEVEL S/W
LEVEL
VOL
VOL
3D SOUND PLUS DRC
TV MUTE TV INFO
AUTO POWER
REPEAT DIMMER
OPTICAL
MUTE (Viti: 2EA)
(Rondelle di
fissaggio: 2EA)
Telecomando /
batterie (formato aaa) Manuale Utente Staffa per montaggio
a parete Viti Cavo USB
Cavo di alimentazione Cavo di alimentazione Cavo Aux Nucleo toroidale
in ferrite
7
ITA
● DESCRIZIONI
descrizioni
PANNELLO ANTERIORE
TASTO DI
ALIMENTAZIONE Accende e spegne l'unità Crystal Surround Air Track.
TASTO FUNZIONI
Seleziona l'ingresso D.IN, AUX, BT, TV, USB.
- Con l'unità accesa, premendo il tasto ( ) per più di 3 secondi,
questo viene impostato per funzionare come tasto MUTE. Per
annullare l'impostazione del tasto come MUTE, premere di nuovo il tasto
( ) per più di 3 secondi.
VOLUME +/- Regola il volume.
DISPLAY Visualizza il modo corrente.
ƒ Quando si accende l'unità vi è un ritardo di 4, 5 secondi prima che venga riprodotto il
suono.
1 2 3
4
8
TERMINALE PER
LA CONNESSIONE
DEL SUBWOOFER
Collega il jack di connessione del subwoofer.
INGRESSO
ALIMENTAZIONE
Collegare correttamente il connettore dell'alimentatore CA
all'ingresso dell'alimentazione, quindi collegare la spina
dell'alimentatore CA alla presa di rete.
PORTA USB
Collegare qui i dispositivi USB (per esempio il lettore MP3) per
riprodurre i file in essi presenti.
- Utilizzare il cavo USB fornito se il prodotto è installato a parete.
INGRESSO
OTTICO Collegare all'uscita digitale (ottica) di un dispositivo esterno.
5 INGRESSO AUX Per il collegamento all'uscita analogica di un dispositivo esterno.
ƒ Tenere l'alimentatore CA dalla spina quando lo si scollega dalla presa di rete. Non tirare il
cavo.
ƒ Non collegare questa unità o altri componenti all'uscita CA finché non sono stati collegati tutti
i componenti.
descrizioni
LATO POSTERIORE
INSTALLAZIONE DEL NUCLEO IN FERRITE SUL CAVO DEL DIFFUSORE SUBWOOFER
Sollevare i fermi per
sbloccare il nucleo ed
aprirlo.
Collocare il cavo del
diffusore subwoofer nel
nucleo aperto.
Richiudere i fermi.
3
AUX IN OPTICAL IN
5 4
1
2
9
ITA
● TELECOMANDO
TV INFO, TV PRE-CH (CAN-PREC TV)
Visualizza lo stato attuale del televisore.
Passa al canale TV precedente.
telecomando
INFORMAZIONI GENERALI SUL TELECOMANDO
HW-F350
Inserimento delle batterie nel telecomando
1. Sollevare il coperchio sul retro
del telecomando tirandolo verso
l'alto come indicato.
2. Inserire due batterie di tipo AAA.
Assicurarsi che la batteria venga posta con i
poli positivo e negativo in corrispondenza dei
simboli "+" e "-" riportati nell'apposito vano.
3. Rimettere il coperchio.
Se impiegate per la TV in
modo standard, le batterie
durano circa un anno.
Portata del telecomando
Il telecomando ha una portata di circa 7 metri in linea d'aria. Funziona anche con un angolo orizzontale fino
a 30° rispetto al sensore del telecomando.
TASTO DI POWER
Accende e spegne l'unità
Crystal Surround Air Track.
TASTO TV POWER
Accende e spegne il televisore Samsung.
OPTICAL (OTTICO)
Premere per selezionare il modo
Optical (Ottico).
TASTO DI COMANDO
Riprodurre, sospendere o arrestare la
riproduzione di un file musicale, oppure
cercare il file musicale in avanti o indietro.
TV MUTE
Disattiva l'audio del televisore. Premerlo
di nuovo per riportare l'audio al livello
precedente.
AUX (AUX)
Premere per selezionare il modo AUX (AUX).
USB(USB)
Premere per selezionare il modo USB (USB).
DRC
Questa funzione permette di
apprezzare l'audio Dolby Digital
quando si guardano film a basso
volume di notte (Standard, MAX, MIN).
TV EXIT (USCITA TV)
Esce dalla TV (funziona in modo
analogo al tasto EXIT del telecomando
della TV)
TV SOURCE
Premere per selezionare una sorgente video
collegata del televisore.
VOLUME TV
Scorre i canali televisivi disponibili.
Regola il livello del volume TV.
SOUND EFFECT
Seleziona l'effetto audio: (MUSIC,
NEWS, DRAMA, CINEMA, SPORTS,
GAME, OFF (Suono originale)) MUTE
Disattiva l'audio dell'unità. Premerlo di nuovo
per riportare l'audio al livello precedente.
3D SOUND PLUS
Questa funzione aggiunge profondità e
il senso dello spazio al suono.
SMART VOLUME
Regola e stabilizza il volume in modo che
non possa cambiare improvvisamente.
POWER TV POWER
AH59-02548A
TV VOL TV CH AUDIO SYNC
AUX USB TV SOURCE
TV PRE-CH TV EXIT
SOUND EFFECT SMART VOLUME
S/W
LEVEL S/W
LEVEL
VOL
VOL
3D SOUND PLUS DRC
TV MUTE TV INFO
AUTO POWER
REPEAT DIMMER
OPTICAL
MUTE
REPEAT
Selezionare Repeat File (Ripeti file),
All (Tutti), Random (Casuale).
CHANNEL TV, AUDIO SYNC
Scorre i canali televisivi disponibili.
Questa funzione contribuisce a
sincronizzare il video con l'audio quando
si è collegati ad un televisore digitale.
S/W LEVEL, VOLUME
Regola il livello del subwoofer.
Regola il volume dell'unità.
AUTO POWER, DIMMER
Sincronizza l'Air Track attraverso la
connessione ottica con il connettore
ottico in modo che si attivi
automaticamente all'accensione del
televisore.
È possibile regolare la luminosità del
display.
10
TASTO DI ACCENSIONE
Accende e spegne l'unità
Crystal Surround Air Track.
REPEAT
Selezionare Repeat File (Ripeti file),
All (Tutti), Random (Casuale).
TASTO TV POWER
Accende e spegne il televisore Samsung.
AUX (AUX)
Premere per selezionare il modo AUX
(AUX).
POWER TV POWER
AH59-02532A
TV VOL TV CH AUDIO SYNC
AUX TV SOURCE
TV PRE-CH DIMMER
SOUND EFFECT SMART VOLUME
VOL
VOL
DRC
TV MUTE TV INFO
OPTICAL
S/W MUTE LEVEL S/W
LEVEL
3D SOUND PLUS
AUTO POWER SoundShare
USB/
REPEAT
TASTO DI COMANDO
Riprodurre, sospendere o arrestare la
riproduzione di un file musicale, oppure
cercare il file musicale in avanti o indietro.
OPTICAL (OTTICO)
Premere per selezionare il modo
Optical (Ottico).
SOUND EFFECT
Seleziona l'effetto audio: (MUSIC,
NEWS, DRAMA, CINEMA, SPORTS,
GAME, OFF (Suono originale))
S/W LEVEL, VOLUME
Regola il livello del subwoofer.
Regola il volume dell'unità.
USB, BLUETOOTH (USB,BLUETOOTH)
Premere per selezionare il modo USB/
BLUETOOTH (USB/BLUETOOTH).
TV SOURCE
Premere per selezionare una sorgente
video collegata del televisore.
SOUNDSHARE
Questa funzione emette l'audio TV dal SAT
attraverso la connessione Bluetooth e lo
comanda.
AUDIO SYNC
Questa funzione contribuisce a
sincronizzare il video con l'audio quando
si è collegati ad un televisore digitale.
AUTO POWER
Sincronizza l'Air Track attraverso la
connessione ottica con il connettore ottico
in modo che si attivi automaticamente
all'accensione del televisore.
VOLUME TV
Scorre i canali televisivi disponibili.
Regola il livello del volume TV.
CHANNEL TV
Scorre i canali televisivi disponibili.
TV MUTE
Disattiva l'audio del televisore. Premerlo di
nuovo per riportare l'audio al livello
precedente.
SMART VOLUME
Regola e stabilizza il volume in modo che
non possa cambiare improvvisamente.
3D SOUND PLUS
Questa funzione aggiunge profondità e
il senso dello spazio al suono.
TV INFO, TV PRE-CH (CAN-PREC TV)
Visualizza lo stato attuale del televisore.
Passa al canale TV precedente.
ƒ SAT sta per Surround Air Track, che è il nome proprietario di Samsung.
ƒ Il telecomando può comandare soltanto televisori Samsung.
ƒ A seconda del televisore che si sta utilizzando, potrebbe non essere possibile comandare il televisore con
questo telecomando. Se non si riesce, comandare il televisore con il relativo telecomando.
DIMMER
È possibile regolare la luminosità del
display.
DRC
Questa funzione permette di
apprezzare l'audio Dolby Digital
quando si guardano film a basso
volume di notte (Standard, MAX, MIN).
MUTE
Disattiva l'audio dell'unità. Premerlo
di nuovo per riportare l'audio al livello
precedente.
telecomando
INFORMAZIONI GENERALI SUL TELECOMANDO
HW-F355
11
ITA
● COLLEGAMENTI
INSTALLAZIONE DEL SUPPORTO PER MONTAGGIO A PARETE
È possibile utilizzare la staffa per montaggio a parete per montare questa unità sulla parete.
Precauzioni per l'installazione
• Installare esclusivamente su una parete verticale.
• Per l'installazione, evitare luoghi con temperature o tassi di umidità elevati; in caso contrario la parete non
può sostenere il peso dell'unità.
• Verificare la resistenza della parete. Se la parete non è sufficientemente robusta per sostenere l'unità,
rinforzarla o installare l'unità su un'altra parete in grado di sopportarne il peso.
• Acquistare e utilizzare viti di fissaggio o tasselli adeguati al tipo di parete (cartongesso, acciaio, legno,
ecc.). Se possibile, fissare le viti di supporto al telaio della parete.
• Collegare i cavi tra l'unità e i dispositivi esterni prima di installarla a parete.
• Assicurarsi che l'unità sia spenta e scollegata prima di effettuare l'installazione. Vi è il rischio di scosse
elettriche.
1. Posizionare la staffa per montaggio a parete su un muro,
quindi fissarla con due viti (non fornite).
Se l'unità viene installata sotto un televisore, assicurarsi di
installare la staffa per montaggio a parete in modo che la freccia
( ) si trovi al centro del televisore.
Assicurarsi inoltre che l'unità sia ad almeno 5 cm sotto il
televisore.
2. Allineare i fori delle viti su entrambi i lati dell’UNITÀ PRINCIPALE
ai fori delle RONDELLE DI FISSAGGIO e inserire le viti.
3. Inserire il cavo USB nel retro dell'unità prima installarla alla
parete.
4. Quindi inserire l'unità nelle corrispondenti fessure della staffa
per montaggio a parete. Per un'installazione sicura, accertarsi
che i perni di fissaggio arrivino saldamente fino in fondo alla
fessura.
5. L'installazione è terminata.
ƒ Non aggrapparsi all’unità installata ed evitare di sottoporla ad urti.
ƒ Fissare saldamente l'unità alla parete in modo che non cada. Cadendo, potrebbe
provocare lesioni o danneggiarsi.
ƒ Quando l'unità viene installata su una parete, assicurarsi che i cavi di connessione non
possano essere tirati da bambini, rischiando di farla cadere.
ƒ Per garantire prestazioni ottimali nelle installazioni a parete, tenere il sistema di diffusori a
collegamenti
5 cm o più
1 2
12
collegamenti
CONNESSIONE DI UN DISPOSITIVO ESTERNO CON UN CAVO
AUDIO (ANALOGICO) O OTTICO (DIGITALE)
Questa sezione spiega due modi (digitale e analogico) per collegare l'unità al televisore.
Questa unità è dotata di jack digitale ottico e di jack analogico audio per il collegamento ad un televisore.
o
AUX IN
OPTICAL IN
AUX IN
AUDIO
OUT
L
R
Red White
Cavo audio
OPTICAL IN
OPTICAL
OUT
Cavo ottico
(non fornito)
Lettore BD/DVD/
set-top box/
console giochi
Rosso Bianco
INGRESSO AUX
Collegare l'ingresso AUX (audio) dell'unità principale all'USCITA AUDIO del televisore o del dispositivo sorgente.
Prestare attenzione ai diversi colori.
o,
INGRESSO OTTICO
Collegare l'ingresso digitale sull'unità principale a OPTICAL OUT sul televisore o sul dispositivo sorgente.
ƒ Non collegare il cavo di alimentazione di questo prodotto o del televisore alla presa di
corrente finché non sono stati collegati tutti i componenti.
ƒ Prima di spostare o installare il prodotto, spegnere l'apparecchio e staccare il cavo di
alimentazione.
13
ITA
● FUNZIONI
MODO DI INGRESSO
È possibile selezionare l'ingresso D.IN, AUX, BT, TV o USB.
Premere il tasto appropriato del telecomando per selezionare il modo desiderato, oppure premere il tasto ( ) per
selezionare una delle seguenti opzioni:
Modo D.IN, AUX, BT, TV o USB.
Tipo di ingresso Display
Ingresso ottico digitale D.IN
Ingresso AUX AUX
Modo BLUETOOTH BT (solo per il modello HW-F355)
Modo TV TV (solo per il modello HW-F355)
Modo USB USB
L'unità si spegne automaticamente nei seguenti casi:
• MODO BT/TV/USB/D.IN
- In assenza di segnale audio per 20 minuti.
• Modo Aux
- Se non vengono effettuati inserimenti dal TELECOMANDO per 8 ore
quando il cavo è collegato.
- Se il cavo Aux non è collegato per 20 minuti.
ƒ Se la memoria flash USB non può essere collegata direttamente all'unità, utilizzare il cavo fornito in
dotazione.
BLUETOOTH (SOLO PER IL MODELLO HW-F355)
Con i dispositivi Bluetooth è possibile ascoltare musica con elevata qualità del suono stereo, tutto senza fili!
Che cos'è il Bluetooth?
Bluetooth è una tecnologia che permette di collegare facilmente tra di loro dispositivi compatibili con
Bluetooth attraverso una connessione wireless a breve raggio.
• Il dispositivo Bluetooth può provocare rumorosità o malfunzionamenti, a seconda delle condizioni di
utilizzo, se:
- Una parte del corpo è a contatto con il sistema di ricezione/di trasmissione del dispositivo Bluetooth
o dell'Air Track.
- È soggetto a variazioni elettriche dovute a interferenze derivanti da riflessioni dei segnali su pareti,
spigoli o tramezzature d'ufficio.
- È esposto a interferenze elettriche derivanti da dispositivi della stessa banda di frequenza, incluse
apparecchiature mediche, forni a microonde e LAN wireless.
• Collegare l'Air Track al dispositivo Bluetooth mantenendo una distanza ravvicinata.
• Maggiore è la distanza tra l'Air Track e il dispositivo Bluetooth, peggiore è la qualità. Se la distanza
supera il raggio d'azione del Bluetooth, la connessione si interrompe.
• In aree a bassa sensibilità di ricezione, la connessione Bluetooth potrebbe non funzionare correttamente.
• Il collegamento Bluetooth funziona solo nelle vicinanze del dispositivo. La connessione viene
automaticamente interrotta se la distanza è superiore a questo limite. La qualità del suono si riduce in
presenza di ostacoli quali pareti o porte, anche entro il limite indicato.
• Questo dispositivo wireless può provocare interferenze elettriche durante il funzionamento.
funzioni
POWER TV POWER
HW-F350
AUX USB TV SOURCE
AUTO POWER
REPEAT DIMMER
OPTICAL AUX USB TV SOURCE
AUTO POWER
REPEAT DIMMER
OPTICAL AUX USB L
HW-F355
OPTICAL AUX TV SOURCE
AUTO POWER SoundShare
USB/
REPEAT
OPTICAL AUX TV SOURCE
AUTO POWER SoundShare
USB/
REPEAT
OPTICAL AUX
14
funzioni
Per collegare l'Air Track a un dispositivo Bluetooth
Verificare che il dispositivo Bluetooth supporti la funzione di auricolare stereo compatibile con Bluetooth.
Collegare
Dispositivo Bluetooth
1. Premere il tasto USB/Bluetooth del telecomando dell'Air Track per visualizzare il messaggio BT.
• Viene visualizzato il messaggio WAIT per 4 secondi e poi il messaggio BT READY sul display
anteriore dell'Air Track.
2.Selezionare il menu Bluetooth sul dispositivo Bluetooth da collegare. (Vedere il manuale utente del
dispositivo Bluetooth)
3.Selezionare il menu dell'auricolare stereo sul dispositivo Bluetooth.
• Viene visualizzato un elenco dei dispositivi scanditi.
4. Selezionare "[Samsung] AirTrack" dall'elenco.
• Quando l'Air Track è collegato al dispositivo Bluetooth, sul display frontale viene visualizzata la scritta
BT CONNECTED ➡ BT.
• Se il dispositivo Bluetooth non riesce a stabilire il collegamento con l'Air Track, eliminare il precedente
"[Samsung] AirTrack" trovato dal dispositivo Bluetooth e cercare nuovamente l'Air Track.
5. Riprodurre la musica sul dispositivo collegato.
• È possibile ascoltare la musica riprodotta sul dispositivo Bluetooth collegato attraverso il sistema
Crystal Surround Air Track.
• In modo BT le funzioni Play(Riproduci)/Repeat(Ripeti)/Stop/Next(Succ)/Prev(Prec) non sono disponibili.
ƒ Per collegare il dispositivo Bluetooth all'Air Track può essere richiesto di inserire un codice PIN
(password). Se viene visualizzata la finestra di inserimento del codice PIN, inserire <0000>.
ƒ L'Air Track supporta i dati SBC (44.1kHz, 48kHz).
ƒ La funzione AVRCP non è supportata.
ƒ Effettuare il collegamento esclusivamente a un dispositivo Bluetooth che supporti la funzione
A2DP (AV).
ƒ Non è possibile effettuare il collegamento a un dispositivo Bluetooth che supporti soltanto la
funzione HF (Hands Free).
ƒ È possibile collegare un solo dispositivo Bluetooth per volta.
ƒ Dopo aver disattivato l'Air Track e interrotto il collegamento, il collegamento non viene ripristinato
automaticamente. Per ristabilire la connessione si deve collegare nuovamente il dispositivo.
ƒ L'Air Track potrebbe non eseguire correttamente la ricerca o la connessione nei seguenti casi:
- In presenza di un forte campo elettrico attorno all'Air Track.
- Se vi sono più dispositivi Bluetooth collegati contemporaneamente all'Air Track.
- Se il dispositivo Bluetooth è spento, non è presente o è difettoso.
- Tenere presente che tutti i dispositivi come forni a microonde, adattatori LAN wireless, luci a
fluorescenza e fornelli a gas utilizzano la stessa gamma di frequenza del dispositivo Bluetooth,
con possibili interferenze elettriche.
15
ITA
● FUNZIONI
Per scollegare il dispositivo Bluetooth dall'Air Track
È possibile scollegare il dispositivo Bluetooth dall'Air Track. Per le istruzioni, vedere il manuale utente del
dispositivo Bluetooth.
• L'Air Track viene scollegato.
• Quando l'Air Track è scollegato dal dispositivo Bluetooth, l'Air Track visualizza BT DISCONNECTED sul
display frontale.
Per scollegare l'Air Track dal dispositivo Bluetooth
Premere il tasto ( ) sul pannello anteriore dell'Air Track per passare BT a un altro modo o per disattivare
l'Air Track.
• Il dispositivo Bluetooth collegato deve attendere un certo tempo for ottenere una risposta dall'Air Track
prima di terminare la connessione.
(Il tempo necessario a scollegarsi può differire a seconda del dispositivo Bluetooth)
• Il dispositivo attualmente collegato viene scollegato.
ƒ In modo di connessione Bluetooth, la connessione cade se la distanza tra l’Air Track e il
dispositivo Bluetooth supera 5 metri.
ƒ Se il dispositivo Bluetooth torna nel campo di ricezione effettivo e poi si ricollega dopo essersi
disconnesso, è possibile riavviarlo per ripristinare il collegamento con il dispositivo Bluetooth.
ƒ L'Air Track si spegne automaticamente dopo 20 minuti in modo Ready.
SOUNDSHARE (SOLO PER IL MODELLO HW-F355)
Questa sezione spiega come collegare il Crystal Surround Air Track a una TV SAMSUNG compatibile
Bluetooth.
Per collegare il Crystal Surround Air Track a una TV Samsung
compatibile Bluetooth
Collegare
Toccare il tasto ( ) per selezionare il modo TV, quindi collegare la TV al Crystal Surround Air Track.
• L'unità riproduce l'audio dalla TV quando è collegata alla TV.
• Se si cambia il modo SoundShare della TV o lo si disattiva, si sentirà nuovamente l’audio dalla TV.
Per riprodurre l'audio della TV sull'Air Track attraverso la connessione Bluetooth, è necessario collegare
innanzitutto il sistema ad una TV compatibile Bluetooth. Una volta stabilita la connessione, le relative
informazioni vengono registrate e conservate e in seguito non vengono più visualizzati messaggi sulla
connessione Bluetooth. Avvicinare l'Air Track alla TV prima di effettuare la connessione.
16
funzioni
1. Accendere la TV Samsung e l'Air Track.
• Impostare Aggiungi nuovo dispositivo del menu Impostazioni SoundShare della TV su On.
2. Quando si passa dall'Air Track alla TV viene visualizzato un messaggio che chiede se si desidera procedere
alla connessione Bluetooth. Sullo schermo della TV viene visualizzato il messaggio "[Samsung] AirTrack".
3. Selezionando sulla schermata della TV, la connessione con Air Track viene completata.
• Se, dopo aver stabilito la connessione, si cambia il modo TV, viene instaurato automaticamente il
collegamento con la TV.
• Sull'Air Track, passando dal modo TV ad un altro modo, la connessione SoundShare viene annullata.
• Per annullare la connessione esistente nel SAT e collegare il SAT a un'altra TV,
- Premere per 5 secondi il tasto PLAY/PAUSE (RIPRODUCI/PAUSA) del SAT nel modo di ingresso
TV per annullare la connessione esistente. A questo punto è possibile stabilire una connessione a
una TV diversa.
• È possibile regolare il volume e silenziare utilizzando il telecomando TV o SAT in modo SoundShare.
ƒ Raggio di azione del SoundShare della TV
- campo di connessione raccomandato: entro 50cm
- raggio d'azione raccomandato: entro 5m
ƒ Se la distanza tra il SAT e la TV Samsung è superiore a 5m, la connessione o l'audio possono subire
interruzioni. In questo caso, collegarsi nuovamente al dispositivo Bluetooth entro il raggio d'azione.
ƒ Prima di utilizzare questa funzione assicurarsi che il modo SoundShare della TV Samsung sia attivato.
ƒ I tasti PLAY (RIPRODUCI), NEXT (SUCC), PREV (PREC), STOP non funzionano in modo
SoundShare.
ƒ Funzione Standby Bluetooth attiva
- L’Air Track viene attivato automaticamente quando si accende la TV se la TV e l’Air Track sono stati
collegati con la funzione SoundShare.
- Questa funzione può essere attivata/disattivata premendo il tasto ( ) del pannello frontale per
almeno 5 secondi quando l’Air Track viene spento. Disattivando questa funzione il prodotto si
spegne automaticamente, ma non si riaccende automaticamente.
- Questa funzione è supportata dalle TV prodotte dal 2013.
ƒ La funzione SoundShare è supportata dai modelli selezionati prodotti dal 2012. Controllare se la TV
supporta la funzione. Per ulteriori informazioni, vedere la Guida utente della TV.
USB
1.Collegare il dispositivo USB alla porta USB a lato dell'unità.
2.Premere il tasto ( ) sul pannello anteriore dell’Air Track ripetutamente finché non compare USB.
3.USB appare sulla schermata di visualizzazione e poi scompare.
• La connessione Crystal Surround Air Track è completa.
• Si spegne automaticamente (Spegnimento automatico disattivato) se per più di 20 minuti non viene
collegato nessun dispositivo USB.
Prima di collegare un dispositivo USB
Tenere presente quanto segue:
• Se la cartella del nome file di un dispositivo USB supera 10
caratteri, non viene visualizzata sul OLED.
• Questo prodotto può non essere compatibile con alcuni tipi di
supporto di memorizzazione USB.
• Sono supportati il file system FAT16 e FAT32.
- Il file system NTFS non è supportato.
17
ITA
● FUNZIONI
• Collegare un dispositivo USB direttamente alla porta USB del prodotto. In caso contrario può verificarsi
un problema di compatibilità USB.
• Non collegare più dispositivi di memorizzazione al prodotto attraverso un lettore multischede.
Potrebbe non funzionare correttamente.
• I protocolli PTP per videocamere digitali non sono supportati.
• Non rimuovere il dispositivo USB mentre viene letto.
• I file musicali protetti da DRM (MP3, WMA) provenienti da un sito Web commerciale non vengono
riprodotti.
• Gli HDD esterni non sono supportati.
• I telefoni cellulari non sono supportati.
• Elenco della compatibilità
Formato Codec
*.mp3
MPEG 1 Layer2
MPEG 1 Layer3
MPEG 2 Layer3
*.wma Wave_Format_MSAudio1
Wave_Format_MSAudio2
*.aac
AAC
AAC-LC
HE-AAC
*.wav -
*.Ogg OGG 1.1.0
*.Flac FLAC 1.1.0, FLAC 1.2.1
※ Supporta frequenze di campionamento oltre i 16 kHz
UTILIZZO DEL TELECOMANDO
Riproduzione/pausa/stop
Durante la riproduzione, premere il tasto ►,.
• Premere di nuovo il tasto ► per arrestare temporaneamente la
riproduzione del file.
Premere il tasto ► per riprodurre il file selezionato.
• Per interrompere la riproduzione, premere il tasto Stop () durante la
riproduzione.
Riproduzione a salti avanti/indietro
Durante la riproduzione, premere il tasto #,$.
• Sono presenti più file, premendo il tasto $ viene selezionato il file successivo.
• Se sono presenti più file, premendo il tasto # viene selezionato il file precedente.
Utilizzo della funzione REPEAT
La ripetizione della riproduzione consente di riprodurre ripetutamente un
file, di ripetere tutti i file, di ripetere i file in modo casuale o di disattivare la
funzione di ripetizione.
Premere il tasto REPEAT.
• REPEAT OFF : Annulla la riproduzione ripetuta.
• REPEAT FILE : Ripete la riproduzione di una traccia.
• REPEAT ALL : Ripete la riproduzione di tutte le tracce.
• REPEAT RANDOM : Riproduce le tracce in ordine casuale. (Una
traccia già riprodotta può essere riprodotta
nuovamente).
ƒ È possibile impostare la funzione REPEAT durante la
riproduzione della musica dall'unità USB.
HW-F350 TV PRE-CH TV EXIT
SOUND EFFECT SMART VOLUME
TV MUTE TV INFO TV PRE-CH TV EXIT
SOUND EFFECT SMART VOLUME
TV MUTE TV INFO
HW-F355
HW-F350 TV PRE-CH TV EXIT
SOUND EFFECT SMART VOLUME
TV MUTE TV INFO TV PRE-CH TV EXIT
SOUND EFFECT SMART VOLUME
TV MUTE TV INFO
HW-F355
HW-F350
TV VOL TV CH AUDIO SYNC
AUTO POWER
REPEAT DIMMER
TV VOL TV CH AUDIO SYNC
AUTO POWER
DIMMER
HW-F355
TV VOL TV CH AUDIO SYNC
AUTO POWER SoundShare
REPEAT
TV VOL TV CH AUDIO SYNC
AUTO POWER SoundShare
18
funzioni
Disattivazione dell'audio
Questa funzione è utile se si deve rispondere al campanello o a una telefonata.
1. Per disattivare l'audio dell'unità, premere il tasto MUTE del telecomando.
2. Per disattivare l'audio del televisore, premere il tasto TV MUTE ( ) del
telecomando.
3. Premere nuovamente il tasto MUTE / TV MUTE ( ) del telecomando
(oppure premere il tasto VOLUME +/–) per riattivare l'audio.
Utilizzo della funzione 3D SOUND PLUS
La funzione 3D Sound Plus aggiunge profondità e il senso dello spazio al suono.
Premere 3D SOUND PLUS sul telecomando.
• Ogni volta che si preme questo tasto, la selezione cambia nella sequenza
indicata di seguito : 3D SOUND PLUS OFF ➡ 3D SOUND PLUS MUSIC
➡ 3D SOUND PLUS MOVIE
ƒ Quando si attiva la funzione 3D Sound Plus, la funzione Sound Effect
(Effetti Audio) commuta automaticamente su OFF.
Utilizzo della funzione SMART VOLUME
Questa funzione regola e stabilizza il livello del volume in modo che non
possa cambiare improvvisamente in caso di cambio di canale o di passaggio
di scena.
Premere SMART VOLUME sul telecomando.
• Ogni volta che si preme questo tasto, la selezione cambia nella sequenza
indicata di seguito : SMART VOLUME ON ➡ SMART VOLUME OFF
Utilizzo della funzione SOUND EFFECT
È possibile scegliere tra 7 diversi modi audio - MUSIC, NEWS, DRAMA,
CINEMA, SPORTS, GAME, e OFF (Suono Originale) - a seconda del tipo
di contenuti che si intende ascoltare.
Premere SOUND EFFECT sul telecomando.
• Selezionare il modo OFF per ascoltare il suono originale.
ƒ Raccomandiamo di selezionare un effetto audio a seconda del
materiale sorgente e del proprio gusto personale.
ƒ Quando si seleziona un effetto audio (eccetto OFF), la funzione
3D Sound Plus si disattiva automaticamente.
Utilizzo della funzione S/W LEVEL
È possibile regolare il volume di base con il tasto S/W Level sul telecomando.
1.Premere il tasto S/W LEVEL sul telecomando.
2.Sul display appare “SW 0”
3. Premere il pulsante o sul tasto LEVEL (LIVELLO) per aumentare o
ridurre il volume del subwoofer. È possibile impostarlo tra SW -6 e SW +6.
HW-F350
LEVEL LEVEL
VOL
3D SOUND PLUS DRC
LEVEL LEVEL
VOL
3D SOUND PLUS
HW-F355 3D SOUND DRC
HW-F350 SOUND EFFECT SMART VOLUME
S/W S/W
VOL
MUTE
SOUND EFFECT SMART VOLUME
S/W S/W
VOL
MUTE
SMART VOLUME
HW-F355
HW-F350 SOUND EFFECT SMART VOLUME
S/W S/W
VOL
S/W MUTE S/W
VOL
MUTE
SOUND EFFECT
HW-F355
HW-F350 S/W
LEVEL S/W
LEVEL S/W MUTE LEVEL S/W LEVEL S/W MUTE LEVEL S/W
LEVEL
HW-F355
HW-F350 TV PRE-CH TV EXIT
SOUND EFFECT SMART VOLUME
S/W
LEVEL S/W
LEVEL
VOL
VOL
3D SOUND PLUS DRC
TV MUTE TV INFO
MUTE
TV PRE-CH TV EXIT
SOUND EFFECT SMART VOLUME
S/W LEVEL S/W LEVEL
VOL
VOL
3D SOUND PLUS DRC
TV MUTE TV MUTE TV INFO
HW-F355
19
ITA
● FUNZIONI
Utilizzo della funzione AUTO POWER LINK
Il Crystal Surround Air Track si attiva automaticamente quando si accende
il televisore o un dispositivo collegato all'Air Track mediante cavo ottico.
Premere il tasto AUTO POWER sul telecomando dell'unità.
• La funzione di collegamento in spegnimento automatico si attiva e si
disattiva ogni volta che si preme AUTO POWER.
AUTO POWER LINK Display
ATTIVATA POWER LINK ON
DISATTIVATA POWER LINK OFF
ƒ Se un televisore o qualsiasi dispositivo collegato con Air Track
con cavo ottico è spento e non vi è un ingresso digitale, Air
Track si spegne dopo 20 minuti.
Utilizzo della funzione DIMMER
Premere Dimmer per regolare la luminosità del display.
Premere DIMMER sul telecomando di questa unità.
• Ogni volta che si preme questo tasto, la selezione cambia nella
sequenza indicata di seguito : DIMMER ON ➡ DIMMER OFF
Utilizzo della funzione AUDIO SYNC
Il video può sembrare in ritardo rispetto all'audio se Air Track è collegato
a un televisore digitale.
Se si verifica questo inconveniente, regolare il ritardo dell'audio per
sincronizzarlo con il video.
Premere AUDIO SYNC +/–. sul telecomando di questa unità.
• È possibile impostare un ritardo dell'audio compreso tra 0 ms e 300
ms premendo i tasti +, -.
ƒ Nei modi USB, TV o BT, la funzione Audio Sync (Sincronia audio)
può non funzionare.
Utilizzo della funzione DRC
Questa funzione effettua il bilanciamento tra i suoni più alti e quelli più
bassi. Questa funzione permette di apprezzare l'audio Dolby Digital
quando si guardano film a basso volume di notte.
Premere DRC sul telecomando di questa unità.
• Ogni volta che si preme questo tasto, la selezione cambia nella sequenza
indicata di seguito : DRC STANDARD ➡ DRC MAX ➡ DRC MIN
HW-F350
TV VOL TV CH AUDIO SYNC
AUTO POWER
REPEAT DIMMER
TV VOL TV CH AUDIO SYNC
AUTO POWER
REPEAT
HW-F355 TV PRE-CH DIMMER
SOUND EFFECT SMART VOLUME
TV MUTE TV INFO TV PRE-CH DIMMER
SOUND EFFECT SMART VOLUME
TV MUTE TV INFO DIMMER
HW-F350
TV VOL TV CH AUDIO SYNC
TV MUTE TV INFO TV PRE CH TV EXIT
TV VOL TV CH AUDIO SYNC
TV MUTE TV INFO TV PRE CH TV EXIT
AUDIO SYNC
HW-F355
HW-F350 LEVEL LEVEL
VOL
3D SOUND PLUS DRC
MUTE LEVEL LEVEL
VOL
3D SOUND PLUS DRC
MUTE
HW-F355
HW-F350 AUTO POWER
REPEAT DIMMER
HW-F355 OPTICAL AUX TV SOURCE
AUTO POWER SoundShare
USB/
REPEAT
OPTICAL AUX TV SOURCE
AUTO POWER SoundShare
USB/
REPEAT
AUTO POWER
20
funzioni
Utilizzo della funzione TV (Solo con TV Samsung)
• Premere TV SOURCE sul telecomando per cambiare la sorgente di
ingresso della TV.
• Premere il tasto TV INFO sul telecomando per visualizzare le informazioni sul
canale TV.
• Pmere il tasto TV CH sul telecomando per selezionare il canale televisivo.
• Premere il tasto TV VOL sul telecomando per aumentare o ridurre il volume.
• Usare il tasto TV PRE-CH per passare al canale TV precedente nel
modo TV.
• Per uscire dal menu della TV, utilizzare il tasto TV EXIT. (funziona in modo
analogo al tasto EXIT del telecomando della TV).
ƒ Premendo il tasto SoundShare, l'audio della TV viene trasmesso
attraverso il sistema Air Track mediante una connessione Bluetooth.
L'Air Track controlla anche il volume audio, la qualità del suono, ecc.
ƒ Il telecomando può comandare soltanto televisori SAMSUNG.
HW-F350
TV VOL TV CH AUDIO SYNC
AUX USB TV SOURCE
TV MUTE TV INFO TV PRE-CH TV EXIT
AUTO POWER
REPEAT DIMMER
OPTICAL
TV VOL TV CH AUDIO SYNC
AUX USB TV SOURCE
TV MUTE TV INFO TV PRE-CH TV EXIT
AUTO POWER
REPEAT DIMMER
OPTICAL
TV INFO
TV VOL TV CH
TV PRE-CH TV EXIT
TV SOURCE
HW-F355
TV VOL TV CH AUDIO SYNC
AUX TV SOURCE
TV MUTE TV INFO TV PRE-CH DIMMER
OPTICAL
AUTO POWER SoundShare
USB/
REPEAT
TV VOL TV CH AUDIO SYNC
AUX TV SOURCE
TV MUTE TV INFO TV PRE-CH DIMMER
OPTICAL
AUTO POWER SoundShare
USB/
REPEAT
TV SOURCE
TV INFO
TV VOL TV CH
TV PRE-CH
HW-F350 S/W
LEVEL S/W
LEVEL S/W MUTE LEVEL S/W LEVEL S/W MUTE LEVEL S/W
LEVEL
HW-F355
AGGIORNAMENTO SOFTWARE
È possibile che Samsung offra in futuro aggiornamenti per la versione
del firmware di Crystal Surround Air Track.
Se viene offerto un aggiornamento, è possibile aggiornare il firmware
collegando un'unità USB su cui è memorizzato l'aggiornamento del
firmware alla porta USB dell'Air Track.
Se sono presenti diversi file di aggiornamento, questi devono essere
caricati singolarmente sull'unità USB e utilizzati uno alla volta per
aggiornare il firmware.
Visitare il sito Samsung.com oppure contattare il call center Samsung
per ulteriori informazioni sullo scaricamento dei file di aggiornamento.
ƒ Inserire un'unità USB con l'aggiornamento firmware nella porta USB dell'unità principale.
ƒ Attenzione a non scollegare l'alimentazione o rimuovere l'unità USB durante l'applicazione degli
aggiornamenti. L'unità principale si spegne automaticamente al termine dell'aggiornamento del
firmware. Al termine dell'aggiornamento del software, vengono ripristinate le impostazioni predefinite.
Si consiglia di prendere nota delle impostazioni effettuate in modo da poterle reimpostare facilmente
dopo l'aggiornamento.
ƒ Una volta terminato l'aggiornamento del software del prodotto, spegnerlo e tenere premuto il tasto
() per un istante per resettare il prodotto. ƒ Se non si riesce ad effettuare l'aggiornamento del firmware, si raccomanda di formattare il dispositivo
USB in FAT16 e riprovare.
ƒ Ai fini dell'aggiornamento non formattare i dati USB in NTFS perché non è un file system supportato.
ƒ A seconda del costruttore, alcuni dispositivi memorizzazione USB potrebbero non essere supportati.
21
ITA
● RISOLUZIONE DEI PROBLEMI
Prima di rivolgersi all'assistenza, eseguire i controlli indicati di seguito.
Sintomo Controllo Rimedio
L'unità non si accende. • Il cavo di alimentazione è
collegato alla presa?
• Collegare la spina alla presa.
Una funzione non si attiva quando
viene premuto il tasto.
• Nell'aria è presente elettricità
statica?
• Scollegare e ricollegare la
spina.
L’audio non viene riprodotto. • L'unità è collegata
correttamente al televisore?
• La funzione di disattivazione
dell'audio è attivata?
• Il volume è regolato sul
minimo?
• Collegarli correttamente.
• Premere il tasto di
disattivazione dell'audio per
ripristinarlo.
• Regolare il volume.
Quando viene selezionata la
funzione, l'immagine non viene
visualizzata sul televisore.
• Il televisore è collegato
correttamente?
• Collegarlo correttamente.
Il telecomando non funziona. • Le batterie sono scariche?
• La distanza tra il telecomando
e l'unità principale è troppo
elevata?
• Sostituire le batterie.
• Avvicinarsi all'unità.
L'audio dei canali sinistro/ destro è
invertito.
• I cavi di uscita audio sinistro/
destro del televisore sono
collegati correttamente?
• Controllare il canale sinistro/
destro e collegarlo/i
correttamente.
Il SoundShare (connessione TV) non
è riuscito.
• La TV supporta SoundShare?
• Il firmware della TV è
aggiornato?
• Si è verificato un errore
durante la connessione?
• Ripristinare il MODO TV ed
effettuare di nuovo il
collegamento.
• La funzione SoundShare è
supportata dai modelli TV
Samsung commercializzati
dopo il 2012. Controllare se la
TV supporta la funzione.
• Aggiornare la TV all'ultimo
firmware.
• Contattare il call center.
• Premere il tasto per 5
secondi per resettare il
prodotto.
risoluzione dei problemi
22
SPECIFICHE
Nome del modello HW-F350 / HW-F355
GENERALE
USB 5V/0,5A
Peso
Unità principale 1,75 kg
Subwoofer
(PS-EW1-1) 3,0 kg
Dimensioni
(L x A x P)
Unità principale 943 x 49 x 59,9 mm
Subwoofer
(PS-EW1-1) 152 x 300 x 284 mm
Temperatura di esercizio Da +5°C a +35°C
Umidità di esercizio 10 % e 75 %
AMPLIFICATORE
Potenza di
uscita nominale
Unità principale 30W/CH, 8OHM, THD = 10%, 1kHz
Subwoofer
(PS-EW1-1) 60W, 3OHM, THD = 10%, 100Hz
Rapporto S/N (ingresso analogico) 60dB
Separazione (1kHz) 50dB
* I valori rapporto S/N, distorsione, separazione e sensibilità utile si basano sulla misurazione secondo gli
standard AES (Audio Engineering Society).
*: Specifica nominale
- Samsung Electronics Co., Ltd si riserva il diritto di modificare le specifiche senza preavviso.
- Peso e dimensioni sono approssimativi.
- Per l'alimentazione e il consumo di energia, vedere l'etichetta applicata al prodotto.
Samsung Electronics dichiara che questo Crystal Surround Air Track è conforme ai requisiti
essenziali e ad altre disposizioni rilevanti della direttiva 1999/5/EC.
La dichiarazione di conformità ufficiale è reperibile al sito http://www.samsung.com, andare su
Support (Supporto) > Search Product Support (Cerca supporto prodotto) e inserire il nome del modello.
Questo apparecchio può essere utilizzato in tutti i Paesi dell'UE.
appendice
AH68-02614L-05
Contatta SAMSUNG WORLD WIDE
Se avete commenti o domande sui prodotti Samsung, contattate il Servizio Clienti Samsung.
[Corretto smaltimento delle batterie del prodotto]
(Applicabile nei Paesi con sistemi di raccolta differenziata)
Il simbolo riportato sulla batteria o sulla sua documentazione o confezione indica
che le batterie di questo prodotto non devono essere smaltite con altri rifiuti al
termine del ciclo di vita. Dove raffigurati, i simboli chimici Hg, Cd o Pb indicano
che la batteria contiene mercurio, cadmio o piombo in quantità superiori ai livelli
di riferimento della direttiva UE 2006/66. Se le batterie non vengono smaltite
correttamente, queste sostanze possono causare danni alla salute umana o
all'ambiente.
Per proteggere le risorse naturali e favorire il riutilizzo dei materiali, separare le
batterie dagli altri tipi di rifiuti e utilizzare il sistema di conferimento gratuito previsto
nella propria area di residenza.
Corretto smaltimento del prodotto
(rifiuti elettrici ed elettronici)
(Applicabile nei Paesi con sistemi di raccolta differenziata)
Il simbolo riportato sul prodotto, sugli accessori o sulla documentazione indica che il
prodotto e i relativi accessori elettronici (quali caricabatterie, cuffia e cavo USB) non
devono essere smaltiti con altri rifiuti al termine del ciclo di vita. Per evitare eventuali
danni all'ambiente o alla salute causati dallo smaltimento dei rifiuti non corretto,
si invita l'utente a separare il prodotto e i suddetti accessori da altri tipi di rifiuti,
conferendoli ai soggetti autorizzati secondo le normative locali.
Gli utenti domestici sono invitati a contattare il rivenditore presso il quale è stato
acquistato il prodotto o l’autorità competente per tutte le informazioni relative alla
raccolta differenziata di questo tipo di materiali.
Gli utenti professionali (imprese e professionisti) sono invitati a contattare il proprio
fornitore e verificare i termini e le condizioni del contratto di acquisto. Questo prodotto
e i relativi accessori elettronici non devono essere smaltiti unitamente ad altri rifiuti
commerciali.
Area Centro di contatto � Sito Web
AUSTRIA 0800 - SAMSUNG (0800 -
7267864) www.samsung.com/at/support
BELGIUM 02-201-24-18
www.samsung.com/be/support
(Dutch)
www.samsung.com/be_fr/
support (French)
BOSNIA 051 331 999 www.samsung.com/support
BULGARIA 07001 33 11 , sharing cost www.samsung.com/bg/support
CROATIA 062 726 786 www.samsung.com/hr/support
CZECH 800 - SAMSUNG (800-726786) www.samsung.com/cz/support
DENMARK 70 70 19 70 www.samsung.com/dk/support
FINLAND 030-6227 515 www.samsung.com/fi/support
FRANCE 01 48 63 00 00 www.samsung.com/fr/support
GERMANY
0180 6 SAMSUNG bzw.
0180 6 7267864*
(*0,20 €/Anruf aus dem dt.
Festnetz, aus dem Mobilfunk
max. 0,60 €/Anruf)
www.samsung.com/de/support
CYPRUS 8009 4000 only from landline, toll
free
www.samsung.com/gr/support
GREECE
80111-SAMSUNG (80111 726
7864) only from land line
(+30) 210 6897691 from mobile
and land line
HUNGARY 0680SAMSUNG (0680-726-786)
0680PREMIUM (0680-773-648)
http://www.samsung.com/hu/
support
ITALIA 800-SAMSUNG (800.7267864) www.samsung.com/it/support
LUXEMBURG 261 03 710 www.samsung.com/support
Area Centro di contatto � Sito Web
MONTENEGRO 020 405 888 www.samsung.com/support
SLOVENIA 080 697 267
090 726 786 www.samsung.com/si/support
NETHERLANDS 0900-SAMSUNG (0900-7267864)
(€ 0,10/Min) www.samsung.com/nl/support
NORWAY 815 56480 www.samsung.com/no/support
POLAND
0 801-172-678* lub +48 22
607-93-33 **
* (całkowity koszt połączenia jak za
1 impuls według taryfy operatora)
** (koszt połączenia według
taryfy operatora)
www.samsung.com/pl/support
PORTUGAL 808 20 7267 www.samsung.com/pt/support
ROMANIA 08008 SAMSUNG (08008 726
7864) TOLL FREE No. www.samsung.com/ro/support
SERBIA 011 321 6899 www.samsung.com/rs/support
SLOVAKIA 0800 - SAMSUNG(0800-726 786) www.samsung.com/sk/support
SPAIN 0034902172678 www.samsung.com/es/support
SWEDEN 0771 726 7864 (SAMSUNG) www.samsung.com/se/support
SWITZERLAND 0848 726 78 64
(0848-SAMSUNG)
www.samsung.com/ch/support
(German)
www.samsung.com/ch_fr/
support (French)
U.K 0330 SAMSUNG (7267864) www.samsung.com/uk/support
EIRE 0818 717100 www.samsung.com/ie/support
LITHUANIA 8-800-77777 www.samsung.com/lt/support
LATVIA 8000-7267 www.samsung.com/lv/support
ESTONIA 800-7267 www.samsung.com/ee/support
E-MANUAL
Thank you for purchasing this Samsung
product. To receive more complete service,
please register your product at
www.samsung.com/register
Model __________ Serial No.____________
Contents
Channel Setting
• Using the INFO button (Now & Next guide) 1
• Memorizing channels 2
• Using the Channel menu 6
• Locking Programme 19
• Other Features 21
Basic Features
• Changing the Preset Picture Mode 32
• Adjusting Picture Settings 33
• Changing the Picture Options 41
• Changing the Preset Sound Mode 51
• Adjusting Sound Settings 52
• Selecting the Sound Mode 59
Preference Features
• Executing initial setup 60
• Setting the Time 61
• Using the Sleep Timer 63
• Setting the On / Off Timer 64
• Economical Solutions 69
• Other Features 71
Advanced Features
• Using the Source List 78
• Connecting a USB Device 79
• Using the Media Contents 85
• Playing the Photos / Videos / Music 87
• Using the 3D function 95
Other Information
• Viewing the e-Manual 102
• Using the Self Diagnosis 103
• Updating the Software 105
• Changing the Use Mode 107
• Viewing the Contact Samsung 108
• Using the Sports Mode 109
• Using the Satellite System 110
• Using the Wireless Network 118
• Using the Wired Network 131
• Managing the Network Connected Devices 138
• Using the DLNA Functions 141
▶
❑ Using the INFO button (Now & Next guide)
The display identifies the current channel and the status of certain audio-video
settings.
The Now & Next guide shows daily TV programme information for each channel
according to the broadcasting time.
N When you press the INFO button, a channel information banner will appear
on the top of the screen. And then press the ENTERE button, you can see
the details of the programme.
● Scroll ◄, ► to view information for a desired programme while watching
the current channel.
● Scroll ▲, ▼ to view information for other channels.
Channel Setting
English
◀ ▶
❑ Memorizing channels
■ Aerial
O MENUm → Broadcasting → Aerial → ENTERE
Before your television can begin memorising the available channels, you must
specify the type of signal source that is connected to the TV.
English
◀ ▶
■ Auto Tuning
(depending on the country)
O MENUm → Broadcasting → Auto Tuning → ENTERE
N Automatically allocated programme numbers may not correspond to actual
or desired programme numbers. If a channel is locked, the PIN input window
appears.
● Auto Tuning
Aerial (Air / Cable): Select the aerial source to memorise.
N When selecting Air, scans for a channel automatically and stores in the
TV.
Channel Type (Digital & Analogue / Digital / Analogue): Select the channel
source to memorise.
English
◀ ▶
When selecting Cable → Digital & Analogue, Digital or Analogue
– Operator Selection (depending on the country): Selects a provider of
cable services.
– Search Mode: Scans for all channels with active broadcast stations and
stores them in the TV.
N If you select Quick, you can set up the Network, Network ID,
Frequency, Modulation and Symbol Rate manually by pressing the
button on the remote control.
– Network: Selects the Network ID setting mode among Auto or Manual.
● Network ID: When Network is Manual, you can set up Network ID
using the numeric buttons.
English
◀ ▶
● Frequency: Displays the frequency for the channel (differs in each
country).
● Modulation: Displays available modulation values.
● Symbol Rate: Displays available symbol rates.
● Cable Search Option
(depending on the country & cable channels only)
Sets additional search options such as the frequency and symbol rate for a
cable network search.
Start Frequency / Stop Frequency: Set the start or stop frequency (differs in
each country).
Symbol Rate: Displays available symbol rates.
Modulation: Displays available modulation values.
English
◀ ▶
❑ Using the Channel menu
O MENUm → Broadcasting → Channel List → ENTERE
■ Channel List
The Channel List contains the channels your TV displays when you press the
channel button. You can view channel information, All, TV, Radio, Data/Other,
Analogue or Favourites 1-5.
Press ► (Mode) button to change the channel mode, or press ◄ (Sorting)
button to change the channel order according to channel number or name on the
list.
N When you press the CH LIST button on the remote control, Channel List
screen will be displayed at once.
English
◀ ▶
Channel Sorting
● Number / Name: Arranges the channel order according to channel number
or name on the list.
Channel Mode
● Air / Cable: Switches to Air or Cable.
● Edit Favourites: Set channels you watch frequently as favourites.
N For detailed information about using Edit Favourites, refer to “Edit
Favourites”.
● Favourites 1-5: Shows all favourite channels, arranged in up to five groups.
Each group has a separate screen.
N The TV displays Favourites 1-5 only if you have added favourites using
Edit Favourites.
English
◀ ▶
● All: Shows all currently available channels.
● TV: Shows all currently available TV channels.
● Radio: Shows all currently radio channels.
● Data/Other: Shows all currently available MHP or other channels.
● Analogue: Shows all currently available analogue channels.
English
◀ ▶
■ Guide
O MENUm → Broadcasting → Guide → ENTERE
The EPG (Electronic Programme Guide) information is provided by broadcasters.
Using programme schedules provided by broadcasters, you can specify
programmes you want to watch in advance so that the channel automatically
changes to the selected programme channel at the specified time. Programme
entries may appear blank or out of date depending on a channel status.
● a Red (Quick Nav): Viewing the TV programmes on the list quickly using
▲/▼/◄/► buttons.
● b Green (Channel Category): Select the type of channels you want to
display.
● { Yellow (Schedule Manager): Moves to the reserved programmes in
Schedule Manager.
English
◀ ▶
■ Schedule Manager
O MENUm → Broadcasting → Schedule Manager → ENTERE
You can set a desired channel to be displayed automatically at the intended time.
In addition, you can view, modify or delete a channel you have reserved to watch.
N You must set the current time first using the Time → Clock function in the
System menu to use this function.
1. Press the Schedule on the Schedule Manager screen. The Schedule
Viewing menu appears.
2. Press the ▲/▼/◄/► buttons to set each option menu.
● Aerial: Select the desired broadcasting signal.
● Channel: Select the desired channel.
English
◀ ▶
● Repeat: Select Once, Manual, Sat~Sun, Mon~Fri or Everyday to set at
your convenience. If you select Manual, you can set the day you want.
N The (c) mark indicates the day you’ve selected.
● Date: You can set the desired date.
N It is available when you select Once in Repeat.
● Start Time: You can set the start time you want.
N If you want to edit or cancel a reserved schedule, select the reserved
schedule on Schedule Manager. Then press the ENTERE button and
select the Edit or Delete.
English
◀ ▶
■ Edit Channel
O MENUm → Broadcasting → Edit Channel → ENTERE
You can edit or delete channels.
1. Go to Edit Channel screen.
2. Press the ▲/▼ buttons to select the desired channel, then press the
ENTERE button. The (c) mark indicates the channel you’ve selected.
N You can select more than one channel.
N Press the ENTERE again to deselect the channel.
English
◀ ▶
N Using the coloured and function buttons with the Edit Channel.
● a Red (Change Number): Changes channel order on the channel list.
● b Green (Lock / Unlock): Lock a channel so that the channel cannot be
selected and viewed. / Unlock the channel that you locked.
N This function is available only when the Channel Lock is set to On.
N The PIN input screen appears. Enter your 4-digit PIN. Change the
PIN using the Change PIN option.
● { Yellow (Delete): Deletes a channel from the channel list.
English
◀ ▶
● } Blue (Select All / Deselect All): Selects or deselects all channels at
once.
● (Go To): Goes to channel directly by pressing numbers (0~9).
● k (Page): Move to previous or next page.
● E (Done): Completes changing the channel order.
● T (Tools): Displays the option menu. The option menu items that appear
may differ depending on the channel status and type.
– Sorting (digital channels only): Changes the list ordered by channel
number or channel name.
– Aerial: Select the desired broadcasting signal.
English
◀ ▶
– Category: Change the channel mode to All, TV, Radio, Data/Other,
Analogue, Recently Viewed, Most Viewed. The selected channel
mode is displayed.
– Edit Favourites: Go to Edit Favourites screen directly.
– Rename channel (analogue channels only): Assign a name of up to
five characters to a channel. For example, Food, Golf, etc. This makes
it easier to find and select the channel.
– Channel Info: Display details of the selected channel.
– Information: Display details of the selected programme.
English
◀ ▶
■
O
Edit Favourites
MENUm → Broadcasting
t
→ Edit Favourites → ENTERE
You can add, edit or delete favourite channels.
1. Go to Edit Favourites screen.
2. Press the ▲/▼ buttons to select the desired channel, and then press
ENTERE button.
3. Choose a specific favourite list among Favourites 1-5 using b (Change Fav.)
button, and then press the { (Add) button. The selected channel has been
added in Favourites 1-5.
N One favourite channel can be added in several of favourites among
Favourites 1-5.
English
◀ ▶
N Using the coloured and function buttons with the Edit Favourites.
● a Red (Category / Change order)
– Category: Changes the channel mode to All, TV, Radio, Analogue,
Data/Other, Recently Viewed, Most Viewed. The selected channel
mode is displayed.
– Change order: Changes the favourite channel order.
– E (Done): Completes changing the channel order.
● b Green (Change Fav.): Changes favourite list among Favourites 1-5.
● { Yellow (Add / Delete)
– Add: Adds selected channels to Favourites 1-5.
– Delete: Deletes the favourite channel from Favourites 1-5.
● } Blue (Select All / Deselect All): Selects or deselects all channels at
once.
English
◀ ▶
● (Go To): Goes to channel directly by pressing numbers (0~9).
● k (Page): Move to previous or next page.
● T (Tools): Displays the option menu. The option menu items that appear
may differ depending on the channel status and type.
– Copy to favourites: Edit the selected favourite channel in Favourites
1-5. You can add or delete from favourite list.
– Rename Favourites: Assign your own favourite channel name.
– Aerial: Select the desired broadcasting signal.
– Edit Channel: Go to Edit Channel screen directly.
– Information: Display details of the selected programme.
English
◀ ▶
❑ Locking Programme
■ Programme Rating Lock
(depending on the country)
O MENUm → Broadcasting → Programme Rating Lock → ENTERE
Prevent unauthorized users, such as children, from watching unsuitable
programme with a user-defined 4-digit PIN code. If the selected channel is
locked, the “\” symbol will be displayed.
N The items of Programme Rating Lock differs depending on the country.
English
◀ ▶
■ Channel Lock
O MENUm → Broadcasting → Channel Lock → ENTERE
Lock channels in Channel menu to prevent unauthorized users, such as children,
from watching unsuitable programme.
N Available only when the Source is set to TV.
English
◀ ▶
❑ Other Features
■ Channel Settings
O MENUm → Broadcasting → Channel Settings → ENTERE
● Country (Area)
(depending on the country)
The PIN input screen appears. Enter your 4 digit PIN number.
Digital Channel: Change the country for digital channels.
Analogue Channel: Change the country for analogue channels.
English
◀ ▶
● Manual Tuning
Scans for a channel manually and stores in the TV.
N If a channel is locked, the PIN input window appears.
N According to the channel source, Manual Tuning may be supported.
● Digital Channel Tuning: Scans for a digital channel manually and stores
in the TV. Press the New button to search the digital channels. When
scanning has finished, a channel is updated in the channel list.
– When selecting Aerial → Air: Channel, Frequency, Bandwidth
– When selecting Aerial → Cable: Frequency, Modulation, Symbol
Rate
English
◀ ▶
● Analogue Channel Tuning: Scans for an analogue channel. Press the
New button to search the channels by adjusting the Programme, Colour
System, Sound System, Channel, Search.
N Channel mode
– P (programme mode): When tuning is complete, the broadcasting
stations in your area have been assigned to the position numbers
from P0 to P99. You can select a channel by entering the position
number in this mode.
– C (aerial channel mode) / S (cable channel mode): These two
modes allow you to select a channel by entering the assigned
number for each aerial broadcasting station or cable channel.
English
◀ ▶
● Fine Tune
(analogue channels only)
If the signal is weak or distorted, fine tune the channel manually.
N Fine tuned channels are marked with an asterisk “*”.
N To reset the fine-tuning, select Reset.
● Transfer Channel List
(depending on the country)
Imports or exports the channel map. You should connect a USB storage to
use this function.
N The PIN number input screen appears. Enter your 4 digit PIN number.
N Supported file systems are FAT and exFAT.
● Delete CAM Operator Profile: Selects the CAM operator to delete.
English
◀ ▶
■
O
Subtitle
MENU
t
m → Broadcasting → Subtitle → ENTERE
Use this menu to set the Subtitle mode.
● Subtitle: Switches subtitles on or off.
● Subtitle Mode: Sets the subtitle mode.
● Subtitle Language: Sets the subtitle language.
N If the programme you are watching does not support the Hearing
Impaired function, Normal automatically activates even if the Hearing
Impaired mode is selected.
N English is the default in cases where the selected language is unavailable
in the broadcast.
● Primary Subtitle: Sets the primary subtitle.
● Secondary Subtitle: Sets the secondary subtitle.
English
◀ ▶
■ Audio Options
(digital channels only)
O MENUm → Broadcasting → Audio Options → ENTERE
● Audio Language
Change the default value for audio languages.
t
Primary Audio / Secondary Audio: You can set the primary or secondary
audio.
N The available language may differ depending on the broadcast.
English
◀ ▶
● Audio Format
When sound is emitted from both the main speaker and the audio receiver,
a sound echo may occur due to the decoding speed difference between
the main speaker and the audio receiver. In this case, use the TV Speaker
function.
N Audio Format option may differ depending on the broadcast. 5.1ch
Dolby digital sound is only available when connecting an external speaker
through an optical cable.
● Audio Description (not available in all locations)
This function handles the Audio Stream for the AD (Audio Description) which
is sent along with the Main audio from the broadcaster.
Audio Description: Turn the audio description function on or off.
Volume: Adjust the audio description volume.
English
◀ ▶
■ Teletext Language
(depending on the country)
O MENUm → Broadcasting → Teletext Language → ENTERE
● Teletext Language
N English is the default in cases where the selected language is unavailable
in the broadcast.
● Primary Teletext / Secondary Teletext
N Primary Teletext and Secondary Teletext may not be supported in
some locations.
English
◀ ▶
■ Digital Text
(UK only)
O MENUm → Broadcasting → Digital Text → ENTERE
If the programme broadcasts with digital text, this feature is enabled.
N MHEG (Multimedia and Hypermedia Information Coding Experts Group)
An International standard for data encoding systems used in multimedia and
hypermedia. This is at a higher level than the MPEG system which includes
data-linking hypermedia such as still images, character service, animation,
graphic and video files as well as multimedia data. MHEG is user runtime
interaction technology and is being applied to various fields including VOD
(Video-On-Demand), ITV (Interactive TV), EC (Electronic Commerce), tele
education, teleconferencing, digital libraries and network games.
English
◀ ▶
■ Common Interface
O MENUm → Broadcasting → Common Interface → ENTERE
● CI Menu: This enables the user to select from the CAM-provided menu.
Select the CI Menu based on the menu PC Card.
● CAM video transcoding: You can configure the setting to transcode the
video codec from the CAM automatically. Turn it Off if you do not want to use
it.
N You must use a CAM that supports transcoding the video codec.
English
◀ ▶
● Application Info: View information on the CAM inserted into the CI slot and
on the “CI or CI+ CARD” which is inserted into the CAM. You can install the
CAM anytime whether the TV is on or off.
1. Purchase a CI CAM module at your nearest dealer or by phone.
2. Firmly insert the “CI or CI+ CARD” into the CAM in the direction of the
arrow.
3. Insert the CAM with the “CI or CI+ CARD” into the common interface slot,
in the direction of the arrow so that it aligns parallel with the slot.
4. Check if you can see a picture on a scrambled signal channel.
English
◀ ▶
❑ Changing the Preset Picture Mode
■
O
Picture Mode
MENUm → Picture
t
→ Picture Mode → ENTERE
Select your preferred picture type.
N When connecting a PC, you can only make changes to the Entertain and
Standard.
● Dynamic: Suitable for a bright room.
● Standard: Suitable for a normal environment.
● Natural for LED 6 series : Suitable for reducing eye strain.
● Movie: Suitable for watching movies in a dark room.
● Entertain: Suitable for watching movies and games.
N It is only available when connecting a PC.
Basic Features
English
◀ ▶
❑ Adjusting Picture Settings
■ Samsung MagicAngle for LED 19", 22" models
O MENUm → Picture → Samsung MagicAngle → ENTERE
Adjust screen viewing Angle to optimize screen quality according to your viewing
position.
● Samsung MagicAngle: When viewing the screen at an angle from below or
above by setting the appropriate mode for each position, you can obtain a
similar picture quality as viewing the screen directly from the front.
Off: Select when viewing from the front position.
Lean Back Mode: Select when viewing from a slightly lower position.
Standing Mode: Select when viewing from the upper position.
● Mode: Adjust screen viewing angle.
N When Samsung MagicAngle is set to Lean Back Mode or Standing Mode,
Gamma is not available.
English
◀ ▶
■ Backlight for LED TV / Cell Light for PDP TV / Contrast / Brightness /
Sharpness / Colour / Tint (G/R)
Your television has several setting options for picture quality control.
N NOTE
● In analogue TV, Ext., AV modes of the PAL system, the Tint (G/R)
function is not available.
● When connecting a PC, you can only make changes to
Backlight for LED TV / Cell Light for PDP TV , Contrast, Brightness and
Sharpness.
● Settings can be adjusted and stored for each external device connected
to the TV.
● Lowering picture brightness reduces power consumption.
English
◀ ▶
■ Picture Size
O MENUm → Picture → Picture Size → ENTERE
Set the various picture options such as picture size and aspect ratio.
N The available items may differ depending on the selected mode.
N Depending on the input source, the picture size options may vary.
● Picture Size t: Your cable box/satellite receiver may have its own set
of screen sizes as well. However, we highly recommend you use 16:9 mode
most of the time.
Auto Wide: Automatically adjusts the picture size to the 16:9 aspect ratio.
16:9: Sets the picture to 16:9 wide mode.
Wide Zoom: Magnifies the picture size more than 4:3.
N Adjusts the Position by using ▲, ▼ buttons.
English
◀ ▶
Zoom: Magnifies the 16:9 wide pictures vertically to fit the screen size.
N Adjusts the Zoom or Position by using ▲, ▼ button.
4:3: Sets the picture to basic (4:3) mode.
N Do not watch in 4:3 format for a long time. Traces of borders displayed
on the left, right and centre of the screen may cause image retention
(screen burn) which are not covered by the warranty.
Screen Fit: Displays the full image without any cut-off when HDMI (720p /
1080i / 1080p) or Component (1080i / 1080p) signals are inputted.
English
◀ ▶
Smart View 1 for LED 6 series : Reduces original screen by 50%.
Smart View 2 for LED 6 series : Reduces original screen by 25%.
N NOTE
● Smart View 1 is enabled only in HDMI mode.
● Smart View 2 is enabled only in DTV and HDMI modes.
● The picture size can vary depending on the input resolution when
content is played using Videos under Media Play.
● Zoom/Position: Adjust the picture size and position. It is only available in
Zoom.
● Position: Adjust the picture position. It is only available in Screen Fit or Wide
Zoom.
English
◀ ▶
N NOTE
● After selecting Screen Fit in HDMI (1080i / 1080p) or Component (1080i
/ 1080p) mode, you may need to centre the picture:
1. Select the Position. Press the ENTERE button.
2. Press the ▲, ▼, ◄ or ► button to move the picture.
● If you want to reset the position you adjusted, select Reset in the
Position screen. The picture will be set to its default position.
● If you use the Screen Fit function with HDMI 720p input, 1 line will be cut
at the top, bottom, left and right as in the overscan function.
● 4:3 Screen Size: Available only when picture size is set to Auto Wide. You
can determine the desired picture size at the 4:3 WSS (Wide Screen Service)
size or the original size. Each European country requires different picture size.
English
◀ ▶
■
O
PIP
MENU
t
m → Picture → PIP → ENTERE
You can watch the TV tuner and one external video source simultaneously. For
example, if you have a cable box connected to the Cable In jack, you can use PIP
to watch programs from the cable box and watch a movie from a Blu-ray player
attached to the HDMI In jack.
N NOTE
● If you turn the TV off while watching in PIP mode, the PIP window will
disappear.
● You may notice that the picture in the PIP window becomes slightly
unnatural when you use the main screen to view a game or karaoke.
English
◀ ▶
● PIP settings
Main picture Sub picture
Component, HDMI TV
● PIP: Activate or deactivate the PIP function.
● Aerial: Select either Air or Cable as the input source for the sub-screen.
● Channel: Select the channel for the sub-screen.
● Size: Select a size for the sub-picture.
● Position: Select a position for the sub-picture.
● Sound Select: You can choose the desired sound in PIP mode.
English
◀ ▶
❑ Changing the Picture Options
■ Advanced Settings
O MENUm → Picture → Advanced Settings → ENTERE
(available in Standard / Movie mode)
You can adjust the detailed setting for the screen including colour and contrast.
N When connecting a PC, you can only make changes to the White Balance
and Gamma.
● Dynamic Contrast: Adjust the screen contrast.
● Black Tone: Select the black level to adjust the screen depth.
● Flesh Tone: Adjust the flesh tone colour.
English
◀ ▶
● RGB Only Mode: Displays the Red, Green and Blue colour for making fine
adjustments to the hue and saturation.
● Colour Space: Adjust the range of colours available to create the image.
N To adjust Colour, Red, Green, Blue and Reset, set Colour Space to
Custom. for PDP TV / LED 6 series
● White Balance: Adjust the colour temperature for a more natural picture.
R-Offset / G-Offset / B-Offset: Adjust each colour’s (red, green, blue)
darkness.
R-Gain / G-Gain / B-Gain: Adjust each colour’s (red, green, blue) brightness.
Reset: Resets the White Balance to its default settings.
English
◀ ▶
● 10p White Balance for PDP TV / LED 6 series : Controls the white balance in 10
point interval by adjusting the red, green, and blue brightness.
N Available when the picture mode is set to Movie and when the external
input is set to all input.
N Some external devices may not support this function.
Interval: Select interval to adjust.
Red: Adjust the red level.
Green: Adjust the green level.
Blue: Adjust the blue level.
Reset: Resets the 10p White Balance to its default settings.
● Gamma: Adjust the primary colour intensity.
English
◀ ▶
● Expert Pattern for PDP TV / LED 6 series : By running the Expert Pattern
function, the picture can be calibrated without a generator or filter. If the OSD
menu disappears or a menu other than the Picture menu is opened, the
calibration is saved and the Expert Pattern window disappears.
N While the Expert Pattern is running, sound is not outputted.
N Only enabled on Component / HDMI mode.
● Motion Lighting: Reduce power consumption by brightness control adapted
motion.
N This function is not supported in 3D mode. for PDP 4900 / LED 6 series
N Only available in Standard mode.
N When changing a setting value of Backlight for LED TV / Cell
Light for PDP TV , Brightness or Contrast, Motion Lighting will be set to
Off.
English
◀ ▶
■ Picture Options
O MENUm → Picture → Picture Options → ENTERE
N When connecting a PC, you can only make changes to the Colour Tone.
● Colour Tone
N Warm1 or Warm2 will be deactivated when the picture mode is
Dynamic.
N Settings can be adjusted and stored for each external device connected
to an input on the TV.
● Digital Clean View: If the broadcast signal received by your TV is weak, you
can activate the Digital Clean View feature to reduce any static and ghosting
that may appear on the screen.
N When the signal is weak, try other options until the best picture is
displayed.
English
◀ ▶
Auto Visualisation: When changing analogue channels, displays signal
strength.
N Only available for analogue channels.
N When the INFO button is pressed, the signal strength bar is displayed.
N When bar is green, you are receiving the best possible signal.
● MPEG Noise Filter: Reduces MPEG noise to provide improved picture
quality.
● HDMI Black Level: Selects the black level on the screen to adjust the screen
depth.
N Available only in HDMI mode (RGB signals).
English
◀ ▶
● Film Mode: Sets the TV to automatically sense and process film signals from
all sources and adjust the picture for optimum quality.
N The Cinema Smooth function is only activated when HDMI 24Hz signal
is inputted. for PDP TV
N Available in TV mode and external input mode which supports SD (480i /
576i) and HD (1080i) except in PC mode.
N If the screen does not seem natural, change its option to Off / Auto1 /
Auto2 in Film Mode.
English
◀ ▶
● Motion Plus for LED 6 series : Removes drag from fast scenes with a lot of
movement to provide a clearer picture.
N The Info screen on your TV displays the resolution and frequency of the
incoming signal (60Hz), but not the frequency the TV is generating for the
image it is displaying by using Motion Plus function.
N If noise occurs on the screen, please set up the Motion Plus to Off. If
Motion Plus is Custom, you can set up the Blur Reduction, Judder
Reduction or Reset manually.
N If Motion Plus is Demo, you can compare the difference of on and off
modes.
English
◀ ▶
Blur Reduction: Adjusts the blur reduction level from video sources.
Judder Reduction: Adjusts the judder reduction level from video sources
when playing films.
LED Clear Motion: Removes drag from fast scenes with a lot of movement
to provide a clear picture.
N It will be deactivated when the picture mode is set to Natural.
N The screen may become slightly darker when you play LED Clear
Motion.
Reset: Reset the custom settings.
● Black Optimiser for PDP TV : Realizes of the black colour deeply and expands
the contrast ratio.
N When connecting a PC, it will be set to off and deactivated.
N When the TV is operating other applications, it will be deactivated. (ex.
Media Play, PIP, Teletext)
English
◀ ▶
■
O
Picture Off
MENUm →
t
Picture → Picture Off → ENTERE
The screen is turned off but the sound remains on. Press any button except
volume button to turn on the screen.
■ Reset Picture
O MENUm → Picture → Reset Picture → ENTERE
Resets your current picture mode to its default settings.
English
◀ ▶
❑ Changing the Preset Sound Mode
■ Sound Mode
O MENUm → Sound → Sound Mode → ENTERE
● Standard: Selects the normal sound mode.
● Music: Emphasizes music over voices.
● Movie: Provides the best sound for movies.
● Clear Voice: Emphasizes voices over other sounds.
● Amplify: Increase the intensity of high-frequency sound to allow a better
listening experience for the hearing impaired.
N If Speaker Select is set to External Speaker, Sound Mode is disabled.
English
◀ ▶
❑ Adjusting Sound Settings
■ Sound Effect
(standard sound mode only)
O MENUm → Sound → Sound Effect → ENTERE
● DTS TruSurround
This function provides a virtual 5.1 channel surround sound experience
through a pair of speakers using HRTF (Head Related Transfer Function)
technology.
● DTS TruDialog
This function allows you to increase the intensity of a voice over background
music or sound effects so that dialogue can be heard more clearly.
English
◀ ▶
● Equaliser
Use Equaliser to customize sound setting for each speaker.
Balance: Adjusts the balance between the right and left speaker.
100Hz / 300Hz / 1kHz / 3kHz / 10kHz (Bandwidth Adjustment): Adjusts the
level of specific bandwidth frequencies.
Reset: Resets the equaliser to its default settings.
N If Speaker Select is set to External Speaker, Sound Effect is disabled.
■ 3D Audio for PDP 4900 / LED 6 series
O MENUm → Sound → 3D Audio → ENTERE
3D audio technology provides the immersive sound corresponding to the pop-up
effect of 3D video by audio depth control in perspective.
N Available in only when watching 3D image.
English
◀ ▶
■ Speaker Settings
O MENUm → Sound → Speaker Settings → ENTERE
● Speaker Select
A sound echo may occur due to a difference in decoding speed between
t
the main speaker and the audio receiver. In this case, set the TV to External
Speaker.
N When Speaker Select is set to External Speaker, the volume and
MUTE buttons will not operate and the sound settings will be limited.
N When Speaker Select is set to External Speaker.
● TV Speaker: Off, External Speaker: On
N When Speaker Select is set to TV Speaker.
● TV Speaker: On, External Speaker: On
N If there is no video signal, both speakers will be mute.
English
◀ ▶
● Auto Volume
To equalize the volume level on each channel, set to Normal.
Night: This mode provides an improved sound experience compared to
Normal mode, making almost no noise. It is useful at night.
N To use the volume control on the source device connected to the TV,
set Auto Volume to Off on the TV. Otherwise, a change to the volume
control of the source device may not be applied.
English
◀ ▶
■ Additional Settings
O MENUm → Sound → Additional Settings → ENTERE
● DTV Audio Level (digital channels only): This function allows you to reduce
the disparity of a voice signal (which is one of the signals received during a
digital TV broadcast) to a desired level.
N According to the type of broadcast signal, MPEG / HE-AAC can be
adjusted between -10dB and 0dB.
N To increase or decrease the volume, adjust between the range 0 and -10
respectively.
English
◀ ▶
● Digital Audio Out: Digital Audio out is used to provide digital sound, reducing
interference going to speakers and various digital devices such as a DVD
player.
Audio Format: You can select the Digital Audio output format. The available
Digital Audio output format may differ depending on the input source.
N By connecting to 5.1ch speakers in a Dolby Digital setup, maximize your
interactive 3D sound experience.
Audio Delay: Correct audio-video sync problems, when watching TV or
video, and when listening to digital audio output using an external device such
as an AV receiver (0ms ~ 250ms).
English
◀ ▶
● Dolby Digital Comp: This function minimizes signal disparity between a dolby
digital signal and a voice signal (i.e. MPEG Audio, HE-AAC, ATV Sound).
N Select Line to obtain dynamic sound, and RF to reduce the difference
between loud and soft sounds at night time.
Line: Set the output level for signals greater or less than -31dB (reference) to
either -20dB or -31dB.
RF: Set the output level for signals greater or less than -20dB (reference) to
either -10dB or -20dB.
■ Reset Sound
O MENUm → Sound → Reset Sound → ENTERE
Reset all sound settings to the factory defaults.
English
◀ ▶
❑ Selecting the Sound Mode
When you set to Dual I-II, the current sound mode is displayed on the screen.
t
Audio Type Dual I-II Default
A2 Stereo Mono Mono Automatic change
Stereo Stereo ↔ Mono
Dual Dual I ↔ Dual II Dual I
NICAM Stereo Mono Mono Automatic change
Stereo Mono ↔ Stereo
Dual Mono → Dual I
Dual II
Dual I
N If the stereo signal is weak and an automatic switching, occurs, then switch
to the mono.
N Only activated in stereo sound signal.
N Only available when the Source is set to TV.
English
◀ ▶
Preference Features
❑ Executing initial setup
■ Setup
O MENUm → System → Setup → ENTERE
Configure the channels and the time when setting up the TV for the first time or
when resetting the unit.
N Execute the initial setup following instructions that the TV guides.
English
◀ ▶
❑ Setting the Time
■ Time
O MENUm → System → Time → ENTERE
The current time will appear every time you press the INFO button.
● Clock: Setting the clock is for using various timer features of the TV.
N If you disconnect the power cord, you have to set the clock again.
Clock Mode: Set up the current time manually or automatically.
– Auto: Set the current time automatically using the time from a digital
channel.
N The aerial must be connected in order to set the time automatically.
– Manual: Set the current time manually.
N Depending on the broadcast station and signal, the auto time set up may
not be correct. In this case, set the time manually.
English
◀ ▶
Clock Set: Set the Date and Time.
N Available only when Clock Mode is set to Manual.
N You can set the Date and Time directly by pressing the number buttons
on the remote control.
Time Zone (depending on the country): Select your time zone.
N This function is only available when the Clock Mode is set to Auto.
N When selecting Manual in Time Zone, GMT and DST will be activated.
Time Offset (depending on the country) for PDP 4900 Series : Adjusts the time
when your TV receives the time information via Internet. Set the right time by
selecting an offset.
N The current time will be set through a network, if the TV fails to receive
the time information including the broadcast signal from TV stations. (ex:
Watching TV via set-top box, Satellite receiver, or etc)
English
◀ ▶
❑ Using the Sleep Timer
O MENUm → System → Time → Sleep Timer → ENTERE
● Sleep Timert: Automatically shuts off the TV after a preset period of
time. (30, 60, 90, 120, 150 and 180 minutes)
N Use the ▲/▼ buttons to select a period of time, and then press
ENTERE. To cancel the Sleep Timer, select Off.
English
◀ ▶
❑ Setting the On / Off Timer
O MENUm → System → Time → On Timer Off Timer → ENTERE
● On Timer: You can set up three separate On Timer configurations. (On Timer
1, On Timer 2, On Timer 3)
Setup: Select Off, Once, Everyday, Mon~Fri, Mon~Sat, Sat~Sun or
Manual to set at your convenience. If you select Manual, you can set up the
day you want to activate the timer.
N The c mark indicates the day you’ve selected.
Time: Set the hour and minute.
Volume: Set the desired volume level.
English
◀ ▶
Source: To select the source of the content that will play when the TV turns
on. You can:
– Select TV and have the TV display a specific air or cable channel.
– Select USB and have the TV play back photo or audio files from a USB
device.
– Select a source on your TV that you have connected a set-top box to, and
have the TV display a channel from the set-top box.
N The USB device must be connected to your TV before you can select
USB.
English
◀ ▶
N If you select a source other than TV or USB, you must:
● Have a cable or satellite set-top box attached to that source
● Set the set-top box to the channel you want to watch when the TV
goes on
● Leave the set-top box turned on.
N When you select a source other than TV or USB, the Aerial and Channel
options will disappear.
Aerial (when the Source is set to TV): Select ATV or DTV.
Channel (when the Source is set to TV): Select the desired channel.
English
◀ ▶
Music / Photo (when the Source is set to USB): Select a folder in the USB
device containing music or photo files to be played when the TV is turned on
automatically.
– If there is no music file on the USB device or the folder containing a music
file is not selected, the timer function does not operate correctly.
– When there is only one photo file in the USB device, the slide show will not
play.
– If a folder name is too long, the folder cannot be selected.
– Each USB you use is assigned its own folder. When using more than one
of the same type of USB, make sure the folders assigned to each USB
have different names.
English
◀ ▶
– It is recommended that you use a USB memory stick and a multi card
reader when using On Timer.
– The On Timer function may not work with USB devices with a built-in
battery, MP3 players, or PMPs made by some manufacturers because
these devices take a long time to be recognized.
● Off Timer: You can set up three separate Off Timer configurations. (Off Timer
1, Off Timer 2, Off Timer 3)
Setup: Select Off, Once, Everyday, Mon~Fri, Mon~Sat, Sat~Sun or
Manual to set at your convenience. If you select Manual, you can set up the
day you want to activate the timer.
N The c mark indicates the day you’ve selected.
Time: Set the hour and minute.
English
◀ ▶
❑ Economical Solutions
■ Eco Solution
O MENUm → System → Eco Solution → ENTERE
● Energy Saving: This adjusts the brightness of the TV in order to reduce
power consumption.
● Eco Sensor for PDP TV / LED 6 series : To enhance your power savings; the
picture settings will automatically adapt to the light in the room.
N If you adjust the Backlight for LED TV / Cell Light for PDP TV , the Eco
Sensor will be set to Off.
Min. Backlight for LED TV / Min Cell Light for PDP TV : When Eco Sensor is
On, the minimum screen brightness can be adjusted manually.
N If Eco Sensor is On, the display brightness may change (become slightly
darker or brighter) depending on the surrounding light intensity.
English
◀ ▶
● No Signal Power Off: To avoid unnecessary energy consumption, set how
long you want the TV to remain on if it’s not receiving a signal.
N Disabled when the PC is in power saving mode.
● Auto Power Off: The TV will be automatically turned off when no user
operation is received for 4 hours.
N If the Auto Power Off option is set to Off, the TV will stay on even if no
operations are performed on the TV.
English
◀ ▶
❑ Other Features
■ Menu Language
O MENUm → System → Menu Language → ENTERE
Set the menu language.
■ Auto Protection Time for LED TV
O MENUm → System → Auto Protection Time → ENTERE
If the screen remains idle with a still image for a certain period of time defined by
the user, the screen saver is activated to prevent the formation of ghost images
on the screen.
English
◀ ▶
■ Screen Burn Protection for PDP TV
O MENUm → System → Screen Burn Protection → ENTERE
To reduce the possibility of screen burn, this unit is equipped with Pixel Shift
screen burn prevention technology. Pixel Shift moves the picture slightly on the
screen. The Time function setting allows you to programme the time between
movement of the picture in minutes.
Your TV also has the following additional screen burn protection functions:
● Pixel Shift
● Auto Protection Time
● Scrolling
● Side Grey
English
◀ ▶
● Pixel Shift: Using this function, you can set the TV to move pixels minutely on
the PDP screen in a horizontal or vertical direction to minimize after images on
the screen.
N Available Pixel Shift Settings and Optimum Settings
Item TV / HDMI
Horizontal 0~4 4
Vertical 0~4 4
Time (minute) 1~4 min 4 min
N The Pixel Shift value may differ depending on the monitor size (inches)
and mode.
N This function is not available in the Screen Fit mode.
● Auto Protection Time: If the screen displays a still image for a certain period
of time you define, the TV activates the screen saver to prevent the formation
of burnt in ghost images on the screen.
English
◀ ▶
● Scrolling: This function removes after-images on the screen by illuminating all
the pixels on the PDP according to a pattern. Use this function when there are
after images or symbols on the screen, especially when you displayed a still
image on the screen for a long time.
N The after-image removal function has to be executed for a long time
(approximately 1 hour) to effectively remove after-images on the screen.
If the after-image is not removed after you apply the function, repeat the
function again.
N Press any key on the remote control to cancel this feature.
● Side Grey: When you watch TV with the screen ratio set to 4:3, using the
Side Grey function can prevent damage to the edges of the screen by
adjusting the white balance on the extreme left and right sides.
English
◀ ▶
■ General
O MENUm → System → General → ENTERE
● Game Mode: When connecting to a game console such as PlayStation™ or
Xbox™, you can enjoy a more realistic gaming experience by selecting game
mode.
N NOTE
● Precautions and limitations for game mode
– To disconnect the game console and connect another external
device, set Game Mode to Off in the setup menu.
– If you display the TV menu in Game Mode, the screen shakes
slightly.
● Game Mode is not available in TV mode.
● After connecting the game console, set Game Mode to On.
Unfortunately, you may notice reduced picture quality.
English
◀ ▶
● If Game Mode is On:
– Picture Mode is set to Standard and Sound Mode is set to
Movie.
● Panel Lock: Lock or unlock all the keys on the panel.
● Boot Logo: Display Samsung logo when the TV is turned on.
■ Change PIN
O MENUm → System → Change PIN → ENTERE
Change your password required to set up the TV.
N The PIN input screen appears before the setup screen.
N Enter your 4-digit PIN. Change the PIN using the Change PIN option.
English
◀ ▶
■ DivX® Video On Demand
O MENUm → System → DivX® Video On Demand → ENTERE
Shows the registration code authorized for the TV. If you connect to the DivX
web site and register with 10-digit registration code, you can download the VOD
activation file.
Once you play it using Videos, the registration is completed.
N For more information on DivX® VOD, visit http://vod.divx.com.
English
◀ ▶
Advanced Features
❑ Using the Source List
■ Source List
O MENUm → Applications → Source List → ENTERE
N When you press the SOURCE button, Source screen will be displayed at
once.
N You can only choose external devices that are connected to the TV. In
Source, connected inputs are highlighted.
N For the detailed information, refer to “Changing the Input Source” in User
Manual.
English
◀ ▶
❑ Connecting a USB Device
1. Turn on your TV.
2. Connect a USB device containing photo, music and movie files to the USB
port on the side of the TV.
3. When USB is connected to the TV, popup window appears. You can select
the Photos, Videos or Music directly.
English
◀ ▶
N It might not work properly with unlicenced multimedia files.
N Need-to-Know List before using Media Contents
● MTP (Media Transfer Protocol) is not supported.
● Supported file systems are FAT and exFAT.
● Certain types of USB Digital camera and audio devices may not be
compatible with this TV.
● Media Contents only supports sequential jpeg format.
● Media Contents only supports USB Mass Storage Class (MSC) devices.
MSC is a Mass Storage Class Bulk-Only Transport device. Examples
of MSC are Thumb drives, Flash Card Readers (USB HUB are not
supported). Devices should be connected directly to the TV’s USB port.
English
◀ ▶
● Before connecting your device to the TV, please back up your files to
prevent them from damage or loss of data. SAMSUNG is not responsible
for any data file damage or data loss.
● The HDD (Hard Disk Drive) connected to USB is not supported.
● Do not disconnect the USB device while it is loading.
● The higher the resolution of the image, the longer it takes to display on
the screen.
● The maximum supported JPEG resolution is 15360 x 8640 pixels.
● For unsupported or corrupted files, the “Not Supported File Format”
message is displayed.
● The scene search and thumbnail functions are not supported in the
Videos.
English
◀ ▶
● MP3 files with DRM that have been downloaded from a non-free site
cannot be played. Digital Rights Management (DRM) is a technology that
supports the creation, distribution and management of the content in an
integrated and comprehensive way, including the protection of the rights
and interests of the content providers, the prevention of the illegal copying
of contents, as well as managing billings and settlements.
● PTP connection mode is fully available only with digital cameras. When
connecting a smartphone or tablet to the TV using PTP mode, it may not
be recognized.
● A USB device that requires high power (more than 500mA or 5V) may not
be supported.
● If the TV has been no input during time set in Auto Protection Time, the
screen saver will run.
English
◀ ▶
● The power-saving mode of some external hard disk drives may be
released automatically when connected to the TV.
● If a USB extension cable is used, the USB device may not be recognized
or the files on the device may not be read.
● If a USB device connected to the TV is not recognized, the list of files on
the device is corrupted or a file in the list is not played, connect the USB
device to the PC, format the device and check the connection.
● If a file deleted from the PC is still found when Media Contents is run, use
the “Empty the Recycle Bin” function on the PC to permanently delete the
file.
● If the number of files and folders saved on a USB storage device is
approximately over 4000, the files and folders may not appear and some
folders may not be opened.
English
◀ ▶
Disconnecting a USB Device
1. Press the SOURCE button.
2. Select a desired USB device, and then press the TOOLS button. The Tools
menu appears.
3. Select Disconnect USB Device, and then wait until the selected USB device
is disconnected. You can remove a USB device from the TV.
N To remove a USB device from the TV, we recommend use Disconnect USB
Device function.
English
◀ ▶
❑ Using the Media Contents
O MENUm → Applications → Media Play → ENTERE
Enjoy photos, music and movie files saved on a USB Mass Storage Class (MSC)
device.
1. Press the MEDIA.P button.
2. Press ◄/► button to select desired menu (Photos, Videos, Music), then
press the ENTERE button.
3. Press ◄/► button to select desired device, then press the ENTERE button
again.
4. Press the ▲/▼/◄/► button to select the desired file in the list, then press the
ENTERE button or ∂ (Play) button.
English
◀ ▶
Playing the selected files
1. Press the ▲ button to select Options at the top of each main screen and
select Play Selected.
2. Select the desired files.
N The check box appears to the left of the selected files.
N Press ENTERE button again to deselect the file.
3. Press the ▲ button to select Play.
N You can select or deselect all files pressing the Select All / Deselect All.
English
◀ ▶
❑ Playing the Photos / Videos / Music
During playing a file, press the ▲/▼/◄/► button to select the desired menu.
N When the option menu is not displayed, press the TOOLS button or
ENTERE button.
N You can also use ∂/∑/∫/π/µ buttons on the remote control during
playback.
N If you press the INFO button during playback, you can view the playback
information.
English
◀ ▶
Playback menu
Button Operation Photos Videos Music
/ Previous / Next ●
/ Start Slide Show / Stop Slide Show ●
Play / Pause Mini Player* ● ●
/ Previous / Next Mini Player* ● ●
/ Rewind / Fast forward ● ●
* When setting the Background Music to Mini Player in Photos, these buttons appear.
English
◀ ▶
Setting menu
● Photos
Button Operation
Slideshow Settings You can set the Speed and Effects during the slide show.
Zoom You can zoom into images in full screen mode.
Rotate You can rotate images in full screen mode.
Background Music /
Mini Player
You can set background music when watching a slide show. /
You can control simple playback menus.
Settings Picture Mode / Sound Mode: You can adjust the picture or
sound setting.
Information: You can see detailed information about the played
file.
English
◀ ▶
N During the slide show, all files in the file list will be displayed in order.
N When you press the ∂ (Play) button (or ▲ button → Options → Slide
Show) in the file list, slide show will be started immediately.
N During the slide show, you can adjust the slide show speed using π (REW)
or µ (FF) button.
● Supported Photo Formats
N For the details, refer to “Specifications” in User Manual.
English
◀ ▶
● Videos
Button Operation
Search Search Titles: You can move the other file directly.
Search Time Bar: You can search the video using ◄ and ► button
at one minute interval or entering the number directly.
N It may not be supported depending on the input source.
Repeat Mode You can play movie files repeatedly.
Picture Size You can adjust the picture size to your preference.
Settings Subtitle Settings: You can play the video with subtitles. This function
only works if the subtitles are the same file name as the video.
Picture Mode / Sound Mode: You can adjust the picture or sound
setting.
Audio Language: You can change the audio language if the video
has more than one language.
Information: You can see detailed information about the played file.
English
◀ ▶
N If video time information is unknown, play time and progress bar are not
displayed.
N In this mode, you can enjoy movie clips contained on a Game, but you
cannot play the Game itself.
● Supported Subtitle / Video Formats
N For the details, refer to “Specifications” in User Manual.
English
◀ ▶
● Music
Button Operation
Repeat You can play music files repeatedly.
Shuffle You can play the music randomly.
Sound Mode You can adjust the sound setting.
N Only displays the files with supported music file extension. Other file
extensions are not displayed, even if they are saved on the same USB device.
N If the sound is abnormal when playing music files, adjust the Equaliser in the
Sound menu. (An over-modulated music file may cause a sound problem.)
● Supported Music Formats
N For the details, refer to “Specifications” in User Manual.
English
◀ ▶
Setting the Encoding language
Set the encoding language if the text is not supported.
1. Press the ▲ button to select Options at the top of music main screen and
select Encoding.
2. Select the desired encoding language.
English
◀ ▶
❑ Using the 3D function
for PDP 4900 / LED 6 series
Viewing TV using the 3D function
IMPORTANT HEALTH AND SAFETY INFORMATION FOR 3D PICTURES.
Read and understand the following safety information before using the TV’s 3D
function.
[WARNING
● Some viewers may experience discomfort while viewing 3D TV such as
dizziness, nausea and headaches. If you experience any such symptom,
stop viewing 3D TV, remove 3D Active Glasses and rest.
● Watching 3D images for an extended period of time may cause eye
strain. If you feel eye strain, stop viewing 3D TV, remove your 3D Active
Glasses and rest.
English
◀ ▶
● A responsible adult should frequently check on children who are using the
3D function. If there are any reports of tired eyes, headaches, dizziness,
or nausea, have the child stop viewing 3D TV and rest.
● Do not use the 3D Active Glasses for other purposes (such as general
eyeglasses, sunglasses, protective goggles, etc.)
● Do not use the 3D function or 3D Active Glasses while walking or moving
around. Using the 3D function or 3D Active Glasses while moving around
may result in injuries due to running into objects, tripping, and/or falling.
Before using 3D function...
● 3D Active Glasses from Samsung’s previous product (IR type) or other
manufacturers not be supported.
● When the TV is initially powered on, may take some time until the 3D display
is optimized.
English
◀ ▶
● The 3D Active Glasses may not work properly if there is any other 3D product
or electronic devices turned on near the glasses or TV. If there is a problem,
keep other electronic devices as far away as possible from the 3D Active
Glasses.
● Be sure to stay within the viewing angle and optimum TV viewing distance
when watching 3D pictures. Otherwise, you may not be able to enjoy proper
3D effects.
● The ideal viewing distance should be three times or more the height of the
screen. We recommend sitting with viewer’s eyes on a level with the screen.
● If you can not play 3D videos in some of the BD players, take out the disk
from player and put it again, or restart the BD player.
English
◀ ▶
■ 3D
O MENUm → Picture → 3D → ENTERE
This exciting new feature enables you to view 3D content.
N "Full HD 3D Glasses™" Logo indicates compatibility between display
products and 3D Glasses which are compliant with the "Full HD 3D
Glasses™" format, and does not indicate picture quality of display products.
N Some 3D modes may not be available depending on the format of the image
source.
N When you watch 3D images under flickering lighting such as a fluorescent
lamp (50Hz ~ 60Hz) or a 3 wavelength lamp, you may notice some screen
flickering. If this occurs, dim or turn off the light.
English
◀ ▶
● 3D Mode
If you want to feel the 3D effect fully, please wear the 3D Active Glasses
first, and then select 3D Mode from the list below that provides the best 3D
viewing experience.
3D Mode Operation
Off Off Turns the 3D function off.
2D → 3D Changes a 2D image to 3D.
N Some file format may not be supported.
Side by Side Displays two images next to each other.
Top & Bottom Displays one image above another.
N 3D Mode is set to Off automatically when you access Media Play or
e-Manual functions.
N 3D Mode is set to memorised configuration value automatically, when
changing the input source.
English
◀ ▶
● 3D Perspective: Adjust overall 3D perspective of on-screen image.
● Depth: Adjust overall depth.
● L/R Change: Swap the left and right pictures.
● 3D → 2D: Displays the image for the left eye only.
N This function is deactivated when 3D Mode set to “ ” or “ Off ”.
Support resolution (16:9 only)
● HDMI
Source Resolution Frequency (Hz)
/ 1280 x 720p 50 / 59.94 / 60 Hz
1920 x 1080i 50 / 59.94 / 60 Hz
1920 x 1080p 23.98 / 24 / 25 / 29.97 / 30 / 50 / 59.94 / 60 Hz
Frame Packing 1280 x 720p 50 / 59.94 / 60 Hz
1920 x 1080i 50 / 59.94 / 60 Hz
1920 x 1080p 23.98 / 24 / 25 / 29.97 / 30 Hz
English
◀ ▶
● Components & DTV
Source Resolution Frequency (Hz)
Components 1280 x 720p 50 / 59.94 / 60 Hz
1920 x 1080i 50 / 59.94 / 60 Hz
1920 x 1080p 23.98 / 24 / 25 / 29.97 / 30 / 50 / 59.94 / 60 Hz
DTV 1280 x 720p 50 / 59.94 / 60 Hz
1920 x 1080i 50 / 59.94 / 60 Hz
1920 x 1080p 25 Hz
● Videos / Photos (In Media Play)
For the details, refer to “Specifications” in User Manual.
English
◀ ▶
❑ Viewing the e-Manual
■ e-Manual
O MENUm → Support → e-Manual → ENTERE
You can read the introduction and instructions about the TV features stored in
your TV.
N For the detailed information about e-Manual Screen, refer to “How to use the
e-Manual” in User Manual.
Other Features
English
◀ ▶
❑ Using the Self Diagnosis
■ Self Diagnosis
O MENUm → Support → Self Diagnosis → ENTERE
● Self Diagnosis might take few seconds, this is part of the normal operation of
the TV.
● Picture Test: Use to check for picture problems.
● Sound Test: Use the built-in melody sound to check for sound problems.
N If you hear no sound from the TV’s speakers, before performing the
sound test, make sure Speaker Select is set to TV Speaker in the
Sound menu.
N The melody will be heard during the test even if Speaker Select is set to
External Speaker or the sound is muted by pressing the MUTE button.
English
◀ ▶
● Signal Information (digital channels only): HDTV channel’s reception quality
is either perfect or the channels are unavailable. Adjust your aerial to increase
signal strength.
● Reset: Reset all settings to the factory defaults except network settings.
N The PIN input screen appears before the setup screen.
N Enter your 4-digit PIN. Change the PIN using the Change PIN option.
English
◀ ▶
❑ Updating the Software
■ Software Update
O MENUm → Support → Software Update → ENTERE
The Software Update menu lets you upgrade your TV’s software to the latest
version.
Current version: This is the software version already installed in the TV.
N When software is upgraded, video and audio settings you have made will
return to their default settings. We advise you to write down your settings so
that you can easily reset them after the upgrade.
English
◀ ▶
● Update now
– By USB: Insert a USB drive containing the firmware upgrade file,
downloaded from “www.samsung.com” into the TV.
N Please be careful not to disconnect the power or remove the USB
drive until upgrades are complete. The TV will be turned off and on
automatically after completing the firmware upgrade.
– By Channel: Upgrade the software using the broadcasting signal.
N If the function is selected during the software transmission period,
software will be automatically searched and downloaded.
N The time required to download the software is determined by the
signal status.
● Auto update: A manual upgrade will be automatically performed at selected
time. Since the power of the unit is turned on internally, the screen may be
turned on slightly for the product. This phenomenon may continue for more
than 1 hour until the software upgrade is complete.
English
◀ ▶
❑ Changing the Use Mode
■ Use Mode
O MENUm → Support → Use Mode → ENTERE
Select the Use Mode suitable for your place. We strongly recommend you select
Home Use.
● Home Use: Home Use is the default setting.
● Store Demo: Store Demo is for retail environments only. If you select Store
Demo, some functions will not work, and the picture settings will be reset
every 30 minutes.
English
◀ ▶
❑ Viewing the Contact Samsung
■ Contact Samsung
O MENUm → Support → Contact Samsung → ENTERE
View this information when your TV does not work properly or when you want to
upgrade the software. You can find information regarding our call centres, and
how to download products and software.
English
◀ ▶
❑ Using the Sports Mode
■
O
Sports Mode
MENUm → Applications
t
→ Sports Mode → ENTERE
This mode provides optimized condition for watching sports games.
N When the sports mode is on, the picture and sound modes are set to
Stadium automatically.
N If you turn the TV off while watching Sports Mode, the Sports Mode will be
disable.
English
◀ ▶
❑ Using the Satellite System
for LED 6170 series
● Auto Tuning
O MENUm → Broadcasting → Auto Tuning → ENTERE
When Aerial Source is set to Satellite
– Channel Type: Select the Channel Type to memorise.
– Satellite: Selects the satellite to scan. The option may differ depending on
country.
– Scan Mode: Select a scan mode for the selected satellite.
– Re-initialise: Selects the scanning mode of the selected satellite.
N This function is available after connecting to satellite aerial and set
the channels.
– Search Mode: Sets search mode using up/down buttons.
English
◀ ▶
● Manual Tuning
O MENUm → Broadcasting → Channel Settings → Manual Tuning →
ENTERE
Scan Satellite
Transponder: Selects the transponder using the up/down buttons.
Scan Mode: Selects either free or all channels to store.
Network Search: Select to search network or not.
Signal Quality: Display the current status of broadcasting signal.
N Information on a satellite and its transponder is subject to change
depending on the broadcasting conditions.
N When setting is completed, move to Search and press the ENTERE
button. Channel scan is started.
English
◀ ▶
● Satellite System
O MENUm → Broadcasting → Channel Settings → Satellite System →
ENTERE
The PIN input screen appears. Enter your 4 digit PIN number. Satellite
System is available when Aerial is set to Satellite. Before running Auto
Tuning, set Satellite System. Then channel scan is run normally.
● Satellite Selection: You can choose the satellites for this TV.
● LNB Power: Enables or disables the power supply for the LNB.
English
◀ ▶
● LNB Settings: Configures the outdoor equipment.
N It is available when LNB Power is set to On.
Satellite: Selects the satellite for receiving digital broadcasts.
Transponder: Selects a transponder from the list or adds a new
transponder.
DiSEqC Mode: Selects DiSEqC mode for the selected LNB.
Lower LNB Oscillators: Sets the LNB oscillators to a lower frequency.
Upper LNB Oscillators: Sets the LNB oscillators to a higher frequency.
Tone 22 kHz: Selects the Tone 22 kHz depending on the LNB type. For a
universal LNB it should be Auto.
Signal Quality: Display the current status of broadcasting signal.
English
◀ ▶
● SatCR/Unicable Settings: Configure single cable installation.
N SatCR is short for satellite channel router.
N This function may not support depending on the country.
SatCR/Unicable: Enables or disable single cable installation support.
● Positioner Settings: Configures the aerial positioner.
N It is available when LNB Power is set to On.
Positioner: Enables or disables the positioned control.
Positioner Type: Sets the positioned type between DiSEqC 1.2 and
USALS(Universal Satellite Automatic Location System).
– My Longitude: Sets the longitude for my location.
– My Latitude: Sets the latitude for my location.
– Satellite Longitude Settings: Sets the longitude of user defined
satellites.
English
◀ ▶
User Mode: Sets the position of satellite aerial according to each satellite.
If you store the current position of satellite aerial according to a certain
satellite, when the signal of that satellite is needed, the satellite aerial can
be moved to pre-populated position.
– Satellite: Selects the satellite to set the position for.
– Transponder: Selects a transponder from the list for signal reception.
– Moving Mode: Selects the movement mode between discrete and
continuous movement.
– Step Size: Adjusts the step size degrees for the aerial rotation. It is
available when Moving Mode is set to Step.
English
◀ ▶
– Go To Stored Position: Rotates the aerial to the stored satellite
position.
– Aerial Position: Adjusts and stores the aerial position for the selected
satellite.
– Store Current Position: Stores current position as the selected
positioner limit.
– Signal Quality: Display the current status of broadcasting signal.
English
◀ ▶
Installer Mode: Sets limits to the scope of movement of satellite aerial or
reset the position. Generally, installation guide uses this function.
– Limit Position: Selects the direction of the positioner Limit.
– Aerial Position: Adjusts and stores the aerial position for the selected
satellite.
– Store Current Position: Stores the current position as the selected
positioner Limit.
– Go to zero: Moves the aerial to the reference position.
– Reset positioner limit: Allows the aerial to rotate over the full arc.
● Reset all settings: All satellite settings will be reset to the initial values.
English
◀ ▶
❑ Using the Wireless Network
for PDP 4900 series
Using wireless IP sharer (router or modem), you can connect your TV to the
wireless network.
N For detailed settings for wireless network connection, refer to the User
Manual.
N NOTE
● To use a wireless network, your TV must be connected to a wireless IP
sharer (either a router or a modem). If the wireless IP sharer supports
DHCP, your TV can use a DHCP or static IP address to connect to the
wireless network.
● Select a channel for the wireless IP sharer that is not currently being used.
If the channel set for the wireless IP sharer is currently being used by
another device nearby, this will result in interference and communication
failure.
English
◀ ▶
● You need to change the wireless router's security settings to AES. WEP
security settings don't support WPS Connection.
● If HIGH PURE THROUGHPUT (Greenfield) 802.11n mode is selected and
the Encryption type is set to WEP for your wireless router, Samsung TVs
will not support a connection in compliance with new Wi-Fi certification
specifications.
● If your wireless router supports WPS (Wi-Fi Protected Setup), you can
connect to the network via PBC (Push Button Configuration) or PIN
(Personal Identification Number). WPS will automatically configure the
SSID and WPA key in either mode.
English
◀ ▶
● If your router, modem, or device is not certified, it may not connect to the
TV via the “Samsung Wireless LAN Adapter”.
● Connection Methods: You can setup the wireless network connection like
below.
– Auto Setup (Using the Auto Network Search function)
– Manual Setup
– WPS(PBC)
– Wi-Fi Direct
English
◀ ▶
● Ensure the TV is turned off before you connect the Samsung Wireless
LAN Adapter.
● The Samsung Wireless LAN Adapter may not be recognized when using
a connection via a USB hub or via a USB extension cable other than the
cable supplied.
● You must use the “Samsung Wireless LAN Adapter” (WIS12ABGNX,
WIS09ABGNX) to use a wireless network. Samsung Wireless LAN
Adapter and the USB extension Cable are sold separately and are offered
by select retailers and Ecommerce sites.
English
◀ ▶
How to connect the Samsung Wireless LAN Adapter
1 Connect using the USB right angle adapter.
2 Connect via an extension cable
1 2
N The picture may appear corrupted or have static for some channels when
the TV is connected to the Samsung Wireless LAN Adapter. In such a case,
connect the Samsung Wireless LAN Adapter using a USB cable in a place
that is not affected by radio interference.
N The position of port may differ depending on the model.
English
◀ ▶
■ Network Status
O MENUm → Network → Network Status → ENTERE
You can check the current network and Internet status.
■ Network Settings
O MENUm → Network → Network Settings → ENTERE
Set the network connection to use AllShare™.
N The Internet can't be used other than content sharing via AllShare™.
English
◀ ▶
■ Auto Network Setup
Most wireless networks have an optional security system that requires devices
that access the network to transmit an encrypted security code called an Access
or Security Key. The Security Key is based on a Pass Phrase, typically a word or a
series of letters and numbers of a specified length you were asked to enter when
you set up wireless security for your wireless network. If you use this method of
setting up the network connection, and have a Security Key for your wireless
network, you will have to enter the Pass Phrase during the setup process.
N When connecting Samsung Wireless LAN Adapter, the screen pop-up
appears directly to set wireless network.
English
◀ ▶
1. Go to Network Settings screen.
(Network → Network Settings)
2. The Network function searches for available wireless networks. When done, it
displays a list of the available networks.
3. In the list of networks, press the ▲ or ▼ button to select a network, and then
press ENTERE button.
N If the wireless router is set to Hidden (Invisible), you have to select Add
Network and enter the correct network name and Security key to
establish the connection.
4. If the Security screen pop-up appears, go to step 6. The wireless router which
does not have wireless security, go to step 7.
English
◀ ▶
5. Enter the security key using ▲/▼/◄/► buttons, and then select Done.
N You can also enter numbers by pressing the number buttons
N You should be able to find the Pass Phrase on one of the set up screens
you used to set up your router or modem.
6. The network connection screen appears, and network setting is done.
N If it fails to set Security key (Security or PIN), select Retry or IP Settings.
N If you want to set connection manually, select the IP Settings. Refer to
following “How to set up manually”.
N If you select Change Network, you can select other wireless networks.
English
◀ ▶
How to set up WPS(PBC)
If your router has a WPS(PBC) button, follow these steps:
1. The Network function searches for available wireless networks. When done, it
displays a list of the available networks.
2. Select the WPS(PBC).
3. Press the WPS(PBC) button on your router within 2 minutes. Your TV
automatically acquires all the network setting values it needs and connects to
your network.
4. The network connection screen appears, and network setting is done.
English
◀ ▶
■ Manual Network Setup
Use the Manual Network Setup when connecting your TV to a network that
requires a Static IP address.
N You can find the network connection values in control panel of Windows
computers.
How to set up manually
To set up your TV’s cable network connection manually, follow these steps:
1. Select the IP Settings on network connection screen.
N When it fails to connect the network automatically, the IP Settings is
available to select.
2. Set IP setting to Enter manually.
3. Move to each field using ▲/▼/◄/► buttons. Enter the network connection
values, and then select OK.
4. The network connection screen appears, and network setting is done.
English
◀ ▶
The check list for wireless network connection failure
When wireless network connection failed, try to apply the following information to
each issue.
Issues Solutions and Explanations
Wireless network
connection failed.
• No wireless router selected. Go to Network Settings to select your
router.
• Samsung Wireless LAN adapter is required to use a wireless network.
• Make sure the TV is connected to a wireless IP sharer (Router).
IP auto setting failed. • Try the following to set your IP address automatically or set your IP
address manually by selecting IP Settings.
• Ensure DHCP server is enabled on router and unplug and re-plug-in the
router.
• Check if you need to enter a security key to use the router.
• Contact your Internet Service Provider for more information.
English
◀ ▶
Issues Solutions and Explanations
Unable to connect to
wireless router.
• Check that the router is turned on, and if it is on, try turning it off and
on again.
• Check if you need to enter a security key to use the router.
Unable to connect to the
network.
• Check if your IP address is set correctly in IP Settings.
• Check if you need to enter a security key to use the router.
• Contact your Internet Service Provider for more information.
Connected to your local
network, but cannot
connect to the Internet.
• Check your Internet LAN cable is connected correctly to LAN port of
router.
• Check the DNS settings in IP Settings.
• If the problem persists, contact your Internet Service Provider to
access the Internet.
Network setup complete,
but cannot connect to the
Internet.
• Confirm that your router is connected to the Internet.
• If the problem persists, contact your Internet Service Provider to
access the Internet.
English
◀ ▶
❑ Using the Wired Network
UK only
■ Wired Network Connection
You can attach your TV to your LAN using cable in three ways:
● Connecting the LAN port on your TV to an external modem
● Connecting the LAN port on your TV to a IP Sharer which is connected to an
external modem
● Connecting the LAN port on your TV directly to a network wall outlet
N To use this way, wall outlet is attached to a modem or router elsewhere in
your house.
N For detailed settings for wired network connection, refer to the User Manual.
English
◀ ▶
● If your network requires a Dynamic IP address, you should use an ADSL
modem or router that supports Dynamic Host Configuration Protocol (DHCP).
Modems and routers that support DHCP automatically provide the IP
address, subnet mask, gateway, and DNS values your TV needs to access
the Internet so you do not have to enter them manually. Most home networks
use a Dynamic IP address. Some networks require a Static IP address. If your
network requires a Static IP address, you must enter the IP address, subnet
mask, gateway, and DNS values manually on your TV’s Cable Setup Screen
when you set up the network connection. To get the IP address, subnet
mask, gateway, and DNS values, contact your Internet Service Provider (ISP).
If you have a Windows computer, you can also get these values through your
computer.
N You can use ADSL modems that support DHCP if your network requires
a Static IP address. ADSL modems that support DHCP also let you use
Static IP addresses.
English
◀ ▶
■ Network Setup
Use the Automatic Network Setup when connecting your TV to a network that
supports DHCP. To set up your TV’s cable network connection automatically,
follow these steps:
1. Go to Network Status screen.
(Network → Network Status)
2. You can check the connected status on the screen.
N If it fails to set automatically, check the connection of LAN port.
English
◀ ▶
N If you cannot find network connection values or if you want to set connection
manually:
1. Select the IP Settings on Network Status screen.
N When it fails to connect the network automatically, the IP Settings is
available to select.
2. Set IP setting to Enter manually.
3. Move to each field using ▲/▼/◄/► buttons. Enter the network
connection values, and then select OK.
4. The network connection screen appears, and network setting is done.
English
◀ ▶
The check list for wired network connection failure
When wired network connection failed, try to apply the following information to
each issue.
Issues Solutions and Explanations
No network cable
found.
• Check that your network cable is plugged in.
• If it is connected, make sure that the router is turned on; if it is on, try
turning it off and on again.
IP auto setting failed. Try the following to set your IP address automatically or set your IP address
manually by selecting IP Settings.
• Ensure DHCP server is enabled on router and unplug and re-plug-in the
router.
• Contact your Internet Service Provider for more information.
English
◀ ▶
Issues Solutions and Explanations
Unable to connect to the
network.
• Check if your IP address is set correctly in IP Settings.
• Contact your Internet Service Provider for more information.
Connected to your local
network, but cannot
connect to the Internet.
• Check your Internet LAN cable is connected correctly to LAN port of
router.
• Check the DNS settings in IP Settings.
• If the problem persists, contact your Internet Service Provider to
access the Internet.
Network setup complete,
but cannot connect to the
Internet.
• Confirm that your router is connected to the Internet.
• If the problem persists, contact your Internet Service Provider to
access the Internet.
English
◀ ▶
If Your TV Fails to Connect to the Internet
Your TV may not be able to connect to the Internet because your ISP has permanently
registered the MAC address (a unique identifying number) of your PC or modem, which
it then authenticates each time you connect to the Internet as a way of preventing
unauthorized access. As your TV has a different MAC address, your ISP can not
authenticate its MAC address, and your TV can not connect.
To resolve this problem, ask your ISP about the procedures required to connect devices
other than a PC (such as your TV) to the Internet.
If your Internet service provider requires an ID or password to connect to the Internet,
your TV may not be able to connect to the Internet. If this is the case, you must enter
your ID or password when connecting to the Internet.
The internet connection may fail because of a firewall problem. If this is the case, contact
your Internet service provider.
If you cannot connect to the Internet even after you have followed the procedures of your
Internet service provider, please contact Samsung Electronics.
English
◀ ▶
❑ Managing the Network Connected Devices
for PDP 4900 series
■ Wi-Fi Direct
O MENUm → Network → Wi-Fi Direct → ENTERE
Set to connect the TV to wireless mobile devices. Using this function, you can
connect wireless mobile devices with your TV directly without a wireless router.
N You can use this function when connecting the Samsung Wireless LAN
Adapter.
N It only supports Media Play function.
N It may not be supported depending on the mobile device.
English
◀ ▶
How to connect the device to your TV using Wi-Fi Direct function
N Using this function, you must turn on Wi-Fi Direct function on your device.
1. Go to Wi-Fi Direct screen. The TV starts to search devices.
(Network → Wi-Fi Direct)
2. Select the desired device, and then press the ENTERE button.
3. When connection message appears on your device, let you allow it. Your TV
automatically acquires all the network setting values it needs and connects to
your network.
N If you want to disconnect the device, select the connected device, and press
the ENTERE button to select Disconnect.
English
◀ ▶
■ AllShare Settings
O MENUm → Network → AllShare Settings → ENTERE
Set whether to allow a network connected device like a smartphone or tablet
to share content or control TV using an application downloaded on your mobile
device. For details, refer to the “Using the AllShare Settings function”.
■ Device Name
O MENUm → Network → Device Name → ENTERE
Change the TV’s name.
N When selecting User Input, you can key in a name for your TV manually. Use
▲/▼/◄/► buttons to select characters, and then select Done.
English
◀ ▶
❑ Using the DLNA Functions
for PDP 4900 series
N This model only supports DLNA functions in AllShare™.
You can play media contents including videos, photos and music saved on your
mobile phones or the other devices (such as your PC) by controlling them on the
TV via the network.
N First, configure your network. For detailed procedures on using the Network
Setup, refer to the “Network Settings” instructions.
N For more information, visit “www.samsung.com” or contact the Samsung call
centre. Mobile devices may need additional software installation. For details,
refer to each device’s user’s guide.
N If your Samsung TV connects to a non-Samsung DLNA server, a compatibility
issue may occur during video playback.
English
◀ ▶
N By connecting your Samsung TV to a network via AllShare™, you can use
Samsung’s original functions as follows:
– Playback of various video formats (DivX, MP4, 3GPP, AVI, ASF, MKV,
etc.)
– Bookmark function (to resume video playback)
– Auto-chaptering (scene navigation)
– Digital content management
– Compatibility with various subtitle formats (SRT, SMI, SUB, TXT, TTXT)
– And many others
N To use the original DLNA functions of Samsung fully, it is recommended that
you use the AllShare™ software provided with your TV.
English
◀ ▶
Playing the media contents saved on the devices
1. Connect the mobile phone or other devices which support AllShare™
function, and then play the media contents of each device. The popup screen
appears on the bottom of your TV.
2. Select the Allow to accept the connected devices. The media contents of the
devices can be playing on your TV.
N You can find the allowed devices on the AllShare Settings.
English
◀ ▶
Using the Media Play function, play the media contents of the devices connected
to DLNA function.
1. Press the MEDIA.P button to select Media Play.
2. Press ▲/▼ button to select desired menu (Videos, Photos, Music), then
press the ENTERE button.
3. When the DLNA device is selected, press the ENTERE button again.
4. Press the ▲/▼/◄/► button to select the desired file.
5. Press the ENTERE button.
English
◀ ▶
N NOTE
● Contents may not be played on your TV depending on their resolution
and format.
● The ENTERE and ◄/► buttons may not work depending on the type
of media content.
● Using the mobile device, you can control the media playing. For details,
refer to each mobile’s user’s guide.
English
◀ ▶
Using the AllShare Settings function
O MENUm → Network → AllShare Settings → Content Sharing →
ENTERE
Shows a list of mobile phones or connected devices which have been set up with
this TV for using the AllShare Settings function.
N The AllShare Settings function is available in all devices which support DLNA
DMC.
● Allow / Deny: Allows/Blocks the devices.
● Delete: Deletes the devices from the list.
N This function only deletes the name of the devices from the list. If the
deleted device is turned on or tries to connect to the TV, it may appear
on the list again.
English
◀ ▶
Connecting to the PC through network
You can play pictures, music and videos saved on your PC through a network
connection in the Media Play mode over your TV.
N If you want to use Media Play to play files saved on your PC over your TV,
you should download “AllShare PC Software” and users manual from “www.
samsung.com”.
1. For more information on how to configure your network, refer to the “Network
Settings”.
– You are recommended to locate both TV and PC in same subnet. The
first 3 parts of the IP address of the TV and PC should be the same and
only the last part (the host address) should be changed. (e.g. IP Address:
123.456.789.**)
English
◀ ▶
2. Connect the PC on which you will install or have installed AllShare PC
software and your TV to the same network.
N Functions that are not supported when connecting to a PC through a
network:
● Background music when watching a slide show.
● The π (REW) or µ (FF) button while a movie is playing.
N The DivX DRM, Multi-audio, embedded caption does not supported.
N AllShare PC Software should be permitted by the firewall programme on your
PC.
English
◀
N When you use Media Play mode through a network connection, according
to functions of the provided server:
● The sorting method may vary.
● The π (REW), µ (FF) or ∑ (Pause) buttons may not work depending
on the content information.
N When playing the video through network, it may not work depending on the
network status. When you play video over a network connection, the video
may not be played smoothly.
English
E-MANUAL
Thank you for purchasing this Samsung
product. To receive more complete service,
please register your product at
www.samsung.com/register
Model __________ Serial No.____________
Contenu
Réglage des canaux
• Utilisation du bouton INFO (Guide Maintenant
et Après)
1
• Mémorisation de chaînes 2
• Utilisation du menu Canal 6
• Verrouillage des programmes 19
• Autres fonctionnalités 21
Fonctions de base
• Changement du mode Image prédéfini 32
• Réglages des paramètres de l’image 33
• Modification des options d’image 41
• Changement du mode Son prédéfini 51
• Réglage des paramètres sonores 52
• Sélection du mode Son 59
Fonctions de préférence
• Exécution de la configuration initiale 60
• Réglage de l’heure 61
• Utilisation de la veille 63
• Réglage de la minuterie de mise en
marche / arrêt
64
• Solutions économiques 69
• Autres fonctionnalités 71
Fonctions avancées
• Utilisation de la liste des sources 78
• Connexion d'un périphérique USB 79
• Utilisation du contenu multimedia 85
• Lecture des photos / vidéos / fichiers musicaux
87
• Utilisation de la fonction 3D 95
Informations supplémentaires
• Affichage du manuel électronique 102
• Utilisation du diagnostic automatique 103
• Mise à jour du logiciel 105
• Changement du mode d'utilisation 107
• Affichage de Contacter Samsung 108
• Utilisation du mode Sport 109
• Utilisation du système satellite 110
• Utilisation du réseau sans fil 118
• Utilisation du réseau câblé 131
• Gestion des périphériques connectés au
réseau
138
• Utilisation des fonctions DLNA 141
▶
❑ Utilisation du bouton INFO (Guide Maintenant et Après)
L'affichage identifie la chaîne en cours et l'état de certains paramètres audio et
vidéo.
Le Guide Maintenant et Après affiche des informations quotidiennes sur les
programmes de télévision pour chaque chaîne en fonction de l'heure de diffusion.
N Lorsque vous appuyez sur le bouton INFO, un bandeau d'information sur
les chaînes apparaît en haut de l'écran. Puis, lorsque vous appuyez sur le
bouton ENTERE, les détails du programme s'affichent.
● Faites défiler à l'aide des boutons ◄ et ► pour afficher des informations
sur le programme de votre choix, tout en regardant la chaîne actuelle.
● Faites défiler à l'aide des boutons ▲ et ▼ pour afficher des informations
sur d'autres chaînes.
Réglage des canaux
Français
◀ ▶
❑ Mémorisation de chaînes
■ Antenne
O MENUm → Diffusion → Antenne → ENTERE
Avant que votre téléviseur ne puisse commencer à mémoriser les chaînes
disponibles, vous devez spécifier le type de la source du signal reliée au téléviseur.
Français
◀ ▶
■ Recherche automatique
(en fonction du pays)
O MENUm → Diffusion → Recherche automatique → ENTERE
N Il est possible que les numéros de programme attribués automatiquement ne
correspondent pas aux numéros de programme souhaités ou réels. Si une
chaîne est verrouillée, la fenêtre de saisie du code PIN s'affiche.
● Recherche automatique
Antenne (Hertzien / Câble): permet de sélectionner la source d'antenne à
mémoriser.
N La sélection de la fonction Hertzien permet de rechercher
automatiquement une chaîne et de l'enregistrer dans le téléviseur.
Type de canal (Numér. et Anal. / Numérique / Analogique): permet de
sélectionner la source de chaîne à mémoriser.
Français
◀ ▶
Lors de la sélection de Câble → Numér. et Anal., Numérique ou
Analogique
– Sélection opérateur (selon le pays): sélecionne un fournisseur de diffusion
par câble.
– Mode de rech.: permet de rechercher toutes les chaînes dont les stations
émettent et les mémorise.
N Si vous sélectionnez Rapide, vous pouvez définir Réseau, ID
réseau, Fréquence, Modulation et Taux de symbole manuellement
en appuyant sur les boutons numériques de la télécommande.
– Réseau: permet de sélectionner le mode de réglage ID réseau Auto. ou
Manuel.
● ID réseau: si Réseau est défini sur Manuel, vous pouvez configurer
un ID réseau à l'aide des touches numériques.
Français
◀ ▶
● Fréquence: affiche la fréquence correspondant à la chaîne (différente
dans chaque pays).
● Modulation: affiche les valeurs de modulation disponibles.
● Taux de symbole: affiche les taux de symboles disponibles.
● Option de rech. de câble
(Varie d'un pays à l'autre et pour les chaînes câblées uniquement.)
Définit des options de recherche supplémentaires, telles que la fréquence et le
taux de symboles pour la recherche de réseaux câblés.
Fréq. Début / Fréquence de fin.: définit la fréquence de départ ou de fin
(différente dans chaque pays).
Taux de symbole: affiche les taux de symboles disponibles.
Modulation: affiche les valeurs de modulation disponibles.
Français
◀ ▶
❑ Utilisation du menu Canal
O MENUm → Diffusion → Liste des chaînes → ENTERE
■ Liste des chaînes
La Liste des chaînes contient les chaînes que peut afficher votre téléviseur
lorsque vous appuyez sur le bouton des chaînes. Vous pouvez afficher les
informations sur les chaînes: Tous, TV, Radio, Données/autres , Analogique ou
Favoris 1-5.
Appuyez sur le bouton ► (Mode) pour modifier le mode chaîne, ou appuyez sur
le bouton ◄ (Tri) pour modifier l'ordre des chaînes en fonction du numéro ou du
nom de la chaîne dans la liste.
N Lorsque vous appuyez sur la touche CH LIST de la télécommande, l'écran
Liste des chaînes s'affiche.
Français
◀ ▶
Tri des canaux
● Numéro / Nom: organise l'ordre des canaux en fonction du numéro ou du
nom de la chaîne dans la liste.
Mode des canaux
● Hertzien / Câble: permet de basculer vers Hertzien ou Câble.
● Modif. favoris: permet de définir comme favorites les chaînes que vous
regardez souvent.
N Pour obtenir des informations détaillées sur l'utilisation de Modif. favoris,
reportez-vous au chapitre "Modif. favoris".
● Favoris 1-5: permet d'afficher toutes les chaînes favorites, réparties dans
un ensemble maximal de cinq groupes. Chaque groupe possède un écran
distinct.
N Votre téléviseur affichera uniquement des Favoris 1-5 si vous avez ajouté
des chaînes favorites en utilisant Modif. favoris.
Français
◀ ▶
● Tous: affiche toutes les chaînes actuellement disponibles.
● TV: affiche toutes les chaînes de télévision actuellement disponibles.
● Radio: affiche toutes les stations de radio actuellement disponibles.
● Données/autres : affiche toutes les chaînes MHP ou autres actuellement
disponibles.
● Analogique: affiche toutes les chaînes analogiques actuellement disponibles.
Français
◀ ▶
■ Guide
O MENUm → Diffusion → Guide → ENTERE
Les informations du Guide électronique des programmes (EPG) sont fournies par
les diffuseurs. Les programmes planifiés fournis par les diffuseurs vous permettent
de planifier les émissions que vous souhaitez regarder, de telle sorte que le
téléviseur change automatiquement de chaîne à l'heure indiquée. Des entrées de
programmes peuvent être vides ou ne pas être à jour en raison de l'état d'une
chaîne.
● a Rouge (Nav. rapide): permet de parcourir rapidement les programmes de
télévision sur la liste à l'aide des boutons ▲/▼/◄/►.
● b Vert (Catégorie de chaîne): permet de sélectionner le type de chaînes que
vous voulez afficher.
● { Jaune (Gestionnaire prog.): permet d'accéder aux programmes réservés
dans Gestionnaire prog..
Français
◀ ▶
■ Gestionnaire prog.
O MENUm → Diffusion → Gestionnaire prog. → ENTERE
Vous pouvez programmer l'affichage automatique d'une chaîne de votre choix à
l'heure prévue. De plus, vous pouvez voir, modifier ou supprimer une chaîne que
vous avez réservée.
N Avant d'utiliser cette fonction, vous devez régler l'heure en utilisant la fonction
Heure → Horloge du menu Système.
1. Appuyez sur Programmer sur l'écran Gestionnaire prog.. Le menu
Programmer visionnage apparaît.
2. Appuyez sur les boutons ▲/▼/◄/► pour définir chaque menu d'options.
● Antenne: permet de sélectionner le signal de diffusion souhaité.
● Canal: permet de sélectionner la chaîne souhaitée.
Français
◀ ▶
● Répétition: sélectionnez Une fois, Manuel, Sam~Dim, Lun~Ven ou
Quotid. pour définir l'option suivant vos besoins. Si vous sélectionnez
Manuel, vous pouvez définir le jour de votre choix.
N Le symbole (c) indique le jour sélectionné.
● Date: permet de définir la date de votre choix.
N Cette option est disponible lorsque vous sélectionnez Une fois sous
Répétition.
● Heure de début: permet de définir l'heure de début de votre choix.
N Pour modifier ou annuler la programmation, sélectionnez le programme
réservé sous Gestionnaire prog.. Puis, appuyez sur le bouton ENTERE et
sélectionnez la fonction Editer ou Supprimer.
Français
◀ ▶
■ Modifier la chaîne
O MENUm → Diffusion → Modifier la chaîne → ENTERE
Vous pouvez modifier ou supprimer des chaînes.
1. Accédez à l'écran Modifier la chaîne.
2. Appuyez sur les boutons ▲/▼ pour sélectionner la chaîne de votre choix,
puis sur ENTERE. Le symbole (c) indique la chaîne que vous avez
sélectionnée.
N Vous pouvez sélectionner plusieurs chaînes.
N Appuyez à nouveau sur le bouton ENTERE pour annuler la sélection de
la chaîne.
Français
◀ ▶
N Utilisation des boutons de couleur et de fonction avec Modifier la chaîne.
● a Rouge (Changer numéro): modifie l'ordre des chaînes dans la liste
des chaînes.
● b Vert (Verrouil. / Déverr.): vous pouvez verrouiller une chaîne afin qu'elle
ne puisse être ni sélectionnée, ni visualisée. / Déverrouille une chaîne que
vous aviez verrouillée.
N Cette fonction n'est disponible que si l'option Verr. chaîne est définie
sur Activé.
N L’écran de saisie du code PIN apparaît. Entrez votre code PIN à
quatre chiffres. Modifiez le code PIN à l’aide de l’option Modifier
PIN.
● { Jaune (Supprimer): Supprime une chaîne dans la liste.
Français
◀ ▶
● } Bleu (Sélectionner tout / Tout désélectionner): sélectionne ou
désélectionne toutes les chaînes en même temps.
● (Accéder à): permet d'accéder directement à une chaîne en
appuyant sur les numéros (0 à 9).
● k (Page): permet de passer à la page suivante ou précédente.
● E (Terminé): Valide le changement d'ordre des chaînes.
● T (Outils): affiche le menu d'options. Les éléments de menu qui
s'affichent peuvent varier en fonction de l'état et du type de chaîne.
– Tri (chaînes numériques uniquement): Permet de changer l'ordre des
chaînes classées par numéro ou par nom.
– Antenne: permet de sélectionner le signal de diffusion souhaité.
Français
◀ ▶
– Catégorie : permet de basculer le mode chaîne vers Tous, TV, Radio,
Données/autres , Analogique, Regardées récemment, Fréquem.
regardées. Le mode chaîne sélectionné s'affiche.
– Modif. favoris: Accédez directement à l'écran Modif. favoris.
– Renom. chaîne (chaînes analogiques uniquement): Vous pouvez
attribuer un nom allant de un à cinq caractères à une chaîne. Par
exemple, Mode, Sport, etc. Ceci facilite vos recherches ultérieures.
– Info chaîne: Permet d'afficher des détails sur la chaîne sélectionnée.
– Information: affiche des détails sur le programme sélectionné.
Français
◀ ▶
■
O
Modif. favoris
MENUm → Diffusion
t
→ Modif. favoris → ENTERE
Vous pouvez ajouter, modifier ou supprimer des chaînes favorites.
1. Accédez à l'écran Modif. favoris.
2. Appuyez sur les boutons ▲/▼ pour sélectionner la chaîne de votre choix,
puis sur ENTERE.
3. Choisissez une liste spécifique de chaînes favorites parmi Favoris 1-5 à l'aide
du bouton b (Modif. fav.), puis appuyez sur le bouton { (Ajouter). La chaîne
sélectionnée a été ajoutée dans Favoris 1-5.
N Vous pouvez affecter une chaîne favorite qui sera incluse dans la liste
Favoris 1-5.
Français
◀ ▶
N Utilisation des boutons de couleur et de fonction avec Modif. favoris.
● a Rouge (Catégorie / Modif. ordre)
– Catégorie: permet de basculer le mode chaîne vers Tous, TV, Radio,
Analogique, Données/autres , Regardées récemment, Fréquem.
regardées. Le mode chaîne sélectionné s'affiche.
– Modif. ordre: Modifie l'ordre des chaînes favorites.
– E (Terminé): Valide le changement d'ordre des chaînes.
● b Vert (Modif. fav.): permet de modifier la liste des chaînes favorites
parmi Favoris 1-5.
● { Jaune (Ajouter / Supprimer)
– Ajouter: Permet d'ajouter des chaînes sélectionnées à Favoris 1-5.
– Supprimer: permet de supprimer la chaîne favorite de Favoris 1-5.
● } Bleu (Sélectionner tout / Tout désélectionner): sélectionne ou
désélectionne toutes les chaînes en même temps.
Français
◀ ▶
● (Accéder à): permet d'accéder directement à une chaîne en
appuyant sur les numéros (0 à 9).
● k (Page): permet de passer à la page suivante ou précédente.
● T (Outils): affiche le menu d'options. Les éléments de menu qui
s'affichent peuvent varier en fonction de l'état et du type de chaîne.
– Copier dans Favoris: permet de modifier la chaîne favorite
sélectionnée dans Favoris 1-5. Vous pouvez ajouter ou supprimer une
chaîne de la liste de favoris.
– Renommer favoris: permet d'attribuer le nom de votre choix à la
chaîne favorite.
– Antenne: permet de sélectionner le signal de diffusion souhaité.
– Modifier la chaîne: Accédez directement à l'écran Modifier la
chaîne.
– Information: affiche des détails sur le programme sélectionné.
Français
◀ ▶
❑ Verrouillage des programmes
■ Contrôle Parental
(en fonction du pays)
O MENUm → Diffusion → Contrôle Parental → ENTERE
cette fonction permet d'empêcher certains utilisateurs, tels que des enfants, de
regarder des émissions qui ne leur sont pas destinées, à l'aide d'un code PIN à 4
chiffres défini par l'utilisateur. Si la chaîne sélectionnée est verrouillée, le symbole
“\” apparaît.
N Les options de Contrôle Parental diffèrent selon le pays.
Français
◀ ▶
■ Verr. chaîne
O MENUm → Diffusion → Verr. chaîne → ENTERE
vous pouvez verrouiller des chaînes dans le menu Canal afin d'empêcher certains
utilisateurs, tels que des enfants, de regarder des émissions qui ne leur sont pas
destinées.
N Disponible uniquement lorsque la Source est définie sur TV.
Français
◀ ▶
❑ Autres fonctionnalités
■ Paramètres chaînes
O MENUm → Diffusion → Paramètres chaînes → ENTERE
● Pays (zone)
(en fonction du pays)
L’écran de saisie du code PIN apparaît. Entrez votre code PIN à quatre
chiffres.
Chaîne numérique: modifiez le pays pour obtenir les chaînes numériques qui
y sont diffusées.
Chaîne analogique: modifiez le pays pour obtenir les chaînes analogiques
qui y sont diffusées.
Français
◀ ▶
● Recherche manuelle
Recherche manuellement une chaîne et la mémorise dans le téléviseur.
N Si une chaîne est verrouillée, la fenêtre de saisie du code PIN s'affiche.
N En fonction de la source des chaînes, il se peut que la fonction
Recherche manuelle soit prise en charge.
● Réglage des chaînes numériques: recherche manuellement une chaîne
numérique et la mémorise dans le téléviseur. Appuyez sur le bouton
Nouveau pour lancer la recherche des chaînes numériques. Au terme de
la recherche, les chaînes de la liste sont mises à jour.
– Lorsque vous sélectionnez Antenne → Hertzien: Canal, Fréquence,
Bande passante
– Lorsque vous sélectionnez Antenne → Câble: Fréquence,
Modulation, Taux de symbole
Français
◀ ▶
● Réglage des chaînes analogiques: recherche une chaîne analogique.
Appuyez sur le bouton Nouveau pour démarrer la recherche des chaînes
en réglant les valeurs Programme, Système de Couleur, Système
Sonore, Canal, Recherche.
N Mode Canal
– P (mode de programme): A la fin du réglage, des numéros de
position compris entre P0 et P99 sont attribués aux stations
de radiodiffusion de votre région. Dans ce mode, vous pouvez
sélectionner une chaîne en saisissant son numéro de position.
– C (mode de canal Hertzien) / S (mode de canal Câble): ces
deux modes vous permettent de sélectionner une chaîne en
entrant le numéro attribué à chaque chaîne câblée ou station de
radiodiffusion hertzienne.
Français
◀ ▶
● Réglage fin
(chaînes analogiques uniquement)
Si le signal est faible ou déformé, vous devez effectuer manuellement un
réglage fin de la chaîne.
N Les chaînes qui ont fait l'objet d'un réglage fin sont indiquées par un
astérisque "*".
N Pour réinitialiser le réglage fin, sélectionnez Réinit..
● Transf. liste chaînes
(en fonction du pays)
Importe ou exporte la carte des chaînes. Vous devez connecter un
périphérique de stockage USB pour utiliser cette fonction.
N L'écran de saisie du code PIN s'affiche. Entrez votre code PIN à quatre
chiffres.
N Les systèmes de fichiers pris en charge sont FAT et exFAT.
● Supprimer profil opérateur CAM: Permet de sélectionner l'opérateur CAM à
supprimer.
Français
◀ ▶
■
O
Sous-titres
MENUm →
t
Diffusion → Sous-titres → ENTERE
Utilisez ce menu pour définir le mode Sous-titres.
● Sous-titres: active ou désactive les sous-titres.
● Mode sous-titre: configure le mode des sous-titres.
● Langue des sous-titres: définit la langue des sous-titres.
N Si le programme visionné ne prend pas en charge la fonction
Malentendant, le mode Normal est automatiquement activé, même si le
mode Malentendant est sélectionné.
N L’anglais est utilisé par défaut si la langue sélectionnée n’est pas diffusée.
● Sous-titre principal: Permet de définir le sous-titre principal.
● Sous-titre secondaire: Permet de définir le sous-titre secondaire.
Français
◀ ▶
■ Options audio
(chaînes numériques uniquement)
O MENUm → Diffusion → Options audio → ENTERE
● Langue audio
Permet de modifier la valeur par défaut des langues audio.
t
Audio principal / Audio secondaire: permet de définir la langue audio
primaire ou secondaire.
N La langue disponible peut varier en fonction de l’émission.
Français
◀ ▶
● Format Audio
Lorsque le son est émis à la fois par le haut-parleur principal et le récepteur
audio, un effet d’écho peut se produire en raison de la différence de vitesse
de décodage entre le hautparleur principal et le récepteur audio. Dans ce cas,
utilisez la fonction Haut-parleur TV.
N L’option Format Audio peut varier en fonction de l’émission. Le son
Dolby Digital 5.1 est disponible uniquement en cas de connexion d’un
haut parleur externe au moyen d’un câble optique.
● Description audio (non disponible dans toutes les régions)
Cette fonction traite le flux audio relatif à la description audio (AD) lorsqu’il est
envoyé avec le son principal par le radiodiffuseur.
Description audio: active ou désactive la fonction de description audio.
Volume: permet de régler le volume de description audio.
Français
◀ ▶
■ Langue du télétexte
(en fonction du pays)
O MENUm → Diffusion → Langue du télétexte → ENTERE
● Langue du télétexte
N L’anglais est utilisé par défaut si la langue sélectionnée n’est pas diffusée.
● Télétexte principal / Télétexte secondaire
N Il se peut que les options Télétexte principal et Télétexte secondaire
ne soient pas prises en charge dans tous les pays.
Français
◀ ▶
■ Texte numérique
(Royaume-Uni uniquement)
O MENUm → Diffusion → Texte numérique → ENTERE
Si le programme diffuse du texte numérique, cette fonction est activée.
N MHEG (Multimedia and Hypermedia Information Coding Experts Group)
Norme internationale pour les systèmes de codage des données utilisés
avec le multimédia et l'hypermédia. Niveau supérieur à celui du système
MPEG, qui inclut de l'hypermédia à liaison de données tel que des images
fixes, le service de caractères, l'animation, les fichiers graphiques et vidéo
et les données multimédia. MHEG est une technologie d'interaction de
l'utilisateur en cours d'utilisation appliquée à divers domaines, dont la vidéo à
la demande (VOD), la télévision interactive (ITV), le commerce électronique, la
téléformation, la téléconférence, les bibliothèques numériques et les jeux en
réseau.
Français
◀ ▶
■ Interface commune
O MENUm → Diffusion → Interface commune → ENTERE
● CI Menu: permet à l’utilisateur d’opérer une sélection dans le menu du
module CAM. Sélectionnez le menu CI en fonction du menu PC Card.
● Transcodage vidéo CAM: Ce paramètre peut être configuré pour transcoder
automatiquement le codec vidéo depuis la CAM. Définissez-le sur Arrêt si
vous ne souhaitez pas l'utiliser.
N vous devez utiliser une CAM prenant en charge le transcodage du codec
vidéo.
Français
◀ ▶
● Infos sur l'application: affiche des informations sur le module CAM inséré
dans l’emplacement CI et sur la "CARTE CI ou CI+" insérée dans le module
CAM. Vous pouvez installer le module CAM, que le téléviseur soit allumé ou
éteint.
1. Vous pouvez acheter un module CI CAM chez le revendeur le plus proche
ou le commander par téléphone.
2. Insérez fermement la "CARTE CI ou CI+" dans le module CAM en suivant
le sens de la flèche.
3. Insérez le module CAM avec la "CARTE CI ou CI+" dans la fente de
l’interface commune (dans le sens de la flèche), de telle sorte qu’il soit
aligné parallèlement à la fente.
4. Vérifiez si une image est visible sur une chaîne à signal brouillé.
Français
◀ ▶
❑ Changement du mode Image prédéfini
■
O
Mode Image
MENUm →
t
Image → Mode Image → ENTERE
Sélectionnez le type d’image que vous préférez.
N Si vous connectez un PC, vous ne pouvez modifier que Loisirs et Standard.
● Dynamique: adapté à un environnement lumineux.
● Standard: adapté à un environnement normal.
● Naturel pour les téléviseurs LED de la série 6 : permet de réduire la fatigue oculaire.
● Cinéma: convient au visionnage de films dans une pièce sombre.
● Loisirs: adapté au visionnage de films et de jeux vidéo.
N Cette option n’est disponible que si vous connectez un PC.
Fonctions de base
Français
◀ ▶
❑ Réglages des paramètres de l’image
■ Samsung MagicAngle pour les modèles LED 19", 22"
O MENUm → Image → Samsung MagicAngle → ENTERE
Ajustez l’angle de visualisation afin d’optimiser la qualité d’image en fonction de
votre angle de vue.
● Samsung MagicAngle: lorsque vous visionnez l'écran d'un point de
vueinférieur ou supérieur à celui-ci, vous pouvez obtenir une qualité d'image
similaire à celle que vous auriez en face de l'écran, et ce en le réglant sur le
mode approprié à chaque position.
Arrêt: sélectionnez cette option pour la vue de face.
Mode Penché: sélectionnez ce bouton lorsque vous vous situez d’un point
de vue légèrement inférieur à l’écran.
Mode Debout: sélectionnez cette option pour une vue supérieure.
● Mode: règle l'angle de visualisation de l'écran.
N Lorsque l'option Samsung MagicAngle est définie sur Mode Penché ou
Mode Debout, la fonction Gamma n'est pas disponible.
Français
◀ ▶
■ Rétroéclairage pour les téléviseurs LED / Lum. Cellules pour les téléviseurs plasma
/ Contraste / Luminosité / Netteté / Couleur / Teinte (V/R)
Votre téléviseur dispose de plusieurs options de réglage pour le contrôle de la
qualité d’image.
N REMARQUE
● La fonction Teinte (V/R) n’est pas disponible dans les modes TV, Ext.,
AV analogiques du système PAL.
● Lors de la connexion à un ordinateur, vous pouvez uniquement apporter
des modifications aux options Rétroéclairage pour les téléviseurs LED /
Lum. Cellules pour les téléviseurs plasma , Contraste, Luminosité et
Netteté.
● Les paramètres peuvent être réglés et mémorisés pour chaque dispositif
externe connecté au téléviseur.
● La réduction de la luminosité de l’image se traduit par une consommation
d’énergie moindre.
Français
◀ ▶
■ Format de l'image
O MENUm → Image → Format de l'image → ENTERE
Définissez les différentes options d'image (par exemple, le format de l'image et le
rapport de format).
N Les options disponibles peuvent varier en fonction du mode sélectionné.
N Les options de taille de l’image peuvent varier en fonction de la source
d’entrée.
● Format de l'image t: il se peut que votre décodeur câble / récepteur
satellite dispose de son propre jeu de tailles d’écran. Il est toutefois vivement
conseillé d’utiliser le mode 16:9.
16:9 Auto: règle automatiquement la taille de l'image sur le format 16:9.
16:9: règle l'image en mode large, c'est-à-dire en 16:9.
Zoom large: agrandit l’image à une taille supérieure à 4:3.
N Réglez la Position à l’aide des boutons ▲, ▼.
Français
◀ ▶
Zoom: agrandit l’image en 16:9 (dans le sens vertical) pour l’adapter à la taille
de l’écran.
N Réglez la Zoom ou la Position à l’aide des boutons ▲, ▼.
4:3: règle l'image en mode normal, c'est-à-dire en 4:3.
N Ne regardez pas un film au format 4:3 pendant une période prolongée.
Les traces de bordures situées sur la gauche, sur la droite et au centre
de l’écran peuvent donner lieu au phénomène de rémanence (brûlure
d’écran) non couvert par la garantie.
Adapter à l’écran: affiche l’intégralité de l’image sans coupure lors de l’entrée
de signaux HDMI (720p / 1080i / 1080p) ou Composant (1080i / 1080p).
Français
◀ ▶
Smart View 1 pour les téléviseurs LED de la série 6 : permet de réduire la taille de
l'écran de 50%.
Smart View 2 pour les téléviseurs LED de la série 6 : permet de réduire la taille de
l'écran de 25%.
N REMARQUE
● L'option Smart View 1 est uniquement activée en mode HDMI.
● L'option Smart View 2 est uniquement activée avec les modes DTV
et HDMI.
● Le format de l'image peut varier en fonction de la résolution d'entrée
en cas de lecture du contenu à l'aide de l'option Vidéos sous Media
Play.
● Zoom/Position: permet de régler la taille et la position de l'image. Cette
option est uniquement disponible avec la fonction Zoom.
● Position: permet de régler la position de l'image. Cette option est uniquement
disponible avec la fonction Adapter à l’écran ou Zoom large.
Français
◀ ▶
N REMARQUE
● Après avoir sélectionné Adapter à l’écran en mode HDMI (1080i /
1080p) ou Composant (1080i / 1080p), il se peut que vous deviez centrer
l’image:
1. Sélectionnez l'option Position. Appuyez sur le bouton ENTERE.
2. Appuyez sur le bouton ▲, ▼, ◄ ou ► pour déplacer l’image.
● Si vous souhaitez réinitialiser la position que vous avez réglée,
sélectionnez l'option Réinit. de l'écran Position. L'image est alors définie
sur sa position par défaut.
● Si vous utilisez la fonction Adapter à l’écran avec l’entrée HDMI 720p,
une ligne sera coupée en haut, en bas, à gauche et à droite, comme c’est
le cas avec la fonction Overscan.
● Taille d'écran 4:3: disponible uniquement lorsque la taille d’image est définie
sur 16:9 Auto. Vous pouvez déterminer la taille d’image souhaitée sur 4:3
WSS (Wide Screen Service) ou sur la taille d’origine. Chaque pays européen
impose une taille d’image différente.
Français
◀ ▶
■
O
PIP
MENU
t
m → Image → PIP → ENTERE
Vous pouvez regarder simultanément le tuner TV et une source vidéo externe. Par
exemple, si un boîtier décodeur de réseau câblé est connecté à la prise Cable
In, vous pouvez utiliser la fonction PIP pour regarder des programmes depuis ce
décodeur tout en regardant un film depuis le lecteur Blu-ray connecté à la prise
HDMI In.
N REMARQUE
● Si vous éteignez le téléviseur alors que le mode PIP est activé, la fenêtre
PIP disparaît lorsque vous le rallumez.
● Il est possible que l’image affichée dans la fenêtre PIP semble légèrement
moins naturelle lorsque vous utilisez l’écran principal pour un jeu ou un
karaoké.
Français
◀ ▶
● Réglages PIP
Image principale Image secondaire
Composant, HDMI TV
● PIP: active ou désactive la fonction PIP.
● Antenne: sélectionnez soit l'option Hertzien, soit l'option Câble comme
source d'entrée pour le sous-écran.
● Canal: permet de choisir la chaîne affichée dans l’écran secondaire.
● Taille: sélectionnez la taille de l’image secondaire.
● Position: permet de sélectionner une position pour l'image secondaire.
● Sélection du son: Vous pouvez sélectionner le mode audio de votre
choix en mode PIP.
Français
◀ ▶
❑ Modification des options d’image
■ Paramètres avancés
O MENUm → Image → Paramètres avancés → ENTERE
(Disponible en mode Standard / Cinéma)
Vous pouvez régler les paramètres avancés de votre écran, notamment la couleur
et le contraste.
N Si vous connectez un PC, vous ne pouvez modifier que Balance blancs et
Gamma.
● Contraste Dyn.: permet de régler le contraste de l’écran.
● Nuance de noir: sélectionnez le niveau de noir afin de régler la profondeur
d’écran.
● Carnation: permet de régler la couleur de carnation.
Français
◀ ▶
● RVB uniquement: affiche les couleurs Rouge, Vert et Bleu afin de permettre
un réglage précis de la teinte et de la saturation.
● Espace de couleur: permet de régler la gamme des couleurs disponibles
pour créer l'image.
N Pour régler les options Couleur, Rouge, Vert, Bleu
et Réinit., réglez l'option Espace de couleur sur
Personnalisé. pour les téléviseurs plasma et les téléviseurs LED de la série 6
● Balance blancs: permet de régler la température des couleurs afin d’obtenir
une image plus naturelle.
Aj. Rouge / Aj. Vert / Aj. Bleu: permet de régler la profondeur de chaque
couleur (rouge, vert, bleu).
Régl. Rouge / Régl. vert / Régl. bleu: permet de régler la profondeur de
chaque couleur (rouge, vert, bleu).
Réinit.: rétablit les paramètres par défaut de l’option Balance blancs.
Français
◀ ▶
● Balance Blancs 10p pour les téléviseurs plasma et les téléviseurs LED de la série 6 :
Permet de contrôler la balance des blancs par intervalles de 10 points en
réglant la luminosité des couleurs rouge, vert et bleu.
N Ce mode est disponible lorsque le mode d'image est défini sur Cinéma
et lorsque l'entrée externe est définie sur toutes les entrées.
N Cette fonction n'est pas prise en charge par tous les dispositifs externes.
Intervalle: permet de sélectionner l'intervalle à ajuster.
Rouge: permet de régler le niveau de rouge.
Vert: permet de régler le niveau de vert.
Bleu: permet de régler le niveau de bleu.
Réinit.: rétablit les paramètres par défaut de l’option Balance Blancs 10p.
● Gamma: permet de régler l’intensité des couleurs primaires.
Français
◀ ▶
● Mire Expert pour les téléviseurs plasma et les téléviseurs LED de la série 6 : en exécutant
la fonction Mire Expert, l'image peut être calibrée sans générateur ni filtre.
Si le menu à l'écran disparaît ou si un menu autre que Image s'ouvre, le
calibrage est enregistré et la fenêtre Mire Expert se ferme.
N Pendant l'exécution de Mire Expert, aucun son n'est émis.
N Activé uniquement en mode Composant / HDMI.
● Lumin./Mouvement: permet de réduire la consommation d'énergie en
contrôlant la luminosité par rapport au mouvement.
N Cette fonction n'est pas prise en charge en mode
3D. pour les téléviseurs à écran plasma de la série 4900 ou LED de la série 6
N Disponible uniquement en mode Standard.
N Lorsque vous modifiez une valeur de Rétroéclairage pour un téléviseur LED
/ Lum. Cellules pour un téléviseur plasma , Luminosité or Contraste, l'option
Lumin./Mouvement sera réglée sur Arrêt.
Français
◀ ▶
■ Options d'image
O MENUm → Image → Options d'image → ENTERE
N Si vous connectez un PC, vous ne pouvez modifier que Nuance Coul..
● Nuance Coul.
N Les options Chaude 1 ou Chaude 2 sont désactivées lorsque le mode
d’image est Dynamique.
N Les paramètres peuvent être réglés et mémorisés pour chaque dispositif
externe connecté à une entrée du téléviseur.
● Digital Clean View: Si le signal de radiodiffusion reçu par votre téléviseur
est faible, vous pouvez activer la fonction Digital Clean View pour faciliter la
réduction d'imagesfantômes ou statiques qui peuvent apparaître à l'écran.
N Lorsque le signal est faible, sélectionnez une autre option jusqu'à
obtention de la meilleure image possible.
Français
◀ ▶
Visualisation auto: Lors du changement des chaînes analogiques, il affiche
l'intensité du signal.
N Disponible uniquement pour les chaînes analogiques.
N Une pression sur le bouton INFO affiche la barre de puissance du signal.
N Lorsque la barre est verte, vous recevez le meilleur signal possible.
● Filtre Bruit MPEG: réduit le bruit MPEG afin d’offrir une meilleure qualité
d’image.
● Niv. noir HDMI: permet de choisir le niveau de noir pour régler la profondeur
de l’écran.
N Disponible uniquement en mode HDMI (signaux RVB).
Français
◀ ▶
● Mode Film: ègle le téléviseur de sorte qu’il détecte et traite automatiquement
les signaux de cinéma en provenance de toutes les sources et adapte l’image
afin d’obtenir une qualité optimale.
N La fonction Cinema Smooth n'est activée que lors de l'application d'un
signal HDMI de 24 Hz. pour les téléviseurs plasma
N Disponible en mode TV et en mode d'entrée externe supportant SD (480i
/ 576i) et HD (1080i), à l'exception du mode PC.
N Si l’image à l’écran ne semble pas naturelle, définissez sa configuration
sur Arrêt / Auto.1 / Auto.2 dans Mode Film.
Français
◀ ▶
● Motion Plus pour les téléviseurs LED de la série 6 : Permet de supprimer les traînées
des scènes rapides avec beaucoup de mouvements, ce qui rend l'image plus
nette.
N L'écran Info (Infos) de votre téléviseur affiche la résolution et la fréquence
du signal entrant (60 Hz), et non la fréquence générée par le téléviseur
pour l'image affichée à l'aide de la fonction Motion Plus.
N Si des parasites apparaissent sur l'écran, configurez la fonction Motion
Plus sur Arrêt. Si la fonction Motion Plus est définie sur Personnalisé,
vous pouvez configurer manuellement l'option Réduction de flou,
Värinän vähent. ou Réinit..
N Si la fonction Motion Plus est définie sur Démo, vous pouvez comparer
la différence entre les modes Arrêt et Activé.
Français
◀ ▶
Réduction de flou: règle le niveau de réduction du flou à partir des sources
vidéo.
Värinän vähent.: règle le niveau de réduction des vibrations à partir des
sources vidéo lors de la lecture de films.
LED Clear Motion: Permet de supprimer les traînées des scènes rapides
avec beaucoup de mouvements, ce qui rend l'image plus claire.
N Il est désactivé lorsque le mode d’image est défini sur Naturel.
N L'écran est susceptible de légèrement s'assombrir lors de l'utilisation de
la fonction LED Clear Motion.
Réinit.: restaure les paramètres par défaut.
● Optimiseur noir pour les téléviseurs plasma : permet d'optimiser le noir et
d'améliorer le rapport de contraste.
N Lors de la connexion à un ordinateur, cette fonction est désactivée.
N Lorsque le téléviseur exécute d'autres applications, cette fonction est
désactivée. (ex. : AllShare Play, PIP, télétexte)
Français
◀ ▶
■
O
Image désactivée
MENUm → Image
t
→ Image désactivée → ENTERE
L'écran est éteint, mais le son reste activé. Appuyez sur n'importe quel bouton,
excepté celui du volume, pour allumer l'écran.
■ Réinit. param. img
O MENUm → Image → Réinit. param. img → ENTERE
Rétablit les paramètres par défaut du mode d’image actuel.
Français
◀ ▶
❑ Changement du mode Son prédéfini
■ Mode Son
O MENUm → Son → Mode Son → ENTERE
● Standard: sélectionne le mode son normal.
● Musique: accentue la musique par rapport aux voix.
● Cinéma: offre le meilleur son pour les films.
● Voix claire: accentue les voix par rapport aux autres sons.
● Amplifier: augmente l’intensité du son aigu pour garantir une meilleure écoute
aux personnes malentendantes.
N Si Sélection Haut-parleur est défini sur Haut-parleur ext, l'option Mode
Son est désactivée.
Français
◀ ▶
❑ Réglage des paramètres sonores
■ Effet sonore
(mode de son standard uniquement)
O MENUm → Son → Effet sonore → ENTERE
● DTS TruSurround
Cette fonction garantit un son surround virtuel 5.1 canaux par le biais de deux
haut-parleurs grâce à la technologie HRTF (Head Related Transfer Function -
Fonction de transfert asservie aux mouvements de la tête).
● DTS TruDialog
Cette fonction permet d’accentuer l’intensité d’une voix par rapport au fond
musical ou aux effets sonores, de manière à rendre les dialogues plus clairs
lorsque vous regardez une émission.
Français
◀ ▶
● Egaliseur
Utilisez l’égaliseur pour personnaliser les paramètres de son de chaque hautparleur.
Balance: règle la balance entre les haut-parleurs droit et gauche.
100Hz / 300Hz / 1kHz / 3kHz / 10kHz (Réglage de la bande passante): règle
le niveau des fréquences de bande passante spécifiques.
Réinit.: rétablit les paramètres par défaut de l’égaliseur.
N Si Sélection Haut-parleur est défini sur Haut-parleur ext, l'option Effet
sonore est désactivée.
■ Audio 3D pour les téléviseurs à écran plasma de la série 4900 ou LED de la série 6
O MENUm → Son → Audio 3D → ENTERE
La technologie audio 3D vous plonge dans un environnement sonore
correspondant à l'effet en relief de la vidéo 3D grâce à un contrôle de la
profondeur audio.
N Disponible uniquement lors du visionnage de contenu 3D.
Français
◀ ▶
■ Paramètres haut-parleur
O MENUm → Son → Paramètres haut-parleur → ENTERE
● Sélection Haut-parleur
Un effet d’écho peut se produire en raison de la différence de vitesse de
t
décodageentre le haut-parleur principal et le récepteur audio. Dans ce cas,
réglez le téléviseur sur Haut-parleur ext.
N Lorsque l'option Sélection Haut-parleur est définie sur Haut-parleur
ext, les boutons de volume et MUTE ne sont pas opérationnels et les
paramètres sonores sont limités.
N Lorsque l'option Sélection Haut-parleur est définie sur Haut-parleur
ext.
● Haut-parleur TV: Arrêt, Haut-parleur ext: Activé
N Lorsque l'option Sélection Haut-parleur est définie sur Haut-parleur
TV.
● Haut-parleur TV: Activé, Haut-parleur ext: Activé
N En l’absence de signal vidéo, les deux haut-parleurs sont coupés.
Français
◀ ▶
● Volume auto
Pour équilibrer le niveau de volume sur chaque canal, définissez cette option
sur Normal.
Nuit: ce mode garantit un environnement sonore de meilleure qualité que le
mode Normal, avec une absence pratiquement totale de parasites. Il s’avère
particulièrement utile pendant la nuit.
N Pour contrôler le niveau de volume sur le périphérique source connecté
au téléviseur, définissez l’option Volume auto sur Arrêt sur le téléviseur.
Sinon, il se peut que les réglages du volume du périphérique source ne
soient pas appliqués.
Français
◀ ▶
■ Paramètres supplém.
O MENUm → Son → Paramètres supplém. → ENTERE
● Niveau Audio DTV (chaînes numériques uniquement): cette fonction vous
permet de réduire la disparité d’un signal vocal (à savoir l’un des signaux
reçus lors d’une émission de télévision numérique) sur le niveau souhaité.
N En fonction du type de signal de radiodiffusion, les options MPEG / HEAAC
peuvent être réglées sur une valeur comprise entre -10 dB et 0 dB.
N Pour augmenter ou diminuer le volume, réglez ces valeurs entre 0 et -10,
respectivement.
Français
◀ ▶
● Sortie audio numér.: La sortie audio numérique permet d'offrir un son
numérique et de réduire ainsi les interférences vers les haut-parleurs et divers
périphériques numériques, tels qu'un lecteur DVD.
Format Audio: Vous pouvez sélectionner le format de sortie audio numérique.
Le format de sortie audio numérique disponible peut varier en fonction de la
source d'entrée.
N La connexion de haut-parleurs 5.1 canaux dans un environnement Dolby
Digital vous permet d’optimiser votre environnement sonore 3D interactif.
Retard Audio: cette option permet de corriger le décalage audio/vidéo
lorsque vous regardez la télévision ou une vidéo et diffusez la sortie audio
numérique sur un dispositif externe tel qu’un récepteur AV (0ms ~ 250ms).
Français
◀ ▶
● Comp Dolby Digital: cette fonction réduit la disparité entre un signal Dolby
Digital et un signal vocal (à savoir, Audio MPEG, HE-AAC, Son ATV).
N Sélectionnez Line pour obtenir un son dynamique et RF pour réduire la
différence entre les sons forts et faibles pendant la nuit.
Line: permet de définir le niveau de sortie des signaux supérieurs ou inférieurs
à -31 dB (référence) sur -20 dB ou -31 dB.
RF: permet de définir le niveau de sortie des signaux supérieurs ou inférieurs
à -20 dB (référence) sur -10 dB ou -20 dB.
■ Réinit. son
O MENUm → Son → Réinit. son → ENTERE
Rétablit les paramètres sonores par défaut définis en usine.
Français
◀ ▶
❑ Sélection du mode Son
Lorsque vous définissez cette option sur
t
Dual I-II, le mode son actuel est affiché
à l’écran.
Type d'audio Dual I-II Par défaut
Stéréo A2 Mono Mono Changement automatique
Stéréo Stéréo ↔ Mono
Dual Dual I ↔ Dual II Dual I
NICAM Stéréo Mono Mono Changement automatique
Stéréo Mono ↔ Stéréo
Dual Mono → Dual I
Dual II
Dual I
N Si le signal stéréo est faible et qu’une commutation automatique se produit,
passez en Mono.
N Cette fonction n’est activée qu’avec un signal sonore stéréo.
N Accessible uniquement lorsque la Source est définie sur TV.
Français
◀ ▶
Fonctions de préférence
❑ Exécution de la configuration initiale
■ Configuration
O MENUm → Système → Configuration → ENTERE
Réglez les chaînes et l'heure si vous configurez le téléviseur pour la première fois
ou après une réinitialisation.
N Exécutez la configuration initiale en suivant les instructions fournies par le
téléviseur.
Français
◀ ▶
❑ Réglage de l’heure
■ Heure
O MENUm → Système → Heure → ENTERE
L’heure actuelle s’affiche à chaque fois que vous appuyez sur le bouton INFO.
● Horloge: le réglage de l’heure est nécessaire pour utiliser différentes fonctions
de minuterie du téléviseur.
N Si vous débranchez le cordon d’alimentation, vous devez régler de
nouveau l’horloge.
Mode Horloge: permet de définir l'heure manuellement ou automatiquement.
– Auto.: règle automatiquement l'heure en fonction des signaux diffusés par
une chaîne numérique.
N L’antenne doit être connectée pour permettre le réglage automatique de
l’heure.
– Manuel: permet de régler l'heure manuellement.
N En fonction du signal et de la station de diffusion, il se peut que la
configuration automatique de l’heure soit incorrecte. Dans ce cas, réglez
l’heure manuellement.
Français
◀ ▶
Réglage Horloge: permet de régler la Date et l'Heure.
N Disponible uniquement lorsque l’option Mode Horloge est définie sur
Manuel.
N Vous pouvez régler directement la Date et l'Heure en appuyant sur les
touches numériques de la télécommande.
Fuseau Horaire (selon le pays): sélectionnez votre fuseau horaire.
N Cette fonction est uniquement disponible lorsque Mode Horloge est
défini sur Auto..
N Si vous sélectionnez l’option Manuel dans Fuseau Horaire, GMT et
Heure d'été d'été sont activés.
Décalage horaire (selon le pays) pour les téléviseurs plasma de la série 4900 : Règle
l'heure lorsque votre téléviseur reçoit les informations relatives à l'heure via
Internet. permet de définir l'heure exacte en sélectionnant un décalage.
N L'heure actuelle est réglée par le biais d’un réseau si le téléviseur ne
parvient pas à recevoir les informations relatives à l’heure, y compris le
signal de radiodiffusion des chaînes de télévision (par exemple si vous
regardez la télévision par le biais d'un boîtier décodeur, d'un récepteur
satellite, etc.).
Français
◀ ▶
❑ Utilisation de la veille
O MENUm → Système → Heure → Veille → ENTERE
● Veillet: éteint automatiquement le téléviseur après une période
déterminée. (30, 60, 90, 120, 150 ou 180 minutes)
N Utilisez les boutons ▲/▼ pour sélectionner un intervalle de temps, puis
appuyez sur ENTERE. Pour annuler la fonction Veille, sélectionnez
Arrêt.
Français
◀ ▶
❑ Réglage de la minuterie de mise en marche / arrêt
O MENUm → Système → Heure → Progr. activ. Progr. désact. →
ENTERE
● Progr. activ.: vous pouvez définir trois configurations Progr. activ. distinctes.
(Progr. activ. 1, Progr. activ. 2, Progr. activ. 3)
Configuration: sélectionnez Arrêt, Une fois, Quotid., Lun~Ven, Lun~Sam,
Sam~Dim ou Manuel pour définir l'option suivant vos besoins. Si vous
sélectionnez Manuel, vous pouvez choisir le jour d'activation de la minuterie.
N Le symbole c indique le jour sélectionné.
Heure: réglez les heures et les minutes.
Volume: sélectionnez le niveau de volume désiré.
Français
◀ ▶
Source: permet de sélectionner la source du contenu lu au démarrage du
téléviseur. Vous pouvez:
– Sélectionner TV et faire en sorte que le téléviseur affiche une chaîne
hertzienne ou câblée spécifique.
– Sélectionner USB et faire en sorte que le téléviseur lise des fichiers photo
ou audio à partir d'un périphérique USB.
– Sélectionner une source sur le téléviseur auquel vous avez connecté un
boîtier décodeur et faire en sorte que le téléviseur affiche une chaîne à
partir du décodeur.
N Le périphérique USB doit être connecté à votre téléviseur avant de
pouvoir sélectionner la fonction USB.
Français
◀ ▶
N Si vous sélectionnez une autre source que TV ou USB, vous devez:
● Disposer d'un câble ou d'un décodeur satellite connecté à cette
source
● Définir sur le décodeur la chaîne que vous souhaitez regarder au
démarrage du téléviseur
● Laisser le décodeur sous tension.
N Lorsque vous sélectionnez une autre source que TV ou USB, les options
Aerial (Antenne) et Channel (Chaîne) disparaissent.
Antenne (lorsque Source est réglé sur TV): sélectionnez ATV ou DTV.
Canal (lorsque Source est réglé sur TV): permet de sélectionner la chaîne
souhaitée.
Français
◀ ▶
Musique / Photo (lorsque Source est réglé sur USB): sélectionnez un dossier
de la clé USB contenant les fichiers de musique ou les photos qui doivent être
lus lors de la mise sous tension automatique du téléviseur.
– Si le périphérique USB ne contient aucun fichier audio ou si le dossier
contenant un fichier audio n'est pas sélectionné, la fonction de veille ne
fonctionne pas correctement.
– Si le périphérique USB ne contient qu'un seul fichier photo, la fonction de
diaporama ne démarre pas.
– Les dossiers dont le nom est trop long ne peuvent pas être sélectionnés.
– Chaque périphérique USB utilisé se voit attribuer son propre dossier. Si
vous utilisez plusieurs périphériques USB du même type, assurez-vous
que les dossiers affectés à chacun d’eux portent des noms différents.
Français
◀ ▶
– Il est conseillé d'utiliser une clé USB et un lecteur de cartes multiformat
lors de l'utilisation de la fonction Progr. activ..
– Il se peut que l'option Progr. activ. ne fonctionne pas avec certains
périphériques USB équipés d'une batterie intégrée, ainsi que des lecteurs
MP3 et lecteurs multimédias portables de certains fabricants, car leur
reconnaissance prend trop de temps.
● Progr. désact.: vous pouvez définir trois configurations Progr. désact.
distinctes. (Progr. désact. 1, Progr. désact. 2, Progr. désact. 3)
Configuration: sélectionnez Arrêt, Une fois, Quotid., Lun~Ven, Lun~Sam,
Sam~Dim ou Manuel pour définir l'option suivant vos besoins. Si vous
sélectionnez Manuel, vous pouvez choisir le jour d'activation de la minuterie.
N Le symbole c indique le jour sélectionné.
Heure: réglez les heures et les minutes.
Français
◀ ▶
❑ Solutions économiques
■ Solution Eco
O MENUm → Système → Solution Eco → ENTERE
● Mode éco.: permet de régler la luminosité du téléviseur afin de réduire la
consommation d’énergie.
● Capteur Eco pour les téléviseurs plasma et les téléviseurs LED de la série 6 : cette fonction
permet d'optimiser vos économies d'énergie ; les réglages de l'image
s'adaptent automatiquement en fonction de la luminosité de la pièce.
N Si vous réglez l'option Rétroéclairage pour les téléviseurs LED / Lum.
Cellules pour les téléviseurs plasma , la fonction Capteur Eco sera définie sur
Arrêt.
Rétro-écl. min pour les téléviseurs LED / Lum. cellules
min. pour les téléviseurs plasma : lorsque Capteur Eco est défini sur Activé, la
luminosité d'écran minimale peut être réglée manuellement.
N Si Capteur Eco est Activé, la luminosité de l'écran peut changer
(ildevient plus ou moins lumineux) en fonction de l'intensité de la lumière
environnante.
Français
◀ ▶
● Veille si aucun signal: pour éviter toute consommation d'énergie inutile,
définissez la durée d'activation du téléviseur lorsqu'il ne reçoit pas de signal.
N Il est désactivé lorsque le PC est en mode d’économie d’énergie.
● Hors ten. auto: le téléviseur s'éteint automatiquement si aucune activité n'est
détectée pendant 4 heures.
N Si l'option Hors ten. auto est définie sur Arrêt, le téléviseur restera
allumé même si aucune opération n'y est effectuée.
Français
◀ ▶
❑ Autres fonctionnalités
■ Langue des menus
O MENUm → Système → Langue des menus → ENTERE
définissez la langue des menus.
■ Temps protection auto pour les téléviseurs LED
O MENUm → Système → Temps protection auto → ENTERE
Si l’écran est inutilisé et affiche une image fixe pendant une durée définie par
l’utilisateur, l’économiseur d’écran est activé de manière à prévenir la formation
d’images parasites sur l’écran.
Français
◀ ▶
■ Protec brûl. écran pour les téléviseurs plasma
O MENUm → Système → Protec brûl. écran → ENTERE
Afin de réduire le risque de brûlure d'écran, cet écran est équipé d'une
technologie de prévention des brûlures Modif. pixel. La fonction Modif. pixel
déplace légèrement l'image à l'écran. La fonction Durée permet de programmer
la durée en minutes séparant les mouvements de l'image.
Votre téléviseur est également doté de ces fonctions de protection de brûlure
d'écran supplémentaires:
● Modif. pixel
● Temps protection auto
● Défilement
● Gris de bord
Français
◀◀ ▶▶
● Modif. pixel: cette fonction permet de régler le téléviseur pour déplacer les
pixels sur l'écran plasma dans le sens vertical ou horizontal, afin d'éviter une
image résiduelle sur l'écran.
N Réglages des modifications de pixels disponibles et réglages optimaux
Elément TV / HDMI
Horizontal 0~4 4
Vertical 0~4 4
Durée (minute) 1~4 min 4 min
N La valeur Modif. pixel peut changer selon le mode et la taille de l’écran.
N Cette fonction n’est pas disponible en mode Adapter à l’écran.
● Temps protection auto: si l'écran affiche une image fixe pendant une certaine
période que vous définissez, le téléviseur active l'économiseur d'écran pour
éviter la formation d'images fantômes.
Français
◀ ▶
● Défilement: cette fonction permet d'éviter le phénomène de rémanence en
illuminant tous les pixels de l'écran plasma suivant un modèle. Utilisez cette
fonction lorsque des images résiduelles ou des symboles apparaissent à
l'écran, en particulier lorsque vous affichez une image fixe à l'écran longtemps.
N La fonction de suppression d’images résiduelles doit être exécutée
pendant longtemps (environ une heure) pour supprimer efficacement
les images résiduelles. Si l'image résiduelle n'est pas supprimée après
l'exécution de cette fonction, répétez l'opération.
N Appuyez sur n'importe quelle touche de la télécommande pour annuler
cette fonction.
● Gris de bord: lorsque vous regardez la télévision avec un format d'écran
4:3, la fonction Gris de bord permet d'éviter des dommages sur les bords
de l'écran par un réglage de la balance des blancs aux extrêmes gauche et
droite.
Français
◀ ▶
■ Général
O MENUm → Système → Général → ENTERE
● Mode Jeu: lorsque vous connectez une console de jeux, telle qu’une
PlayStation™ ou Xbox™, vous pouvez bénéficier d’une expérience ludique
encore plus réaliste en sélectionnant le mode Jeu.
N REMARQUE
● Précautions et restrictions du mode Jeu
– Pour déconnecter la console de jeux et connecter un autre
périphérique externe, définissez Mode Jeu sur Arrêt dans le
menu de configuration.
– Si vous affichez le menu du téléviseur en Mode Jeu, l’écran
tremble légèrement.
● Le Mode Jeu n'est pas disponible en mode TV.
● Après avoir connecté la console de jeux, définissez le Mode Jeu sur
Activé. Malheureusement, il se peut que la qualité d'image soit moins
bonne.
Français
◀ ▶
● Si Mode Jeu est défini sur Activé:
– Le Mode Image est défini sur Standard et le Mode Son sur
Cinéma.
● Verr. Touches: permet de verrouiller ou déverrouiller toutes les touches du
panneau.
● Affich. logo: affichez le logo Samsung au démarrage de la TV.
■ Modifier PIN
O MENUm → Système → Modifier PIN → ENTERE
Une modification de votre mot de passe est requise pour pouvoir configurer le
téléviseur.
N L’écran de saisie du code PIN s’affiche après l’écran de configuration.
N Entrez votre code PIN à quatre chiffres. Modifiez le code PIN à l’aide de
l’option Modifier PIN.
Français
◀ ▶
■ DivX® Vidéo à la demande
O MENUm → Système → DivX® Vidéo à la demande → ENTERE
affiche le code d’enregistrement autorisé pour le téléviseur. Connectez-vous au
site Web DivX et enregistrez-vous à l’aide du code d’enregistrement à 10 chiffres
pour pouvoir télécharger le fichier d’activation VOD.
Une fois que vous exécutez ce dernier à l’aide de Vidéos, l’enregistrement est
terminé.
N Pour plus d'informations sur DivX® VOD, rendez-vous sur le site Web http://
vod.divx.com.
Français
◀ ▶
Fonctions avancées
❑ Utilisation de la liste des sources
■ Liste Source
O MENUm → Applications → Liste Source → ENTERE
N Lorsque vous appuyez sur le bouton SOURCE, l'écran Source s'affiche
immédiatement.
N Vous pouvez uniquement choisir des périphériques externes connectés au
téléviseur. Les entrées connectées sont mises en surbrillance dans la liste
Source.
N Pour plus d'informations, consultez le chapitre "Modification de la source
d'entrée" dans le manuel utilisateur.
Français
◀ ▶
❑ Connexion d'un périphérique USB
1. Allumez votre téléviseur.
2. Connectez un périphérique USB contenant des photos ou des fichiers
musicaux au port USB sur le côté du téléviseur.
3. Lorsqu'un périphérique USB est connecté au téléviseur, une fenêtre
contextuelle s'ouvre. Vous pouvez sélectionner directement Photos, Vidéos
ou Musique.
Français
◀ ▶
N Il se peut que le fonctionnement ne soit pas correct avec des fichiers
multimédia sans licence.
N Liste des choses à savoir avant d'utiliser le contenu multimedia
● Le protocole MTP (Media Transfer Protocol) n'est pas pris en charge.
● Les systèmes de fichiers pris en charge sont FAT et exFAT.
● Il est possible que certains types d'appareils photo numériques et de
périphériques audio USB ne soient pas compatibles avec ce téléviseur.
● Le contenu multimédia prend uniquement en charge le format JPEG
séquentiel.
● Media Contents ne prend en charge que les périphériques de stockage
de masse USB. Ceux-ci sont dédiés aux périphériques de transport
de masse uniquement. Il s'agit notamment des clés USB et lecteurs
de cartes Flash (les concentrateurs USB ne sont pas pris en charge).
Les périphériques doivent être connectés directement au port USB du
téléviseur.
Français
◀ ▶
● Avant de connecter l'appareil au téléviseur, sauvegardez vos fichiers afin
d'éviter qu'ils ne soient endommagés ou que des données ne soient
perdues. SAMSUNG ne saurait, en aucun cas, être tenu responsable de
la perte de données ou de l'endommagement d'un fichier de données.
● Le disque dur connecté au port USB n'est pas pris en charge.
● Ne déconnectez pas le périphérique USB en cours de chargement.
● Plus la résolution de l'image est élevée, plus le temps d'affichage à
l'écran sera long.
● La résolution JPEG maximale prise en charge est de 15360 x 8640
pixels.
● Pour les fichiers non pris en charge ou endommagés, le message "Not
Supported File Format" s'affiche.
● Les fonctions de recherche de scène et de miniature ne sont pas prises
en charge dans l'option Vidéos.
Français
◀ ▶
● Les fichiers MP3 avec gestion des droits numériques (DRM) téléchargés
à partir d'un site payant ne peuvent pas être lus. La technologie DRM
(Gestion des droits numériques) prend en charge la création de contenu,
la distribution et la gestion intégrales du contenu (par exemple, la
protection des droits et des intérêts des fournisseurs de contenu, la
prévention de la copie illégale du contenu), ainsi que la gestion de la
facturation et des règlements.
● Le mode de connexion PTP n'est entièrement disponible qu'avec des
appareils photo numériques. Lorsque vous connectez un smartphone ou
une tablette au téléviseur à l'aide du mode PTP, cet appareil risque de ne
pas être reconnu.
● Un périphérique USB nécessitant beaucoup de puissance (plus de 500
mA ou 5 V) ne sera peut-être pas pris en charge.
● Si le téléviseur ne reçoit aucun signal d'entrée pendant la période
configurée sous l'option Temps protection auto, l'économiseur d'écran
s'active.
Français
◀ ▶
● Le mode d'économie d'énergie de certains disques durs externes peut
être désactivé automatiquement lors d'une connexion au téléviseur.
● Si un câble d'extension USB est utilisé, il se peut que le périphérique
USB ne soit pas reconnu ou que les fichiers qui y sont stockés ne soient
pas lus.
● Si un périphérique USB connecté au téléviseur n'est pas reconnu, si la
liste des fichiers qui y sont stockés est altérée ou si un fichier de la liste
est illisible, connectez le périphérique en question à l'ordinateur, formatez
le périphérique et vérifiez la connexion.
● Si un fichier supprimé depuis le PC apparaît encore lors de l'utilisation du
contenu multimedia, utilisez la fonction "Vider la Corbeille" de l'ordinateur
pour supprimer définitivement ce fichier.
● Si le nombre de fichiers et dossiers enregistrés sur un périphérique de
stockage USB est supérieur à environ 4 000, certains peuvent ne pas
apparaître et certains dossiers sont susceptibles de ne pas pouvoir être
ouverts.
Français
◀ ▶
Déconnexion d'un périphérique USB
1. Appuyez sur le bouton SOURCE.
2. Sélectionnez le périphérique USB souhaité, puis appuyez sur le bouton
TOOLS. Le menu Outils apparaît.
3. Sélectionnez Retirer USB, puis attendez que le périphérique USB soit
déconnecté. Vous pouvez retirer le périphérique USB du téléviseur.
N Pour retirer un périphérique USB du téléviseur, nous vous recommandons
d'utiliser la fonction Retirer USB.
Français
◀ ▶
❑ Utilisation du contenu multimedia
O MENUm → Applications → Media Play → ENTERE
Profitez des photos, des fichiers musicaux et des films enregistrés sur un
périphérique de stockage de masse USB de la classe MSC.
1. Appuyez sur le bouton MEDIA.P.
2. Appuyez sur le bouton ◄/► pour sélectionner le menu de votre choix (Photos,
Vidéos, Musique), puis sur ENTERE.
3. Appuyez sur le bouton ◄/► pour sélectionner le périphérique de votre choix,
puis sur ENTERE.
4. Appuyez sur le bouton ▲/▼/◄/► pour sélectionner le fichier voulu dans la
liste, puis sur ENTERE ou ∂ (Lecture).
Français
◀ ▶
Lecture des fichiers sélectionnés
1. Appuyez sur le bouton ▲ pour sélectionner Options dans le haut de chaque
écran principal, et sélectionnez Lire élém. sél..
2. Sélectionnez les fichiers de votre choix.
N Une marque de sélection s'affiche à gauche des fichiers sélectionnés.
N Appuyez de nouveau sur le bouton ENTERE pour désélectionner le
fichier.
3. Appuyez sur le bouton ▲ pour sélectionner Lecture.
N Vous pouvez sélectionner ou désélectionner tous les fichiers en appuyant
sur Sélectionner tout / Tout désélectionner.
Français
◀ ▶
❑ Lecture des photos / vidéos / fichiers musicaux
Pendant la lecture d'un fichier, appuyez sur le bouton ▲/▼/◄/► pour
sélectionner le menu voulu.
N Lorsque le menu d'options ne s'affiche pas, appuyez sur le bouton TOOLS
(Outils) ou ENTERE.
N Vous pouvez aussi utiliser les boutons ∂/∑/∫/π/µ de la
télécommande pendant la lecture.
N En appuyant sur le bouton INFO pendant la lecture, vous pouvez consulter
les informations de lecture.
Français
◀ ▶
Menu Lecture
Bouton Opération Photos Vidéos Musique
/ Précédent / Suivant ●
/ Lancer le diaporama / Arrêter le diaporama ●
Lecture / Pause Mini-lecteur* ● ●
/ Précédent / Suivant Mini-lecteur* ● ●
/ Rembobiner / Avance rapide ● ●
* Ces boutons s'affichent lorsque l'option Fond musical est réglée sur Mini-lecteur dans Photos.
Français
◀ ▶
Menu Configuration
● Photos
Bouton Opération
Paramètres du
diaporama
Vous pouvez définir les options Vitesse et Effets pendant le
diaporama.
Zoom Vous pouvez effectuer un zoom sur des images lorsque vous
êtes en mode Plein écran.
Pivoter Vous pouvez faire pivoter des images lorsque vous êtes en
mode Plein écran.
Fond musical / Minilecteur
Vous pouvez définir le fond musical d'un diaporama. / Vous
pouvez contrôler des menus de lecture simples.
Paramètres Mode Image / Mode Son: vous permet de régler la
configuration de l'image ou du son.
Information: Vous pouvez consulter des informations détaillées
sur le fichier en cours de lecture.
Français
◀ ▶
N Pendant le diaporama, tous les fichiers de la liste sont affichés dans l'ordre.
N Lorsque vous appuyez sur le bouton ∂ (Lecture) (ou le bouton ▲ →
Options → Diaporama) dans la liste des fichiers, le diaporama démarre
immédiatement.
N Pendant le diaporama, vous pouvez régler la vitesse de défilement à l'aide du
bouton π (REW) ou µ (FF).
● Formats de photo pris en charge
N Pour plus de détails, reportez-vous au chapitre "Caractéristiques
techniques" du manuel utilisateur.
Français
◀ ▶
● Vidéos
Bouton Opération
Recherche Rech. titres: Vous pouvez directement déplacer l'autre fichier.
Rech. barre de temps: Vous pouvez rechercher la vidéo à l'aide
des boutons ◄ et ► toutes les minutes ou en entrant directement
le numéro correspondant.
N Cette fonction peut ne pas être prise en charge, en fonction de
la source.
Mode Répétition Vous pouvez lire des fichiers films en boucle.
Format de l'image Vous pouvez régler le format de l'image selon vos besoins.
Paramètres Param. de sous-titre: Vous pouvez visionner la vidéo avec des
sous-titres. Cette fonction n'est active que lors de la lecture de
fichiers de type streaming prenant en charge plusieurs formats
audio.
Mode Image / Mode Son: vous permet de régler la configuration
de l'image ou du son.
Langue audio: Vous pouvez modifier la langue audio si la vidéo en
comporte plusieurs.
Information: Vous pouvez consulter des informations détaillées sur
le fichier en cours de lecture.
Français
◀ ▶
N Si les informations sur la durée de la vidéo sont inconnues, la durée de
lecture et la barre de progression ne s'affichent pas.
N Ce mode vous permet de profiter des séquences vidéo d'un jeu vidéo, mais
pas de jouer au jeu proprement dit.
● Formats sous-titrage/vidéo pris en charge
N Pour plus de détails, reportez-vous au chapitre "Caractéristiques
techniques" du manuel utilisateur.
Français
◀ ▶
● Musique
Bouton Opération
Répétition Vous pouvez lire des fichiers musicaux en boucle.
Aléatoire vous pouvez lire la musique de manière aléatoire.
Mode Son Vous pouvez régler les paramètres sonores.
N Seuls les fichiers musicaux dont l'extension est prise en charge sont affichés.
Les autres extensions de fichier ne sont pas affichées, même si elles sont
enregistrées sur le même périphérique USB.
N Si un son anormal est émis lors de la lecture de fichiers musicaux, réglez
l'option Egaliseur dans le menu Son. (Un fichier musical surmodulé peut être
à l'origine d'un problème sonore.)
● Formats musicaux pris en charge
N Pour plus de détails, reportez-vous au chapitre "Caractéristiques
techniques" du manuel utilisateur.
Français
◀ ▶
Définition de la langue d'encodage
Définissez la langue d'encodage si le texte n'est pas pris en charge.
1. Appuyez sur le bouton ▲ pour sélectionner Options dans le haut de l'écran
principal Musique et sélectionnez Encodage.
2. Sélectionnez la langue d'encodage souhaitée.
Français
◀ ▶
❑ Utilisation de la fonction 3D
pour les téléviseurs à écran plasma de la série 4900 ou LED de la série 6
Regarder la télévision à l'aide de la fonction 3D
INFORMATIONS IMPORTANTES SUR LA SECURITE ET LA PROTECTION DE LA
SANTE CONCERNANT LES IMAGES EN 3D.
Il est important de lire attentivement et de bien comprendre les informations de
sécurité suivantes avant d'utiliser la fonction 3D de votre téléviseur.
[AVERTISSEMENT
● Certaines personnes peuvent être victimes de vertiges, nausées et maux
de tête lorsqu'elles regardent la télévision en 3D. Si vous présentez des
symptômes de ce type, arrêtez de regarder la télévision en 3D, retirez les
lunettes actives 3D et reposez-vous.
● Le fait de regarder des images 3D pendant une période prolongée peut
causer une fatigue oculaire. Si vous présentez ce type de symptôme,
arrêtez de regarder le téléviseur 3D, retirez les lunettes actives 3D et
reposez-vous.
Français
◀ ▶
● Des adultes doivent régulièrement vérifier que tout se passe bien pour
les enfants qui utilisent la fonction 3D. Si un enfant se plaint de fatigue
oculaire, de maux de tête, de vertiges ou de nausées, demandez-lui
d'arrêter de regarder la télévision en 3D et de se reposer.
● N'utilisez pas les lunettes actives 3D à d'autres fins (par exemple, comme
lunettes de vue, de soleil ou de protection).
● N'utilisez pas la fonction 3D ou les lunettes actives 3D lorsque vous
marchez ou vous vous déplacez. Si vous utilisez la fonction 3D ou les
lunettes actives 3D en vous déplaçant, vous pouvez vous blesser en
trébuchant, en chutant et/ou en percutant des objets.
Avant d'utiliser la fonction 3D...
● Il se peut que les lunettes actives 3D d'un modèle antérieur de Samsung (de
type IR) ou d'autres fabricants ne soient pas prises en charge.
● Lors de la mise en marche initiale du téléviseur, l'optimisation de l'écran 3D
peut prendre quelques instants.
Français
◀ ▶
● En cas de proximité avec un autre appareil 3D ou électronique, il est possible
que les lunettes actives 3D ne fonctionnent pas correctement. En cas de
problème, placez les autres appareils électroniques le plus loin possible des
lunettes actives 3D .
● Veillez à rester dans l'angle de visualisation et à une distance de visualisation
du téléviseur optimale lorsque vous regardez des images 3D. Sinon, vous
risquez de ne pas pouvoir profiter des effets 3D attendus.
● La distance de visualisation idéale doit correspondre à au moins trois fois la
hauteur de l'écran. Nous recommandons à l'utilisateur de s'asseoir de sorte
que ses yeux soient au même niveau que l'écran.
● Si la lecture de vidéos 3D ne fonctionne pas sur un lecteur BD, retirez le
disque du lecteur puis réinsérez-le, ou redémarrez le lecteur BD.
Français
◀ ▶
■ 3D
O MENUm → Image → 3D → ENTERE
Cette nouvelle fonctionnalité vous permet de regarder du contenu 3D.
N Le logo "Full HD 3D Glasses™" indique une compatibilité entre les produits
d'affichage et les lunettes 3D conformes au format "Full HD 3D Glasses™".
Cela n'indique pas la qualité d'image des produits d'affichage.
N Selon le format de l'image source, certains modes 3D peuvent ne pas être
disponibles.
N Lorsque vous regardez des images 3D sous une lumière tremblotante
comme une lampe fluorescente (50 Hz ~ 60 Hz) ou une lampe à 3 longueurs
d'onde, il se peut que l'écran scintille légèrement. Si tel est le cas, atténuez
l'intensité de l'éclairage ou éteignez la lumière.
Français
◀ ▶
● Mode 3D
Pour profiter pleinement de l'effet 3D, mettez les lunettes actives 3D, puis
sélectionnez l'un des modes Mode 3D décrits dans la liste ci-dessous pour
obtenir une qualité 3D optimale .
Mode 3D Opération
Off Arrêt Désactive la fonction 3D.
2D → 3D Change une image 2D en 3D.
N Certains formats de fichier peuvent ne pas être pris en charge.
Côte à côte Affiche deux images côte à côte.
Haut & Bas Affiche les images l'une au-dessus de l'autre.
N Le Mode 3D est défini automatiquement sur Off lorsque vous accédez
aux fonctions Media Play ou e-Manual.
N Le Mode 3D est défini automatiquement sur la valeur de configuration
mémorisée en cas de changement de la source d'entrée.
Français
◀ ▶
● Perspective 3D: permet de régler la perspective 3D globale de l'image à
l'écran.
● Profondeur: permet de régler la profondeur globale.
● Modification G/D: intervertit les images gauche et droite.
● 3D → 2D: permet d'afficher uniquement l'image pour l'œil gauche.
N Cette fonction est désactivée lorsque 3D Mode est défini sur " " ou "
Off ".
Résolution prise en charge (16:9 uniquement)
● HDMI
Source Résolution Fréquence (Hz)
/ 1280 x 720p 50 / 59.94 / 60 Hz
1920 x 1080i 50 / 59.94 / 60 Hz
1920 x 1080p 23.98 / 24 / 25 / 29.97 / 30 / 50 / 59.94 / 60 Hz
Frame Packing 1280 x 720p 50 / 59.94 / 60 Hz
1920 x 1080i 50 / 59.94 / 60 Hz
1920 x 1080p 23.98 / 24 / 25 / 29.97 / 30 Hz
Français
◀ ▶
● Composant & DTV
Source Résolution Fréquence (Hz)
Composant 1280 x 720p 50 / 59.94 / 60 Hz
1920 x 1080i 50 / 59.94 / 60 Hz
1920 x 1080p 23.98 / 24 / 25 / 29.97 / 30 / 50 / 59.94 / 60 Hz
DTV 1280 x 720p 50 / 59.94 / 60 Hz
1920 x 1080i 50 / 59.94 / 60 Hz
1920 x 1080p 25 Hz
● Vidéos / Photos (dans Media Play)
Pour plus de détails, reportez-vous au chapitre "Caractéristiques techniques"
du manuel utilisateur.
Français
◀ ▶
❑ Affichage du manuel électronique
■ e-Manual
O MENUm → Assistance → e-Manual → ENTERE
Vous pouvez lire l'introduction et les instructions relatives aux fonctions de votre
TV.
N Pour plus d'informations sur l'écran du Manuel électronique, reportez-vous à
la section "Consultation du manuel électronique" du Manuel de l'utilisateur.
Autres fonctionnalités
Français
◀ ▶
❑ Utilisation du diagnostic automatique
■ Diagnost. auto.
O MENUm → Assistance → Diagnost. auto. → ENTERE
● Le Diagnost. auto. peut prendre quelques secondes; ce phénomène est
normal.
● Test de l'image: Utilisez cette option pour rechercher d'éventuels problèmes
d'image.
● Test du son: utilisez la mélodie intégrée pour rechercher d’éventuels
problèmes sonores.
N Si les haut-parleurs du téléviseur restent muets, avant d’effectuer le test
du son, vérifiez que l’option Sélection Haut-parleur est réglée sur Hautparleur
TV dans le menu Son.
N La mélodie est diffusée pendant le test, même si l’option Sélection Hautparleur
est réglée sur Haut-parleur ext ou si le son a été désactivé en
appuyant sur le bouton MUTE.
Français
◀ ▶
● Informations de signal (chaînes numériques uniquement): soit la qualité
de réception des chaînes HDTV est parfaite, soit les chaînes ne sont pas
disponibles. Réglez votre antenne afin d’augmenter l’intensité du signal.
● Réinit.: rétablit tous les paramètres par défaut, à l'exception des paramètres
réseau.
N L’écran de saisie du code PIN s’affiche après l’écran de configuration.
N Entrez votre code PIN à quatre chiffres. Modifiez le code PIN à l’aide de
l’option Modifier PIN.
Français
◀ ▶
❑ Mise à jour du logiciel
■ Mise à jour du logiciel
O MENUm → Assistance → Mise à jour du logiciel → ENTERE
Le menu Mise à jour du logiciel vous permet de mettre à niveau le logiciel de
votre téléviseur vers la dernière version.
Version actuelle: il s'agit de la version du logiciel installée sur votre téléviseur.
N Lorsque la mise à niveau du logiciel est terminée, les paramètres vidéo
et audio par défaut sont réinitialisés. Il est conseillé de prendre note des
paramètres afin de pouvoir les rétablir facilement après la mise à niveau.
Français
◀ ▶
● MàJ maintenant
– USB: insérez la clé USB contenant le fichier de mise à niveau du
microprogramme téléchargé sur www.samsung.com dans le téléviseur.
N Veillez à ne pas couper l’alimentation, ni retirer la clé USB tant que
les mises à niveau ne sont pas terminées. Une fois la mise à niveau
du microprogramme terminée, le téléviseur se met automatiquement
hors tension, puis se rallume.
– Canal: met à niveau le logiciel en utilisant le signal de télédiffusion.
N Si la fonction est sélectionnée pendant la période de transmission du
logiciel, ce dernier est automatiquement recherché et téléchargé.
N Le temps nécessaire au téléchargement du logiciel dépend de l’état
du signal.
● Mise à jour auto: une mise à niveau manuelle sera automatiquement
effectuée au moment que vous avez choisi. Etant donné que le courant est
activé de façon interne, l'écran peut s'allumer brièvement pour le produit. Ce
phénomène peut se produire pendant plus d'une heure, jusqu'à ce que la
mise à jour logiciel soit terminée.
Français
◀ ▶
❑ Changement du mode d'utilisation
■ Mode Utilisation
O MENUm → Assistance → Mode Utilisation → ENTERE
Sélectionnez le Mode Utilisation adapté à votre situation. Nous vous
recommandons vivement de sélectionner le mode Util. domicile.
● Util. domicile: le réglage par défaut est Util. domicile.
● Util. magasin: le mode Util. magasin est uniquement prévu pour un usage
en magasin. Si vous sélectionnez Util. magasin, certaines fonctions ne
fonctionneront pas et les paramètres d'image seront redéfinis toutes les 30
minutes.
Français
◀ ▶
❑ Affichage de Contacter Samsung
■ Contacter Samsung
O MENUm → Assistance → Contacter Samsung → ENTERE
Consultez ces informations si le téléviseur ne fonctionne pas correctement ou
si vous voulez mettre à niveau le logiciel. Vous y trouverez des informations
concernant nos centres d’appel, ainsi que le téléchargement de nos produits et
logiciels.
Français
◀ ▶
❑ Utilisation du mode Sport
■
O
Mode Sport
MENUm →
t
Applications → Mode Sport → ENTERE
Ce mode optimise les conditions pour regarder des compétitions sportives.
N Lorsque le mode sport est activé, les modes d'image et de son sont
automatiquement définis sur Stade.
N Si vous éteignez le téléviseur alors que vous regardez le mode Mode Sport,
le Mode Sport sera désactivé.
Français
◀ ▶
❑ Utilisation du système satellite
pour les téléviseurs LED de la série 6170
● Recherche automatique
O MENUm → Diffusion → Recherche automatique → ENTERE
Lorsque la source Antenne est définie sur Satellite
– Type de canal: permet de sélectionner le type de canal à mémoriser.
– Satellite: permet de sélectionner le satellite à rechercher. L'option peut
varier en fonction du pays.
– Mode Recherche: permet de sélectionner un mode de recherche pour le
satellite sélectionné.
– Réinitialiser: permet de sélectionner le mode de balayage du satellite
sélectionné.
N Cette fonction est disponible après connexion à une antenne satellite
et paramétrage des chaînes.
– Mode de rech.: permet de sélectionner le mode de recherche avec les
boutons de navigation.
Français
◀ ▶
● Recherche manuelle
O MENUm → Diffusion → Paramètres chaînes → Recherche manuelle
→ ENTERE
Rechercher satellite
Transpondeur: permet de sélectionner le transpondeur à l'aide des boutons
de navigation.
Mode Recherche: permet de sélectionner les chaînes gratuites ou toutes les
chaînes à enregistrer.
Rech. réseau: permet de sélectionner ou non la recherche réseau.
Qualité du signal: permet d'afficher l'état actuel du signal de diffusion.
N Les informations concernant un satellite et son transpondeur sont
sujettes à des modifications selon les conditions de diffusion.
N Une fois le paramétrage terminé, allez sur Recherche et appuyez sur le
bouton ENTERE. La recherche des chaînes commence.
Français
◀ ▶
● Système satellite
O MENUm → Diffusion → Paramètres chaînes → Système satellite →
ENTERE
L’écran de saisie du code PIN apparaît. Entrez votre code PIN à quatre
chiffres. La fonction Système satellite est disponible lorsque l'option
Antenne est définie sur Satellite. Avant d'exécuter la fonction Recherche
automatique, définissez l'option Système satellite. La recherche des
chaînes est alors exécutée normalement.
● Sélection du satellite: vous pouvez choisir les satellites pour ce
téléviseur.
● Alimentation du LNB: permet d'activer ou de désactiver l'alimentation
du LNB.
Français
◀ ▶
● Réglages LNB: permet de configurer l'équipement extérieur.
N Cette fonction est disponible lorsque l'option Alimentation du LNB
est réglé sur Activé.
Satellite: sélectionnez le satellite pour la réception des émissions
numériques.
Transpondeur: permet de sélectionner un transpondeur dans la liste ou
d'en ajouter un nouveau.
Mode DiSEqC: permet de sélectionner le mode DiSEqC pour le LNB
sélectionné.
Osc. LNB plus bas: permet de régler les oscillateurs LNB sur une
fréquence inférieure.
Osc. LNB plus hauts: permet de régler les oscillateurs LNB sur une
fréquence supérieure.
Tone 22 kHz: permet de sélectionner la tonalité 22kHz en fonction du
type de LNB. Pour un LNB universel, elle doit être sur Auto..
Qualité du signal: permet d'afficher l'état actuel du signal de diffusion.
Français
◀ ▶
● Param. SatCR/Unicable: configurez l'installation à câble unique.
N SatCR désigne le routeur de chaînes satellites.
N Cette fonction n'est pas prise en charge dans tous les pays.
SatCR/Unicable: activez ou désactivez la prise en charge de l'installation
à câble unique.
● Réglages du positionneur: configure le positionneur de l'antenne.
N Cette fonction est disponible lorsque l'option Alimentation du LNB
est réglé sur Activé.
Positionneur: permet d'activer ou de désactiver le contrôle du
positionneur.
Type de posit.: permet de régler le type de positionneur entre DiSEqC 1.2
et USALS (Universal Satellite Automatic Location System).
– Longitude: définissez la longitude de votre emplacement.
– Latitude: définissez la latitude de votre emplacement.
– Réglages longitude satellite: définissez la longitude des satellites
définis par l'utilisateur.
Français
◀ ▶
Mode Utilisateur: permet de définir la position de l'antenne satellite en
fonction de chaque satellite. Si vous mémorisez la position actuelle de
l'antenne satellite en fonction d'un satellite donné, lorsque le signal de
ce satellite est requis, l'antenne satellite peut se placer dans la position
prédéfinie.
– Satellite: permet de sélectionner le satellite pour lequel la position
doit être définie.
– Transpondeur: sélectionnez un transpondeur dans la liste pour la
réception du signal.
– Mode Déplacement: permet de choisir entre le mode de
déplacement individuel ou continu.
– Taille des pas: permet de régler les degrés de la taille des pas pour
la rotation de l'antenne. Cette fonction est disponible lorsque l'option
Mode Déplacement est réglé sur Pas.
Français
◀ ▶
– Aller à une pos. enregistrée: permet de faire pivoter l'antenne
jusqu'à la position de satellite mémorisée.
– Position de l'antenne: ajuste et mémorise la position de l'antenne
pour le satellite sélectionné.
– Mémoriser la position actuelle: mémorise la position actuelle
comme limite du positionneur sélectionné.
– Qualité du signal: permet d'afficher l'état actuel du signal de
diffusion.
Français
◀ ▶
Mode Installateur: permet de définir les limites de l'étendue du
mouvement de l'antenne satellite ou de réinitialiser sa position. En règle
générale, le guide d'installation utilise cette fonction.
– Position limite: permet de sélectionner la direction de la limite du
positionneur.
– Position de l'antenne: ajuste et mémorise la position de l'antenne
pour le satellite sélectionné.
– Mémoriser la position actuelle: mémorise la position actuelle
comme limite du positionneur sélectionnée.
– Réinitialiser la position: déplacez l'antenne jusqu'à la position de
référence.
– Redéfinir limite positionneur: autorisez l'antenne à effectuer un arc
complet.
● Réinit. tous les paramètres: toutes les valeurs initiales des paramètres
du satellite seront réinitialisées.
Français
◀ ▶
❑ Utilisation du réseau sans fil
pour les téléviseurs plasma de la série 4900
Vous pouvez connecter votre téléviseur au réseau sans fil à l'aide d'un routeur IP
sans fil (ou d'un modem).
N Pour connaître en détail les paramètres pour une connexion à un réseau sans
fil, reportez-vous au manuel utilisateur.
N REMARQUE
● Pour utiliser un réseau sans fil, vous devez connecter le téléviseur à
un routeur IP sans fil (un routeur ou un modem). Si ce routeur prend
en charge le protocole DHCP, le téléviseur peut utiliser DHCP ou une
adresse IP statique pour se connecter au réseau sans fil.
● Sélectionnez un canal inutilisé pour le routeur IP sans fil. Si le canal affecté
au routeur IP sans fil est actuellement utilisé par un autre périphérique
dans le voisinage, il y aura des interférences et la communication peut
échouer
Français
◀ ▶
● Changez les paramètres de sécurité du routeur sans fil pour les définir
sur AES. Les paramètres de sécurité WEP ne prennent pas en charge la
connexion WPS.
● Si le mode HIGH PURE THROUGHPUT (Greenfield) 802.11n est
sélectionné et que le type de cryptage est défini sur WEP pour votre
routeur sans fil, les téléviseurs Samsung ne prendront pas en charge la
connexion, conformément aux nouvelles spécifications de certification
Wi-Fi.
● Si votre routeur sans fil prend en charge le WPS (Wi-Fi Protected
Setup), vous pouvez vous connecter au réseau via PBC (Push Button
Configuration) ou à l'aide d'un code PIN (Personal Indentification
Number). La fonction WPS configurera automatiquement le SSID et la clé
WPA dans ces deux modes.
Français
◀ ▶
● Si votre routeur, modem ou appareil n'est pas certifié, il risque de ne pas
pouvoir se connecter au téléviseur via l'adaptateur LAN sans fil Samsung.
● Méthodes de connexion: Vous pouvez configurer la connexion réseau
sans fil de la manière indiquée ci-dessous.
– Auto. (Utilisation de la fonction Auto Network Search)
– Manuel
– WPS(PBC)
– Wi-Fi Direct
Français
◀ ▶
● Veillez à ce que le téléviseur soit éteint avant de connecter l’adaptateur
LAN sans fil Samsung.
● L'adaptateur LAN sans fil Samsung peut ne pas être reconnu si vous
utilisez une connexion par hub USB ou par câble d'extension USB autre
que le câble fourni.
● Vous devez employer l'adaptateur LAN sans fil Samsung (WIS12ABGNX,
WIS09ABGNX) pour utiliser un réseau sans fil. L’adaptateur LAN sans fil
Samsung et le câble d’extension USB sont vendus séparément, et sont
disponibles auprès de certains revendeurs et sur les sites de commerce
électronique.
Français
◀ ▶
Connexion de l'adaptateur LAN sans fil Samsung
1 Connexion à l'aide de l'adaptateur USB à angle droit.
2 Connexion via un câble d'extension
1 2
N L'image peut apparaître altérée ou statique pour certaines chaînes lorsque
le téléviseur est connecté à l'adaptateur LAN sans fil Samsung. Le cas
échéant, branchez l'adaptateur LAN sans fil Samsung avec un câble USB à
un emplacement préservé de toute interférence radio.
N L'emplacement du port peut varier en fonction du modèle.
Français
◀ ▶
■ État du réseau
O MENUm → Réseau → État du réseau → ENTERE
Vérifiez l'état Internet et du réseau.
■ Paramètres réseau
O MENUm → Réseau → Paramètres réseau → ENTERE
Définissez la connexion réseau pour utiliser AllShare™.
N L'Internet ne peut être utilisé pour autre chose que le partage de contenu via
AllShare™.
Français
◀ ▶
■ Configuration automatique du réseau
La plupart des réseaux sans fil disposent d'un système de sécurité en option
nécessitant l'accès de périphériques au réseau pour transmettre un code de
sécurité crypté appelé clé d'accès ou de sécurité. Le code de sécurité repose
sur une phrase secrète, qui correspond généralement à un mot ou une série
de lettres et de chiffres d'une longueur définie, que vous devez saisir lors de la
configuration de la sécurité sans fil au niveau de votre réseau sans fil. Si vous
optez pour cette méthode de configuration pour la connexion réseau et que vous
disposez d'un code de sécurité pour votre réseau sans fil, vous devrez entrer la
phrase secrète lors de la procédure de configuration.
N Lors de la connexion d'un adaptateur LAN sans fil Samsung, la fenêtre
contextuelle s'affiche automatiquement pour vous permettre de configurer le
réseau sans fil.
Français
◀ ▶
1. Accédez à l'écran Paramètres réseau.
(Réseau → Paramètres réseau)
2. La fonction Réseau recherche les réseaux sans fil disponibles. Lorsque vous
avez terminé, la liste des réseaux disponibles s'affiche.
3. Dans la liste des réseaux, appuyez sur le bouton ▲ ou ▼ pour sélectionner
un réseau, puis sur le bouton ENTERE.
N Si le routeur sans fil est caché (Invisible), vous devez sélectionner l'option
Ajouter réseau, et entrer le nom de réseau et le code de sécurité
corrects pour établir la connexion.
4. Si la fenêtre contextuelle Sécurité s'affiche, passez à l'étape 6. Si le routeur
sans fil n'est pas doté d'une fonction de sécurité sans fil, allez à l'étape 7.
Français
◀ ▶
5. Entrez la clé de sécurité à l'aide des boutons ▲/▼/◄/►, puis sélectionnez
Terminé.
N Vous pouvez également entrer des numéros en appuyant sur les touches
numériques.
N Vous devriez retrouver la phrase secrète dans l'un des écrans de
configuration utilisés pour la configuration de votre routeur ou modem.
6. L'écran de connexion réseau s'affiche et la configuration du réseau est
effectuée.
N Si la définition du code de sécurité (Sécurité ou PIN) échoue, sélectionnez
Réessayer ou Param. IP.
N Si vous souhaitez définir manuellement la connexion, sélectionnez l'option
Param. IP. Reportez-vous à la section "Procédure de configuration
manuelle" ci-après.
N Si vous sélectionnez Modifier réseau, vous pouvez sélectionner d'autres
réseaux sans fil.
Français
◀ ▶
Configuration à l'aide de la méthode WPS(PBC)
Si votre routeur est pourvu d'un bouton WPS(PBC), procédez comme suit :
1. La fonction Réseau recherche les réseaux sans fil disponibles. Lorsque vous
avez terminé, la liste des réseaux disponibles s'affiche.
2. Sélectionnez l'option WPS(PBC).
3. Appuyez sur le bouton WPS(PBC) de votre routeur dans les deux minutes.
Votre téléviseur récupère automatiquement tous les paramètres réseau dont il
a besoin et se connecte à votre réseau.
4. L'écran de connexion réseau s'affiche et la configuration du réseau est
effectuée.
Français
◀ ▶
■ Configuration manuelle du réseau
Utilisez l'option de configuration manuelle du réseau lors de la connexion du
téléviseur à un réseau qui nécessite une adresse IP statique.
N Les paramètres de connexion réseau se trouvent dans le panneau de
configuration des ordinateurs Windows.
Procédure de configuration manuelle
Pour configurer automatiquement la connexion réseau par câble de votre
téléviseur, procédez comme suit :
1. Sélectionnez Param. IP dans l'écran de test du réseau.
N En cas d'échec de la connexion automatique au réseau, vous pouvez
sélectionner l'option Param. IP.
2. Définissez l'option Config. IP sur Entrer manuellement.
3. Passez d'un champ à l'autre à l'aide des boutons ▲/▼/◄/►. Entrez les
paramètres de connexion réseau, puis sélectionnez OK.
4. L'écran de connexion réseau s'affiche et la configuration du réseau est
effectuée.
Français
◀ ▶
Echec au niveau de la liste de contrôle pour la connexion réseau sans fil
Lorsque la connexion réseau sans fil échoue, essayez d'appliquer les informations
suivantes à chaque problème.
Problèmes Solutions et explications
La connexion au réseau
sans fil a échoué.
• Aucun routeur sans fil sélectionné. Allez dans Paramètres réseau pour
sélectionner votre routeur.
• L'adaptateur LAN sans fil Samsung est nécessaire pour utiliser un
réseau sans fil.
• Assurez-vous que le téléviseur est connecté à un routeur IP sans fil.
Echec de la définition
automatique de
l'adresse IP.
• Tentez l'opération suivante pour définir automatiquement votre adresse
IP ou définissez-la manuellement en sélectionnant Param. IP.
• Assurez-vous que le serveur DHCP est activé sur le routeur, puis
débranchez et rebranchez le routeur.
• Vérifiez si vous devez entrer un code de sécurité pour utiliser le routeur.
• Contactez votre fournisseur d'accès Internet pour plus d'informations.
Français
◀ ▶
Problèmes Solutions et explications
Connexion au routeur
sans fil impossible.
• Vérifiez que le routeur est sous tension ; le cas échéant, essayez de
l'éteindre, puis de le rallumer.
• Vérifiez si vous devez entrer un code de sécurité pour utiliser le
routeur.
Connexion au réseau
impossible.
• Vérifiez si votre adresse IP est définie correctement dans Param. IP.
• Vérifiez si vous devez entrer un code de sécurité pour utiliser le
routeur.
• Contactez votre fournisseur d'accès Internet pour plus
d'informations.
Connexion à votre
réseau local établie, mais
connexion à Internet
impossible.
• Vérifiez que votre câble LAN est connecté correctement au port LAN
du routeur.
• Vérifiez les paramètres DNS dans Param. IP.
• Si le problème persiste, contactez votre fournisseur d'accès Internet
pour pouvoir accéder à Internet.
Configuration du réseau
terminée, mais connexion
à Internet impossible.
• Vérifiez que votre routeur est connecté à Internet.
• Si le problème persiste, contactez votre fournisseur d'accès Internet
pour pouvoir accéder à Internet.
Français
◀ ▶
❑ Utilisation du réseau câblé
Royaume-Uni uniquement
■ Connexion réseau câblée
Vous pouvez connecter votre téléviseur au réseau local avec un câble de trois
manières différentes:
● Connexion du port LAN du téléviseur à un modem externe
● Connexion du port LAN du téléviseur à un routeur IP connecté à un modem
externe
● Connexion directe du port LAN du téléviseur à une prise réseau murale
N Pour ce type d'utilisation, la prise murale est reliée à un modem ou un
routeur installé quelque part chez vous.
N Pour connaître en détail les paramètres pour une connexion à un réseau
câblé, reportez-vous au manuel utilisateur.
Français
◀ ▶
● Si votre réseau requiert une adresse IP dynamique, vous devez utiliser
un routeur ou un modem ADSL prenant en charge le protocole DHCP
(Dynamic Host Configuration Protocol). Les modems de ce type fournissent
automatiquement l'adresse IP, le masque de sous-réseau, la passerelle et les
valeurs DNS dont votre téléviseur a besoin pour accéder à Internet. Aucune
saisie manuelle n'est donc requise. La plupart des réseaux domestiques
utilisent une adresse IP dynamique. Certains réseaux nécessitent une adresse
IP statique. Si tel est votre cas, vous devez saisir manuellement l'adresse
IP, le masque de sous-réseau, la passerelle et les valeurs DNS dans l'écran
de configuration câblée de votre téléviseur lors de la configuration de la
connexion réseau. Pour obtenir l'adresse IP, le masque de sous-réseau, la
passerelle et les valeurs DNS, contactez votre fournisseur d'accès Internet. Si
vous possédez un ordinateur Windows, vous pouvez également obtenir ces
valeurs par le biais de ce dernier.
N Si votre réseau nécessite une adresse IP statique, vous pouvez utiliser un
modem ADSL prenant en charge le protocole DHCP. Les modems ADSL
prenant en charge le protocole vous permettent également d'utiliser des
adresses IP statiques.
Français
◀ ▶
■ Configuration du réseau
Utilisez l'option de configuration automatique du réseau lors de la connexion du
téléviseur à un réseau prenant en charge le protocole DHCP. Pour configurer
automatiquement la connexion réseau par câble de votre téléviseur, procédez
comme suit:
1. Accédez à l'écran État du réseau.
(Réseau → État du réseau)
2. Vous pouvez vérifiez l'état de connexion sur l'écran.
N Si la configuration automatique échoue, vérifiez la connexion du port LAN.
Français
◀ ▶
N Si les valeurs de connexion réseau sont introuvables ou si vous souhaitez
définir la connexion manuellement :
1. Sélectionnez le Param. IP dans l'écran État du réseau.
N En cas d'échec de la connexion automatique au réseau, vous
pouvez sélectionner l'option Param. IP.
2. Définissez l'option Config. IP sur Entrer manuellement.
3. Passez d'un champ à l'autre à l'aide des boutons ▲/▼/◄/►. Entrez les
paramètres de connexion réseau, puis sélectionnez OK.
4. L'écran de connexion réseau s'affiche et la configuration du réseau est
effectuée.
Français
◀ ▶
Liste de contrôle relative à l'échec de la connexion réseau câblée
Lorsque la connexion réseau câblée échoue, essayez d'appliquer les informations
suivantes à chaque problème.
Problèmes Solutions et explications
Aucun câble détecté. • Vérifiez que votre câble réseau est branché.
• Si tel est le cas, assurez-vous que le routeur est sous tension ; le cas
échéant, essayez de l'éteindre, puis de le rallumer.
Echec de la définition
automatique de
l'adresse IP.
Tentez l'opération suivante pour définir automatiquement votre adresse IP
ou définissez-la manuellement en sélectionnant Param. IP.
• Assurez-vous que le serveur DHCP est activé sur le routeur, puis
débranchez et rebranchez le routeur.
• Contactez votre fournisseur d'accès Internet pour plus d'informations.
Français
◀ ▶
Problèmes Solutions et explications
Connexion au réseau
impossible.
• Vérifiez si votre adresse IP est définie correctement dans Param. IP.
• Contactez votre fournisseur d'accès Internet pour plus
d'informations.
Connexion à votre
réseau local établie, mais
connexion à Internet
impossible.
• Vérifiez que votre câble LAN est connecté correctement au port LAN
du routeur.
• Vérifiez les paramètres DNS dans Param. IP.
• Si le problème persiste, contactez votre fournisseur d'accès Internet
pour pouvoir accéder à Internet.
Configuration du réseau
terminée, mais connexion
à Internet impossible.
• Vérifiez que votre routeur est connecté à Internet.
• Si le problème persiste, contactez votre fournisseur d'accès Internet
pour pouvoir accéder à Internet.
Français
◀ ▶
Si le téléviseur ne parvient pas à se connecter à Internet
Il se peut que votre téléviseur ne parvienne pas à se connecter à Internet du fait que
votre fournisseur d'accès a enregistré de manière permanente l'adresse MAC (numéro
d'identification unique) de votre PC ou modem, qui est authentifiée à chaque connexion à
Internet afin d'éviter tout accès non autorisé. Dans la mesure où votre téléviseur possède
une adresse MAC différente, votre fournisseur d'accès Internet ne peut pas l'authentifier,
ce qui rend impossible toute connexion.
Pour remédier à ce problème, demandez à votre fournisseur d’accès la procédure à
suivre pour connecter des appareils autres que votre PC (votre téléviseur, par exemple) à
Internet.
Si votre fournisseur d'accès exige un identifiant (ID) ou un mot de passe pour la
connexion à Internet, votre téléviseur ne pourra peut-être pas se connecter à Internet.
Si tel est le cas, vous devez entrer l'identifiant ou le mot de passe lors de la connexion à
Internet.
La connexion à Internet peut échouer à cause d’un problème de pare-feu. Dans ce cas,
contactez votre fournisseur d'accès Internet.
Si vous ne parvenez toujours pas à vous connecter à Internet après avoir suivi les
procédures indiquées par votre fournisseur d'accès, contactez Samsung Electronics.
Français
◀ ▶
❑ Gestion des périphériques connectés au réseau
pour les téléviseurs plasma de la série 4900
■ Wi-Fi Direct
O MENUm → Réseau → Wi-Fi Direct → ENTERE
Utilisez cette option pour connecter le téléviseur à des périphériques mobiles
sans fil. A l'aide de cette fonction, vous pouvez connecter directement des
périphériques mobiles sans fil à votre téléviseur sans passer par un routeur san fil.
N Vous pouvez utiliser cette fonction lors de la connexion de l'adaptateur LAN
sans fil Samsung.
N Ne prend en charge que la fonction Media Play.
N Cette fonction peut ne pas être prise en charge, en fonction du périphérique
mobile.
Français
◀ ▶
Comment connecter votre périphérique à votre téléviseur à l'aide de la
fonction Wi-Fi Direct
N Pour utiliser cette fonction, vous devez activer la fonction Wi-Fi Direct de
votre périphérique.
1. Accédez à l'écran Wi-Fi Direct. Le téléviseur lance une recherche de
périphériques.
(Réseau → Wi-Fi Direct)
2. Sélectionnez le périphérique souhaité, puis appuyez sur le bouton ENTERE.
3. Lorsque le message de connexion s'affiche sur votre périphérique, autorisezla.
Votre téléviseur récupère automatiquement tous les paramètres réseau
dont il a besoin et se connecte à votre réseau.
N Pour déconnecter le périphérique, sélectionnez-le, puis appuyez sur le
bouton ENTERE afin de sélectionner Déconnexion.
Français
◀ ▶
■ Paramètres AllShare
O MENUm → Réseau → Paramètres AllShare → ENTERE
Indique si un périphérique connecté au réseau, tel qu'un smartphone ou une
tablette, doit être autorisé ou non à partager du contenu ou à commander le
téléviseur à l'aide d'une application téléchargée. Pour en savoir plus, reportezvous
au chapitre "Utilisation de la fonction AllShare Settings (Paramètres
AllShare)".
■ Nom du périph.
O MENUm → Réseau → Nom du périph. → ENTERE
Changez le nom du téléviseur.
N Vous pouvez saisir manuellement un nom pour votre téléviseur en
sélectionnant Entrée util.. Utilisez les boutons ▲/▼/◄/► pour sélectionner
des caractères, puis sélectionnez Terminé.
Français
◀ ▶
❑ Utilisation des fonctions DLNA
pour les téléviseurs plasma de la série 4900
N Ce modèle prend uniquement en charge les fonctions DLNA dans AllShare™.
Vous pouvez lire du contenu multimédia (photos, vidéos et musique) enregistré
sur votre téléphone portable ou d'autres appareils (un PC, par exemple) en le
contrôlant sur le téléviseur via le réseau.
N Commencez par configurer votre réseau. Pour plus d'informations sur
l'utilisation de la fonction Configuration du réseau, reportez-vous à la section
"Paramètres réseau".
N Pour plus d’informations, rendez-vous sur "www.samsung.com" ou
contactez le centre d’appel Samsung. Il peut s’avérer nécessaire d’installer
des logiciels supplémentaires sur l’appareil mobile. Pour plus d’informations à
ce sujet, reportez-vous au mode d’emploi qui accompagne l’appareil mobile.
N Si votre téléviseur Samsung est connecté à un serveur DLNA d'une autre
marque, une erreur de compatibilité peut survenir lors de la lecture de vidéos.
Français
◀ ▶
N La connexion de votre téléviseur Samsung à un réseau via AllShare™ vous
permet d'utiliser les fonctions originales de Samsung suivantes :
– Lecture de différents formats vidéo (DivX, MP4, 3GPP, AVI, ASF, MKV,
etc.)
– Fonction de signet (pour la reprise de la lecture d'une vidéo)
– Chapitrage automatique (navigation entre les scènes)
– Gestion de contenu numérique
– Compatibilité avec différents formats de sous-titres (SRT, SMI, SUB,
TXT, TTXT)
– Et plus encore
N Pour utiliser toutes les fonctions DLNA originales de Samsung, il est
recommandé d'utiliser le logiciel AllShare™ fourni avec votre téléviseur.
Français
◀ ▶
Lecture du contenu multimédia enregistré sur les périphériques
1. Connectez le téléphone mobile ou d'autres périphériques prenant en
charge la fonction AllShare™, puis lisez le contenu multimédia de chaque
périphérique. L'écran contextuel s'affiche au bas du téléviseur.
2. Sélectionnez Autor. pour accepter les périphériques connectés. La lecture du
contenu multimédia des périphériques peut être en cours sur votre téléviseur.
N Les périphériques autorisés sont indiqués dans le Paramètres AllShare.
Français
◀ ▶
Utilisez la fonction Media Play pour lire le contenu multimédia des périphériques
connectés à la fonction DLNA.
1. Appuyez sur le bouton MEDIA.P pour sélectionner Media Play.
2. Appuyez sur le bouton ▲/▼ afin de sélectionner le menu de votre choix
(Vidéos, Photos, Musique), puis appuyez sur le bouton ENTERE.
3. Une fois le périphérique DLNA sélectionné, appuyez à nouveau sur le bouton
ENTERE.
4. Appuyez sur le bouton ▲/▼/◄/► pour sélectionner le fichier de votre choix.
5. Appuyez sur le bouton ENTERE.
Français
◀ ▶
N REMARQUE
● En fonction de sa résolution et de son format, il se peut que le contenu
ne soit pas lu sur le téléviseur.
● se peut que les boutons ENTERE et ◄/► ne fonctionnent pas avec
certains types de contenu multimédia.
● Il est possible de contrôler la lecture à l'aide de l'appareil mobile. Pour
plus d'informations, reportez-vous au mode d'emploi de l'appareil
concerné.
Français
◀ ▶
Utilisation de la fonction Paramètres AllShare
O MENUm → Réseau → Paramètres AllShare → Partage de contenu →
ENTERE
Affiche la liste des téléphones portables ou appareils connectés qui ont été
configurés avec ce téléviseur en vue d'utiliser la fonction Paramètres AllShare.
N La fonction Paramètres AllShare est disponible sur tous les périphériques
prenant en charge la fonction DLNA DMC.
● Autor. / Refuser: autorise/bloque les appareils.
● Supprimer: supprime les appareils de la liste.
N Cette fonction efface uniquement de la liste le nom des appareils. Si
l'appareil effacé s'allume ou tente de se reconnecter au téléviseur, il est
possible qu'il s'affiche à nouveau.
Français
◀ ▶
Connexion à l'ordinateur par le biais du réseau
Vous pouvez lire les images, la musique et les vidéos enregistrées sur votre
ordinateur à l'aide d'une connexion réseau en mode Media Play sur votre
téléviseur.
N Si vous souhaitez utiliser la fonction Media Play pour lire sur votre téléviseur
des fichiers enregistrés sur votre PC, vous devez télécharger "AllShare PC
Software" et le manuel utilisateur sur le site Web "www.samsung.com".
1. Pour plus d'informations sur la configuration de votre réseau, reportez-vous
au chapitre "Paramètres réseau".
– Nous recommandons de placer le téléviseur et l'ordinateur sur le même
sous-réseau. Les 3 premières parties de l’adresse IP du téléviseur et de
l’ordinateur doivent être les mêmes. Seule la dernière partie (adresse de
l’hôte) doit être modifiée. (par exemple, Adresse IP : 123.456.789.**)
Français
◀ ▶
2. Connectez le PC sur lequel vous voulez installer ou avez installé le logiciel
AllShare PC et votre téléviseur au même réseau.
N Fonctions non prises en charge lors de la connexion à un ordinateur via un
réseau:
● Fond musical d'un diaporama.
● Le bouton π (Retour arrière) ou µ (Avance rapide) pendant la lecture
d'un film.
N Les sous-titres intégrés multi-audio DivX DRM ne sont pas pris en charge.
N AllShare PC Software doit être autorisé par le pare-feu de l'ordinateur.
Français
◀
N Lors de l'utilisation du mode Media Play sur une connexion réseau, selon les
fonctions du serveur fourni :
● La méthode de tri peut varier.
● Il se peut que le bouton π (Retour arrière), µ (Avance rapide) ou ∑
(Pause) ne fonctionne pas suivant les informations de contenu.
N Lors de la lecture de la vidéo via le réseau, il se peut que celle-ci échoue
en fonction de l'état du réseau. Si vous lisez une vidéo sur une connexion
réseau, des saccades risquent d’apparaître.
Français
BASIC
User’s Guide
BASIC
User’s Guide
This guide provides information concerning the installation, basic operation
and troubleshooting on windows.
ADVANCED
This guide provides information about the installation, advanced configuration, operation
and troubleshooting on various OS environments.
Some features may not be available depending on models or countries.
2
BASIC
1. Introduction
Key benefits 5
Features by models 7
Useful to know 12
About this user’s guide 13
Safety information 14
Machine overview 19
Control panel overview 23
Turning on the machine 27
Installing the driver locally 28
Reinstalling the driver 29
2. Menu Overview and Basic Setup
Menu overview 31
Machine’s basic settings 36
Media and tray 38
Basic printing 50
Basic copying 56
Basic scanning 61
Basic faxing 62
3. Maintenance
Ordering supplies and accessories 67
Available supplies 68
Storing the toner cartridge 69
Redistributing toner 71
Replacing the toner cartridge 73
Monitoring the supplies life 75
Setting the toner low alert 76
Cleaning the machine 77
Tips for moving & storing your machine 83
4. Troubleshooting
Tips for avoiding paper jams 85
Clearing original document jams 86
Clearing paper jams 91
Understanding the status LED 95
Understanding display messages 98
3
BASIC
5. Appendix
Specifications 104
Regulatory information 113
Copyright 126
1. Introduction
This chapter provides information you need to know before using the machine.
• Key benefits 5
• Features by models 7
• Useful to know 12
• About this user’s guide 13
• Safety information 14
• Machine overview 19
• Control panel overview 23
• Turning on the machine 27
• Installing the driver locally 28
• Reinstalling the driver 29
Key benefits
Environmentally friendly
• To save toner and paper, this machine supports Eco feature (see "Eco
printing" on page 54).
• To save paper, you can print multiple pages on one single sheet of paper
(see "Using advanced print features" on page 204).
• To save paper, you can print on both sides of the paper (double-sided
printing) (Manual) (see "Using advanced print features" on page 204).
• To save electricity, this machine automatically conserves electricity by
substantially reducing power consumption when not in use.
• We recommend using recycled paper for saving energy.
Fast high resolution printing
• You can print with a resolution of up to 1,200 x 1,200 dpi effective output.
• Fast, on-demand printing.
- M207x series
▪ For single-side printing, 20 ppm (A4) or 21 ppm (Letter).
- M2074 series
▪ For single-side printing, 18 ppm (A4) or 19 ppm (Letter).
Convenience
• Easy Capture Manager allows you to easily edit and print whatever you
captured using the Print Screen key on the keyboard (see "Easy Capture
Manager" on page 237).
• Samsung Easy Document Creator is an application to help users scan,
compile, and save documents in multiple formats, including .epub format.
These documents can be shared via social networking sites or fax (see"Using
Samsung Easy Document Creator" on page 243)
Key benefits
• AnyWeb Print helps you screen-capture, preview, scrap, and print the
screen of Windows Internet Explorer more easily, than when you use the
ordinary program (see "Samsung AnyWeb Print" on page 238).
• Smart Update allows you to check for the latest software and install the
latest version during the printer driver installation process. This is available
only for Windows.
• If you have Internet access, you can get help, support application, machine
drivers, manuals, and order information from the Samsung website,
www.samsung.com > find your product > Support or Downloads.
Wide range of functionality and application support
• Supports various paper sizes (see "Print media specifications" on page 106).
• Print watermark: You can customize your documents with words, such as
“Confidential” (see "Using advanced print features" on page 204).
• Print posters: The text and pictures of each page of your document are
magnified and printed across the multiple sheets of paper and can then be
taped together to form a poster (see "Using advanced print features" on
page 204).
• You can print in various operating systems (see "System requirements" on
page 109).
• Your machine is equipped with a USB interface and/or a network interface.
AirPrint
• AirPrint allows you to wirelessly print directly from iPhone, iPad and iPod
touch running iOS 4.2 or later.
Supports various wireless network setting method
• Using the WPS (Wi-Fi Protected Setup™) button
- You can easily connect to a wireless network using the WPS button on
the machine and the access point (a wireless router).
• Using the USB cable or a network cable
- You can connect and set various wireless network settings using a USB
cable or a network cable.
• Using the Wi-Fi Direct
- You can conveniently print from your mobile device using the Wi-Fi or
Wi-Fi Direct feature.
See "Introducing wireless set up methods" on page 149.
Features by models
Some features and optional goods may not be available depending on model or country.
Operating System
(●: Included, Blank: Not available)
Software
Operating System
M207x series
M207xW series
M207xF series
M207xFW series
M207xFH series
M207xHW series
Windows ● ●
Mac ● ●
Linux ● ●
Software M207x series
M207xW series
M207xF series
M207xFW series
M207xFH series
M207xHW series
SPL printer driver ● ●
PCL printer driver
PS printer driver
Features by models
(●: Included, Blank: Not available)
XPS printer drivera ● ●
Direct Printing Utility
Samsung Easy Printer Manager Scan to PC settings ● ●
Fax to PC settings ●
Device Settings ● ●
Samsung Easy Document Creator ● ●
Samsung Printer Status ● ●
AnyWeb Print ● ●
SyncThru™ Web Service ●
(M207xW series only)
●
(M207xFW series only)
SyncThru Admin Web Service ●
(M207xW series only)
●
(M207xFW series only)
Easy Eco Driver ● ●
Fax Samsung Network PC Fax ●
a. For XPS driver, it is only supported for Windows through the Samsung http://www.samsung.com
Software M207x series
M207xW series
M207xF series
M207xFW series
M207xFH series
M207xHW series
Features by models
Variety feature
Features
M207x series
M207xW series
M207xF series
M207xFW series
M207xFH series
M207xHW series
Hi-Speed USB 2.0 ● ●
Network Interface Ethernet 10/100 Base TX wired LAN ●
(M207xFW series /M207xHW series only)
Network Interface 802.11b/g/n wireless LANa ●
(M207xW series only)
●
(M207xFW series /M207xHW series only)
NFC printing/scanning ●
(M207xW series only)
●
(M207xFW series /M207xHW series only)
Eco printing (Control panel) ● ●
Duplex (2-sided) printing (Manual)b ● ●
USB memory interface
Memory module
Mass Storage Device (HDD)
Duplex Automatic Document Feeder (DADF)
Automatic Document Feeder (ADF) ●
Features by models
Fax Multi-send ●
Delay send ●
Priority send ●
Duplex send
Secure receive ●
Duplex print
Send/ Receive forward - fax ●
Send/ Receive forward - email
Send/ Receive forward - server
Scan Scanning to email
Scanning to SMB server
Scanning to FTP server
Duplex scan
Scan to PC ● ●
Scan to WSD ●
(M207xW series only)
●
(M207xFW series only)
Features
M207x series
M207xW series
M207xF series
M207xFW series
M207xFH series
M207xHW series
Features by models
(●: Included, Blank: Not available)
Copy ID card copying ● ●
Reduced or enlarged copying ● ●
Collation ● ●
Poster
Clone
Book
2-up/4-up ● ●
Adjust background ● ●
Margin shift
Edge erase
Gray enhance
Duplex copy
a. Depending on your country, wireless LAN card may not be available. For some counties, only 802.11 b/g can be applied. Contact your local Samsung dealer or the retailer where you
bought your machine.
b. Windows only.
Features
M207x series
M207xW series
M207xF series
M207xFW series
M207xFH series
M207xHW series
Useful to know
The machine does not print.
• Open the print queue list and remove the document from the
list (see "Canceling a print job" on page 51).
• Remove the driver and install it again (see "Installing the driver
locally" on page 28).
• Select your machine as your default machine in your Windows
(see "Setting your machine as a default machine" on page 203).
Where can I purchase accessories or supplies?
• Inquire at a Samsung distributor or your retailer.
• Visit www.samsung.com/supplies. Select your country/region
to view product service information.
The status LED flashes or remains constantly on.
• Turn the product off and on again.
• Check the meanings of LED indications in this manual and
troubleshoot accordingly (see "Understanding the status LED"
on page 95).
A paper jam has occurred.
• Open and close the scan unit (see "Front view" on page 20).
• Check the instructions on removing jammed paper in this
manual and troubleshoot accordingly (see "Clearing paper
jams" on page 91).
Printouts are blurry.
• The toner level might be low or uneven. Shake the toner
cartridge (see "Redistributing toner" on page 71).
• Try a different print resolution setting (see "Opening printing
preferences" on page 52).
• Replace the toner cartridge (see "Toner cartridge" on page 73).
Where can I download the machine’s driver?
• You can get help, support application, machine drivers,
manuals, and order information from the Samsung website,
www.samsung.com > find your product > Support or
Downloads.
1. Introduction 13
About this user’s guide
This user's guide provides information for your basic understanding of the
machine as well as detailed steps to explain machine usage.
• Read the safety information before using the machine.
• If you have a problem using the machine, refer to the troubleshooting
chapter.
• Terms used in this user’s guide are explained in the glossary chapter.
• All illustrations in this user’s guide may differ from your machine depending
on its options or model you purchased.
• The screenshots in this administrator’s guide may differ from your machine
depending on the machine’s firmware/driver version.
• The procedures in this user’s guide are mainly based on Windows 7.
1
Conventions
Some terms in this guide are used interchangeably, as below:
• Document is synonymous with original.
• Paper is synonymous with media, or print media.
• Machine refers to printer or MFP.
2
General icons
Icon Text Description
Caution
Gives users information to protect the machine from
possible mechanical damage or malfunction.
Note
Provides additional information or detailed
specification of the machine function and feature.
1. Introduction 14
Safety information
These warnings and precautions are included to prevent injury to you and
others, and to prevent any potential damage to your machine. Be sure to read
and understand all of these instructions before using the machine. After reading
this section, keep it in a safe place for future reference.
3
Important safety symbols
Explanation of all icons and signs used in this chapter
4
Operating environment
Warning
Warning Hazards or unsafe practices that may result in severe
personal injury or death.
Caution Hazards or unsafe practices that may result in minor
personal injury or property damage.
Do not attempt.
Do not use if the power cord is damaged or if the electrical outlet is
not grounded.
This could result in electric shock or fire.
Do not place anything on top of the machine (water, small metal or
heavy objects, candles, lit cigarettes, etc.).
This could result in electric shock or fire.
• If the machine gets overheated, it releases smoke, makes
strange noises, or generates an odd odor, immediately turn off
the power switch and unplug the machine.
• The user should be able to access the power outlet in case of
emergencies that might require the user to pull the plug out.
This could result in electric shock or fire.
Do not bend, or place heavy objects on the power cord.
Stepping on or allowing the power cord to be crushed by a heavy
object could result in electric shock or fire.
Do not remove the plug by pulling on the cord; do not handle the
plug with wet hands.
This could result in electric shock or fire.
Safety information
1. Introduction 15
Caution
5
Operating method
Caution
During an electrical storm or for a period of non-operation,
remove the power plug from the electrical outlet.
This could result in electric shock or fire.
Be careful, the paper output area is hot.
Burns could occur.
If the machine has been dropped, or if the cabinet appears
damaged, unplug the machine from all interface connections and
request assistance from qualified service personnel.
Otherwise, this could result in electric shock or fire.
If the machine does not operate properly after these instructions
have been followed, unplug the machine from all interface
connections and request assistance from qualified service
personnel.
Otherwise, this could result in electric shock or fire.
If the plug does not easily enter the electrical outlet, do not
attempt to force it in.
Call an electrician to change the electrical outlet, or this could
result in electric shock.
Do not allow pets to chew on the AC power, telephone or PC
interface cords.
This could result in electric shock or fire and/or injury to your pet.
Do not forcefully pull the paper out during printing.
It can cause damage to the machine.
Be careful not to put your hand between the machine and paper
tray.
You may get injured.
Be care when replacing paper or removing jammed paper.
New paper has sharp edges and can cause painful cuts.
When printing large quantities, the bottom part of the paper
output area may get hot. Do not allow children to touch.
Burns can occur.
When removing jammed paper, do not use tweezers or sharp metal
objects.
It can damage the machine.
Do not allow too many papers to stack up in the paper output tray.
It can damage the machine.
Safety information
1. Introduction 16
6
Installation / Moving
Warning
Do not block or push objects into the ventilation opening. Caution
This could result in elevated component temperatures which can
cause damage or fire.
Use of controls or adjustments or performance of procedures other
than those specified herein may result in hazardous radiation
exposure.
This machine's power reception device is the power cord.
To switch off the power supply, remove the power cord from the
electrical outlet.
Do not place the machine in an area with dust, humidity, or water
leaks.
This could result in electric shock or fire.
Place the machine in the environment where it meets the
operating temperature and humidity specification.
Otherwise, quality problems can occur and cause damage to the
machine.
see "General specifications" on page 104.
Before moving the machine, turn the power off and disconnect all
cords. The information below are only suggestions based on the
units weight.If you have a medical condition that prevents you
from lifting, do not lift the machine. Ask for help, and always use
the appropriate amount of people to lift the device safety.
Then lift the machine:
• If the machine weighs under 20 kg (44.09 lbs), lift with 1 person.
• If the machine weighs 20 kg (44.09 lbs) - 40kg (88.18 lbs), lift
with 2 people.
• If the machine weighs more than 40 kg (88.18 lbs), lift with 4 or
more people.
The machine could fall, causing injury or machine damage.
Choose a flat surface with enough space for ventilation to place
the machine. Also consider the space required to open the cover
and trays.
The place should be well-ventilated and be far from direct light,
heat, and humidity.
When using the machine for a long period of time or printing a
large number of pages in a non-ventilated space, it could pollute
the air and be harmful to your health. Place the machine in a wellventilated
space or open a window to circulate the air periodically.
Do not place the machine on an unstable surface.
The machine could fall, causing injury or machine damage.
Safety information
1. Introduction 17
7
Maintenance / Checking
Caution
Use only No.26 AWGa
or larger, telephone line cord, if necessary.
Otherwise, it can cause damage to the machine.
Make sure you plug the power cord into a grounded electrical
outlet.
Otherwise, this could result in electric shock or fire.
Use the power cord supplied with your machine for safe
operation. If you are using a cord which is longer than 2 meters (6
feet) with a 110V machine, then the gauge should be 16 AWG or
larger.
Otherwise, it can cause damage to the machine, and could result
in electric shock or fire.
Do not put a cover over the machine or place it in an airtight
location, such as a closet.
If the machine is not well-ventilated, this could result in fire.
Do not overload wall outlets and extension cords.
This can diminish performance, and could result in electric shock
or fire.
The machine should be connected tothe power level which is
specified on the label.
If you are unsure and want to check the power level you are using,
contact the electrical utility company.
a. AWG: American Wire Gauge
Unplug this product from the wall outlet before cleaning the
inside of the machine. Do not clean the machine with benzene,
paint thinner or alcohol; do not spray water directly into the
machine.
This could result in electric shock or fire.
When you are working inside the machine replacing supplies or
cleaning the inside, do not operate the machine.
You could get injured.
Keep cleaning supplies away from children.
Children could get hurt.
Do not disassemble, repair or rebuild the machine by yourself.
It can damage the machine. Call a certified technician when the
machine needs repairing.
To clean and operate the machine, strictly follow the user's guide
provided with the machine.
Otherwise, you could damage the machine.
Safety information
1. Introduction 18
8
Supply usage
Caution
Keep the power cable and the contact surface of the plug clean
from dust or water.
Otherwise, this could result in electric shock or fire.
• Do not remove any covers or guards that are fastened with
screws.
• Fuser units should only be repaired by a certified service
technician. Repair by non-certified technicians could result in
fire or electric shock.
• The machine should only be repaired by a Samsung service
technician.
Do not disassemble the toner cartridge.
Toner dust can be dangerous if inhaled or ingested.
Do not burn any of the supplies such as toner cartridge or fuser
unit.
This could cause an explosion or uncontrollable fire.
When storing supplies such as toner cartridges, keep them away
from children.
Toner dust can be dangerous if inhaled or ingested.
Using recycled supplies, such as toner, can cause damage to the
machine.
In case of damage due to the use of recycled supplies, a service
fee will be charged.
For supplies that contain toner dust (toner cartridge, waste toner
bottle, imaging unit, etc.) follow the instructions below.
• When disposing of the supplies, follow the instructions for
disposal. Refer to the reseller for disposal instructions.
• Do not wash the supplies.
• For a waste toner bottle, do not reuse it after emptying the
bottle.
If you do not follow the instructions above, it may cause machine
malfunction and environmental pollution. The warranty does not
cover damages caused by a user's carelessness.
When toner gets on your clothing, do not use hot water to wash
it.
Hot water sets toner into fabric. Use cold water.
When changing the toner cartridge or removing jammed paper,
be careful not to let toner dust touch your body or clothes.
Toner dust can be dangerous if inhaled or ingested.
1. Introduction 19
Machine overview
9
Accessories
Power cord Quick installation guide
Software CDa
a. The software CD contains the printer drivers and software applications.
Misc. accessoriesb
b. Miscellaneous accessories included with your machine may vary by country of purchase and specific model.
Machine overview
1. Introduction 20
10
Front view
• This illustration may differ from your machine depending on your model.
There are various types of machine.
• Some features and optional goods may not be available depending on
model or country (see "Features by models" on page 7).
Type A
1 Scanner lid 7 Output tray
9 10
11
7
6 2
5
4 3
1
8
12
2 Control panel 8 NFC (Near Field Communication) tag
3 Handle 9 Scanner glass
4 Tray 10 Scan unita b
5 Tray handle 11 Inner cover
6 Output support 12 Toner cartridge
a. Close the scanner lid before opening the scan unit.
b. Be careful not to pinch your fingers.
Machine overview
1. Introduction 21
Type B
15
12
14
16
10
9 5
4
8
7 6
1 2
13
3
11
1 Document feeder cover 9 Output support
2 Document feeder guide
cover
10 Output tray
3 Document feeder output tray 11 NFC (Near Field Communication) tag
4 Document feeder output
support
12 Scanner lid
5 Control panel 13 Scanner glass
6 Handle 14 Scan unita b
a. Close the scanner lid before opening the scan unit.
b. Be careful not to pinch your fingers.
7 Tray 15 Inner cover
8 Tray handle 16 Toner cartridge
Machine overview
1. Introduction 22
11
Rear view
• This illustration may differ from your machine depending on your model.
There are various types of machine.
• Some features and optional goods may not be available depending on
model or country (see "Features by models" on page 7).
Type A
Type B
1 USB port 2 Power receptacle
1
2
1 USB port
2 Network porta
a. M207xFW series only.
3 Extension telephone socket (EXT.)
4 Telephone line socket (LINE)
5 Power receptacle
1
3
2
5
4
1. Introduction 23
Control panel overview
• This control panel may differ from your machine depending on its model.
There are various types of control panels.
• Some features and optional goods may not be available depending on
model or country (see "Features by models" on page 7).
12
Type A
1
ID Copy
Allows you to copy both sides of an ID card like a
driver’s license on a single side of paper (see "ID card
copying" on page 59).
2 Scan to Switches between scan and copy mode. The Scan to
LED turns on scan mode and turns off on copy mode
3 Display screen Shows the current status and displays prompts during
operation.
1 2 3 4 5 6 7
14 13 12 11 10 9 8
4
Menu Opens Menu mode and scrolls through the available
menus (see "Menu overview" on page 31).
5 Left/Right
Arrows
Scrolls through the options available in the selected
menu and increases or decreases values.
6 Stop/
Clear
Stops an operation at any time.
7
Power/
Wakeup
Turns the power on or off, or wakes up the machine
from the power save mode. If you need to turn the
machine off, press this button for more than three
seconds.
8
Start Starts a job.
9 Power
saver
Goes into sleep mode.
10 OK Confirms the selection on the screen.
11 Back Sends you back to the upper menu level.
12 Status LED Indicates the status of your machine (see
"Understanding the status LED" on page 95).
13
Eco
Turns into eco mode to reduce toner consumption and
paper usage when pc-printing and copying only (see
"Eco printing" on page 54).
Control panel overview
1. Introduction 24
13
Type B
14
WPSa
Configures the wireless network connection easily
without a computer (see "Using the WPS button" on
page 151).
Print
Screen
Press this button and the Status LED will start blinking.
If you want to print only the active screen, release the
button when the Status LED stops blinking. If you want
to print the whole screen, release the button while it’s
blinking.
• Print Screen can only be used in the
Windows and Mac operating systems.
• You can only use this function with USBconnected
machine.
• When printing the active window/whole
monitor screen using the print screen
button, the machine may use more toner
depending on what is being printed.
• You can only use this function if the
machine’s Samsung Easy Printer Manager
program is installed. If you are a Mac OS
user, you need to enable Screen Print
Settings from the Samsung Easy Printer
Manager to use the Print Screen feature.
a. M207xW/ M207xFW series only.
1
Darkness
Adjusts the brightness level to make a copy for easier
reading, when the original contains faint markings and
dark images.
2
ID Copy
Allows you to copy both sides of an ID card like a
driver’s license on a single side of paper (see "ID card
copying" on page 59).
3 Display screen Shows the current status and displays prompts during
an operation.
4 Copy Switches to Copy mode.
5 Fax Switches to Fax mode.
6
Menu Opens Menu mode and scrolls through the available
menus (see "Menu overview" on page 31).
1 2 3 4 5 6 7 8 9 10 11 12
21 20 19 18 17 16 15 14 13
Control panel overview
1. Introduction 25
7 Left/
Right
Arrows
Scrolls through the options available in the selected
menu and increases or decreases values.
8 Numeric keypad Dials a number or enters alphanumeric characters (see
"Keypad letters and numbers" on page 197).
9 Address
Book
Allows you to store frequently used fax numbers or
search for stored fax numbers (see "Storing email
address" on page 195 or "Setting up the fax address
book" on page 198).
10
Redial/
Pause
Redials the recently sent fax number or received caller
ID in ready mode, or inserts a pause(-) into a fax number
in edit mode (see "Redialing the fax number" on page
225).
11 Stop/
Clear
Stops an operations at any time.
12
Power/
Wakeup
Turns the power on or off, or wakes up the machine
from the power save mode. If you need to turn the
machine off, press this button for more than three
seconds.
13
Start Starts a job.
14 Power
saver
Goes into sleep mode.
15
On Hook
Dial
When you press this button, you can hear a dial tone.
Then enter a fax number. It is similar to making a call
using speaker phone (see "Receiving manually in Tel
mode" on page 231).
16 OK Confirms the selection on the screen.
17 Back Sends you back to the upper menu level.
18
Scan
Switches to Scan mode.
19 Status LED Indicates the status of your machine (see
"Understanding the status LED" on page 95).
20
Eco
Turn into eco mode to reduce toner consumption and
paper usage when pc-printing and copying only (see
"Eco printing" on page 54).
Control panel overview
1. Introduction 26
21
WPSa
Configures the wireless network connection easily
without a computer (see "Using the WPS button" on
page 151).
Print
Screen
Press this button and the display will Print Screen? on
the display screen. If you want to print only the active
screen, select the Active. If you want to print the whole
screen, select Full.
• Print Screen can only be used in the
Windows and Mac operating systems.
• You can only use this function with USBconnected
machine.
• When printing the active window/whole
monitor screen using the print screen
button, the machine may use more toner
depending on what is being printed.
• You can only use this function if the
machine’s Samsung Easy Printer Manager
program is installed. If you are a Mac OS user,
you need to enable Screen Print Settings
from the Samsung Easy Printer Manager to
use the Print Screen feature.
a. M207xW/ M207xFW series only.
1. Introduction 27
Turning on the machine
1 Connect the machine to the electricity supply first.
Turn the switch on if the machine has a power switch.
Illustrations on this user’s guide may differ from your machine depending
on its options or models. Check your machine type (see "Front view" on
page 20).
2 Power is turned on automatically.
For M207x series, press (Power/Wakeup) button on the control
panel.
If you want to turn the power off, press and hold (Power/Wakeup)
button for about 3 seconds.
1. Introduction 28
Installing the driver locally
A locally connected machine is a machine directly attached to your computer
using the cable. If your machine is attached to a network, skip the following
steps below and go on to installing a network connected machine’s driver (see
"Installing driver over the network" on page 140).
• If you are a Mac or Linux operating systems user, refer to the "Installation
for Mac" on page 131 or "Installation for Linux" on page 133.
• The installation window in this User’s Guide may differ depending on the
machine and interface in use.
• Only use a USB cable no longer than 3 meters (118 inches).
14
Windows
1 Insert the supplied software CD into your CD-ROM drive.
If the installation window does not appear, click Start > All programs >
Accessories > Run.
X:\Setup.exe replacing “X” with the letter, which represents your CDROM
drive and click OK.
2 Review and accept the installation agreements in the installation
window. Then, click Next.
3 Select USB connection on the Printer Connection Type screen. Then,
click Next.
4 Follow the instructions in the installation window.
1. Introduction 29
Reinstalling the driver
If the printer driver does not work properly, follow the steps below to reinstall
the driver.
15
Windows
1 From the Start menu, select Programs or All Programs > Samsung
Printers > Uninstall Samsung Printer Software.
2 Follow the instructions in the installation window.
3 Insert the software CD into your CD-ROM drive and install the driver
again (see "Installing the driver locally" on page 28).
2. Menu Overview and
Basic Setup
This chapter provides information about the overall menu structure and the basic setup options.
• Menu overview 31
• Media and tray 38
• Basic printing 50
• Basic copying 56
• Basic scanning 61
• Basic faxing 62
2. Menu Overview and Basic Setup 31
Menu overview
The control panel provides access to various menus to set up the machine or use
the machine’s functions.
• This function is not supported for M207x series (see "Control panel
overview" on page 23).
• Some menus may not appear on the display depending on options or
models. If so, it is not applicable to your machine.
• Some menu names may differ from your machine depending on its
options or the models.
• The menus are described in the Advanced Guide (see "Useful Setting
Menus" on page 178).
1
Accessing the menu
1 Select the Fax, Copy, or Scan button on the control panel depending on
the feature to be used.
2 Select (Menu) until the menu you want appears on the bottom line
of the display and press OK.
3 Press the arrows until the needed menu item appears and press OK.
4 If the setting item has sub menus, repeat step 3.
5 Press OK to save the selection.
6 Press (Stop/Clear) to return to the ready mode.
Items Options
Fax Feature
(M207xF series,
M207xFW series)
Darkness Normal
Dark+1- Dark+5
Light+5- Light+1
Resolution Standard
Fine
Super Fine
Photo Fax
Color Fax
Original Size
Multi Send
Delay Send
Priority Send
Send Forward Forward to Fax
Rcv.Forward Forward to Fax
Forward to PC
Forward & Print
Secure Receive Off
On
Print
Menu overview
2. Menu Overview and Basic Setup 32
Fax Feature
(Continue)
Add Page
Cancel Job
Fax Setup
(M207xF
series,M207xFW
series)
Sending Redial Times
Redial Term
Prefix Dial
ECM Mode
Fax Confirm
Image TCR
Dial Modea
Items Options
Fax Setup
(Continue)
Receiving Receive Mode
Ring To Answer
Stamp RCV Name
RCV Start Code
Auto Reduction
Discard Size
Junk Fax Setup
DRPD Modea
Change Default Resolution
Darkness
Original Size
Manual TX/RX
Manual TX/RX On
Off
Copy Feature Original Size
Reduce/Enlarge
Darkness Normal
Dark+1- Dark+5
Light+5- Light+1
Items Options
Menu overview
2. Menu Overview and Basic Setup 33
Copy Feature
(Continue)
Original Type Text
Text/Photo
Photo
Collation On
Off
Layout Normal
2-Up
4-Up
ID Copy
Adjust Bkgd. Off
Auto
Enhance Lev.1
Enhance Lev.2
Erase Lev.1- Erase Lev.4
Copy Setup Change Default Original Size
Copies
Reduce/Enlarge
Darkness
Original Type
Collation
Items Options
System Setup Machine Setup Machine ID
Fax Number
Date & Time
Clock Mode
Language
Default Mode
Power Save
Auto Power Off
Wakeup Event
System Timeout
Job Timeout
Altitude Adj.
Auto Continueb
Paper Substit.b
Toner Save
Eco Settings
Paper Setup Paper Size
Paper Type
Margin
Items Options
Menu overview
2. Menu Overview and Basic Setup 34
System Setup
(Continue)
Sound/Volume Key Sound
Alarm Sound
Speaker
Ringer
Report Configuration
Demo Page
Supplies Info.
Usage Counter
Fax Received
Fax Sent
Schedule Jobs
Fax Confirm.
Junk Fax
Address Book
Maintenance CLR Empty Msg.c
Supplies Life
Image Mgr.
TonerLow Alert
Serial Number
Items Options
Network c
(M207xF series,
M207xFW series)
TCP/IP (IPv4) DHCP
BOOTP
Static
TCP/IP (IPv6) IPv6 Protocol
DHCPv6 Config
Ethernet Ethernet Port
Ethernet Speed
Wi-Fi Wi-Fi ON/OFF
WPS
Wi-Fi Direct
Wi-Fi Signal
WLAN Default
Protocol Mgr. HTTP
WINS
SNMPv1/v2t
UPnP(SSDP)
mDNS
SetIP
SLP
Network Conf.
Items Options
Menu overview
2. Menu Overview and Basic Setup 35
Network
(Continue)
Clear Settings
a. This option may not be available depending on your country.
b. This option only appears if Paper Mismatch is enabled.
c. This option only appears when small amount of toner is left in the cartridge.
Items Options
2. Menu Overview and Basic Setup 36
Machine’s basic settings
You can set the machine’s settings by using the Device Settings in
Samsung Easy Printer Manager program.
• For Windows and Mac users, you set from Samsung Easy Printer
Manager > (Switch to advanced mode) > Device Settings, see
"Device Settings" on page 246.
After installation is complete, you may want to set the machine's default
settings.
To change the machine’s default settings, follow these steps:
It may be necessary to press OK to navigate to lower-level menus for some
models.
1 Select (Menu) > System Setup > Machine Setup on the control
panel.
2 Select the option you want, then press OK.
• Language: change the language that is displayed on the control
panel.
• Date & Time: When you set the time and date, they are used in delay
fax. They are printed on reports. If, however, they are not correct, you
need to change it for the correct time being.
Enter the correct time and date using arrows or numeric keypad (see
"Keypad letters and numbers" on page 197).
• Month = 01 to 12
• Day = 01 to 31
• Year = requires four digits
• Hour = 01 to 12
• Minute = 00 to 59
• Clock Mode: You can set your machine to display the current time
using either a 12-hour or 24-hour format.
• Power Save: When you are not using the machine for a while, use
this feature to save power.
When you press the (Power/Wakeup) button, start printing, or a fax is
received, the product will wake up from the power saving mode.
• Altitude Adj.: Print quality is affected by atmospheric pressure,
which atmospheric pressure is determined by the height of the
machine above sea level. Before you set the altitude value,
determine the altitude where you are (see "Altitude adjustment" on
page 194).
3 Select the option you want, then press OK.
4 Press OK to save the selection.
Machine’s basic settings
2. Menu Overview and Basic Setup 37
5 Press (Stop/Clear) button to return to ready mode.
Refer to below links to set other settings useful for using the machine.
• See "Entering various characters" on page 197.
• See "Keypad letters and numbers" on page 197.
• See "Setting the paper size and type" on page 45.
• See "Setting up the fax address book" on page 198.
2. Menu Overview and Basic Setup 38
Media and tray
This chapter provides information on how to load print media into your
machine.
• Using print media that does not meet these specifications may cause
problems or require repairs. Such repairs are not covered by Samsung’s
warranty or service agreements.
• Make sure not to use the inkjet photo paper with this machine. It could
cause damage to the machine.
• Using inflammable print media can cause a fire.
• Use designated print media (see "Print media specifications" on page
106).
The use of inflammable media or foreign materials left in the printer may
lead to overheating of the unit and, in rare cases may cause a fire.
2
Tray overview
To change the size, you need to adjust the paper guides.
1 Paper width guide
2 Tray
Illustrations on this user’s guide may differ from your machine depending
on its options or models. Check your machine type (see "Front view" on
page 20).
If you do not adjust the guide, it may cause paper registration, image skew,
or jamming of the paper.
2
1
Media and tray
2. Menu Overview and Basic Setup 39
3
Loading paper in the tray
Illustrations on this user’s guide may differ from your machine depending
on its options or models. Check your machine type (see "Front view" on
page 20).
1 Open the tray. Then, adjust the tray size to the media size you are loading
(see "Tray overview" on page 38).
2 Flex or fan the edge of the paper stack to separate the pages before
loading papers.
3 Place the paper with the side you want to print facing up.
1
2
Media and tray
2. Menu Overview and Basic Setup 40
• Do not push the paper width guide too far causing the media to warp.
• Do not use a paper with a leading-edge curl, it may cause a paper jam or
the paper can be wrinkled.
• If you do not adjust the paper width guide, it may cause paper jams.
4 Squeeze the paper width guide and slide it to the edge of the paper stack
without causing it to bend.
5 When you print a document, set the paper type and size for the tray (see
"Setting the paper size and type" on page 45).
Media and tray
2. Menu Overview and Basic Setup 41
4
Manual feeding in the tray
The tray can hold special sizes and types of print material, such as postcards,
note cards, and envelopes (see "Print media specifications" on page 106).
To feed manually in the tray, click the below:
See "Loading paper in the tray" on page 39.
Tips on using the manual feeding in tray
• If you select Paper > Source > Manual Feeder from your printer driver,
you need to press OK each time you print a page.
• Load only one type, size and weight of print media at time in the in the
tray.
• To prevent paper jams, do not add paper while printing when there is still
paper in the tray.
• Print media should be loaded face up with the top edge going into the
tray first and be placed in the center of the tray.
• To ensure printing quality and to prevent paper jams, only load the
available paper (see "Print media specifications" on page 106).
• Flatten any curl on postcards, envelopes, and labels before loading them
into the in the tray.
• When printing on special media, you must follow the loading guidelines
(see "Printing on special media" on page 41).
5
Printing on special media
The table below shows the special media usable in tray.
To change the paper setting set in the machine, set the paper type from the
Printing preferences window > Paper tab > Paper Type (see "Opening
printing preferences" on page 52).
• When using special media, we recommend you feed one sheet at a time
(see "Print media specifications" on page 106).
• Illustrations on this user’s guide may differ from your machine
depending on its options or models. Check your machine type (see
"Front view" on page 20).
To see for paper weights for each sheet, refer to "Print media specifications" on
page 106.
Types Traya
Plain ●
Thick ●
Thin ●
Bond ●
Color ●
Media and tray
2. Menu Overview and Basic Setup 42
(●: Supported, Blank: Not supported)
Envelope
Printing successfully on envelopes depends upon the quality of the envelopes.
To print an envelope, place it as shown in the following figure.
• When selecting envelopes, consider the following factors:
- Weight: should not exceed 90 g/m2 otherwise; jams may occur.
- Construction: should lie flat with less than 6 mm curl and should not
contain air.
- Condition: should not be wrinkled, nicked, nor damaged.
- Temperature: should resist the heat and pressure of the machine
during operation.
• Use only well-constructed envelopes with sharp and well-creased folds.
• Do not use stamped envelopes.
• Do not use envelopes with clasps, snaps, windows, coated lining, selfadhesive
seals, or other synthetic materials.
• Do not use damaged or poorly made envelopes.
CardStock ●
Labels ●
Envelope ●
Preprinted ●
Cotton ●
Recycled ●
Archive ●
a. The paper types available manual feeding in tray.
Types Traya
Media and tray
2. Menu Overview and Basic Setup 43
• Be sure the seam at both ends of the envelope extends all the way to the
corner of the envelope.
1 Acceptable
2 Unacceptable
• Envelopes with a peel-off adhesive strip or with more than one flap that
folds over to seal must use adhesives compatible with the machine’s fusing
temperature for 0.1 second about 170°C (338 °F). The extra flaps and strips
might cause wrinkling, creasing, or jams, and may even damage the fuser.
• For the best print quality, position margins no closer than 15 mm from the
edges of the envelope.
• Avoid printing over the area where the envelope’s seams meet.
Labels
To avoid damaging the machine, use only labels designed for use in laser
printers.
• When selecting labels, consider the following factors:
- Adhesives: Should be stable at your machine’s fusing temperature
about 170°C (338°F).
- Arrangement: Only use labels with no exposed backing between them.
Labels can peel off sheets that have spaces between the labels, causing
serious jams.
- Curl: Must lie flat with no more than 13 mm of curl in any direction.
- Condition: Do not use labels with wrinkles, bubbles, or other
indications of separation.
• Make sure that there is no exposed adhesive material between labels.
Exposed areas can cause labels to peel off during printing, which can cause
paper jams. Exposed adhesive can also cause damage to machine
components.
Media and tray
2. Menu Overview and Basic Setup 44
• Do not run a sheet of labels through the machine more than once. The
adhesive backing is designed for only a single pass through the machine.
• Do not use labels that are separating from the backing sheet or are wrinkled,
bubbled, or otherwise damaged.
Card stock/ Custom-sized paper
• In the software application, set the margins to at least 6.4 mm (0.25 inches)
away from the edges of the material.
Preprinted paper
When loading preprinted paper, the printed side should be facing up with an
uncurled edge at the front. If you experience problems with paper feeding, turn
the paper around. Note that print quality is not guaranteed.
• Must be printed with heat-resistant ink that will not melt, vaporize, or
release hazardous emissions when subjected to the machine’s fusing
temperature for 0.1 second (about 170°C (338°F)).
• Preprinted paper ink must be non-flammable and should not adversely
affect machine rollers.
• Before you load preprinted paper, verify that the ink on the paper is dry.
During the fusing process, wet ink can come off preprinted paper, reducing
print quality.
Media and tray
2. Menu Overview and Basic Setup 45
6
Setting the paper size and type
After loading paper in the paper tray, set the paper size and type using the
control panel buttons.
To change the paper setting set in the machine, set the paper type from the
Printing preferences window > Paper tab > Paper Type (see "Opening
printing preferences" on page 52).
It may be necessary to press OK to navigate to lower-level menus for some
models.
1 Select (Menu) button on the control panel.
2 Press System Setup > Paper Setup > Paper Size or Paper Type.
3 Select the tray and the option you want.
4 Press OK to save the selection.
5 Press (Stop/Clear) to return to ready mode.
If you want to use special-sized paper such as billing paper, select the Paper
tab > Size > Edit... and set Custom Paper Size Settings in the Printing
Preferences (see "Opening printing preferences" on page 52).
7
Using the output support
The surface of the output tray may become hot if you print a large number
of pages at once. Make sure that you do not touch the surface, and do not
allow children near it.
The printed pages stack on the output support, and the output support will help
the printed pages to align. The printer sends output to the output tray by
default.
Media and tray
2. Menu Overview and Basic Setup 46
Illustrations on this user’s guide may differ from your machine depending
on its options or models. Check your machine type (see "Front view" on
page 20).
8
Preparing originals
• Do not load paper smaller than 142 x 148 mm (5.6 x 5.8 inches) or larger than
216 x 356 mm (8.5 x 14 inches).
• Do not attempt to load the following s of paper, in order to prevent paper
jam, low print quality and machine damage.
- Carbon-paper or carbon-backed paper
- Coated paper
- Onion skin or thin paper
- Wrinkled or creased paper
- Curled or rolled paper
- Torn paper
• Remove all staples and paper clips before loading.
• Make sure any glue, ink, or correction fluid on the paper is completely dry
before loading.
• Do not load originals that include different sizes or weights of paper.
• Do not load booklets, pamphlets, transparencies, or documents with other
unusual characteristics.
Media and tray
2. Menu Overview and Basic Setup 47
9
Loading originals
You can use the scanner glass or the document feeder to load an original for
copying, scanning, and sending a fax.
Illustrations on this user’s guide may differ from your machine depending
on its options or models. Check your machine type (see "Front view" on
page 20).
On the scanner glass
Using the scanner glass, you can copy or scan originals. You can get the best
scan quality, especially for colored or gray-scaled images. Make sure that no
originals are in the document feeder. If an original is detected in the document
feeder, the machine gives it priority over the original on the scanner glass.
1 Lift and open the scanner lid.
Media and tray
2. Menu Overview and Basic Setup 48
2 Place the original face down on the scanner glass. Align it with the
registration guide at the top left corner of the glass.
3 Close the scanner lid.
• Leaving the scanner lid open while copying may affect copy quality and
toner consumption.
• Dust on the scanner glass may cause black spots on the printout. Always
keep it clean (see "Cleaning the machine" on page 77).
• If you are copying a page from a book or magazine, lift the scanner lid
until its hinges are caught by the stopper and then close the lid. If the
book or magazine is thicker than 30 mm, start copying with the scanner
lid open.
• Be careful not to break the scanner glass. You may get hurt.
• Do not put hands while closing the scanner lid. The scanner lid may fall
on your hands and get hurt.
• Do not look the light from inside of the scanner while copying or
scanning. It is harmful to eyes.
In the document feeder
Using the document feeder, you can load up to 40 sheets of paper (80 g/m2, 20
lbs bond) for one job.
1 Flex or fan the edge of the paper stack to separate the pages before
loading originals.
Media and tray
2. Menu Overview and Basic Setup 49
2 Load the original face up into the document feeder input tray. Make sure
that the bottom of the original stack matches the paper size marked on
the document input tray.
3 Adjust the document feeder width guides to the paper size.
Dust on the document feeder glass may cause black lines on the printout.
Always keep the glass clean (see "Cleaning the machine" on page 77).
2. Menu Overview and Basic Setup 50
Basic printing
For special printing features, refer to the Advanced Guide (see "Using
advanced print features" on page 204).
10
Printing
If you are a Mac or Linux operating systems user, refer to the Advanced
Guide (see "Mac printing" on page 212 or "Linux printing" on page 214).
The following Printing Preferences window is for Notepad in Windows 7.
1 Open the document you want to print.
2 Select Print from the File menu.
3 Select your machine from the Select Printer list.
4 The basic print settings including the number of copies and print range
are selected within the Print window.
To take advantage of the advanced printing features, click Properties or
Preferences from the Print window (see "Opening printing preferences" on
page 52).
5 To start the print job, click OK or Print in the Print window.
Basic printing
2. Menu Overview and Basic Setup 51
11
Canceling a print job
If the print job is waiting in the print queue or print spooler, cancel the job as
follows:
• You can access this window by simply double-clicking the machine icon
( ) in the Windows task bar.
• You can also cancel the current job by pressing (Stop/Clear) on the
control panel.
Basic printing
2. Menu Overview and Basic Setup 52
12
Opening printing preferences
• The Printing Preferences window that appears in this user’s guide may
differ depending on the machine in use.
• When you select an option in Printing Preferences, you may see a
warning mark or . An mark means you can select that certain
option but it is not recommended, and an mark means you cannot
select that option due to the machine’s setting or environment.
1 Open the document you want to print.
2 Select Print from the file menu. The Print window appears.
3 Select your machine from the Select Printer.
4 Click Properties or Preferences.
You can check the machine’s current status pressing the Printer Status
button (see "Using Samsung Printer Status" on page 247).
Basic printing
2. Menu Overview and Basic Setup 53
Using a favorite setting
The Presets option, which is visible on each preferences tab except for the
Samsung tab, allows you to save the current preferences for future use.
To save a Presets item, follow these steps:
1 Change the settings as needed on each tab.
2 Enter a name for the item in the Presets input box.
3 Click (Add). When you save Presets, all current driver settings are
saved.
Select more options and click (Update), settings will be added to the
Presets you made. To use a saved setting, select it from the Presets dropdown
list. The machine is now set to print according to the settings you
have selected.To delete saved settings, select it from the Presets dropdown
list and click (Delete).
You can also restore the printer driver’s default settings by selecting
Default Preset from the Presets drop-down list.
13
Using help
Click the option you want to know on the Printing Preferences window and
press F1 on your keyboard.
Basic printing
2. Menu Overview and Basic Setup 54
14
Eco printing
The Eco function cuts toner consumption and paper usage. The Eco function
allows you to save print resources and lead you to eco-friendly printing.
If you press the Eco button from the control panel, eco mode is enabled. The
default setting of Eco mode is Multiple Pages per Side (2) and Toner Save.
Setting Eco mode on the control panel
If your has machine for +/- buttons on the control panel or the machine is
not supported network (see "Control panel overview" on page 23):
You can set the machine’s settings by using the Device Settings in
Samsung Easy Printer Manager program.
• For Windows and Mac users, see "Device Settings" on page 246.
• Accessing menus may differ from model to model (see "Accessing the
menu" on page 31).
• It may be necessary to press OK to navigate to lower-level menus for
some models.
1 Select (Menu) > System Setup > Machine Setup > Eco Settings on
the control panel.
2 Select the option you want and press OK.
• Default Mode: Select this to turn on or off the eco mode. (Toner
save/2-up)
- Off: Set the eco mode off.
- On: Set the eco mode on.
If you set the eco mode on with a password from the SyncThru™ Web
Service (Settings tab > Machine Settings > System > Eco > Settings) or
Samsung Easy Printer Manager (Device Settings > Eco), the On force
message appears. You have to enter the password to change the eco mode
status.
• Select Temp.: Follow the settings from Syncthru™ Web Service or
Samsung Easy Printer Manager. Before you select this item, you must
set the eco function in SyncThru™ Web Service (Settings tab >
Machine Settings > System > Eco > Settings) or Samsung Easy
Printer Manager (Device Settings > Eco).
- Default Eco: The machine is set to Default Eco mode.
- Custom Eco: Change any necessary values.
3 Press OK to save the selection.
Basic printing
2. Menu Overview and Basic Setup 55
Setting eco mode on the driver
Open the Eco tab to set Eco mode. When you see the eco image ( ), that
means the eco mode is currently enabled.
Eco options
• Printer Default: Follows the settings from the machine's control panel.
• None: Disables Eco mode.
• Eco Printing: Enables eco mode. Activate the various Eco items you want to
use.
• Password: If the administrator fixed to enable the Eco mode, you have to
enter the password to change the status.
Result simulator
Result Simulator shows the results of reduced emission of carbon dioxide, used
electricity, and the amount of saved paper in accordance with the settings you
selected.
• The results are calculated on the basis that the total number of printed
paper is one hundred without a blank page when the Eco mode is disabled.
• Refers to the calculation coefficient about CO2, energy, and paper from IEA,
the index of Ministry of Internal Affairs and Communication of Japan and
www.remanufacturing.org.uk. Each model has a different index.
• The power consumption in printing mode refers to the average printing
power consumption of this machine.
• The actual amount displayed is only an estimate as the actual amount may
differ depending on the operating system used, computing performance,
application software, connection method, media type [thickness], media
size, job complexity, etc.
2. Menu Overview and Basic Setup 56
Basic copying
• For special printing features, refer to the Advanced Guide (see "Copy
menu" on page 180).
• Accessing menus may differ from model to model (see "Accessing the
menu" on page 31 or "Control panel overview" on page 23).
• Depending on models or options, some menus may not be supported
(see "Features by models" on page 7).
15
Basic copy
1 Select (copy) > (Menu) > Copy Feature on the control panel.
Or select (Menu) > Copy Feature on the control panel.
2 Place a single document (see "Loading originals" on page 47).
3 If you want to customize the copy settings including Reduce/Enlarge,
Darkness, Original, and more by using the control panel buttons (see
"Changing the settings for each copy" on page 57).
4 Enter the number of copies using the arrow or number keypad, if
necessary.
5 Press (Start).
Basic copying
2. Menu Overview and Basic Setup 57
If you need to cancel the copying job during the operation, press (Stop/
Clear) and the copying will stop.
16
Changing the settings for each copy
Your machine provides default settings for copying so that you can quickly and
easily make a copy. However, if you want to change the options for each copy,
use the copy function buttons on the control panel.
• If you press (Stop/Clear) while setting the copy options, all of the
options you have set for the current copy job will be canceled and
returned to their default status. Or, they will automatically return to their
default status after the machine completes the copy in progress.
• Accessing menus may differ from model to model (see "Accessing the
menu" on page 31).
• It may be necessary to press OK to navigate to lower-level menus for
some models.
Darkness
If you have an original containing faint marking and dark images, you can adjust
the brightness to make a copy that is easier to read.
1 Select (copy) > (Menu) > Copy Feature > Darkness on the
control panel.
Or select Darkness button on the control panel.
2 Select the option you want and press OK.
For example, the Light+5 being the lightest, and the Dark+5 being the
darkest.
3 Press (Stop/Clear) to return to ready mode.
Original
The original setting is used to improve the copy quality by selecting the
document for the current copy job.
1 Select (copy) > (Menu) > Copy Feature > Original Type on the
control panel.
Or select (Menu) > Copy Feature > Original Type on the control
panel.
2 Select the option you want and press OK.
Basic copying
2. Menu Overview and Basic Setup 58
• Text: Use for originals containing mostly text.
• Text/Photo: Use for originals with mixed text and photographs.
If texts in the printout is blurry, select Text to get the clear texts.
• Photo: Use when the originals are photographs.
3 Press (Stop/Clear) to return to ready mode.
Reduced or enlarged copy
You can reduce or enlarge the size of a copied image from 25% to 400% when
you copy original documents from the scanner glass.
• This feature may not be available depending on model or optionalgoods
(see "Variety feature" on page 9).
• If the machine set to Eco mode, reduce and enlarge features are
notavailable.
To select from the predefined copy sizes
1 Select (copy) > (Menu) > Copy Feature > Reduce/Enlarge on
the control panel.
Or select (Menu) > Copy Feature > Reduce/Enlarge on the control
panel.
2 Select the option you want and press OK.
3 Press (Stop/Clear) to return to ready mode.
To scale the copy by directly entering the scale rate
1 Select (copy) > (Menu) > Copy Feature > Reduce/Enlarge >
Custom on the control panel.
Or select (Menu) > Copy Feature > Reduce/Enlarge on the control
panel.
2 Enter the copy size you want using the numeric keypad.
3 Press OK to save the selection.
4 Press (Stop/Clear) to return to ready mode.
When you make a reduced copy, black lines may appear at the bottom of
your copy.
Basic copying
2. Menu Overview and Basic Setup 59
17
ID card copying
Your machine can print 2-sided originals on one sheet.
The machine prints one side of the original on the upper half of the paper and
the other side on the lower half without reducing the size of the original. This
feature is helpful for copying a small-sized item such as business card.
• The original must be placed on the scanner glass to use this feature.
• If the machine set to Eco mode, this feature is not available.
• For better image quality, Select (copy) > (Menu) > Copy
Feature > Original Type > Photo on the control panel or (Menu) >
Copy Feature > Original Type > Photo.
1 Press ID Copy on the control panel.
2 Place the front side of an original facing down on the scanner glass
where arrows indicate as shown. Then, close the scanner lid.
3 Place Front Side and Press [Start] appears on the display.
4 Press Start.
Your machine begins scanning the front side and shows Place Back Side
and Press [Start].
Basic copying
2. Menu Overview and Basic Setup 60
5 Turn the original over and place it on the scanner glass where arrows
indicate as shown. Then, close the scanner lid.
6 Press Start.
• If you do not press the (Start) button, only the front side will be
copied.
• If the original is larger than the printable area, some portions may not be
printed.
2. Menu Overview and Basic Setup 61
Basic scanning
For special scanning features, refer to the Advanced Guide (see "Scan
features" on page 216).
18
Basic Scanning
This is the normal and usual procedure for scanning originals.
This is a basic scanning method for USB-connected machine.
• It may be necessary to press OK to navigate to lower-level menus for
some models.
• If you want to scan using the network, refer to the Advanced Guide (see
"Scanning from network connected machine" on page 217).
1 Place a single document face down on the document glass, or load the
documents face up into the document feeder (see "Loading originals" on
page 47).
2 Select (scan) > Scan to PC on the control panel.
OR
Press Scan to on the control panerl.
If you see Not Available message, check the port connection, or select
Enable Scan from Device Panel in Samsung Easy Printer Manager >
Switch to advanced mode > Scan to PC Settings.
3 Select the scan destination you want and press OK.
Default setting is My Documents.
• You can create and save the frequently used settings as a profile list. Also
you can add and delete the profile and save each profile to a different
path.
• To change the Samsung Easy Printer Manager > Switch to
advanced mode > Scan to PC Settings.
4 Select the option you want and press OK.
5 Scanning begins.
Scanned image is saved in computer’s C:\Users\users name\My
Documents. The saved folder may differ, depending on your operating
system or the application you are using.
2. Menu Overview and Basic Setup 62
Basic faxing
• This function is not supported for M207x series (see "Control panel
overview" on page 23).
• For special faxing features, refer to the Advanced Guide (see "Fax
features" on page 225).
• You cannot use this machine as a fax via the internet phone. For more
information ask your internet service provider.
• We recommend using traditional analog phone services (PSTN: Public
Switched Telephone Network) when connecting telephone lines to use
a fax machine. If you use other Internet services (DSL, ISDN, VolP), you can
improve the connection quality by using the Micro-filter. The Micro-filter
eliminates unnecessary noise signals and improves connection quality or
Internet quality. Since the DSL Micro-filter is not provided with the
machine, contact your Internet service provider for use on DSL Microfilter.
1 Line port
2 Micro filter
3 DSL modem / Telephone line
(see "Rear view" on page 22).
19
Preparing to fax
Before you send or receive a fax, you need to connect the supplied line cord to
your telephone wall jack (see "Rear view" on page 22). Refer to the Quick
Installation Guide how to make a connection. The method of making a
telephone connection is different from one country to another.
20
Sending a fax
When you place the originals, you can use either the document feeder or
the scanner glass. If the originals are placed on both the document feeder
and the scanner glass, the machine will read the originals on the document
feeder first, which has higher priority in scanning.
1 Place a single document face down on the document glass, or load the
documents face up into the document feeder (see "Loading originals" on
page 47).
2 Select (fax) on the control panel.
3 Adjust the resolution and the darkness to suit your fax needs (see
"Adjusting the document settings" on page 64).
Basic faxing
2. Menu Overview and Basic Setup 63
4 Enter the destination fax number (see "Keypad letters and numbers" on
page 197).
5 Press (Start) on the control panel. The machine starts to scan and
send the fax to the destinations.
• If you want to send a fax directly from your computer, use Samsung
Network PC Fax (see "Sending a fax in the computer" on page 226).
• When you want to cancel a fax job, press (Stop/Clear) before the
machine starts transmission.
• If you used the scanner glass, the machine shows the message asking to
place another page.
Sending a fax manually
Perform the following to send a fax using (On Hook Dial) on the control
panel.
1 Place a single document face down on the document glass, or load the
documents face up into the document feeder (see "Loading originals" on
page 47).
2 Select (fax) on the control panel.
3 Adjust the resolution and the darkness to suit your fax needs (see
"Adjusting the document settings" on page 64).
4 Press (On Hook Dial) on the control panel.
5 Enter a fax number using the number keypad on the control panel.
6 Press (Start) on the control panel when you hear a high-pitched fax
signal from the remote fax machine.
Sending a fax to multiple destinations
You can use the multiple send feature, which allows you to send a fax to multiple
locations. Originals are automatically stored in memory and sent to a remote
station. After transmission, the originals are automatically erased from memory.
You cannot send faxes with this feature if you chosen super fine as an option
or if the fax is in color.
1 Place a single document face down on the document glass, or load the
documents face up into the document feeder (see "Loading originals" on
page 47).
2 Select (fax) on the control panel.
3 Adjust the resolution and the darkness to suit your fax needs (see
"Adjusting the document settings" on page 64).
4 Select (Menu) > Fax Feature > Multi Send on the control panel.
Basic faxing
2. Menu Overview and Basic Setup 64
5 Enter the number of the first receiving fax machine and press OK.
You can press speed dial numbers or select a group dial number using
the (Address book) button.
6 Enter the second fax number and press OK.
The display asks you to enter another fax number to send the document.
7 To enter more fax numbers, press OK when Yes appears and repeat
steps 5 and 6.
• You can add up to 10 destinations.
• Once you have entered a group dial number, you cannot enter another
group dial number.
8 When you have finished entering fax numbers, select No at the Another
No.? prompt and press OK.
The machine begins sending the fax to the numbers you entered in the
order in which you entered them.
Multi send report is printed after sending faxes.
21
Receiving a fax
Your machine is preset Fax mode at the factory. When you receive a fax, the
machine answers the call on a specified number of rings and automatically
receives the fax.
22
Adjusting the document settings
Before starting a fax, change the following settings according to your original’s
status to get the best quality.
It may be necessary to press OK to navigate to lower-level menus for some
models.
Resolution
The default document settings produce good results when using typical textbased
originals. However, if you send originals that are of poor quality, or
contain photographs, you can adjust the resolution to produce a higher quality
fax.
Basic faxing
2. Menu Overview and Basic Setup 65
1 Select (fax) > (Menu) > Fax Feature > Resolution on the control
panel.
2 Select the option you want and press OK.
• Standard: Originals with normal sized characters.
• Fine: Originals containing small characters or thin lines or originals
printed using a dot-matrix printer.
• Super Fine: Originals containing extremely fine detail. Super Fine
mode is enabled only if the machine with which you are
communicating also supports the Super Fine resolution.
• For memory transmission, Super Fine mode is not available. The
resolution setting is automatically changed to Fine.
• When your machine is set to Super Fine resolution and the fax machine
with which you are communicating does not support Super Fine
resolution, the machine transmits using the highest resolution mode
supported by the other fax machine.
• Photo Fax: Originals containing shades of gray or photographs.
• Color Fax: Original with colors.
• Memory transmission is not available in this mode.
• You can only send a color fax if the machine you are communicating with
supports color fax reception and you send the fax manually.
3 Press (Stop/Clear) to return to ready mode.
Darkness
You can select the degree of darkness of the original document.
The darkness setting is applied to the current fax job. To change the default
setting (see "Fax menu" on page 182).
1 Select (fax) > (Menu) > Fax Feature > Darkness on the control
panel.
2 Select a darkness level you want.
3 Press (Stop/Clear) to return to ready mode.
3. Maintenance
This chapter provides information about purchasing supplies, accessories and maintenance parts available for your
machine.
• Ordering supplies and accessories 67
• Available supplies 68
• Storing the toner cartridge 69
• Redistributing toner 71
• Toner cartridge 73
• Monitoring the supplies life 75
• Setting the toner low alert 76
• Cleaning the machine 77
• Tips for moving & storing your machine 83
3. Maintenance 67
Ordering supplies and accessories
Available accessories may differ from country to country. Contact your sales representatives to obtain the list of available supplies, and maintenance parts.
To order Samsung-authorized supplies, accessories, and maintenance parts, contact your local Samsung dealer or the retailer where you purchased your machine.
You can also visit www.samsung.com/supplies, and then select your country/region to obtain the contact information for service.
3. Maintenance 68
Available supplies
When supplies reach the end of their life spans, you can order the followings of supplies for your machine:
Depending on the options, percentage of image area and job mode used, the toner cartridge’s lifespan may differ.
When purchasing new toner cartridges or other supplies, these must be purchased in the same country as the machine you are using. Otherwise, new toner
cartridges or other supplies will be incompatible with your machine due to different configurations of toner cartridges and other supplies according to the specific
country conditions.
Samsung does not recommend using non-genuine Samsung toner cartridge such as refilled or remanufactured toner. Samsung cannot guarantee non-genuine
Samsung toner cartridge's quality. Service or repair required as a result of using non-genuine Samsung toner cartridges will not be covered under the machine’s
warranty.
Type Average yielda
a. Declared yield value in accordance with ISO/IEC 19752. The number of pages may be affected by operating environment, printing interval, graphics, media type and media size.
Part name
Toner cartridge Approx. 1,000 pages MLT-D111S
3. Maintenance 69
Storing the toner cartridge
Toner cartridges contain components that are sensitive to light, temperature
and humidity. Samsung suggests users follow these recommendations to
ensure optimal performance, highest quality, and longest life from your new
Samsung toner cartridge.
Store this cartridge in the same environment in which the printer will be used.
This should be in controlled temperature and humidity conditions. The toner
cartridge should remain in its original and unopened package until installation
– if original packaging is not available, cover the top opening of the cartridge
with paper and store in a dark cabinet.
Opening the cartridge package prior to use dramatically shortens its useful shelf
and operating life. Do not store on the floor. If the toner cartridge is removed
from the printer, follow the instructions below to store the toner cartridge
properly.
• Store the cartridge inside the protective bag from the original package.
• Store lying flat (not standing on end) with the same side facing up as if it
were installed in the machine.
• Do not store consumables in any of the following conditions:
- Temperature greater than 40°C (104°F).
- Humidity range less than 20% or greater than 80%.
- An environment with extreme changes in humidity or temperature.
- Direct sunlight or room light.
- Dusty places.
- A car for a long period of time.
- An environment where corrosive gases are present.
- An environment with salty air.
1
Handling instructions
• Do not touch the surface of the photoconductive drum in the cartridge.
• Do not expose the cartridge to unnecessary vibrations or shock.
• Never manually rotate the drum, especially in the reverse direction; this can
cause internal damage and toner spillage.
2
Toner cartridge usage
Samsung Electronics does not recommend or approve the use of non-Samsung
brand toner cartridges in your printer including generic, store brand, refilled, or
remanufactured toner cartridges.
Samsung’s printer warranty does not cover damage to the machine caused
by the use of a refilled, remanufactured, or non-Samsung brand toner
cartridges.
Storing the toner cartridge
3. Maintenance 70
3
Estimated cartridge life
Estimated cartridge life (the life of the toner cartridge yield) depends on the
amount of toner that print jobs require. The actual print yield may vary
depending on the print density of the pages you print on, operating
environment, percentage of image area, printing interval, media type and/or
media size. For example, if you print a lot of graphics, the consumption of the
toner is higher and you may need to change the cartridge more often.
3. Maintenance 71
Redistributing toner
When the toner cartridge is near the end of its life:
• White streaks or light printing occurs and/or density variation side to side.
• The Status LED blinks red.
If this happens, you can temporarily improve print quality by redistributing the remaining toner in the cartridge. In some cases, white streaks or light printing will still
occur even after you have redistributed the toner.
Illustrations in this user’s guide may differ from your machine depending on the model and options installed. Check your machine type (see "Front view" on page 20).
• To prevent damage to the toner cartridge, do not expose it to light for more than a few minutes. Cover it with a piece of paper, if necessary.
• Do not touch the green area of the toner cartridge. Use the handle on the cartridge to avoid touching this area.
• Do not use sharp objects such as a knife or scissors to open the toner cartridge package. They might scratch the drum of the cartridge.
• If toner gets on your clothing, wipe it off with a dry cloth and wash clothing in cold water. Hot water sets toner into fabric.
• When opening a scan unit, hold the document feeder and scan unit together.
Redistributing toner
3. Maintenance 72
2
1
3. Maintenance 73
Replacing the toner cartridge
4
Toner cartridge
Click this link to open an animation about replacing a toner cartridge.
• Shake the toner cartridge thoroughly, it will increase the initial print quality.
• Illustrations in this user’s guide may differ from your machine depending on the model and options installed. Check your machine type (see "Front view" on page
20).
• To prevent damage to the toner cartridge, do not expose it to light for more than a few minutes. Cover it with a piece of paper, if necessary.
• Do not touch the green area of the toner cartridge. Use the handle on the cartridge to avoid touching this area.
• Do not use sharp objects such as a knife or scissors to open the toner cartridge package. They might scratch the drum of the cartridge.
• If toner gets on your clothing, wipe it off with a dry cloth and wash clothing in cold water. Hot water sets toner into fabric.
• When opening a scan unit, hold the document feeder and scan unit together.
When a toner cartridge has reached the end of life, the machine will stop printing.
Replacing the toner cartridge
3. Maintenance 74
3. Maintenance 75
Monitoring the supplies life
If you experience frequent paper jams or printing problems, check the number of pages the machine has printed or scanned. Replace the corresponding parts, if
necessary.
1 Select (Menu) > System Setup > Report > Supplies Info. on the control panel.
2 Select the option you want and press OK.
• Total: Displays the total number of pages printed.
• ADF Scan: Displays the number of pages printed by using the document feeder.
• Platen Scan: Displays the number of pages scanned by using scanner glass.
• Supplies Info.: Prints the supply information page.
3 Press (Stop/Clear) to return to ready mode.
3. Maintenance 76
Setting the toner low alert
If the amount of toner in the cartridge is low, a message or LED informing the user to change the toner cartridge appears. You can set the option for whether or not
this message or LED appears.
• Accessing menus may differ from model to model (see "Accessing the menu" on page 31).
• It may be necessary to press OK to navigate to lower-level menus for some models.
• You can set the machine’s settings by using the Device Settings in Samsung Easy Printer Manager program.
- For Windows and Mac users, you set from Samsung Easy Printer Manager > (Switch to advanced mode) > Device Settings.
1 Select (Menu) > System Setup > Maintenance > TonerLowAlert on the control panel.
2 Select the option you want.
3 Press OK to save the selection.
3. Maintenance 77
Cleaning the machine
If printing quality problems occur or if you use your machine in a dusty environment, you need to clean your machine regularly to keep it in the best printing
condition and use your machine longer.
• Cleaning the cabinet of the machine with cleaning materials containing large amounts of alcohol, solvents, or other strong substances can discolor or distort the
cabinet.
• If your machine or the surrounding area is contaminated with toner, we recommend you use a cloth or tissue dampened with water to clean it. If you use a vacuum
cleaner, toner blows in the air and might be harmful to you.
5
Cleaning the outside
Clean the machine cabinet with a soft, lint-free cloth. Dampen the cloth slightly with water, but be careful not to let any water drip onto or into the machine.
Cleaning the machine
3. Maintenance 78
6
Cleaning the inside
During the printing process, paper, toner, and dust particles can accumulate inside the machine. This buildup can cause print quality problems, such as toner specks
or smearing. Cleaning the inside of the machine clears and reduces these problems.
• To prevent damage to the toner cartridge, do not expose it to light for more than a few minutes. Cover it with a piece of paper, if necessary.
• Do not touch the green area of the toner cartridge. Use the handle on the cartridge to avoid touching this area.
• Use a dry lint free cloth when cleaning the inside of the machine, be careful not to damage the transfer roller or any other inside parts. Do not use solvents such
as benzene or thinner. Printing quality problems can occur and cause damage to the machine.
• Use a dry lint-free cloth to clean the machine.
• Turn the machine off and unplug the power cord. Wait for the machine to cool down. If your machine has a power switch, turn the power switch off before
cleaning the machine.
• Illustrations in this user’s guide may differ from your machine depending on the model and options installed. Check your machine type (see "Front view" on page
20).
• When opening a scan unit, hold the document feeder and scan unit together.
Cleaning the machine
3. Maintenance 79
2
1
Cleaning the machine
3. Maintenance 80
7
Cleaning the pickup roller
• Turn the machine off and unplug the power cord. Wait for the machine to cool down. If your machine has a power switch, turn the power switch off before
cleaning the machine.
• Illustrations on this user’s guide may differ from your machine depending on its options or models. Check your machine type (see "Front view" on page 20).
Cleaning the machine
3. Maintenance 81
8
Cleaning the scan unit
Keeping the scan unit clean helps ensure the best possible copies. We suggest that you clean the scan unit at the start of each day and during the day as needed.
• Turn the machine off and unplug the power cord. Wait for the machine to cool down. If your machine has a power switch, turn the power switch off before
cleaning the machine.
• Illustrations on this user’s guide may differ from your machine depending on its options or models. Check your machine type (see "Front view" on page 20).
1 Slightly dampen a soft, lint-free cloth or paper towel with water.
2 Lift and open the scanner lid.
Cleaning the machine
3. Maintenance 82
3 Wipe the surface of the scanner until it is clean and dry.
1 Scanner lid
2 Scanner glass
3 Document feeder glass
4 White Sheet
4 Close the scanner lid.
1
2
4
3
3. Maintenance 83
Tips for moving & storing your machine
• When moving the machine, do not tilt or turn it upside down. Otherwise, the inside of the machine may be contaminated by toner, which can cause damage to
the machine or reduce print quality.
• When moving the machine, make sure at least two people are holding the machine securely.
4. Troubleshooting
This chapter gives helpful information for what to do if you encounter an error.
• Tips for avoiding paper jams 85
• Clearing original document jams 86
• Clearing paper jams 91
• Understanding the status LED 95
• Understanding display messages 98
This chapter gives helpful information for what to do if you encounter an error. If your machine
has a display screen, check the message on the display screen first to solve the error.If you
cannot find a solution to your problem in this chapter, refer to the Troubleshooting chapter in
the Advanced Guide (see "Troubleshooting" on page 249).If you cannot find a solution in the
User's Guide or the problem persists, call for service.
4. Troubleshooting 85
Tips for avoiding paper jams
By selecting the correct media s, most paper jams can be avoided. To avoid paper jams, refer to the following guidelines:
• Ensure that the adjustable guides are positioned correctly (see "Tray overview" on page 38).
• Do not remove paper from the tray while your machine is printing.
• Flex, fan, and straighten paper before loading.
• Do not use creased, damp, or highly curled paper.
• Do not mix papers in a tray.
• Use only recommended print media (see "Print media specifications" on page 106).
4. Troubleshooting 86
Clearing original document jams
When an original document jams in the document feeder, a warning message appears on the display.
To avoid tearing the document, remove the jammed document slowly and carefully.
To prevent document jams, use the scanner glass for thick, thin or mixed paper- originals.
Clearing original document jams
4. Troubleshooting 87
1
Original paper jam in front of scanner
• Illustrations in this user’s guide may differ from your machine depending on the model and options installed. Check your machine type (see "Front view" on page
20).
• This troubleshooting may not be available depending on model or optional goods (see "Variety feature" on page 9).
Clearing original document jams
4. Troubleshooting 88
2
Original paper jam inside of scanner
• Illustrations in this user’s guide may differ from your machine depending on the model and options installed. Check your machine type (see "Front view" on page
20).
• This troubleshooting may not be available depending on model or optional goods (see "Variety feature" on page 9).
Clearing original document jams
4. Troubleshooting 89
Clearing original document jams
4. Troubleshooting 90
3
Original paper jam in exit area of scanner
• Illustrations in this user’s guide may differ from your machine depending on the model and options installed. Check your machine type (see "Front view" on page
20).
• This troubleshooting may not be available depending on model or optional goods (see "Front view" on page 20).
1 Remove any remaining pages from the document feeder.
2 Gently remove the jammed paper from the document feeder.
4. Troubleshooting 91
Clearing paper jams
To avoid tearing the paper, pull the jammed paper out slowly and gently.
4
In tray
Click this link to open an animation about clearing a jam.
Illustrations in this user’s guide may differ from your machine depending on the model and options installed. Check your machine type (see "Front view" on page 20).
Clearing paper jams
4. Troubleshooting 92
5
Inside the machine
Click this link to open an animation about clearing a jam.
• The fuser area is hot. Take care when removing paper from the machine.
• Illustrations in this user’s guide may differ from your machine depending on the model and options installed. Check your machine type (see "Front view" on page
20).
Clearing paper jams
4. Troubleshooting 93
2
1
Clearing paper jams
4. Troubleshooting 94
If you do not see the paper in this area, stop and go to next step:
4. Troubleshooting 95
Understanding the status LED
The color of the LED indicates the machine's current status.
• Some LEDs may not be available depending on model or country (see "Control panel overview" on page 23).
• To resolve the error, look at the error message and its instructions from the troubleshooting part (see "Understanding display messages" on page 98).
• If the problem persists, call a service representative.
Understanding the status LED
4. Troubleshooting 96
LED Status Description
Status
Off The machine is off-line.
Green
Blinking When the backlight blinks, the machine is receiving or printing data.
On • The machine is on-line and can be used.
Red
Blinking
• A minor error has occurred and the machine is waiting for the error to be cleared. Check the display message. When the problem
is cleared, the machine resumes.
• Small amount of toner is left in the cartridge. The estimated cartridge lifea
of toner is close. Prepare a new cartridge for
replacement. You may temporarily increase the printing quality by redistributing the toner (see "Redistributing toner" on page
71).b
On
• A toner cartridge has almost reached its estimated cartridge lifea
. It is recommended to replace the toner cartridge (see "Toner
cartridge" on page 73).
• The cover is opened. Close the cover.
• There is no paper in the tray when receiving or printing data. Load paper in the tray.
• The machine has stopped due to a major error. Check the display message (see "Understanding display messages" on page 98).
• A paper jam has occurred (see "Clearing paper jams" on page 91).
Blue
Blinking The machine is connecting to a wireless network.
On The machine is connected to a wireless network (see "Wireless network setup" on page 148).
Orange
Blinking Small amount of toner is left in the cartridge. The estimated cartridge lifea
of toner is close. Prepare a new cartridge for
replacement.You may temporarily increase the printing quality by redistributing the toner (see "Redistributing toner" on page 71)
On A toner cartridge has almost reached its estimated cartridge lifea
. It is recommended to replace the toner cartridge (see "Toner
cartridge" on page 73).
Understanding the status LED
4. Troubleshooting 97
(
Power/
Wakeup )
Blue
On The machine is in power save mode.
Off The machine is in ready mode or machine’s power is off.
Eco Green
On Eco mode is on.
The default setting of Eco mode is 2-up and toner save.
Off Eco mode is off.
a. Estimated cartridge life means the expected or estimated toner cartridge life, which indicates the average capacity of print-outs and is designed pursuant to ISO/IEC 19752. The number of pages
may be affected by operating environment, percentage of image area, printing interval, graphics, media and media size. Some amount of toner may remain in the cartridge even when red LED is
on and the printer stops printing.
b. Some LEDs may not be available depending on model or country (see "Control panel overview" on page 23).
LED Status Description
4. Troubleshooting 98
Understanding display messages
Messages appear on the control panel display to indicate the machine’s status or errors. Refer to the tables below to understand the messages’ and their meaning,
and correct the problem, if necessary.
• If a message is not in the table, reboot the power and try the printing job again. If the problem persists, call a service representative.
• When you call for service, provide the service representative with the contents of display message.
• Some messages may not appear depending on the model and options installed.
• [error number] indicates the error number.
6
Paper Jam-related messages
Message Meaning Suggested solutions
Document jam.
Remove jam
The loaded original document has jammed in the document
feeder.
Clear the jam (see "Clearing original document jams" on page 86).
Jam or empty
Door open&close
• Paper has jammed in the paper feed area.
• There is no paper in tray.
• Clear the jam (see "In tray" on page 91).
• Load paper in tray (see "Loading paper in the tray" on page 39).
Paper Jam
inside machine
Paper has jammed in the inside machine. Clear the jam (see "Inside the machine" on page 92).
Understanding display messages
4. Troubleshooting 99
7
Toner-related messages
Message Meaning Suggested solutions
Install Toner
Cartridge
A toner cartridge is not installed. Install a toner cartridge.
Not Compatible
Toner cartridge
The toner cartridge you have installed is not for your machine. Install a Samsung-genuine toner cartridge, designed for your
machine.
Prepare new cartridge Small amount of toner is left in the indicated cartridge. The
estimated cartridge life of toner is close.
Prepare a new cartridge for a replacement. You may temporarily
increase the printing quality by redistributing the toner (see
"Redistributing toner" on page 71).
Understanding display messages
4. Troubleshooting 100
Replace new cartridge The indicated toner cartridge has almost reached its estimated
cartridge life.
Estimated cartridge life means the expected or
estimated toner cartridge life, which indicates the
average capacity of print-outs and is designed pursuant
to ISO/IEC 19752 (see "Available supplies" on page 68).
The number of pages may be affected by operating
environment, percentage of image area, printing
interval, media, percentage of image area, and media
size. Some amount of toner may remain in the cartridge
even when replace new cartridge appears and the
machine stops printing.
• You can choose Stop or Continue as shown on the control panel.
If you select Stop, the printer stops printing and you cannot print
any more without changing the cartridge. If you select Continue,
the printer keeps printing but the printing quality cannot be
guaranteed.
• Replace the toner cartridge for the best print quality when this
message appears. Using a cartridge beyond this stage can result in
printing quality issues (see "Toner cartridge" on page 73).
Samsung does not recommend using a non-genuine
Samsung toner cartridge such as refilled or remanufactured.
Samsung cannot guarantee a non-genuine Samsung toner
cartridge's quality. Service or repair required as a result of
using non-genuine Samsung toner cartridges will not be
covered under the machine warranty.
The indicated toner cartridge has reached its estimated
cartridge life. The machine might stop printing.
Replace the toner cartridge (see "Toner cartridge" on page 73).
Message Meaning Suggested solutions
Understanding display messages
4. Troubleshooting 101
8
Tray-related messages
9
Network-related messages
10
Misc. messages
Message Meaning Suggested solutions
Jam or empty
Door open&close
• Paper has jammed in the paper feed area.
• There is no paper in tray.
• Clear the jam (see "In tray" on page 91).
• Load paper in tray (see "Loading paper in the tray" on page 39).
Message Meaning Suggested solutions
Network Problem:
IP Conflict
The network IP address you have set is being used by
someone else.
Check the IP address and reset it if necessary (see "Printing a network
configuration report" on page 137).
#S6-3210 Wireless module is not installed. Turn off then on.
Message Meaning Suggested solutions
Door Open
Close it
The cover is not securely latched. Close the cover until it locks into place.
Understanding display messages
4. Troubleshooting 102
Door of scanner is open. The document feeder cover is not securely latched. Close the cover until it locks into place.
Error [error number]
Turn off then on
The machine unit cannot be controlled. Reboot the power and try the printing job again. If the problem
persists, please call for service.
Error [error number]
Call for service
Scanner Locked The scanner is locked. Reboot the power. If the problem persists, please call for service.
Message Meaning Suggested solutions
5. Appendix
This chapter provides product specifications and information concerning applicable regulations.
• Specifications 104
• Regulatory information 113
• Copyright 126
5. Appendix 104
Specifications
1
General specifications
The specification values listed below are subject to change without notice. See www.samsung.com for possible changes in information.
Items Description
Dimensiona Width x Length x Height M207x series
M207xW series
406 x 359.6x 253 mm (15.98 x 14.16 x 9.96 inches)
M207xF series / M207xFW series
M207xFH series / M207xHW series
406 x 359.6x 308.7mm (15.98 x 14.16 x 12.15 inches)
Weighta Machine with consumables M207x series
M207xW series
7.4 Kg (16.31 lbs)
M207xF series / M207xFW series
M207xFH series / M207xHW series
8.47 Kg (18.67lbs)
Noise Levelb Ready mode Less than 26 dB (A)
Print mode Less than 50 dB (A)
Copy mode Scanner glass Less than 50 dB (A)
Document feeder Less than 53 dB (A)
Scan mode Scanner glass Less than 52 dB (A)
Document feeder Less than 54 dB (A)
Specifications
5. Appendix 105
Temperature Operation 10 to 32°C (50 to 89.6°F)
Storage (packed) -20 to 40°C (-4 to 104°F)
Humidity Operation 20 to 80% RH
Storage (packed) 10 to 90% RH
Power ratingc 110 volt models AC 110 - 127 V
220 volt models AC 220 - 240 V
Power consumption Average operating mode Less than 310 W
Ready mode Less than 30 W
Power save moded • M207x series: Less than 1.5 W
• M207xW series: Less than 2.1 W ( Wi-Fi Direct off :Less than 1.8 W )
• M207xF series / M207xFH series: Less than 1.9 W
• M207xFW series / M207xHW series: Less than 2.5 W ( Wi-Fi Direct off :Less than 2.3 W )
Power off modee Less than 0.45 W
Wirelessf Module T77H262/SPW-B4319S
a. Dimensions and weight are measured without a handset and other accessories.
b. Sound Pressure Level, ISO 7779. Configuration tested: basic machine installation, A4 paper, simplex printing.
c. See the rating label on the machine for the correct voltage (V), frequency (hertz) and of current (A) for your machine.
d. The power consumption of power save mode may be affected by machine's status, setting conditions, operating environment.
e. Power consumption can be completely avoided only when the power cable is not connected.
f. Wireless models only (see "Features by models" on page 7).
Items Description
Specifications
5. Appendix 106
2
Print media specifications
Type Size Dimensions
Print media weight/Capacitya
Tray Manual feeding in trayb
Plain
Letter 216 x 279 mm (8.5 x 11 inches) 71 to 85 g/m2 (19 to 23 lbs bond)
• 150 sheets of 80 g/m2 (21 lbs
bond)
71 to 85 g/m2 (19 to 23 lbs bond)
Legal 216 x 356 mm (8.5 x 14 inches) • 1 sheet
Folio 216 x 330 mm (8.5 x 13 inches)
A4 210 x 297 mm (8.27 x 11.69 inches)
Oficio 216 x 343 mm (8.5 x 13.5 inches)
B5(JIS) 182 x 257 mm (7.17 x 10.12 inches)
B5(ISO) 176 x 250 mm (6.93 x 9.84 inches)
Executive 184 x 267 mm (7.25 x 10.5 inches)
A5 148 x 210 mm (5.83 x 8.27 inches)
Envelope
Monarch Envelope 98 x 191 mm (3.87 x 7.5 inches) 75 to 90 g/m2 (20 to 24 lbs bond)
• 10 sheets
75 to 90 g/m2 (20 to 24 lbs bond)
No. 10 Envelope 105 x 241 mm (4.12 x 9.5 inches) • 1 sheet
DL Envelope 110 x 220 mm (4.33 x 8.66 inches)
C5 Envelope 162 x 229 mm (6.38 x 9.02 inches)
Specifications
5. Appendix 107
Thick Refer to the Plain
section
Refer to the Plain section 86 to 120 g/m2 (23 to 32 lbs
bond)
• 50 sheets of 120 g/m2 (32 lbs
bond)
86 to 120 g/m2 (23 to 32 lbs bond)
• 1 sheet
Thin Refer to the Plain
section
Refer to the Plain section 60 to 70 g/m2 (16 to 19 lbs bond)
• 160 sheets of 60 g/m2 (16 lbs
bond)
60 to 70 g/m2 (16 to 19 lbs bond)
• 1 sheet
Cotton Refer to the Plain
section
Refer to the Plain section 75 to 90 g/m2 (20 to 24 lbs bond)
• 150 sheets of 80 g/m2 (21 lbs
bond)
75 to 90 g/m2 (20 to 24 lbs bond)
• 1 sheet
Colored Refer to the Plain
section
Refer to the Plain section 75 to 90 g/m2 (20 to 24 lbs bond)
• 150 sheets of 80 g/m2 (21 lbs
bond)
75 to 90 g/m2 (20 to 24 lbs bond)
• 1 sheet
Preprinted Refer to the Plain
section
Refer to the Plain section 75 to 90 g/m2 (20 to 24 lbs bond)
• 150 sheets of 80 g/m2 (21 lbs
bond)
75 to 90 g/m2 (20 to 24 lbs bond)
• 1 sheet
Recycled Refer to the Plain
section
Refer to the Plain section 60 to 90 g/m2 (16 to 24 lbs bond)
• 150 sheets of 80 g/m2 (21 lbs
bond)
60 to 90 g/m2 (16 to 24 lbs bond)
• 1 sheet
Type Size Dimensions
Print media weight/Capacitya
Tray Manual feeding in trayb
Specifications
5. Appendix 108
Labelsc
Letter, Legal, Oficio,
Folio, A4, B5(JIS),
B5(ISO), Executive,
A5
Refer to the Plain section 120 to 150 g/m2 (32 to 40 lbs
bond)
• 10 sheets
120 to 150 g/m2 (32 to 40 lbs bond)
• 1 sheet
CardStock
Letter, Legal, Oficio,
Folio, A4, B5(JIS),
B5(ISO), Executive,
A5,
Postcard 4x6
Refer to the Plain section 121 to 163 g/m2 (32 to 43 lbs
bond)
• 10 sheets
121 to 163 g/m2 (32 to 43 lbs bond)
• 1 sheet
Bond Refer to the Plain
section
Refer to the Plain section • 10 sheets • 1 sheet
Archive Refer to the Plain
section
Refer to the Plain section • 100 sheets • 1 sheet
Minimum size (custom) 76 x 127 mm (3 x 5 inches) 60 to 163 g/m2 (16 to 43 lbs bond)
Maximum size (custom) 216 x 356 mm (8.5 x 14 inches)
a. Maximum capacity may differ depending on media weight, thickness, and environmental conditions.
b. 1 sheet for manual feeding.
c. The smoothness of the labels used in this machine is 100 to 250 (sheffield). This means the numeric level of smoothness.
Type Size Dimensions
Print media weight/Capacitya
Tray Manual feeding in trayb
Specifications
5. Appendix 109
3
System requirements
Microsoft® Windows®
Operating system
Requirement (recommended)
CPU RAM free HDD space
Windows® XP Intel® Pentium® III 933 MHz (Pentium IV 1 GHz) 128 MB (256 MB) 1.5 GB
Windows Server® 2003 Intel® Pentium® III 933 MHz (Pentium IV 1 GHz) 128 MB (512 MB) 1.25 GB to 2 GB
Windows Server® 2008 Intel® Pentium® IV 1 GHz (Pentium IV 2 GHz) 512 MB (2 GB) 10 GB
Windows Vista® Intel® Pentium® IV 3 GHz 512 MB (1 GB) 15 GB
Windows® 7 Intel® Pentium® IV 1 GHz 32-bit or 64-bit processor or higher 1 GB (2 GB) 16 GB
• Support for DirectX® 9 graphics with 128 MB memory (to enable the Aero theme).
• DVD-R/W Drive
Windows Server® 2008 R2 Intel® Pentium® IV 1.4 GHz (x64) or 1.4 GHz (x64) processors (2 GHz or faster) 512 MB (2 GB) 10 GB
Windows® 8
Windows® 8.1
Intel® Pentium® IV 1 GHz 32-bit or 64-bit processor or higher 2 GB 20 GB
• Support for DirectX® 9 graphics with 128 MB memory (to enable the Aero theme).
• DVD-R/W Drive
Windows Server® 2012
Windows Server® 2012 R2
Intel® Pentium® IV 1.4 GHz (x64) or 1.4 GHz (x64) processors (2 GHz or faster) 512 MB (2 GB) 32 GB
Specifications
5. Appendix 110
• Internet Explorer 6.0 or higher is the minimum requirement for all Windows operating systems.
• Users who have administrator rights can install the software.
• Windows Terminal Services is compatible with your machine.
• For Windows 2000, Services Pack 4 or higher is required.
Mac
Operating system
Requirements (Recommended)
CPU RAM Free HDD space
Mac OS X 10.5 • Intel® processors
• 867 MHz or faster Power PC G4/G5
512 MB (1 GB) 1 GB
Mac OS X 10.6 • Intel® processors 1 GB (2 GB) 1 GB
Mac OS X 10.7 ~ 10.9 • Intel® processors 2 GB 4 GB
Specifications
5. Appendix 111
Linux
Items Requirements
Operating system Redhat® Enterprise Linux 5, 6
Fedora 11, 12, 13, 14, 15, 16, 17, 18
SuSE Linux 10.1 (32 bit)
OpenSuSE® 11.0, 11.1, 11.2, 11.3, 11.4, 12.1, 12.2, 12.3
Ubuntu 10.04, 10.10, 11.04, 11.10, 12.04, 12.10
SuSE Linux Enterprise Desktop 10, 11
Debian 5.0, 6.0
Mint 13, 14
CPU Pentium IV 2.4GHz (Intel Core™2)
RAM 512 MB (1 GB)
Free HDD space 1 GB (2 GB)
Specifications
5. Appendix 112
4
Network environment
Network and wireless models only (see "Features by models" on page 7).
You need to set up the network protocols on the machine to use it as your network machine. The following table shows the network environments supported by the
machine.
Items Specifications
Network interface • Ethernet 10/100 Base-TX Wired Lan
• 802.11b/g/n Wireless LAN
Network operating system • Server 2003 /Server 2008/XP/Vista/7/Server 2008 R2
• Various Linux OS
• Mac OS X 10.5 ~10.9
Network protocols • TCP/IPv4
• DHCP, BOOTP
• DNS, WINS, Bonjour, SLP, UPnP
• Standard TCP/IP Printing (RAW), LPR, IPP, WSD
• SNMPv 1/2/3, HTTP, IPSec
• TCP/IPv6 (DHCP, DNS, RAW, LPR, SNMPv 1/2/3, HTTP, IPSec)
Wireless security • Authentication: Open System, Shared Key, WPA Personal, WPA2 Personal (PSK)
• Encryption: WEP64, WEP128, TKIP, AES
5. Appendix 113
Regulatory information
This machine is designed for a normal work environment and certified with
several regulatory statements.
5
Laser safety statement
The printer is certified in the U.S. to conform to the requirements of DHHS 21
CFR, chapter 1 Subchapter J for Class I(1) laser products, and elsewhere is
certified as a Class I laser product conforming to the requirements of IEC 60825-
1 :2007.
Class I laser products are not considered to be hazardous. The laser system and
printer are designed so there is never any human access to laser radiation above
a Class I level during normal operation, user maintenance or prescribed service
condition.
Warning
Never operate or service the printer with the protective cover removed from
laser/scanner assembly. The reflected beam, although invisible, can damage
your eyes.
When using this product, these basic safety precautions should always be
followed to reduce risk of fire, electric shock, and injury to persons:
Regulatory information
5. Appendix 114
6
Ozone safety
7
Mercury Safety
8
Power saver
9
Recycling
This product’s ozone emission rate is under 0.1 ppm. Because
ozone is heavier than air, keep the product in a place with good
ventilation.
Contains Mercury, Dispose According to Local, State or Federal
Laws.(U.S.A. only)
This printer contains advanced energy conservation technology that
reduces power consumption when it is not in active use.
When the printer does not receive data for an extended period of
time, power consumption is automatically lowered.
ENERGY STAR and the ENERGY STAR mark are registered U.S. marks.
For more information on the ENERGY STAR program see http://
www.energystar.gov
For ENERGY STAR certified models, the ENRGY STAR label will be on
your machine. Check if your machine is ENERGY STAR certified.
Recycle or dispose of the packaging material for this product in an
environmentally responsible manner.
Regulatory information
5. Appendix 115
10
China only
Website : http://www.samsung.com/cn/support/location/
supportServiceLocation.do?page=SERVICE.LOCATION
11
Correct disposal of this product (Waste electrical &
electronic equipment)
(Applicable in countries with separate collection
systems)
襦愤縑趀爮闭
賉帞 縑趀绌裎 術賉縑聱ポM9śJマ
;SUHVV0����:
;SUHVV0����+:
蜷筨愤竖爮襔*%����������
襦愤縑趀爮闭
賉帞 縑趀绌裎 術賉縑聱ポM9śJマ
� ����
� ����
This marking on the product, accessories or literature indicates that the
product and its electronic accessories (e.g. charger, headset, USB cable)
should not be disposed of with other household waste at the end of
their working life. To prevent possible harm to the environment or
human health from uncontrolled waste disposal, please separate these
items from other s of waste and recycle them responsibly to promote the
sustainable reuse of material resources.
Household users should contact either the retailer where they
purchased this product, or their local government office, for details of
where and how they can take these items for environmentally safe
recycling.
Business users should contact their supplier and check the terms and
conditions of the purchase contract. This product and its electronic
accessories should not be mixed with other commercial wastes for
disposal.
Regulatory information
5. Appendix 116
(The United States of America only)
Dispose unwanted electronics through an approved recycler. To find the nearest
recycling location, go to our website:www.samsung.com/recyclingdirect Or call,
(877) 278 - 0799
12
State of California Proposition 65 Warning (US Only)
13
Taiwan only
14
Radio frequency emissions
FCC information to the user
This device complies with Part 15 of the FCC Rules. Operation is subject to the
following two conditions:
• This device may not cause harmful interference, and
• This device must accept any interference received, including interference
that may cause undesired operation.
This equipment has been tested and found to comply with the limits for a Class
B digital device, pursuant to Part 15 of the FCC Rules. These limits are designed
to provide reasonable protection against harmful interference in a residential
installation. This equipment generates, uses and can radiate radio frequency
energy and, if not installed and used in accordance with the instructions, may
cause harmful interference to radio communications. However, there is no
guarantee that interference will not occur in a particular installation. If this
equipment does cause harmful interference to radio or television reception,
which can be determined by turning the equipment off and on, the user is
encouraged to try to correct the interference by one or more of the following
measures:
• Reorient or relocate the receiving antenna.
• Increase the separation between the equipment and receiver.
• Connect the equipment into an outlet on a circuit different from that to
which the receiver is connected.
Regulatory information
5. Appendix 117
• Consult the dealer or experienced radio TV technician for help.
Change or modifications not expressly approved by the manufacturer
responsible for compliance could void the user's authority to operate the
equipment.
Canadian radio interference regulations
This digital apparatus does not exceed the Class B limits for radio noise
emissions from digital apparatus as set out in the interference-causing
equipment standard entitled “Digital Apparatus”, ICES-003 of the Industry and
Science Canada.
Cet appareil numérique respecte les limites de bruits radioélectriques
applicables aux appareils numériques de Classe B prescrites dans la norme sur le
matériel brouilleur: “Appareils Numériques”, ICES-003 édictée par l’Industrie et
Sciences Canada.
15
United States of America
Federal Communications Commission (FCC)
Intentional emitter per FCC Part 15
Low power, Radio LAN devices (radio frequency (RF) wireless communication
devices), operating in the 2.4 GHz/5 GHz Band, may be present (embedded) in
your printer system. This section is only applicable if these devices are present.
Refer to the system label to verify the presence of wireless devices.
Wireless devices that may be in your system are only qualified for use in the
United States of America if an FCC ID number is on the system label.
The FCC has set a general guideline of 20 cm (8 inches) separation between the
device and the body, for use of a wireless device near the body (this does not
include extremities). This device should be used more than 20 cm (8 inches)
from the body when wireless devices are on. The power output of the wireless
device (or devices), which may be embedded in your printer, is well below the
RF exposure limits as set by the FCC.
This transmitter must not be collocated or operation in conjunction with any
other antenna or transmitter.
Operation of this device is subject to the following two conditions: (1) This
device may not cause harmful interference, and (2) this device must accept any
interference received, including interference that may cause undesired
operation of the device.
Regulatory information
5. Appendix 118
Wireless devices are not user serviceable. Do not modify them in any way.
Modification to a wireless device will void the authorization to use it.
Contact manufacturer for service.
FCC Statement for Wireless LAN use:
While installing and operating this transmitter and antenna combination
the radio frequency exposure limit of 1m W/cm2 may be exceeded at
distances close to the antenna installed. Therefore, the user must maintain
a minimum distance of 20cm from the antenna at all times. This device
cannot be colocated with another transmitter and transmitting antenna.
16
Russia/Kazakhstan/Belarus only
17
Germany only
18
Turkey only
19
Thai only
20
Canada only
This product meets the applicable Industry Canada technical specifications. / Le
present materiel est conforme aux specifications techniques applicables
d’Industrie Canada.
Regulatory information
5. Appendix 119
The Ringer Equivalence Number (REN) is an indication of the maximum number
of devices allowed to be connected to a telephone interface. The termination of
an interface may consist of any combination of devices subject only to the
requirement that the sum of the RENs of all the devices not exceed five. / L’indice
d’equivalence de la sonnerie (IES) sert a indiquer le nombre maximal de
terminaux qui peuvent etre raccordes a une interface telephonique. La
terminaison d’une interface peut consister en une combinaison quelconque de
dispositifs, a la seule condition que la somme d’indices d’equivalence de la
sonnerie de tous les dispositifs n’excede pas cinq.
21
Fax Branding
The Telephone Consumer Protection Act of 1991 makes it unlawful for any
person to use a computer or other electronic device to send any message via a
telephone facsimile machine unless such message clearly contains in a margin
at the top or bottom of each transmitted page or on the first page of the
transmission the following information:
1 the date and time of transmission
2 identification of either business, business entity or individual sending the
message; and
3 telephone number of either the sending machine, business, business entity
or individual.
The Telephone Company may make changes in its communications facilities,
equipment operations or procedures where such action is reasonably required
in the operation of its business and is not inconsistent with the rules and
regulations in FCC Part 68. If such changes can be reasonably expected to render
any customer terminal equipment incompatible with telephone company
communications facilities, or require modification or alteration of such terminal
equipment, or otherwise materially affect its use or performance, the customer
shall be given adequate notice in writing, to allow the customer an opportunity
to maintain uninterrupted service
22
Ringer Equivalence Number
The Ringer Equivalence Number and FCC Registration Number for this machine
may be found on the label located on the bottom or rear of the machine. In some
instances you may need to provide these numbers to the telephone company.
The Ringer Equivalence Number (REN) is a measure of the electrical load placed
on the telephone line, and is useful for determining whether you have
“overloaded” the line. Installing several s of equipment on the same telephone
line may result in problems making and receiving telephone calls, especially
ringing when your line is called. The sum of all Ringer Equivalence Numbers of
the equipment on your telephone line should be less than five in order to assure
proper service from the telephone company. In some cases, a sum of five may
not be usable on your line. If any of your telephone equipment is not operating
properly, you should immediately remove it from your telephone line, as it may
cause harm to the telephone network.
Regulatory information
5. Appendix 120
The equipment complies with Part 68 of the FCC rules and the requirements
adopted by the ACTA. On the rear of this equipment is a label that contains,
among other information, a product identifier in the format US:AAAEQ##TXXXX.
If requested, this number must be provided to the telephone company.
FCC Regulations state that changes or modifications to this equipment not
expressly approved by the manufacturer could void the user’s authority to
operate this equipment. In the event that terminal equipment causes harm
to the telephone network, the telephone company should notify the
customer that service may be stopped. However, where prior notice is
impractical, the company may temporarily cease service, providing that
they:
a promptly notify the customer.
b give the customer an opportunity to correct the equipment problem.
c inform the customer of the right to bring a complaint to the Federal
Communication Commission pursuant to procedures set out in FCC
Rules and Regulations Subpart E of Part 68.
You should also know that:
• Your machine is not designed to be connected to a digital PBX system.
• If you intend to use a computer modem or fax modem on the same phone
line as your machine, you may experience transmission and reception
problems with all the equipment. It is recommended that no other
equipment, except for a regular telephone, share the line with your
machine.
• If your area experiences a high incidence of lightning or power surges, we
recommend that you install surge protectors for both the power and the
telephone lines. Surge protectors can be purchased from your dealer or
telephone and electronic specialty stores.
• When programming emergency numbers and/or making test calls to
emergency numbers, use a non-emergency number to advise the
emergency service dispatcher of your intentions. The dispatcher will give
you further instructions on how to actually test the emergency number.
• This machine may not be used on coin service or party lines.
• This machine provides magnetic coupling to hearing aids.
You may safely connect this equipment to the telephone network by means of
a standard modular jack, USOC RJ-11C.
23
Replacing the Fitted Plug (for UK Only)
Important
The mains lead for this machine is fitted with a standard (BS 1363) 13 amp plug
and has a 13 amp fuse. When you change or examine the fuse, you must re-fit
the correct 13 amp fuse. You then need to replace the fuse cover. If you have lost
the fuse cover, do not use the plug until you have another fuse cover.
Contact the people from you purchased the machine.
Regulatory information
5. Appendix 121
The 13 amp plug is the most widely used in the UK and should be suitable.
However, some buildings (mainly old ones) do not have normal 13 amp plug
sockets. You need to buy a suitable plug adaptor. Do not remove the moulded
plug.
If you cut off the moulded plug, get rid of it straight away.You cannot rewire
the plug and you may receive an electric shock if you plug it into a socket.
Important warning:
If the wires in the mains lead do not match the colors marked in your plug, do
the following:
You must connect the green and yellow wire to the pin marked by the letter “E”
or by the safety ‘Earth symbol’ or colored green and yellow or green.
You must connect the blue wire to the pin which is marked with the letter “N” or
colored black.
You must connect the brown wire to the pin which is marked with the letter “L”
or colored red.
You must have a 13 amp fuse in the plug, adaptor, or at the distribution board.
24
Declaration of conformity (European countries)
Approvals and Certifications
January 1, 1995: Council Directive 2006/95/EC Approximation of the laws of
the member states related to low voltage equipment.
January 1, 1996: Council Directive 2004/108/EC, approximation of the laws of
the Member States related to electromagnetic compatibility.
You must earth this machine.
The wires in the mains lead have the following color code:
• Green and Yellow: Earth
• Blue: Neutral
• Brown: Live
Hereby, Samsung Electronics, declares that this [M207x series] is in
compliance with the essential requirements and other relevant
provisions of Low Voltage Directive (2006/95/EC), EMC Directive
(2004/108/EC).
Hereby, Samsung Electronics, declares that this [M207xW series/
M207xF series/M207xFW series] is in compliance with the essential
requirements and other relevant provisions of R&TTE Directive 1999/
5/EC.
The declaration of conformity may be consulted at
www.samsung.com, go to Support > Download center and enter
your printer (MFP) name to browse the EuDoC.
Regulatory information
5. Appendix 122
March 9, 1999: Council Directive 1999/5/EC on radio equipment and
telecommunications terminal equipment and the mutual recognition of their
conformity. A full declaration, defining the relevant Directives and referenced
standards can be obtained from your Samsung Electronics Co., Ltd.
representative.
EC Certification
Certification to 1999/5/EC Radio Equipment & Telecommunications Terminal
Equipment Directive (FAX)
This Samsung product has been self-certified by Samsung for pan-European
single terminal connection to the analogue public switched telephone network
(PSTN) in accordance with Directive 1999/5/EC. The product has been designed
to work with the national PSTNs and compatible PBXs of the European
countries:
In the event of problems, you should contact the Euro QA Lab of Samsung
Electronics Co., Ltd. in the first instance.
The product has been tested against TBR21. To assist in the use and application
of terminal equipment which complies with this standard, the European
Telecommunication Standards Institute (ETSI) has issued an advisory document
(EG 201 121) which contains notes and additional requirements to ensure
network compatibility of TBR21 terminals. The product has been designed
against, and is fully compliant with, all of the relevant advisory notes contained
in this document.
European radio approval information (for products
fitted with EU-approved radio devices)
Low power, Radio LAN type devices (radio frequency (RF) wireless
communication devices), operating in the 2.4 GHz/5 GHz band, may be present
(embedded) in your printer system which is intended for home or office use. This
section is only applicable if these devices are present. Refer to the system label
to verify the presence of wireless devices.
The power output of the wireless device or devices that may be embedded in
you printer is well below the RF exposure limits as set by the European
Commission through the R&TTE directive.
European states qualified under wireless approvals:
EU countries
European states with restrictions on use:
EU
In France, the frequency range is restricted to 2454-2483.5 MHz for devices
above 10 mW transmitting power such as wireless
EEA/EFTA countries
Wireless devices that may be in your system are only qualified for
use in the European Union or associated areas if a CE mark with a
Notified Body Registration Number and the Alert Symbol is on the
system label.
Regulatory information
5. Appendix 123
No limitations at this time
25
Israel only
26
Regulatory compliance statements
Wireless guidance
Low power, Radio LAN devices (radio frequency (RF) wireless communication
devices), operating in the 2.4 GHz/5 GHz Band, may be present (embedded) in
your printer system. The following section is a general overview of
considerations while operating a wireless device.
Additional limitations, cautions, and concerns for specific countries are listed in
the specific country sections (or country group sections). The wireless devices in
your system are only qualified for use in the countries identified by the Radio
Approval Marks on the system rating label. If the country you will be using the
wireless device in, is not listed, contact your local Radio Approval agency for
requirements. Wireless devices are closely regulated and use may not be
allowed.
The power output of the wireless device or devices that may be embedded in
your printer is well below the RF exposure limits as known at this time. Because
the wireless devices (which may be embedded into your printer) emit less
energy than is allowed in radio frequency safety standards and
recommendations, manufacturer believes these devices are safe for use.
Regardless of the power levels, care should be taken to minimize human contact
during normal operation.
As a general guideline, a separation of 20 cm (8 inches) between the wireless
device and the body, for use of a wireless device near the body (this does not
include extremities) is typical. This device should be used more than 20 cm (8
inches) from the body when wireless devices are on and transmitting.
This transmitter must not be collocated or operation in conjunction with any
other antenna or transmitter.
Some circumstances require restrictions on wireless devices. Examples of
common restrictions are listed below:
Radio frequency wireless communication can interfere with
equipment on commercial aircraft. Current aviation regulations
require wireless devices to be turned off while traveling in an airplane.
IEEE 802.11 (also known as wireless Ethernet) and Bluetooth
communication devices are examples of devices that provide wireless
communication.
Regulatory information
5. Appendix 124
In environments where the risk of interference to other devices or
services is harmful or perceived as harmful, the option to use a wireless
device may be restricted or eliminated. Airports, Hospitals, and
Oxygen or flammable gas laden atmospheres are limited examples
where use of wireless devices may be restricted or eliminated. When in
environments where you are uncertain of the sanction to use wireless
devices, ask the applicable authority for authorization prior to use or
turning on the wireless device.
Every country has different restrictions on the use of wireless devices.
Since your system is equipped with a wireless device, when traveling
between countries with your system, check with the local Radio
Approval authorities prior to any move or trip for any restrictions on
the use of a wireless device in the destination country.
If your system came equipped with an internal embedded wireless
device, do not operate the wireless device unless all covers and shields
are in place and the system is fully assembled.
Wireless devices are not user serviceable. Do not modify them in any
way. Modification to a wireless device will void the authorization to
use it. Contact manufacturer for service.
Only use drivers approved for the country in which the device will be
used. See the manufacturer System Restoration Kit, or contact
manufacturer Technical Support for additional information.
Regulatory information
5. Appendix 125
27
China only
5. Appendix 126
Copyright
© 2013 Samsung Electronics Co., Ltd. All rights reserved.
This user’s guide is provided for information purposes only. All information included herein is subject to change without notice.
Samsung Electronics is not responsible for any direct or indirect damages, arising from or related to use of this user’s guide.
• Samsung and the Samsung logo are trademarks of Samsung Electronics Co., Ltd.
• Microsoft, Windows, Windows Vista, Windows 7, and Windows Server 2008 R2 are either registered trademarks or trademarks of Microsoft Corporation.
• Microsoft, Internet Explorer, Excel, Word, PowerPoint, and Outlook are either registered trademarks or trademarks of Microsoft Corporation in the United States
and other countries.
• Google, Picasa, Google Docs, Android and Gmail are either registered trademarks or trademarks of Google Inc.
• Google Cloud Print is a trademark of Google Inc.
• iPad, iPhone, iPod touch, Mac and Mac OS are trademarks of Apple Inc., registered in the U.S and other countries.
AirPrint and the AirPrint logo are trademarks of Apple Inc.
• LaserWriter is a trademark of Apple Computer, Inc.
• All other brand or product names are trademarks of their respective companies or organizations.
Refer to the 'LICENSE.txt' file in the provided CD-ROM for the open source license information.
REV. 4.00
ADVANCED
User’s Guide
ADVANCED
User’s Guide
This guide provides information about installation, advanced configuration,
operation and troubleshooting on various OS environments.
Some features may not be available depending on models or countries.
BASIC
This guide provides information concerning installation, basic operation and troubleshooting
on windows.
128
ADVANCED
1. Software Installation
Installation for Mac 131
Reinstallation for Mac 132
Installation for Linux 133
Reinstallation for Linux 134
2. Using a Network-Connected
Machine
Useful network programs 136
Wired network setup 137
Installing driver over the network 140
IPv6 configuration 145
Wireless network setup 148
Samsung Mobile Print 173
Using the NFC feature 174
3. Useful Setting Menus
Before you begin reading a chapter 179
Copy menu 180
Fax menu 182
System setup 185
Network setup 191
4. Special Features
Altitude adjustment 194
Storing email address 195
Entering various characters 197
Setting up the fax address book 198
Registering authorized users 202
Printing features 203
Scan features 216
Fax features 225
Using shared folder features 234
Using memory/hard drive features 235
129
ADVANCED
5. Useful Management Tools
Easy Capture Manager 237
Samsung AnyWeb Print 238
Easy Eco Driver 239
Using SyncThru™ Web Service 240
Using Samsung Easy Document Creator 243
Using Samsung Easy Printer Manager 244
Using Samsung Printer Status 247
6. Troubleshooting
Paper feeding problems 250
Power and cable connecting problems 251
Printing problems 252
Printing quality problems 256
Copying problems 264
Scanning problems 265
Faxing problems 267
Operating system problems 269
1. Software Installation
This chapter provides instructions for installing essential and helpful software for use in an environment where the
machine is connected via a cable. A locally connected machine is a machine directly attached to your computer using
the cable. If your machine is attached to a network, skip the following steps below and go on to installing a network
connected machine’s driver (see "Installing driver over the network" on page 140).
• Installation for Mac 131
• Reinstallation for Mac 132
• Installation for Linux 133
• Reinstallation for Linux 134
• If you are a Windows OS user, refer to the Basic Guide for installing the machine’s driver (see
"Installing the driver locally" on page 28).
• Only use a USB cable no longer then 3 meter (118 inches).
1. Software Installation 131
Installation for Mac
1 Make sure that the machine is connected to your computer and
powered on.
2 Insert the supplied software CD into your CD-ROM drive.
3 Double-click the CD-ROM icon that appears on your Mac desktop.
• For Mac OS X 10.8, double-click the CD-ROM that appears on Finder.
4 Double-click the MAC_Installer folder > Installer OS X icon.
5 Click Continue.
6 Read the license agreement and click Continue.
7 Click Agree to agree to the license agreement.
8 Click Install. All components necessary for machine operations will be
installed.
If you click Customize, you can choose individual components to install.
9 Enter the password and click OK.
10 Select USB Connected Printer on the Printer Connection Type and
click Continue.
11 Click Add Printer button to select your printer and add it to your printer
list.
If your machine supports fax, click Add Fax button to select your fax and
add it to your fax list
12 After the installation is finished, click Close.
1. Software Installation 132
Reinstallation for Mac
If the printer driver does not work properly, uninstall the driver and reinstall it.
1 Open the Applications folder > Samsung > Printer Software
Uninstaller.
2 To uninstall printer software, click Continue.
3 Check the program you want to delete and click Uninstall.
4 Enter the password and click OK.
5 After the uninstallation is finished, click Close.
If a machine has already been added, delete it from the Print Setup Utility
or Print & Fax.
1. Software Installation 133
Installation for Linux
You need to download Linux software packages from the Samsung website to
install the printer software (http://www.samsung.com > find your product >
Support or Downloads).
1
Installing the Unified Linux Driver
You must log in as a super user (root) to install the machine software. If you
are not a super user, ask your system administrator.
1 Make sure that the machine is connected to your system and powered
on.
2 Copy Unified Linux Driver package to your system.
3 Open Terminal program and go to the folder that you copied the
package to.
4 Extract the package.
5 Move to uld folder.
6 Execute ” ./install.sh“ command (If you are not logged in as root,
execute the command with “sudo” as “sudo ./install.sh”).
7 Proceed with installation.
8 When installation finished, launch Printing utility (Go to System >
Administration > Printing or execute “system-config-printer“
command in Terminal program).
9 Click Add button.
10 Select your printer.
11 Click Forward button and add it to your system.
1. Software Installation 134
Reinstallation for Linux
If the printer driver does not work properly, uninstall the driver and reinstall it.
1 Open Terminal program.
2 Move to uld folder extracted from Unified Linux Driver package.
3 Execute ” ./install.sh“ command (If you are not logged in as root,
execute the command with “sudo” as “sudo ./install.sh”).
4 Proceed with uninstallation.
2. Using a NetworkConnected
Machine
This chapter gives you step-by-step instructions for setting up a network connected machine and software.
• Useful network programs 136
• Wired network setup 137
• Installing driver over the network 140
• IPv6 configuration 145
• Wireless network setup 148
• Samsung Mobile Print 173
• Using the NFC feature 174
Supported optional devices and features may differ according to your model (see "Features by
models" on page 7).
2. Using a Network-Connected Machine 136
Useful network programs
There are several programs available to setup the network settings easily in a
network environment. For the network administrator especially, managing
several machines on the network is possible.
• Before using the programs below, set the IP address first.
• Some features and optional goods may not be available depending on
model or country (see "Features by models" on page 7).
1
SyncThru™ Web Service
The web server embedded on your network machine allows you to do the
following tasks (see "Using SyncThru™ Web Service" on page 240).
• Check the supplies information and status.
• Customize machine settings.
• Configure the network parameters necessary for the machine to connect to
various network environments.
2
SyncThru™ Web Admin Service
Web-based machine management solution for network administrators.
SyncThru™ Web Admin Service provides you with an efficient way of managing
network devices and lets you remotely monitor and troubleshoot network
machines from any site with corporate Internet access.
• Download this program from http://solution.samsungprinter.com.
3
SetIP wired network setup
This utility program allows you to select a network interface and manually
configure the IP addresses for use with the TCP/IP protocol.
• See "IPv4 configuration using SetIP (Windows)" on page 137.
• See "IPv4 configuration using SetIP (Mac)" on page 138.
• The machine that does not support the network port, it will not be able
to use this feature (see "Rear view" on page 22).
• TCP/IPv6 is not supported by this program.
2. Using a Network-Connected Machine 137
Wired network setup
4
Printing a network configuration report
You can print Network Configuration Report from the machine’s control panel
that will show the current machine’s network settings. This will help you to set
up a network.
• The machine has the display screen: Press the (Menu) button on the
control panel and select Network > Network Conf. (Network
Configuration).
• The machine has the touch screen: Press Setup from the Main screen >
Network > Next > Network Configuration.
• The machine does not have the display screen: Press the (Cancel or
Stop/Clear) button for more than 4~5 seconds on the control panel.
Using this Network Configuration Report, you can find your machine’s MAC
address and IP address.
For example:
• MAC Address: 00:15:99:41:A2:78
• IP Address: 169.254.192.192
5
Setting IP address
• The machine that does not support the network interface, it will not be
able to use this feature (see "Rear view" on page 22).
• TCP/IPv6 is not supported by this program.
First, you have to set up an IP address for network printing and managements.
In most cases a new IP address will be automatically assigned by a DHCP
(Dynamic Host Configuration Protocol) server located on the network.
IPv4 configuration using SetIP (Windows)
Before using the SetIP program, disable the computer firewall from Control
Panel > Security Center > Windows Firewall.
The following instructions may differ for your model.
1 Download the software from the Samsung website then unpack and
install it: (http://www.samsung.com > find your product > Support or
Downloads).
2 Follow the instructions in the installation window.
3 Connect your machine to the network with a network cable.
Wired network setup
2. Using a Network-Connected Machine 138
4 Turn on the machine.
5 From the Windows Start menu, select All Programs > Samsung
Printers > SetIP > SetIP.
6 Click the icon (third from left) in the SetIP window to open the TCP/IP
configuration window.
7 Enter the machine’s new information into the configuration window. In
a corporate intranet, you may need to have this information assigned by
a network manager before proceeding.
Find the machine’s MAC address from the Network Configuration Report
(see "Printing a network configuration report" on page 137) and enter it
without the colons. For example, 00:15:99:29:51:A8 becomes
0015992951A8.
8 Click Apply, and then click OK. The machine will automatically print the
Network Configuration Report. Confirm that all the settings are
correct.
IPv4 configuration using SetIP (Mac)
Before using the SetIP program, disable the computer firewall from System
Preferences > Security > Firewall.
The following instructions may vary from your model.
1 Connect your machine to the network with a network cable.
2 Insert the supplied software CD into your CD-ROM drive.
3 Double-click the CD-ROM icon that appears on your Mac desktop.
• For Mac OS X 10.8, Double-click the CD-ROM that appears on Finder.
4 Double-click the MAC_Installer folder > Installer OS X icon.
5 Click Continue.
6 Read the license agreement and click Continue.
7 Click Agree to agree to the license agreement.
Wired network setup
2. Using a Network-Connected Machine 139
8 Click Install. All components necessary for machine operations will be
installed.
If you click Customize, you can choose individual components to install.
9 Enter the password and click OK.
10 When the message that warns that all applications will close on your
computer appears, click Continue.
11 Select Network Connected Printer(Wired or Wireless) on the Printer
Connection Type and click Set IP Address button.
12 Click the icon (third from left) in the SetIP window to open the TCP/IP
configuration window.
13 Enter the machine’s new information into the configuration window. In
a corporate intranet, you may need to have this information assigned by
a network manager before proceeding.
Find the machine’s MAC address from the Network Configuration Report
(see "Printing a network configuration report" on page 137) and enter it
without the colons. For example, 00:15:99:29:51:A8 becomes
0015992951A8.
14 Click Apply, and then click OK. The machine will automatically print the
Network Configuration Report. Confirm that all the settings are
correct.
2. Using a Network-Connected Machine 140
Installing driver over the network
• Some features and optional goods may not be available depending on
model or country (see "Features by models" on page 7).
• The machine that does not support the network interface, it will not be
able to use this feature (see "Rear view" on page 22).
6
Windows
1 Make sure that the machine is connected to the network and powered
on. Also, your machine’s IP address should have been set (see "Setting IP
address" on page 137).
2 Insert the supplied software CD into your CD-ROM drive.
3 Review and accept the installation agreements in the installation
window. Then, click Next.
4 Select Network connection on the Printer Connection Type screen.
Then, click Next.
5 Follow the instructions in the installation window.
Silent installation Mode
Silent installation mode is an installation method that does not require any user
intervention. Once you start the installation, the machine driver and software
are automatically installed on you computer. You can start the silent installation
by typing /s or /S in the command window.
Command-line Parameters
Following table shows commands that can be used in the command window.
Following command-line are effective and operated when command is
used with /s or /S. But /h, /H or /? are exceptional commands that can be
operated solely.
Command- line Definition Description
/s or/S Starts silent installation. Installs machine drivers
without prompting any UIs
or user intervention.
Installing driver over the network
2. Using a Network-Connected Machine 141
/p””
or/P””
Specifies printer port.
Network Port will
be created by use
of Standard TCP/IP
Port monitor. For
local port, this port
must exist on
system before
being specified by
command.
Printer port name can be
specified as IP address,
hostname, USB local port
name, IEEE1284 port name
or network path.
For example:
• /p”xxx.xxx.xxx.xxx” in
where, “xxx.xxx.xxx.xxx”
means IP address for
network printer. /
p”USB001”, /P”LPT1:”, /
p”hostname”, /
p"\\computer_name\shar
ed_printer" or
"\\xxx.xxx.xxx.xxx\shared
_printer" in where,
"\\computer_name\share
d_printer" or
"\\xxx.xxx.xxx.xxx\shared
_printer" means the
network path to the
printer by entering two
slashes, the computer
name or local IP address
of the PC sharing the
printer, and then the
share name of the printer.
• When installing the driver
silently in Korean, type inSetup.exe
/s /L"0x0012”
or Setup.exe /s.
Command- line Definition Description
/a”” or/
A””
Specifies destination path
for installation.
The destination
path should be a
fully qualified path.
Since machine drivers
should be installed on the OS
specific location, this
command applies to only
application software.
/i”